data-binding-in-angular-explained
QUESTION
Example of unidirectional and bidirectional binding.
Where class logic and template view is defined
Data often defines the look of an application. Interpreting that data into the user interface involves class logic (.component.ts) and a template view (.component.html). Angular connects them through data binding. Think of data binding as a tool for component interaction.
Component and Template
The component stores most of its logic and data inside of its class decorated with @Component. This decorator defines the class as a component with template HTML. The template of the component represents the class within the application. The focus here needs to be between the component’s class and the template HTML.
This is where data binding occurs. Element properties and events get assigned values. These values, defined by the component class, serve either one of two roles. One is to produce data that the template then receives. The other handles events emitted by the template element.
Bidirectional constitutes both directions. This means changes to the data in the class logic or template HTML persist across each other. The scope of the changes are the component’s view. The view comprises the component’s class and template together.
Element Properties
To recognize data-bound element properties, Angular uses a special bracket syntax.
/ my.component.ts
@Component({
  templateUrl: './my.component.html'
})

export class MyComponent {
  value:type = /* some value of type */;
}
<!-- my.component.html -->
<any-element [property]=“value”>innerHTML</any-element>
Bear with me on this one.
[property] mirrors the property in the Domain Object Model (DOM) element’s object node. Do not confuse object properties with a DOM element’s attributes. Properties and attributes often share the same name and do the same thing. There is one clear distinction however.
Remember that attr (attributes) is a single property of the underlying DOM object. It gets declared at the DOM’s instantiation with attribute values matching the element’s definition. It maintains the same value after that. Properties each have their own key-value field in a DOM object node. These properties are mutable post-instantiation.
Know the difference between attributes and properties. It will lead to a better understanding of how Angular binds data to properties (property binding). Angular will hardly ever bind data to an element’s attributes. Exceptions to this are very rare. One last time: Angular binds component data to properties, not attributes!
Referring back to the example, the [ … ] in the element’s property assignment have special meaning. The brackets show that property is bound to “value” on the right of the assignment.
value also has special meaning within context of the brackets. value by itself is a string literal. Angular reads it and matches its value against component class members. Angular will substitute the value of the matching member attribute. This of course refers to the same component class that hosts the template HTML.
The unidirectional flow of data from component to template is complete. The member matched against right assignment of the bracketed property provides the value. Note that changes to the member’s value in the component class percolate down to the template. That is Angular’s change detection at work. Changes within the template’s scope have no effect on the component class member.
Key take-away: the component class provides the data while the template displays it.
I failed to mention that data values can also show up in a component’s innerHTML. This last example implements double curly braces. Angular recognizes these braces and interpolates the matching component class data into the innerHTML of the div.
<div>The value of the component class member ‘value’ is {{value}}.</div>
Event Handling
If the component supplies data, then the template supplies events.
// my.component.ts
@Component({
  templateUrl: './my.component.html'
})

export class MyComponent {
  handler(event):void {
      // function does stuff
  }
}
// my.component.html
<any-element (event)=“handler($event)”>innerHTML</any-element>
This works similarly to property binding.
The (event) pertains to any valid event type. For example, one of the most common event types is click. It emits when you click your mouse. Regardless of the type, event is bound to “handler” in the example. Event handlers are usually member functions of the component class.
The ( … ) are special to Angular. Parenthesis tell Angular an event is bounded to the right assignment of handler. The event itself originates from the host element.
When the event does emit, it passes the Event object in the form of $event. The handler maps to the identically named handler function of the component class. The unidirectional exchange from the event-bound element to the component class is complete.
Emitting events from the handler, while possible, do not impact the template element. The binding is unidirectional after all
Bidirectional Binding
Input forms provide a great example of why bidirectional binding is necessary. Bidirectional data bindings are more costly than event or property bindings.
Bidirectional data binding has its own module. Before taking a look at that, consider the following example.
// my.component.ts
@Component({
  templateUrl: './my.component.html'
})
export class MyComponent {
  inputValue:string = "";

  handler(event) {
      this.inputValue = event.target.value;
  }
}
Time to break this down.
This example combines the previous two. That explains why it is more costly. Following the logic, assume the user types something into the input element. The element emits an input event to the handler of the template’s component class. The handler assigns the class member inputValue to the value of the emitted event. This concludes the event handling/binding.
Now onto the property binding. The inputValue was assigned a new value. Since inputValue is bound to the input element’s value, its change in data percolates down into the input element’s value property. The input element’s value matches up with inputValue. This concludes the property binding.
There you have it. Bidirectional data binding happens with both applications of unidirectional binding applied consecutively. The syntax is a bit messy though.
Thankfully, Angular provides NgModel to simplify the syntax. The below example is synonymous to the above.
// my.component.ts
@Component({
  templateUrl: ‘./my.component.html’
})

export class MyComponent {
  inputValue:string = "";
}
<!-- my.component.html -->
<input [(ngModel)]=“inputValue”>
ngModel is a nice convenience. You have to import the FormsModule in your application’s root before using it. With that squared away, bidirectional data binding becomes much easier to work with.
Sure, here's a step-by-step example of two-way data binding in AngularJS:
Step 1: Create an HTML file and include the AngularJS library
Create a new HTML file and include the AngularJS library using a script tag in the head section of the HTML file.
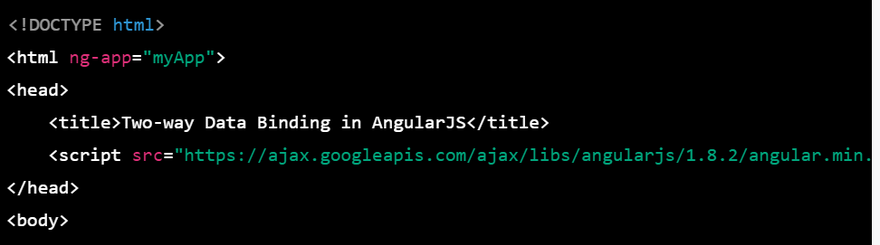
Step 2: Define a module and a controller
Define a module and a controller in the body section of the HTML file. In the controller, define a property that will be used for two-way data binding.
In this step, we have defined an AngularJS module named myApp and a controller named myCtrl. We have also defined a property named name in the controller's scope, which will be used for two-way data binding.
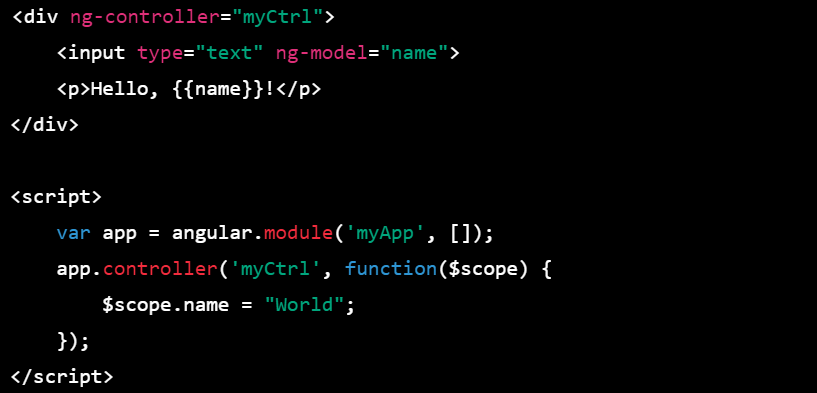
Step 3: Use ng-model for two-way data binding
Add the ng-model directive to the input field to bind it to the name property in the controller's scope.
With this directive, any changes made to the input field will be immediately reflected in the name property, and any changes made to the name property will be immediately reflected in the input field.
Step 4: Display the value of the property
Display the value of the name property in the paragraph element using double curly braces syntax.
This will display the value of the name property in the paragraph element.
Step 5: Test the application
Save the HTML file and open it in a web browser. You should see a text input field with the default value "World" and a paragraph element that says "Hello, World!".
Try changing the value in the input field and observe that the paragraph element is updated with the new value. Similarly, try changing the value in the controller's scope and observe that the input field and the paragraph element are updated with the new value.
That's it! You have successfully implemented two-way data binding in AngularJS.
==========================================================
Sure, here's a step-by-step example of one-way data binding in AngularJS:
Step 1: Create an HTML file and include the AngularJS library
Create a new HTML file and include the AngularJS library using a script tag in the head section of the HTML file.
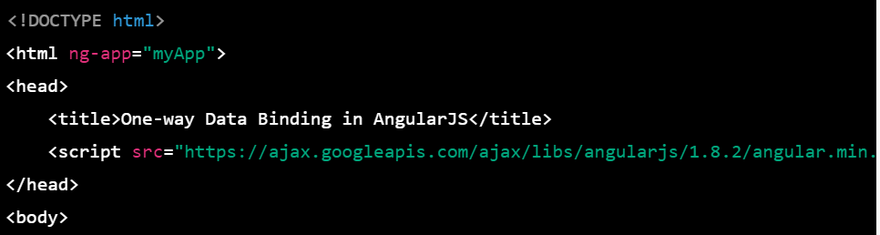
Step 2: Define a module and a controller
Define a module and a controller in the body section of the HTML file. In the controller, define a property that will be used for one-way data binding.
In this step, we have defined an AngularJS module named myApp and a controller named myCtrl. We have also defined a property named appName in the controller's scope, which will be used for one-way data binding.
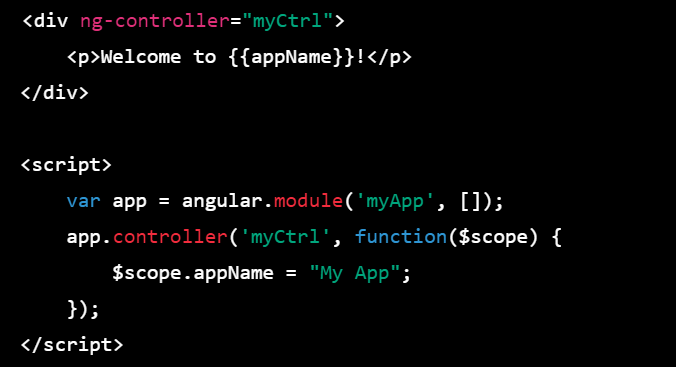
Step 3: Use the double curly braces syntax to display the value
Display the value of the appName property in the paragraph element using double curly braces syntax.

With this syntax, the value of the appName property will be displayed in the paragraph element.
Step 4: Test the application
Save the HTML file and open it in a web browser. You should see a paragraph element that says "Welcome to My App!".
Try changing the value of the appName property in the controller's scope and observe that the paragraph element is not updated with the new value. One-way data binding means that changes made to the model are reflected in the view, but changes made to the view are not reflected in the model.
That's it! You have successfully implemented one-way data binding in AngularJS.

Top comments (0)