Explain Amazon s3 bucket architecture with example
Django Application with Amazon S3 Integration
Can we have more than one bucket and object inside s3
Explain Amazon s3 bucket architecture with example
DynamoDB can trigger AWS Lambda when the data in added to the tables, updated or deleted. In this chapter, we will work on a simple example that will add items to the DynamoDB table and AWS Lambda which will read the data and send mail with the data added.
Steps for Using AWS Lambda Function with Amazon S3
To start using AWS Lambda with Amazon S3, we need the following −
- Create S3 Bucket
- Create role which has permission to work with s3 and lambda
- Create lambda function and add s3 as the trigger
Example
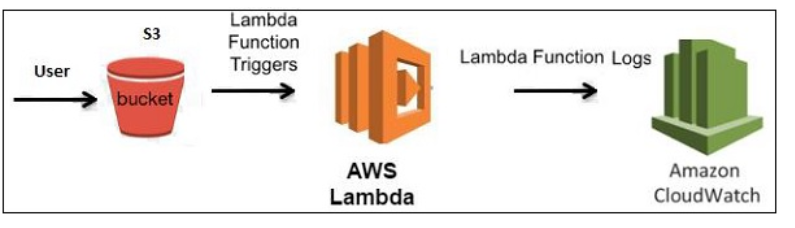
Let us see these steps with the help of an example which shows the basic interaction between Amazon S3 and AWS Lambda.
1.User will upload a file in Amazon S3 bucket
2.Once the file is uploaded, it will trigger AWS Lambda function in the background which will display an output in the form of a console message that the file is uploaded.
3.The user will be able to see the message in Cloudwatch logs once the file is uploaded.
The block diagram that explains the flow of the example is shown here −
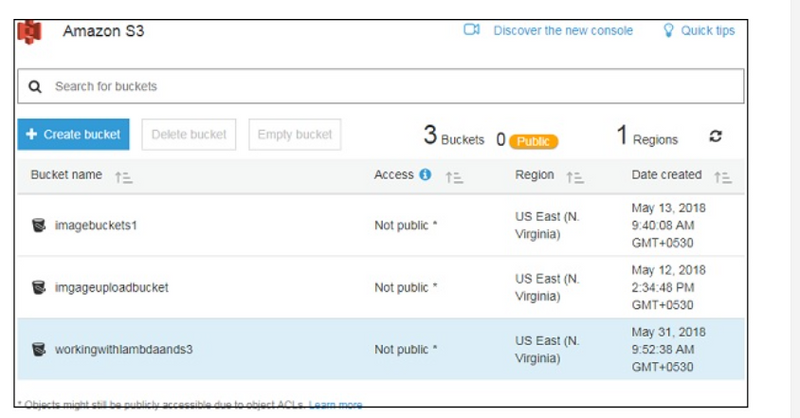
Creating S3 Bucket
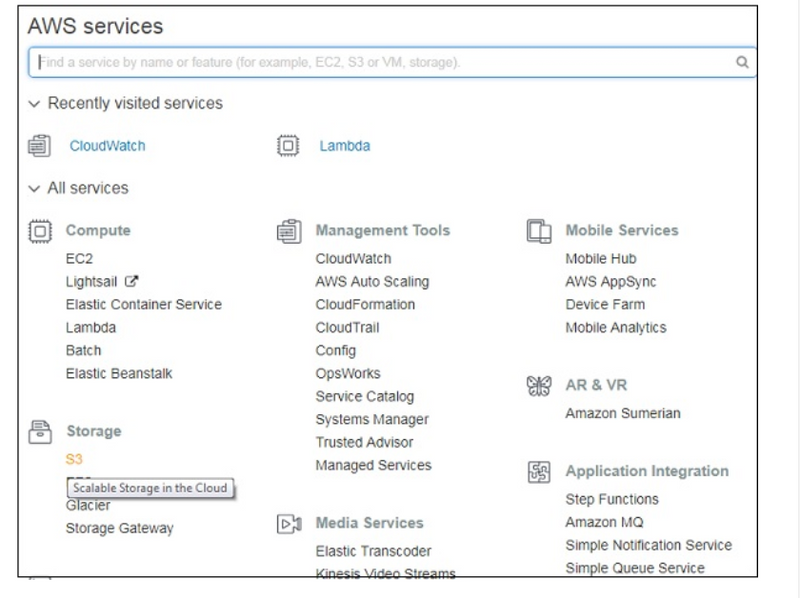
Let us start first by creating a s3 bucket in AWS console using the steps given below −
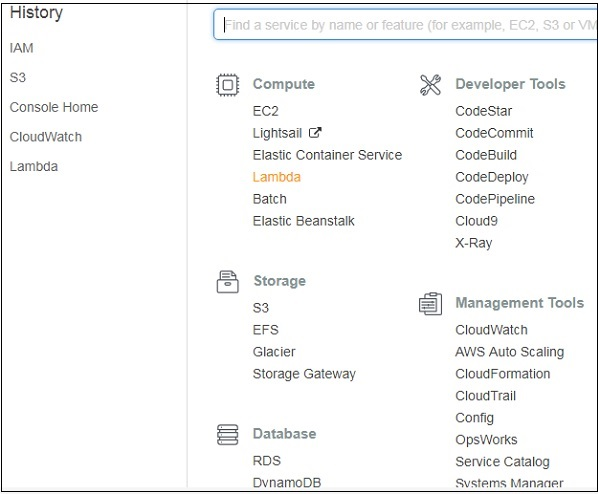
Step 1
Go to Amazon services and click S3 in storage section as highlighted in the image given below −
Step 2
Click S3 storage and Create bucket which will store the files uploaded.
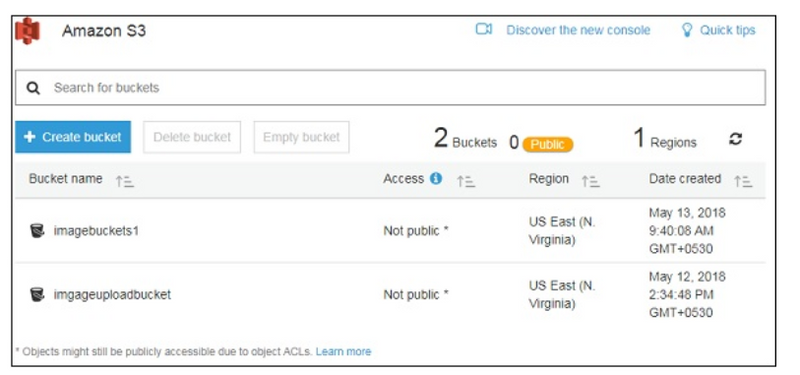
Step 3
Once you click Create bucket button, you can see a screen as follows −
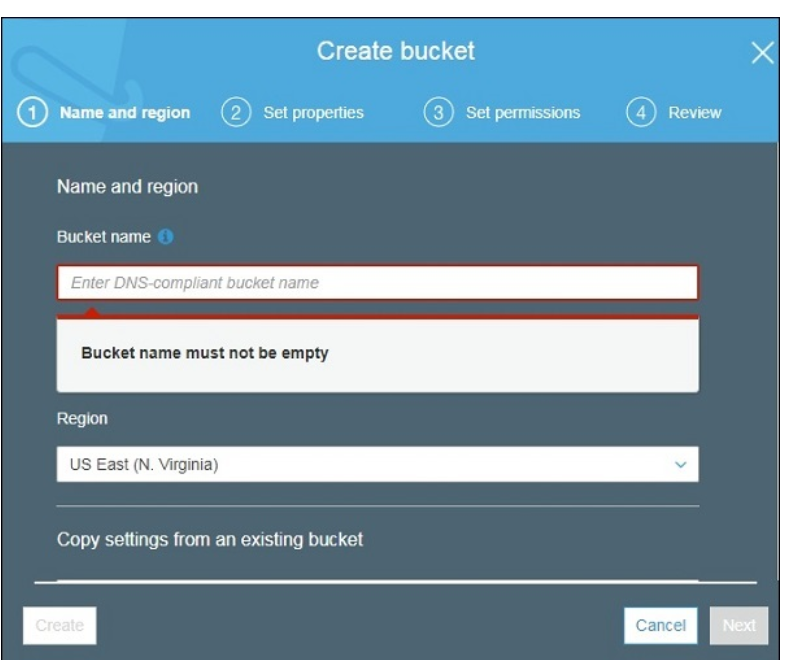
Step 4
Enter the details Bucket name, Select the Region and click Create button at the bottom left side. Thus, we have created bucket with name : workingwithlambdaands3.
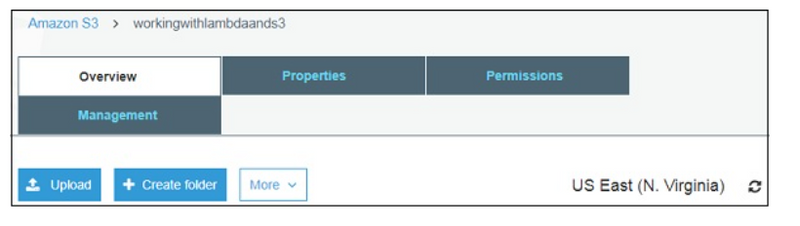
Step 5
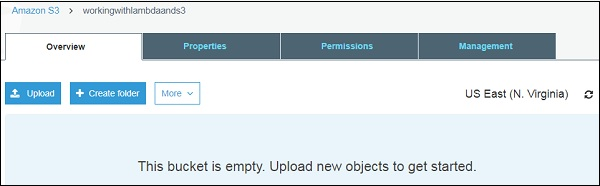
Now, click the bucket name and it will ask you to upload files as shown below −
Thus, we are done with bucket creation in S3.
Create Role that Works with S3 and Lambda
To create role that works with S3 and Lambda, please follow the Steps given below −
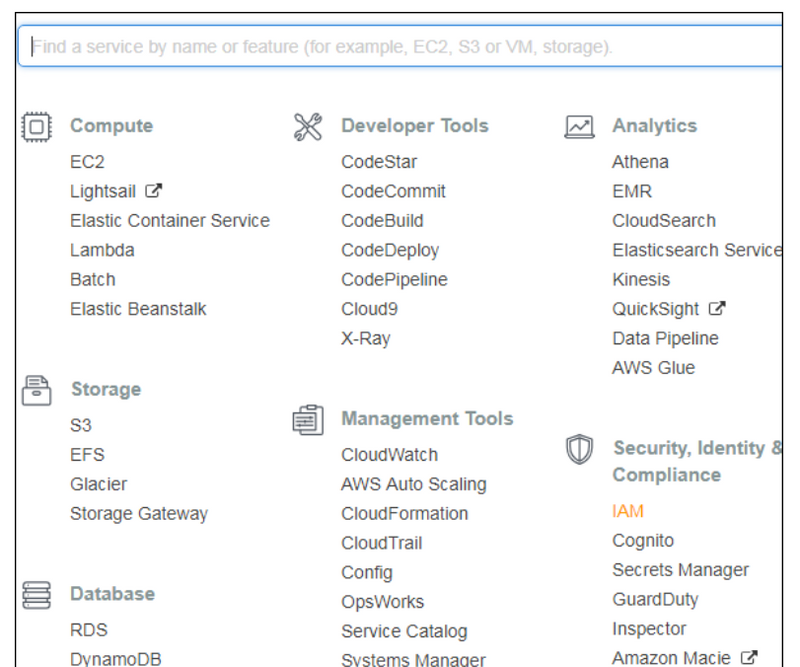
Step 1
Go to AWS services and select IAM as shown below −
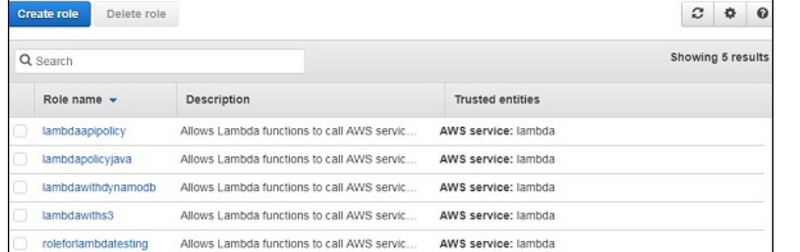
Step 2
Now, click IAM -> Roles as shown below −
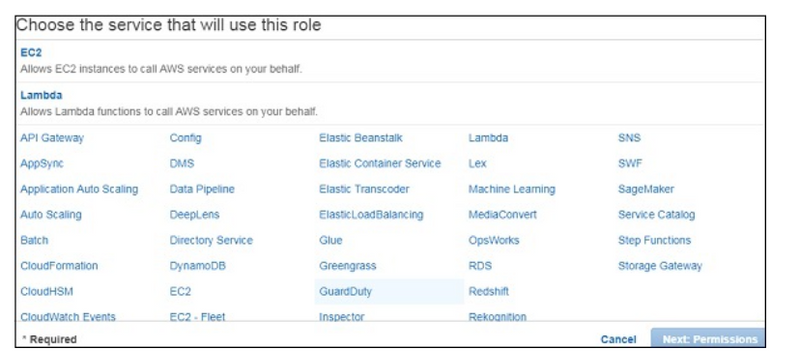
Step 3
Now, click Create role and choose the services that will use this role. Select Lambda and click Permission button.
Step 4
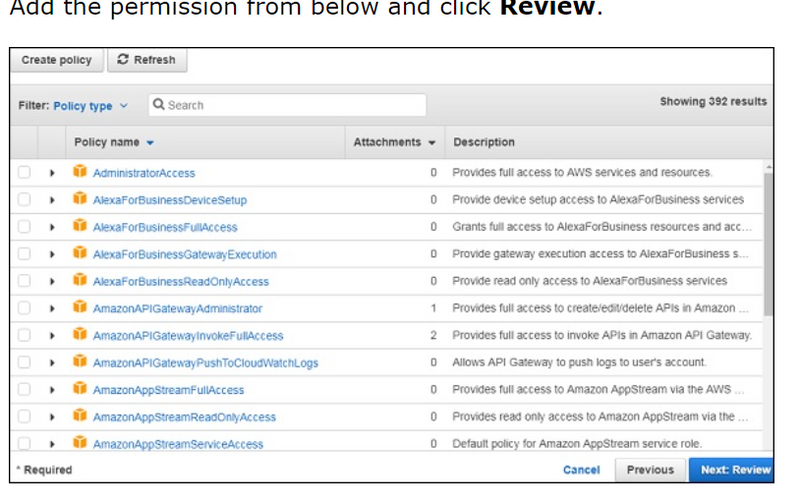
Add the permission from below and click Review.
Step 5
Observe that we have chosen the following permissions −
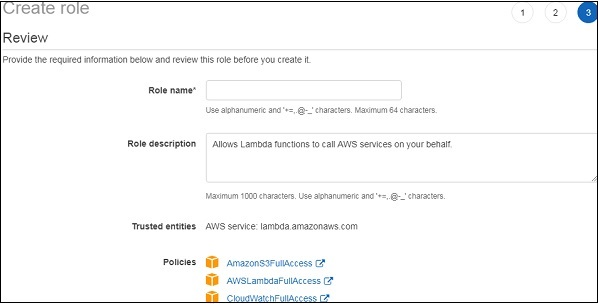
Observe that the Policies that we have selected are AmazonS3FullAccess, AWSLambdaFullAccess and CloudWatchFullAccess.
Step 6
Now, enter the Role name, Role description and click Create Role button at the bottom.
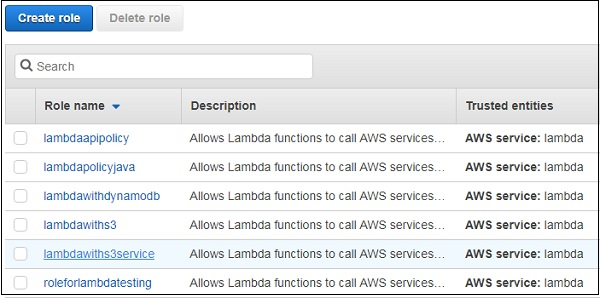
Create The Role
Thus, our role named lambdawiths3service is created.
Create Lambda function and Add S3 Trigger
In this section, let us see how to create a Lambda function and add a S3 trigger to it. For this purpose, you will have to follow th Steps given below −
Step 1
Go to AWS Services and select Lambda as shown below −
Step 2
Click Lambda and follow the process for adding Name. Choose the Runtime, Role etc. and create the function. The Lambda function that we have created is shown in the screenshot below −

Step 3
Now let us add the S3 trigger.
Add S3
Step 4
Choose the trigger from above and add the details as shown below
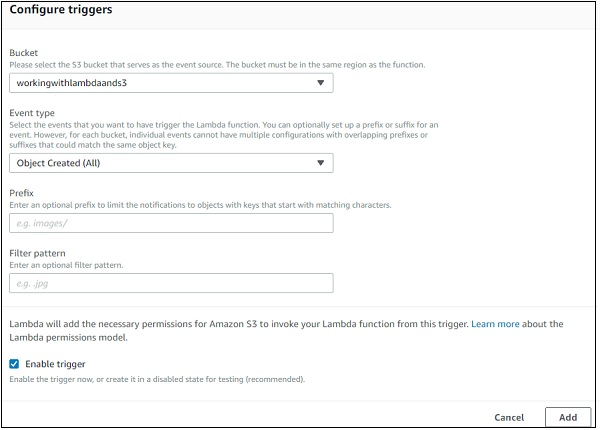
Choose Trigger
Step 5
Select the bucket created from bucket dropdown. The event type has following details −

Select Object Created (All), as we need AWS Lambda trigger when file is uploaded, removed etc.
Step 6
You can add Prefix and File pattern which are used to filter the files added. For Example, to trigger lambda only for .jpg images. Let us keep it blank for now as we need to trigger Lambda for all files uploaded. Click Add button to add the trigger.
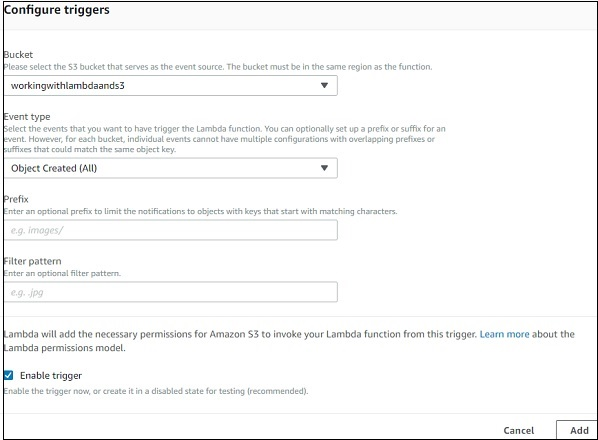
Step 7
You can find the the trigger display for the Lambda function as shown below −

Let’s add the details for the aws lambda function. Here, we will use the online editor to add our code and use nodejs as the runtime environment.
Step 8
To trigger S3 with AWS Lambda, we will have to use S3 event in the code as shown below −
exports.handler = function(event, context, callback) {
   console.log("Incoming Event: ", event);
   const bucket = event.Records[0].s3.bucket.name;
   const filename = decodeURIComponent(event.Records[0].s3.object.key.replace(/\+/g, ' '));
   const message = `File is uploaded in - ${bucket} -> ${filename}`;
   console.log(message);
   callback(null, message);
};
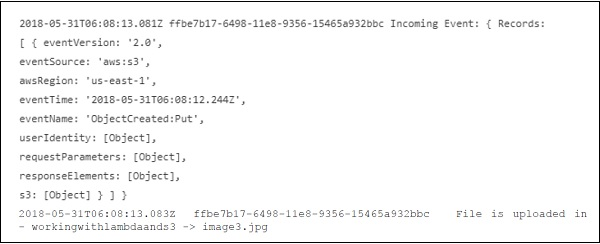
Note that the event param has the details of the S3event. We have consoled the bucket name and the file name which will get logged when you upload image in S3bucket.
Step 9
Now, let us save the changes and test the lambda function with S3upload. The following are the code details added in AWS Lambda −

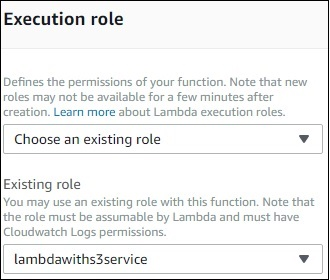
Step 10
Now, let us add the role, memory and timeout.
Step 11
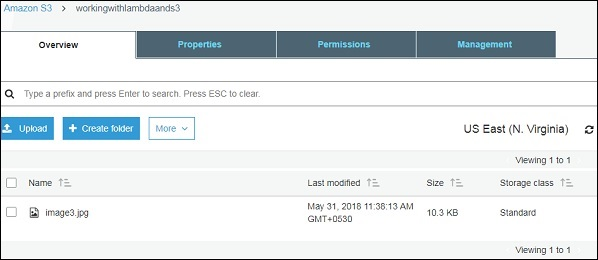
Now, save the Lambda function. Open S3 from Amazon services and open the bucket we created earlier namely workingwithlambdaands3.
Upload the image in it as shown below −
Step 12
Click Upload button to add files as shown −

Step 13
Click Add files to add files. You can also drag and drop the files. Now, click Upload button.
Step 14
To see the trigger details, go to AWS service and select CloudWatch. Open the logs for the Lambda function and use the following code −
exports.handler = function(event, context, callback) {
   console.log("Incoming Event: ", event);
   const bucket = event.Records[0].s3.bucket.name;
   const filename = decodeURIComponent(event.Records[0].s3.object.key.replace(/\+/g, ' '));
   const message = `File is uploaded in - ${bucket} -> ${filename}`;
   console.log(message);
   callback(null, message);
};
The output you can observe in Cloudwatch is as shown −
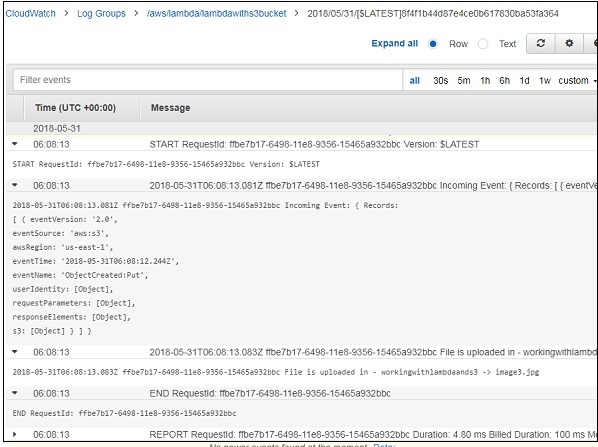
AWS Lambda function gets triggered when file is uploaded in S3 bucket and the details are logged in Cloudwatch as shown below −
========================================
Performing CRUD operations in Django with data saved in an Amazon S3 bucket involves several steps. In this example, we'll create a Django application with a simple model for user data, and we'll use AWS SDK for Python (Boto3) to interact with Amazon S3 for storing user data.
Step 1: Set Up Django Project
Create a new Django project:
django-admin startproject myproject
cd myproject
Create a new Django app:
python manage.py startapp myapp
Define a model for user data in myapp/models.py:
# myapp/models.py
from django.db import models

class User(models.Model):
    name = models.CharField(max_length=100)
    email = models.EmailField(unique=True)
Run migrations:
python manage.py makemigrations
python manage.py migrate
Step 2: Set Up Django Views and Templates
Create Django views in myapp/views.py:
from django.shortcuts import render, get_object_or_404, redirect
from .models import User
import boto3
from botocore.exceptions import NoCredentialsError

def user_list(request):
    users = User.objects.all()
    return render(request, 'user_list.html', {'users': users})

def create_user(request):
    if request.method == 'POST':
        name = request.POST['name']
        email = request.POST['email']

        # Save user data to Amazon S3 (replace 'your-access-key', 'your-secret-key', 'your-s3-bucket' with your credentials)
        try:
            s3 = boto3.client('s3', aws_access_key_id='your-access-key', aws_secret_access_key='your-secret-key')
            s3.put_object(Body=f'Name: {name}, Email: {email}', Bucket='your-s3-bucket', Key=f'users/{name}.txt')

            # Save user data to the database
            User.objects.create(name=name, email=email)

            return redirect('user_list')
        except NoCredentialsError:
            return render(request, 'error.html', {'message': 'AWS credentials not available'})

    return render(request, 'create_user.html')

def delete_user(request, user_id):
    user = get_object_or_404(User, pk=user_id)
    user.delete()

    # Delete user data from Amazon S3 (replace 'your-access-key', 'your-secret-key', 'your-s3-bucket' with your credentials)
    try:
        s3 = boto3.client('s3', aws_access_key_id='your-access-key', aws_secret_access_key='your-secret-key')
        s3.delete_object(Bucket='your-s3-bucket', Key=f'users/{user.name}.txt')
    except NoCredentialsError:
        return render(request, 'error.html', {'message': 'AWS credentials not available'})

    return redirect('user_list')
Create Django templates in myapp/templates:
myapp/templates/user_list.html:
<!-- myapp/templates/user_list.html -->
<!DOCTYPE html>
<html>
<head>
    <title>User List</title>
</head>
<body>
    <h1>User List</h1>
    <ul>
        {% for user in users %}
            <li>{{ user.name }} - {{ user.email }} (<a href="{% url 'delete_user' user.id %}">Delete</a>)</li>
        {% endfor %}
    </ul>
    <a href="{% url 'create_user' %}">Create User</a>
</body>
</html>
myapp/templates/create_user.html:
<!-- myapp/templates/create_user.html -->
<!DOCTYPE html>
<html>
<head>
    <title>Create User</title>
</head>
<body>
    <h1>Create User</h1>
    <form method="post" action="{% url 'create_user' %}">
        {% csrf_token %}
        <label for="name">Name:</label>
        <input type="text" name="name" required><br>
        <label for="email">Email:</label>
        <input type="email" name="email" required><br>
        <button type="submit">Create User</button>
    </form>
    <a href="{% url 'user_list' %}">Back to User List</a>
</body>
</html>
myapp/templates/error.html:

html
Copy code
<!-- myapp/templates/error.html -->
<!DOCTYPE html>
<html>
<head>
    <title>Error</title>
</head>
<body>
    <h1>Error</h1>
    <p>{{ message }}</p>
</body>
</html>
Configure URLs in myapp/urls.py:
# myapp/urls.py
from django.urls import path
from .views import user_list, create_user, delete_user

urlpatterns = [
    path('', user_list, name='user_list'),
    path('create/', create_user, name='create_user'),
    path('delete/<int:user_id>/', delete_user, name='delete_user'),
]
Include the app's URLs in your project's urls.py:
# myproject/urls.py
from django.contrib import admin
from django.urls import path, include

urlpatterns = [
    path('admin/', admin.site.urls),
    path('users/', include('myapp.urls')),
]
Step 3: Set Up AWS Credentials
Go to the AWS Management Console and create an IAM user with S3 access.
Note down the access key, secret key, and S3 bucket name.
Step 4: Install Boto3
Install the Boto3 library for AWS integration:
pip install boto3
Step 5: Configure AWS Credentials Locally
Configure AWS credentials locally by running:
aws configure
Enter the access key, secret key, region, and output format.
Step 6: Run the Django Development Server
python manage.py runserver
Visit http://127.0.0.1:8000/users/ in your browser to see the user list and create users.
This example provides a basic structure for creating and deleting users in Django while storing user data in an S3 bucket. Customize the code based on your specific requirements and integrate additional features as needed.
Can we have more than one bucket and object inside s3
Let's consider an example where you have two S3 buckets, and each bucket contains multiple objects. Here's a simplified JSON representation of two S3 buckets, each with multiple objects:
for record in event['Records']:
        bucket = record['s3']['bucket']['name']
        key = record['s3']['object']['key']
        transformed_data = convert_csv_to_json(bucket, key)
{
  "Records": [
{
  "buckets": [
    {
      "name": "bucket-1",
      "objects": [
        {
          "key": "path/to/object1.txt",
          "size": 1024,
          "eTag": "abcdef123456",
          "sequencer": "1A2B3C4D5E6F789012"
        },
        {
          "key": "path/to/object2.jpg",
          "size": 2048,
          "eTag": "789012345678",
          "sequencer": "A1B2C3D4E5F678901"
        }
      ]
    },
    {
      "name": "bucket-2",
      "objects": [
        {
          "key": "documents/report.pdf",
          "size": 3072,
          "eTag": "xyz987654321",
          "sequencer": "0A1B2C3D4E5F678901"
        },
        {
          "key": "photos/photo1.png",
          "size": 4096,
          "eTag": "123abc456def",
          "sequencer": "Z9Y8X7W6V5U432109"
        }
      ]
    }
  ]
}
  ]
}

Top comments (0)