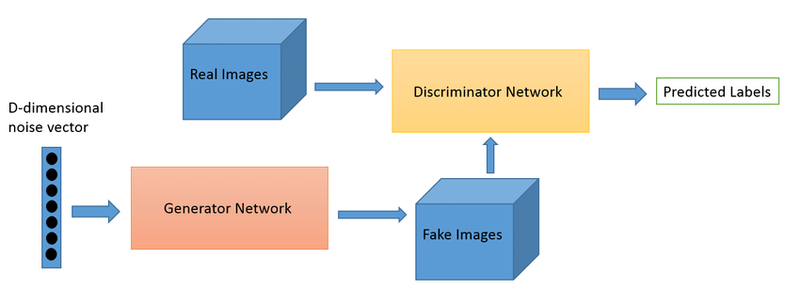
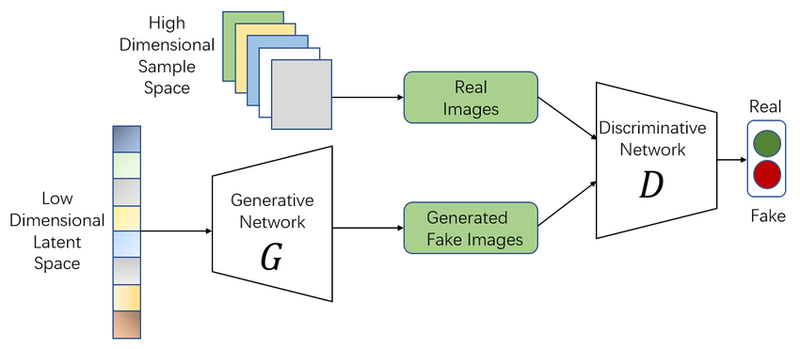
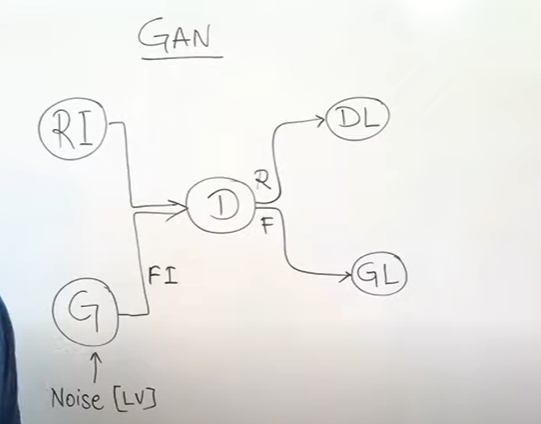
Generative Adversarial Networks (GANs) are a class of machine learning frameworks designed by Ian Goodfellow and his colleagues in 2014. GANs consist of two neural networks, the Generator (G) and the Discriminator (D), which are trained simultaneously through an adversarial process. Here’s a detailed explanation of the GAN architecture with reference to the provided image:
GAN Architecture Components
Generator(G):
Function: The generator creates fake data samples from random noise.
Input: It takes a random noise vector (often called latent vector, represented as LV in the image).
Output: The generator produces data samples that mimic the real data distribution. These samples are then fed to the discriminator for evaluation.
Goal: To generate data so similar to the real data that the discriminator cannot distinguish between real and fake.
Discriminator(D):
Function: The discriminator evaluates the data samples.
Input: It takes data samples from both the real dataset (RI) and the generated dataset (from the generator, G).
Output: The discriminator outputs a probability indicating whether the input data sample is real or fake.
Goal: To correctly classify the input samples as real or fake.
Adversarial Process
Training Objective:
The generator and discriminator are trained in a zero-sum game where the generator tries to fool the discriminator by producing increasingly realistic data, while the discriminator tries to become better at distinguishing real from fake data.
Loss Functions:
Discriminator Loss (DL): Measures how well the discriminator distinguishes real data from generated data.
Generator Loss (GL): Measures how well the generator fools the discriminator.
Training Steps
:
Step 1: The generator creates a batch of fake data from random noise.
Step 2: A batch of real data samples is combined with the generated fake data.
Step 3: The combined data is fed into the discriminator, which classifies each sample as real or fake.
Step 4: The discriminator is updated based on its classification accuracy.
Step 5: The generator is updated based on the discriminator’s feedback, encouraging it to produce more realistic fake data.
Step 6: Steps 1-5 are repeated iteratively until the generator produces data that is indistinguishable from real data according to the discriminator.
Diagram Explanation:
G: Represents the generator neural network.
D: Represents the discriminator neural network.
Noise (LV): The random noise input fed into the generator.
RI (Real Input): Real data samples fed into the discriminator.
FI (Fake Input): Fake data samples generated by the generator and fed into the discriminator.
DL (Discriminator Loss) & GL (Generator Loss): Loss functions that guide the training process of the discriminator and generator respectively.
Flow (F): Indicates the flow of data between components in the GAN architecture.
Visualization:
Left Side (G): The process of generating fake data from random noise.
Right Side (D): The process of evaluating real and fake data to distinguish between them.
Arrows: Indicate the data flow and feedback loop between the generator and discriminator.
In summary, GANs leverage the adversarial relationship between the generator and discriminator to progressively improve the quality of generated data, making it increasingly realistic over time. The training process continues until the generator is capable of producing data that the discriminator can no longer reliably distinguish from real data.
Create AI headshot of image using GAN architecture
To implement the above GAN architecture in Laravel, you need to integrate Python with Laravel since deep learning and GANs are typically implemented in Python using frameworks like TensorFlow or PyTorch. Here’s how you can do it:
Set Up Your Laravel Project:
Ensure you have a Laravel project set up. If not, you can create one using the following command:
composer create-project --prefer-dist laravel/laravel gan-laravel
Install Python and Necessary Libraries:
Ensure you have Python and the required libraries installed. You can use a virtual environment to manage your dependencies.
python -m venv venv
source venv/bin/activate
pip install tensorflow keras numpy matplotlib
Step 1: Set Up Laravel for File Upload
Create a new Laravel project (if you don't have one already):
composer create-project --prefer-dist laravel/laravel ai-headshot-app
Create a route for file upload and processing in routes/web.php:
use Illuminate\Support\Facades\Route;
use App\Http\Controllers\ImageController;

Route::get('/', function () {
    return view('upload');
});

Route::post('/upload', [ImageController::class, 'upload']);
Create a controller to handle the upload and processing logic:
php artisan make:controller ImageController
Implement the upload method in app/Http/Controllers/ImageController.php:
namespace App\Http\Controllers;

use Illuminate\Http\Request;
use Illuminate\Support\Facades\Storage;
use Symfony\Component\Process\Process;
use Symfony\Component\Process\Exception\ProcessFailedException;

class ImageController extends Controller
{
    public function upload(Request $request)
    {
        // Validate the uploaded file
        $request->validate([
            'image' => 'required|image|mimes:jpeg,png,jpg,gif|max:2048',
        ]);

        // Store the uploaded file
        $path = $request->file('image')->store('uploads');

        // Run the Python script
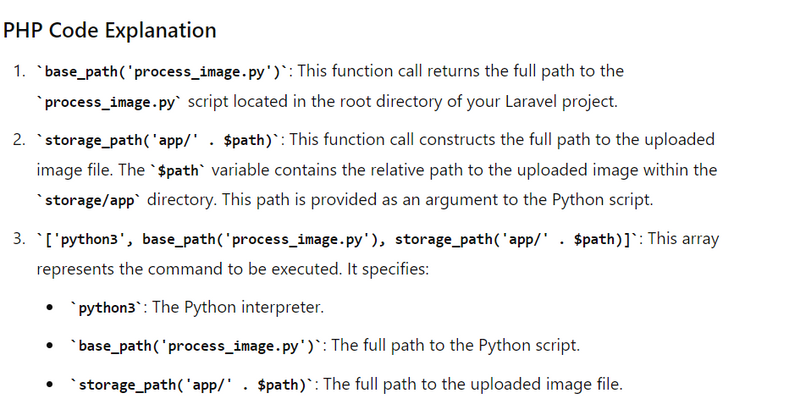
        $process = new Process(['python3', base_path('process_image.py'), storage_path('app/' . $path)]);
        $process->run();

        // Check if the process was successful
        if (!$process->isSuccessful()) {
            throw new ProcessFailedException($process);
        }

        // Return the generated headshot
        return response()->download(storage_path('app/generated_headshot.png'))->deleteFileAfterSend(true);
    }
}
Step 2: Create a Simple Upload Form in Laravel
Create a view for the file upload form in resources/views/upload.blade.php:
<!DOCTYPE html>
<html>
<head>
    <title>Upload Image</title>
</head>
<body>
    <form action="/upload" method="post" enctype="multipart/form-data">
        @csrf
        <input type="file" name="image" required>
        <button type="submit">Upload</button>
    </form>
</body>
</html>
Step 3: Set Up the Python Environment
Place your Python script (process_image.py) in the root of your Laravel project:
import sys
import cv2
import numpy as np
from tensorflow.keras.models import load_model

# Load the pre-trained model (replace with your actual model)
model = load_model('headshot_generator.h5')

def detect_and_crop_face(image):
    face_cascade = cv2.CascadeClassifier(cv2.data.haarcascades + 'haarcascade_frontalface_default.xml')
    gray = cv2.cvtColor(image, cv2.COLOR_BGR2GRAY)
    faces = face_cascade.detectMultiScale(gray, 1.3, 5)
    for (x, y, w, h) in faces:
        cropped_face = image[y:y+h, x:x+w]
        return cropped_face
    return None

def generate_headshot(face_image):
    face_image_resized = cv2.resize(face_image, (128, 128))  # Resize as per model input requirement
    face_image_normalized = face_image_resized / 255.0  # Normalize the image
    face_image_normalized = np.expand_dims(face_image_normalized, axis=0)  # Add batch dimension
    generated_headshot = model.predict(face_image_normalized)
    generated_headshot = (generated_headshot[0] * 255).astype(np.uint8)  # Rescale the output
    return generated_headshot

def process_image(image_path):
    image = cv2.imread(image_path)
    if image is None:
        print("Error: Unable to read image.")
        return
    face_image = detect_and_crop_face(image)
    if face_image is None:
        print("Error: No face detected.")
        return
    headshot = generate_headshot(face_image)
    cv2.imwrite('generated_headshot.png', headshot)
    print("Headshot saved as 'generated_headshot.png'.")

if __name__ == "__main__":
    if len(sys.argv) != 2:
        print("Usage: python process_image.py <path_to_image>")
        sys.exit(1)
    process_image(sys.argv[1])
Step 4: Set Up Environment and Permissions
Ensure Python dependencies are installed:
pip install opencv-python numpy tensorflow
Ensure the web server has permission to execute the Python script:
chmod +x process_image.py
Ensure the storage path is writable:
chmod -R 775 storage
Step 5: Run the Laravel Server
Start the Laravel development server:
php artisan serve
Navigate to http://localhost:8000 in your web browser to access the upload form, upload an image, and receive the generated headshot.
This setup provides a basic integration between Laravel and a Python script for generating AI headshots. For production, consider using a job queue (e.g., Laravel Horizon) to handle image processing tasks asynchronously.
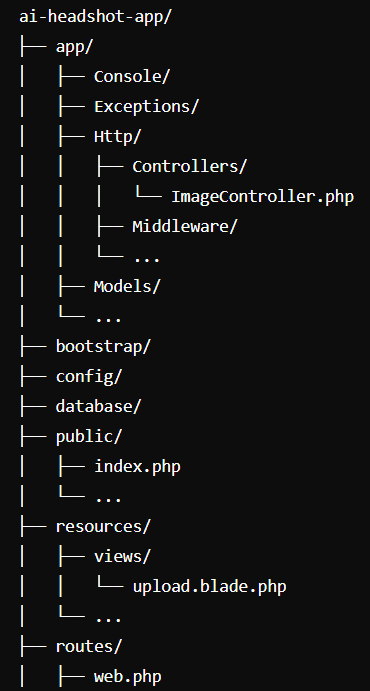
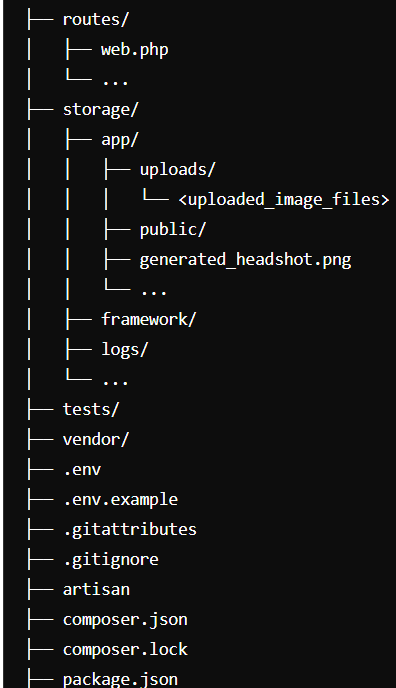
Folder Structure
Code Explanation
Python Code Processing
The Python script (process_image.py) receives the image path as a command-line argument. Here's a step-by-step explanation of how the script processes this image path:
Reading the Command-Line Argument:
The script starts by reading the command-line argument, which is the path to the uploaded image file. This is done using the sys.argv list.
import sys

if __name__ == "__main__":
    if len(sys.argv) != 2:
        print("Usage: python process_image.py <path_to_image>")
        sys.exit(1)
    image_path = sys.argv[1]
Here, sys.argv[1] holds the path to the uploaded image file passed from the PHP code.
Processing the Image:
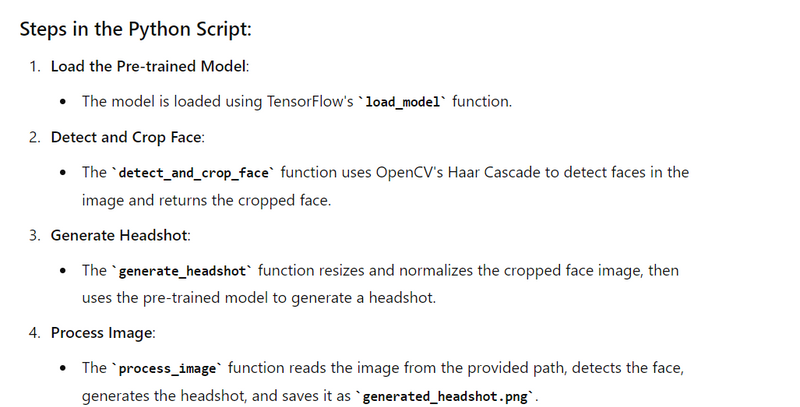
The script uses OpenCV to read the image from the specified path, detect the face, and generate the headshot.
import cv2
import numpy as np
from tensorflow.keras.models import load_model

# Load the pre-trained model (replace with your actual model)
model = load_model('headshot_generator.h5')

def detect_and_crop_face(image):
    face_cascade = cv2.CascadeClassifier(cv2.data.haarcascades + 'haarcascade_frontalface_default.xml')
    gray = cv2.cvtColor(image, cv2.COLOR_BGR2GRAY)
    faces = face_cascade.detectMultiScale(gray, 1.3, 5)
    for (x, y, w, h) in faces:
        cropped_face = image[y:y+h, x:x+w]
        return cropped_face
    return None

def generate_headshot(face_image):
    face_image_resized = cv2.resize(face_image, (128, 128))  # Resize as per model input requirement
    face_image_normalized = face_image_resized / 255.0  # Normalize the image
    face_image_normalized = np.expand_dims(face_image_normalized, axis=0)  # Add batch dimension
    generated_headshot = model.predict(face_image_normalized)
    generated_headshot = (generated_headshot[0] * 255).astype(np.uint8)  # Rescale the output
    return generated_headshot

def process_image(image_path):
    image = cv2.imread(image_path)
    if image is None:
        print("Error: Unable to read image.")
        return
    face_image = detect_and_crop_face(image)
    if face_image is None:
        print("Error: No face detected.")
        return
    headshot = generate_headshot(face_image)
    cv2.imwrite('generated_headshot.png', headshot)
    print("Headshot saved as 'generated_headshot.png'.")

if __name__ == "__main__":
    if len(sys.argv) != 2:
        print("Usage: python process_image.py <path_to_image>")
        sys.exit(1)
    process_image(sys.argv[1])


Top comments (0)