Normal Login (Without Skip Grant Tables)
Safe Mode Login (With --skip-grant-tables)
what is the role of skip-grant-tables Error
managing-mariadb-root-password-and-connection-behavior-in-xampp-ubuntu
How to Check and Remove Permanent --skip-grant-tables
Best Practices to Secure MariaDB on Ubuntu (especially inside XAMPP)
** How to Create a New Admin User (Recommended)**
How to move from root to admin user or normal user
Command to see root’s privileges ,adminuser and appuser privilige:
how we can disable remote root login
Here's a step-by-step guide to logging in to the MySQL shell with and without --skip-grant-tables (safe mode):
Normal Login (Without Skip Grant Tables)
This is the standard, secure way to log in.
Step 1: Open Terminal
Step 2: Log in as root (with password)
mysql -u root -p
You’ll be prompted for the root password.
Enter the password to access the MySQL shell.
Get password in project .env file
If root uses auth_socket (common on Ubuntu), you can also use:
This logs you in as root using your system user privileges.
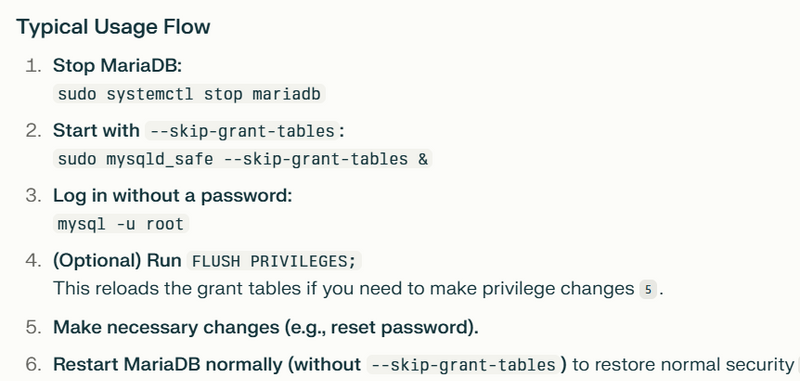
- Safe Mode Login (With --skip-grant-tables) This method is used when you forgot your password or need to reset privileges. Warning: In this mode, anyone can access MySQL without authentication, so use it only for recovery and on a secure system.
Step 1: Stop MySQL Service
sudo systemctl stop mysql
sudo service mysql stop
Step 2: Start MySQL in Safe Mode
sudo mysqld_safe --skip-grant-tables &
The & runs the process in the background.
Step 3: Log in Without a Password
mysql -u root
You will NOT be prompted for a password and will get direct access to the MySQL shell.
After Logging In With Skip Grant Tables
You can now reset the root password or fix user privileges.
Example to reset password (MySQL 5.7+):
FLUSH PRIVILEGES;
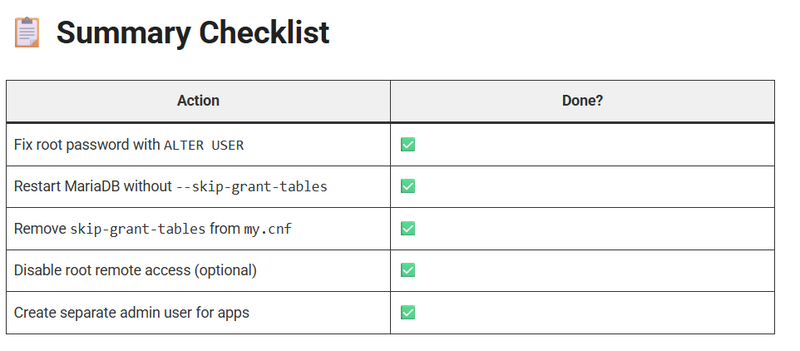
ALTER USER 'root'@'localhost' IDENTIFIED BY 'your_new_password';
Exit MySQL:
sql
exit;
ALTER USER 'root'@'localhost' IDENTIFIED BY 'yourStrongPassword';
FLUSH PRIVILEGES
Step 4: Restart MySQL Normally
sudo systemctl restart mysql
sudo service mysql restart
Step 5: Log in With New Password (Normal Mode)
mysql -u root -p
what is the role of skip-grant-tables Error
*The --skip-grant-tables option in MariaDB *(and MySQL) starts the database server without loading the user privilege tables. This means:
No authentication or privilege checks: Anyone can connect to the database as any user, without a password.
Commonly used for emergency maintenance: It is especially useful for situations like resetting a forgotten root password.
Role and Effects
Bypasses all user authentication and privilege checks.
Allows you to log in without a password and change user credentials.
Disables statements that modify privileges: You cannot run commands like GRANT, REVOKE, or CREATE USER while in this mode. If you try, you get errors like:
ERROR 1290 (HY000): The MariaDB server is running with the --skip-grant-tables option so it cannot execute this statement
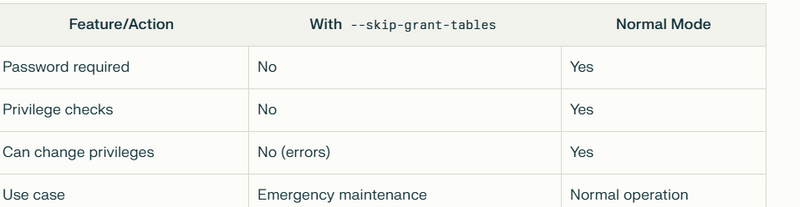
--skip-grant-tables is a powerful but risky option used for emergency access (like password resets). Never leave it enabled, as it disables all security checks and prevents privilege changes
How to Check and Remove Permanent --skip-grant-tables
Sometimes, --skip-grant-tables is accidentally set in XAMPP’s MariaDB configuration.
Check file:
sudo nano /opt/lampp/etc/my.cnf
Look for:
skip-grant-tables
✅ If found, comment it out:
#skip-grant-tables
✅ Then restart MariaDB.
Best Practices to Secure MariaDB on Ubuntu (especially inside XAMPP)
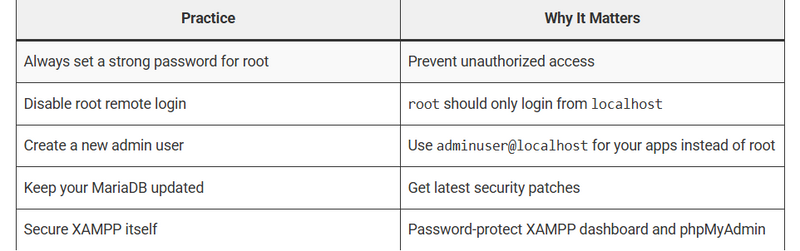
How to Create a New Admin User (Recommended)
mysql -u root -p
Run:
CREATE USER 'adminuser'@'localhost' IDENTIFIED BY 'yourSecurePassword123!';
GRANT ALL PRIVILEGES ON *.* TO 'adminuser'@'localhost' WITH GRANT OPTION;
FLUSH PRIVILEGES;
how to move from root to admin user or normal user
To move from root to an admin or normal user in MariaDB/MySQL, you need to:
Create a new admin or normal user.
Grant appropriate privileges.
Log in as that user instead of root.
** Create a New Admin User**
-- Log in as root first
mysql -u root -p

-- Create an admin user (full privileges)
CREATE USER 'adminuser'@'localhost' IDENTIFIED BY 'StrongPassword!';
GRANT ALL PRIVILEGES ON *.* TO 'adminuser'@'localhost' WITH GRANT OPTION;
FLUSH PRIVILEGES;
adminuser now has all the powers of root, but you can use it for daily admin tasks instead of root.
- Create a Normal User
-- Create a normal user (limited privileges)
CREATE USER 'appuser'@'localhost' IDENTIFIED BY 'AppPassword!';
GRANT SELECT, INSERT, UPDATE ON mydb.* TO 'appuser'@'localhost';
FLUSH PRIVILEGES;
appuser can only read and write data in the mydb database, not administer the server.
- Log in as Admin or Normal User
# For admin user
mysql -u adminuser -p

# For normal user
mysql -u appuser -p
Difference Between Admin and Normal User

Command to see root’s privileges ,adminuser and appuser privilige
SHOW GRANTS FOR 'root'@'localhost';
SHOW GRANTS FOR 'adminuser'@'localhost';
SHOW GRANTS FOR 'appuser'@'localhost';
GRANT ALL PRIVILEGES ON *.* TO 'root'@'localhost' WITH GRANT OPTION;
how we can disable remote root login
How to Disable Remote Root Login
- Log in as root (from localhost):
mysql -u root -p
- Check root user hosts:
SELECT User, Host FROM mysql.user WHERE User='root';
If you see any Host value other than localhost (like %, server_ip, etc.), remote root login is possible.
- Remove or restrict remote root entries:
To delete remote root access (for example, root@%):
DELETE FROM mysql.user WHERE User='root' AND Host!='localhost';
FLUSH PRIVILEGES;
This ensures only root@localhost remains.
- (Optional) Explicitly update root to localhost only:
UPDATE mysql.user SET Host='localhost' WHERE User='root';
FLUSH PRIVILEGES;
- Restart MariaDB/MySQL (optional but recommended):
sudo systemctl restart mariadb
# or
sudo systemctl restart mysql

Top comments (0)