
- Move the project to your Mac
iOS development requires macOS and Xcode.
Open Terminal:
cd /path/to/your-project
Confirm the project contains:
android/
ios/
package.json
src/
If the ios/ folder exists, use it. Do not create another React Native project.
- Install required software
Install Xcode from the Mac App Store, open it once and accept the licence.
Install command-line tools:
xcode-select --install
Install CocoaPods:
sudo gem install cocoapods
Check installations:
node -v
npm -v
pod --version
xcodebuild -version
- Install JavaScript dependencies
From the project root:
npm install
If the project uses Yarn:
yarn install
Use the package manager already represented by the lock file:
package-lock.json → npm
yarn.lock         → Yarn
Do not delete the lock file unnecessarily.
- Install iOS native dependencies
cd ios
pod install
cd ..
Always open the generated .xcworkspace, not .xcodeproj:
open ios/YourAppName.xcworkspace
Replace YourAppName with the actual workspace name shown by:
ls ios
- Review package.json
File:
package.json
Check that dependencies support iOS. Pay special attention to:
Firebase
Push notifications
Maps
Location
Camera
Image/file selection
Payments
WebView
Biometrics
Social login
Background services
You may add an iOS script if one is not present:
{
  "scripts": {
    "android": "react-native run-android",
    "ios": "react-native run-ios",
    "start": "react-native start"
  }
}
After changing native dependencies:
cd ios
pod install
cd ..
- Configure the bundle identifier
Open:
ios/YourAppName.xcworkspace
In Xcode:
Select the project in the left panel.
Select the application target.
Open Signing & Capabilities.
Choose your Apple development team.
Set a unique Bundle Identifier.
Example:
com.professnow.app
Do not use another published app’s identifier.
- Configure Info.plist
File:
ios/YourAppName/Info.plist
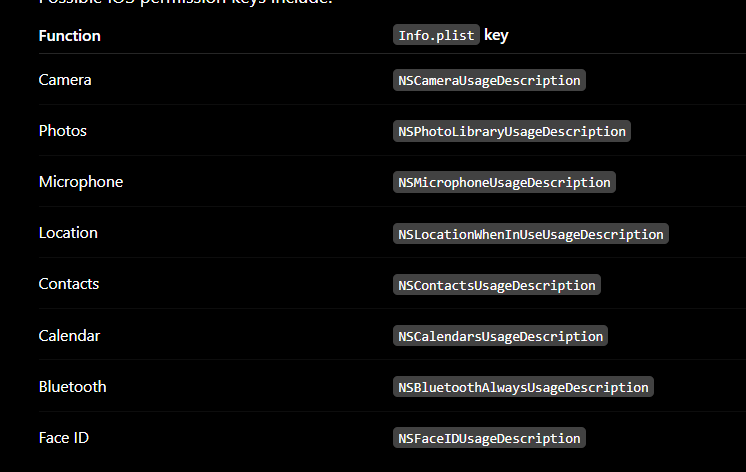
Add only the permissions your app actually uses.
Example:
<key>NSCameraUsageDescription</key>
<string>ProfessNow uses the camera to capture and upload profile images.</string>

<key>NSPhotoLibraryUsageDescription</key>
<string>ProfessNow uses your photo library to select profile and service images.</string>

<key>NSPhotoLibraryAddUsageDescription</key>
<string>ProfessNow saves selected files to your photo library.</string>

<key>NSLocationWhenInUseUsageDescription</key>
<string>ProfessNow uses your location to find nearby professionals.</string>

<key>NSMicrophoneUsageDescription</key>
<string>ProfessNow uses the microphone for audio and video communication.</string>

<key>NSFaceIDUsageDescription</key>
<string>ProfessNow uses Face ID to securely authenticate you.</string>
- Check API URLs and environment variables
Check files such as:
.env
.env.development
.env.production
src/config/api.js
src/services/api.js
src/constants/config.js
Android development sometimes uses:
http://10.0.2.2:8000
That address is specific to the Android emulator. For the iOS Simulator, a backend running on the same Mac normally uses:
http://localhost:8000
For a physical iPhone, use your Mac’s local network IP:
http://192.168.1.10:8000
The iPhone and Mac must be on the same network, and your backend must listen on an accessible interface.
A platform-aware example:
import {Platform} from 'react-native';

export const API_URL =
  Platform.OS === 'ios'
    ? 'http://localhost:8000'
    : 'http://10.0.2.2:8000';
Use HTTPS in production.
- Check platform-specific JavaScript
Search the project:
rg "Platform.OS|android|BackHandler|PermissionsAndroid|ToastAndroid|StatusBar" src
Review code containing:
Platform.OS === 'android'
Support both platforms:
import {Platform} from 'react-native';

const styles = {
  paddingTop: Platform.OS === 'ios' ? 12 : 0,
};
For substantially different implementations, create:
src/components/FilePicker.android.js
src/components/FilePicker.ios.js
Then import without the suffix:
import FilePicker from './components/FilePicker';
React Native selects the appropriate file automatically.
- Replace Android-only APIs
Files using these APIs will require adjustment:
PermissionsAndroid
ToastAndroid
BackHandler
Linking.sendIntent
For example, do not use ToastAndroid directly everywhere:
import {Alert, Platform, ToastAndroid} from 'react-native';

export function showMessage(message) {
  if (Platform.OS === 'android') {
    ToastAndroid.show(message, ToastAndroid.SHORT);
  } else {
    Alert.alert('', message);
  }
}
For permissions, use a cross-platform package or an iOS-compatible implementation.
- Fix Safe Area layout
iPhones have notches, rounded corners and a home indicator.
Update the main application layout, commonly:
App.js
App.tsx
src/navigation/AppNavigator.js
src/layouts/MainLayout.js
Example:
import {SafeAreaProvider} from 'react-native-safe-area-context';

export default function App() {
  return (
    <SafeAreaProvider>
      <AppNavigator />
    </SafeAreaProvider>
  );
}
Use SafeAreaView on screens that need protected spacing:
import {SafeAreaView} from 'react-native-safe-area-context';

export default function HomeScreen() {
  return (
    <SafeAreaView style={{flex: 1}}>
      {/* Screen content */}
    </SafeAreaView>
  );
}
- Check keyboard behaviour
Forms often behave differently on iOS.
Files likely affected:
src/screens/LoginScreen.js
src/screens/RegisterScreen.js
src/screens/*Form*.js

Example:

import {
  KeyboardAvoidingView,
  Platform,
  ScrollView,
} from 'react-native';

<KeyboardAvoidingView
  style={{flex: 1}}
  behavior={Platform.OS === 'ios' ? 'padding' : undefined}>
  <ScrollView keyboardShouldPersistTaps="handled">
    {/* Form */}
  </ScrollView>
</KeyboardAvoidingView>
- Configure Firebase
If Firebase is used:
Open Firebase Console.
Add an iOS application.
Enter the exact iOS Bundle Identifier.
Download:
GoogleService-Info.plist
Open the Xcode workspace.
Drag the file into the application folder in Xcode.
Enable Copy items if needed.
Ensure the application target is selected.
Do not simply copy the file into the directory through Finder; it must also be added to the Xcode target.
Your project may also require changes in:
ios/Podfile
ios/YourAppName/AppDelegate.swift
The exact code depends on the Firebase and React Native versions.
- Configure push notifications
For push notifications:
Open the Xcode application target.
Go to Signing & Capabilities.
Add Push Notifications.
Add Background Modes.
Enable Remote notifications if required.
Configure APNs in the Apple Developer portal.
Connect the APNs key or certificate to Firebase or your notification provider.
Push notifications should be tested on a real iPhone, not only the simulator.
- Configure Google or social login
For Google Sign-In, you may need to update:
ios/YourAppName/Info.plist
ios/YourAppName/AppDelegate.swift
Add the provider’s reversed client ID under URL types through Xcode:
Target → Info → URL Types
For deep links and OAuth callbacks, also check:
Target → Signing & Capabilities → Associated Domains
Do not reuse Android client credentials as the iOS OAuth client.
- Configure maps
Android and iOS map setup can differ.
Review:
ios/Podfile
ios/YourAppName/AppDelegate.swift
ios/YourAppName/Info.plist
If you are using Google Maps, create or restrict an API key for the iOS app and its bundle identifier.
- Review ios/Podfile
File:
ios/Podfile
Initially, avoid manually changing it unless a package’s official iOS setup requires it.
A typical file includes:
platform :ios, min_ios_version_supported
target 'YourAppName' do
config = use_native_modules!
use_react_native!(
:path => config[:reactNativePath],
:app_path => "#{Pod::Config.instance.installation_root}/.."
)
end
Do not copy a Podfile from an unrelated project because its React Native version may differ.
After editing:
cd ios
pod install
cd ..
- Configure app icons
Replace or configure assets through:
ios/YourAppName/Images.xcassets/AppIcon.appiconset
In Xcode:
Project → Application target → General → App Icons
Use a high-quality square source image, normally:
1024 × 1024 pixels
Avoid transparency in the App Store icon.
- Configure the launch screen
Review:
ios/YourAppName/LaunchScreen.storyboard
or the launch-screen configuration shown in Xcode.
Keep the launch screen simple:
Background colour
Logo
No buttons
No dynamic data
No fake progress indicator
Your React Native splash-screen package may require additional configuration in:
AppDelegate.swift
- Run the app in the simulator
Start Metro:
npm start
In another Terminal window:
npx react-native run-ios
To choose a simulator:
npx react-native run-ios --simulator="iPhone 16"
Alternatively, open the workspace in Xcode, select an available iPhone simulator and press Run.
- Test on a real iPhone
Connect the iPhone to your Mac.
Trust the computer on the iPhone.
Open the .xcworkspace.
Select the physical iPhone.
Select your Apple team under Signing.
Enable Developer Mode on the iPhone if requested.
Press Run.
Test these features on the real device:
Camera and gallery
Location
Push notifications
File upload
Microphone
Deep links
Social login
Payment
Background behaviour
Network loss and recovery
- Fix build issues safely
First try:
cd ios
pod install --repo-update
cd ..
npx react-native run-ios
If Pods genuinely need regeneration:
cd ios
rm -rf Pods
pod install
cd ..
Avoid deleting Podfile.lock as your first troubleshooting step because it changes dependency versions.
For Xcode build cache problems, use:
Xcode → Product → Clean Build Folder
- Prepare the release build
In Xcode:
Update Version, for example 1.0.0.
Update Build, for example 1.
Confirm the production API uses HTTPS.
Select Any iOS Device (arm64).
Select Product → Archive.
Open Organizer.
Validate the app.
Upload it to App Store Connect.
Test using TestFlight.
Submit for App Store review.
Main files you may need to change



Top comments (0)