Step-by-Step: Add a PayPal Button to Your Website
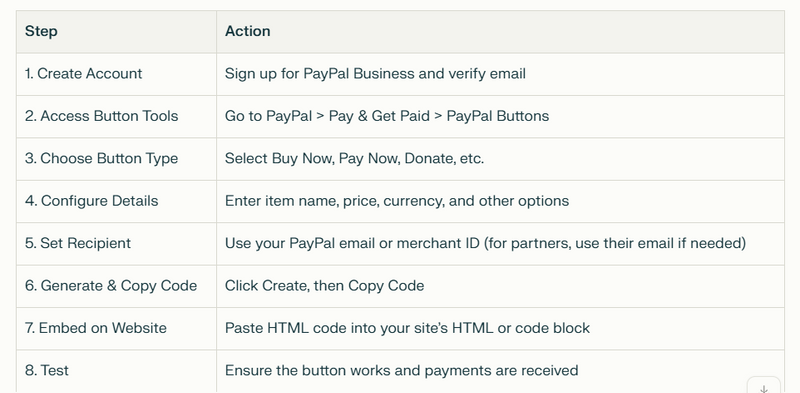
- Create a PayPal Business Account If you don’t have one, sign up at paypal.com.
Confirm your email address and complete any required verification.
- Access PayPal Button Creation Log in to your PayPal account.
Go to Pay & Get Paid > Accept Payments > PayPal Buttons.
Alternatively, visit paypal.com/buttons directly.
Choose the Button Type
Select the button you want (e.g., Buy Now, Pay Now, Donate, etc.).Configure Button Details
Item Name: Enter the product or service name.
Item ID: (Optional) For tracking or inventory.
Price: Set the amount to charge.
Currency: Select the correct currency (e.g., USD, EUR, INR).
Additional Options: Add product options, customize appearance, set shipping/tax rules as needed.
- Associate Payment Recipient By default, payments go to your business account.
For multi-partner setups, you can associate a different PayPal email for each button if needed.
If available, choose to use your secure merchant account ID instead of exposing your email.
- Generate and Copy the Button Code Click Create Button.
PayPal will generate an HTML code snippet for your button.
Click Copy Code to copy it to your clipboard.
- Embed the Button on Your Website Paste the copied HTML code into your website’s HTML where you want the button to appear.
For most website builders, use an “HTML block” or “Custom Code” section.
- Test the Button Visit your website and click the button to ensure it redirects to PayPal and processes payments correctly

=======paypal buttun in flutter==================
Step 2: Import the package
import 'package:url_launcher/url_launcher.dart';
Step 3: Create a function to launch the PayPal payment URL
Future<void> _launchPayPal(Booking booking) async {
final paypalEmail = booking.paypal_email;
final itemName = Uri.encodeComponent("Motoshare Rental for Order #${booking.id}");
final amount = booking.price.toString();
final returnUrl = Uri.encodeComponent("https://motoshare.in/myorders");
// Use sandbox or live URL as needed
final paypalUrl = "https://www.sandbox.paypal.com/cgi-bin/webscr"
"?cmd=_xclick"
"&business=$paypalEmail"
"&item_name=$itemName"
"&amount=$amount"
"¤cy_code=USD"
"&return=$returnUrl";
if (await canLaunchUrl(Uri.parse(paypalUrl))) {
await launchUrl(Uri.parse(paypalUrl), mode: LaunchMode.externalApplication);
} else {
ScaffoldMessenger.of(context).showSnackBar(
const SnackBar(content: Text("Could not open PayPal.")),
);
}
}
Step 4: Show the PayPal Button Dynamically
Replace your PayPal tab content with the following logic:
SingleChildScrollView(
  padding: const EdgeInsets.all(16.0),
  child: Column(
    crossAxisAlignment: CrossAxisAlignment.start,
    children: [
      Container(
        padding: const EdgeInsets.all(10),
        decoration: BoxDecoration(
          color: Colors.orange[100],
          borderRadius: BorderRadius.circular(8),
        ),
        child: const Text(
          "Pay securely using PayPal. After payment, proceed to Step 2 to upload your payment proof.",
          textAlign: TextAlign.center,
          style: TextStyle(fontSize: 14, fontWeight: FontWeight.bold),
        ),
      ),
      const SizedBox(height: 15),
      const Text("PayPal Details", style: TextStyle(fontSize: 20, fontWeight: FontWeight.bold)),
      const SizedBox(height: 10),
      Text("Partner Name: ${widget.booking.name}", style: const TextStyle(fontSize: 13, fontWeight: FontWeight.bold)),
      Text("Partner Email: ${widget.booking.vendorEmail}", style: const TextStyle(fontSize: 13, fontWeight: FontWeight.bold)),
      Text("Partner No: ${widget.booking.vendornumber}", style: const TextStyle(fontSize: 13, fontWeight: FontWeight.bold)),
      const SizedBox(height: 10),
      if (widget.booking.paypal_email != null && widget.booking.paypal_email!.isNotEmpty)
        ElevatedButton.icon(
          icon: const Icon(Icons.payment),
          label: const Text("Pay Now with PayPal"),
          style: ElevatedButton.styleFrom(
            backgroundColor: const Color(0xFFFFC439), // PayPal yellow
            foregroundColor: Colors.black,
            textStyle: const TextStyle(fontWeight: FontWeight.bold, fontSize: 16),
            padding: const EdgeInsets.symmetric(horizontal: 20, vertical: 12),
            shape: RoundedRectangleBorder(borderRadius: BorderRadius.circular(5)),
          ),
          onPressed: () => _launchPayPal(widget.booking),
        ),
      if (widget.booking.paypal_email == null || widget.booking.paypal_email!.isEmpty)
        const Text(
          "PayPal is not available for this booking.",
          style: TextStyle(color: Colors.red, fontWeight: FontWeight.bold),
        ),
      const SizedBox(height: 10),
      const Text(
        "Clicking the button will open PayPal in a new tab. After payment, please upload your receipt below.",
        style: TextStyle(fontSize: 14, color: Color(0xFF555555)),
      ),
    ],
  ),
)

Top comments (0)