- Create a new Laravel project
Open Command Prompt / PowerShell / Git Bash and run:
cd C:\xampp\htdocs
composer create-project laravel/laravel laravel_auth_demo
When it finishes:
cd C:\xampp\htdocs\laravel_auth_demo
- Open project in VS Code
Open VS Code
File → Open Folder → select C:\xampp\htdocs\laravel_auth_demo
You should see folders like app, bootstrap, config, resources, etc.
Do not touch welcome.blade.php yet. Leave it as is.
- Create MySQL database in XAMPP
Start XAMPP → Start Apache and MySQL
Open browser → http://localhost/phpmyadmin
Click New (left side)
Database name: laravel_auth_demo
Collation: utf8mb4_unicode_ci
Click Create
- Configure .env
In VS Code, open .env (root of project) and set:
APP_NAME="Laravel Auth Demo"
APP_ENV=local
APP_DEBUG=true
APP_URL=http://127.0.0.1:8000

DB_CONNECTION=mysql
DB_HOST=127.0.0.1
DB_PORT=3306
DB_DATABASE=laravel_auth_demo
DB_USERNAME=root
DB_PASSWORD=
(Default XAMPP: user root, empty password.)
Save the file.
- Generate app key + run basic migrations
In VS Code terminal (ensure path is project root):
php artisan key:generate
php artisan migrate
If migrate runs without error, DB connection is OK.
- Test fresh Laravel works
Run:
php artisan serve
Open browser:
http://127.0.0.1:8000
You should see the default Laravel welcome page (big Laravel logo, docs, Laracasts, etc.).
If this works, stop server with Ctrl + C in terminal and continue.
- Install Laravel Breeze (auth scaffolding)
We will install the simple Blade stack (no React, no TypeScript), to avoid your previous npm issues.
7.1 Install Breeze package
composer require laravel/breeze --dev
7.2 Run Breeze installer (choose Blade)
php artisan breeze:install
It will ask:
Which Breeze stack would you like to install?
→ Use arrow keys, select: Blade with Alpine (value: blade) → press Enter.
Would you like any optional features?
→ Choose None → press Enter.
Which testing framework do you prefer?
→ You can keep default Pest or choose PHPUnit. Either is fine.
Breeze will now:
Create auth views and controllers
Create routes/auth.php
Update layouts and dashboard
Even if later npm step fails, the PHP files and routes are still generated, which is what we need.
- Install Node dependencies (with legacy peer deps)
Because your Node/@types versions are a bit old/new mix, use:
npm install --legacy-peer-deps
Wait until it finishes.
If there are warnings, ignore them; only errors are important.
- Build frontend assets
Run:
npm run build
This creates:
public/build/manifest.json
compiled CSS/JS files
(If you prefer live reload during dev, you can later use npm run dev instead.)
- Run migrations again (Breeze tables)
Just in case Breeze added extra migrations (for email verification etc.):
php artisan migrate
- Start Laravel server again php artisan serve
create project
composer create-project --prefer-dist laravel/laravel: wz-organisation-ms
==============================OR============================================
composer create-project --prefer-dist laravel/laravel: wz-organisation-ms
composer install
composer install is a command used to install the dependencies specified in a Laravel or PHP project's composer.json file. The composer.json file contains information about the project and its dependencies, including the required versions of libraries and packages, and other information needed to run the project.Composer is a package manager for PHP that helps manage the dependencies in a project. When you run composer install, it reads the composer.json file and downloads the specified dependencies into the vendor directory of the project. This makes it easier to manage the dependencies, as well as makes it easier to set up a development environment and deploy the project to a production environment.By using composer install, you can ensure that your project has all the dependencies it needs to run correctly, and that the versions of those dependencies are the ones specified in the composer.json file.
Composer is a dependency manager for PHP, and it is used in Laravel to manage and install the packages and libraries required for a Laravel project.
Laravel uses many libraries and packages from other developers, such as Symfony, Guzzle, and others, which are installed and managed via Composer. This makes it easy for developers to add and update these dependencies in their Laravel projects, without having to manually download, install, and manage them.
Additionally, Composer also helps in maintaining a consistent version of the dependencies and libraries used in a project, which helps in avoiding compatibility issues and makes it easier to manage the project over time.
In summary, Composer is essential for Laravel development as it simplifies the process of managing dependencies, libraries, and packages, and ensures consistency and compatibility in a Laravel project.
composer install
Install the Laravel UI package
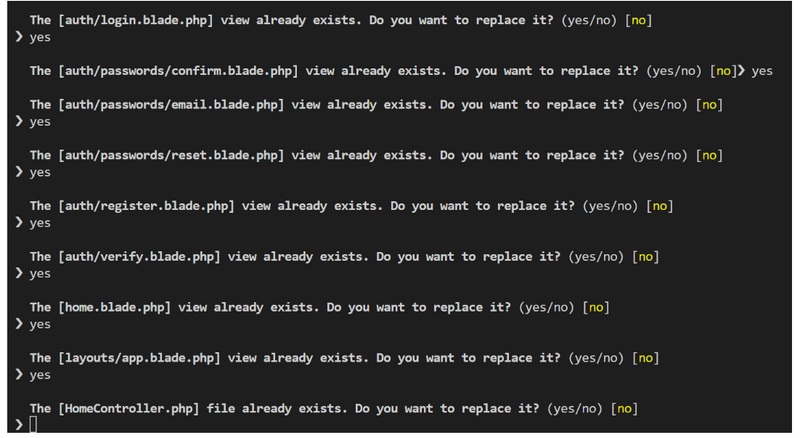
"php artisan ui bootstrap --auth" is used in Laravel to set up a basic user authentication system, which includes the views and routes needed for registration, login, and password reset functionality. The "ui" option specifies the frontend user interface framework to be used, which is Bootstrap in this case, while the "--auth" option sets up the authentication scaffolding.Using this command saves time and effort by generating the necessary files and code snippets for the authentication system, which can then be customized and extended as needed for a specific project.
composer require laravel/ui
Set up a basic user authentication
"php artisan ui bootstrap --auth" is used in Laravel to set up a basic user authentication system, which includes the views and routes needed for registration, login, and password reset functionality. The "ui" option specifies the frontend user interface framework to be used, which is Bootstrap in this case, while the "--auth" option sets up the authentication scaffolding.Using this command saves time and effort by generating the necessary files and code snippets for the authentication system, which can then be customized and extended as needed for a specific project.
php artisan ui bootstrap --auth
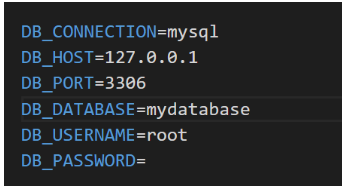
Set up databse name in env
Run php artisan optimize
The command "php artisan optimize" is used to optimize the framework's bootstrapping process. It caches various configurations and routes into a single file, reducing the number of files that need to be loaded and improving the performance of
php artisan optimize
install the Laravel Passport package in a Laravel application
"composer require laravel/passport" is a command used to install the Laravel Passport package in a Laravel application. Passport is a Laravel package that provides a simple and easy way to handle API authentication.
composer require laravel/passport
Add inside config/app.php
Laravel\Passport\PassportServiceProvider::class,
'providers' => [

        /*
         * Laravel Framework Service Providers...
         */
        Illuminate\Auth\AuthServiceProvider::class,
        Illuminate\Broadcasting\BroadcastServiceProvider::class,
        Illuminate\Bus\BusServiceProvider::class,
        Illuminate\Cache\CacheServiceProvider::class,
        Illuminate\Foundation\Providers\ConsoleSupportServiceProvider::class,

        /*
         * Application Service Providers...
         */
        App\Providers\AppServiceProvider::class,
        App\Providers\AuthServiceProvider::class,
        // App\Providers\BroadcastServiceProvider::class,
        App\Providers\EventServiceProvider::class,
        App\Providers\RouteServiceProvider::class,

        Laravel\Passport\PassportServiceProvider::class,

    ],
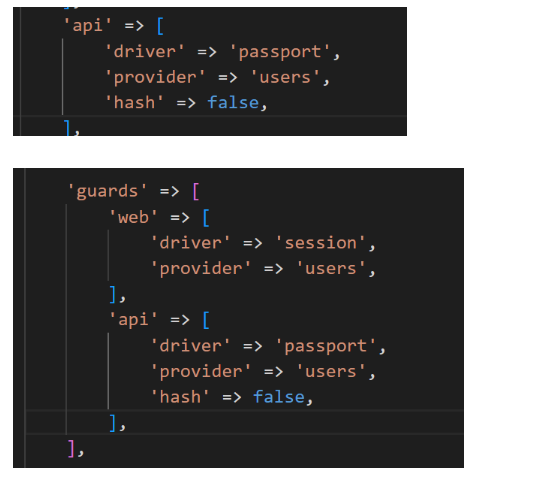
Add inside config/auth.php
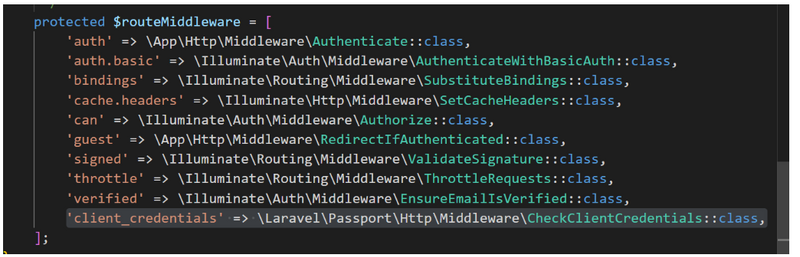
Add inside Http/kernal.php
'client_credentials' => \Laravel\Passport\Http\Middleware\CheckClientCredentials::class,
migrate table
php artisan migrate
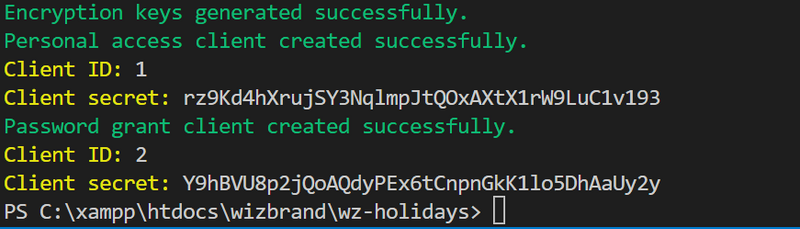
Passport install
php artisan passport:install
Give Permission
chmod -R 777 storage
chmod -R 777 storage/logs
place pull.sh script
inside it put
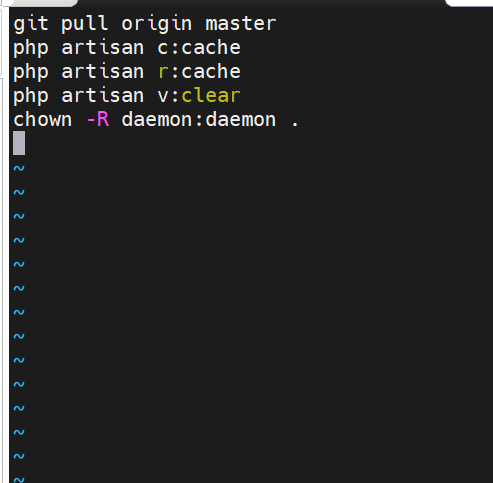
setup root to daemon
change-file-permissions-recursively


Top comments (0)