How to dynamically insert data in node js
How to dynamically insert array type data in node js
How to dynamically insert map type data in node js
How to dynamically insert data in node js
Certainly! Here's a step-by-step example of how to dynamically insert data using req.body with the help of MVC (Model-View-Controller) architecture in Node.js with MongoDB:
Step 1: Set up the required modules and connect to your MongoDB database.
const express = require('express');
const mongoose = require('mongoose');

const app = express();

mongoose.connect('mongodb://localhost/mydatabase', {
  useNewUrlParser: true,
  useUnifiedTopology: true,
})
  .then(() => {
    console.log('Connected to MongoDB');
  })
  .catch((error) => {
    console.error('Error connecting to MongoDB:', error);
  });

app.use(express.json());

app.listen(3000, () => {
  console.log('Server started on port 3000');
});
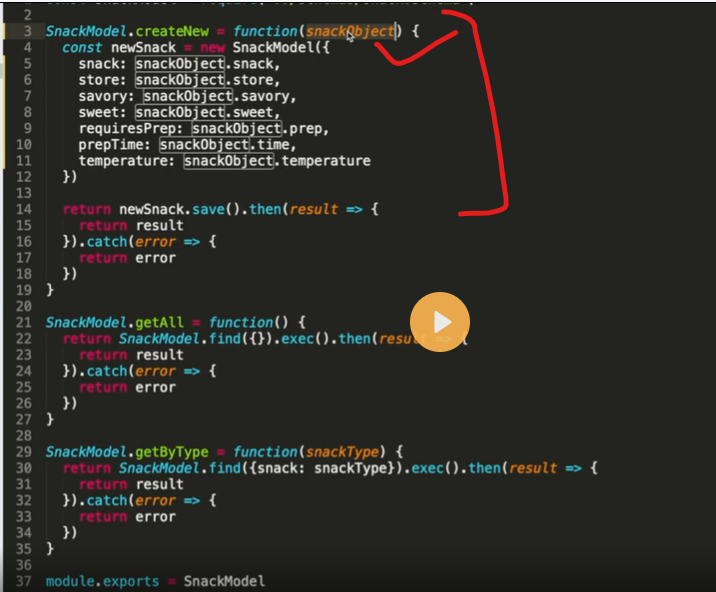
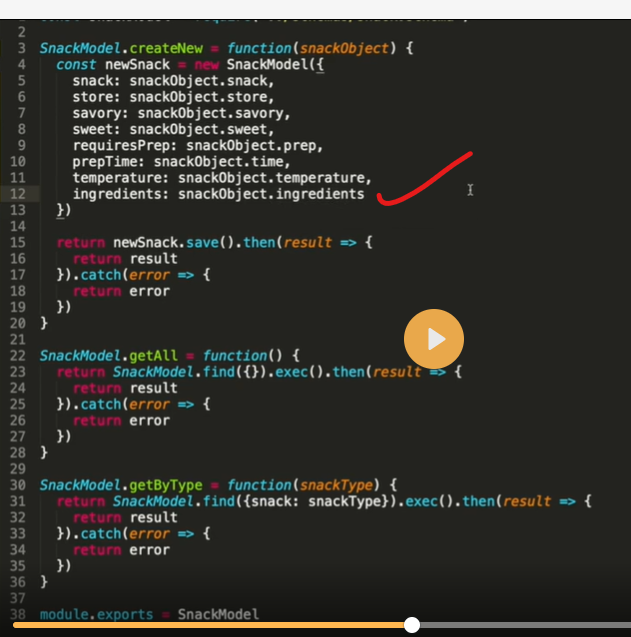
Step 2: Define the model for your collection. In this example, let's create a "User" model.
const mongoose = require('mongoose');

const userSchema = new mongoose.Schema({
  name: String,
  age: Number,
  email: String,
  city: String
});

const User = mongoose.model('User', userSchema);

module.exports = User;
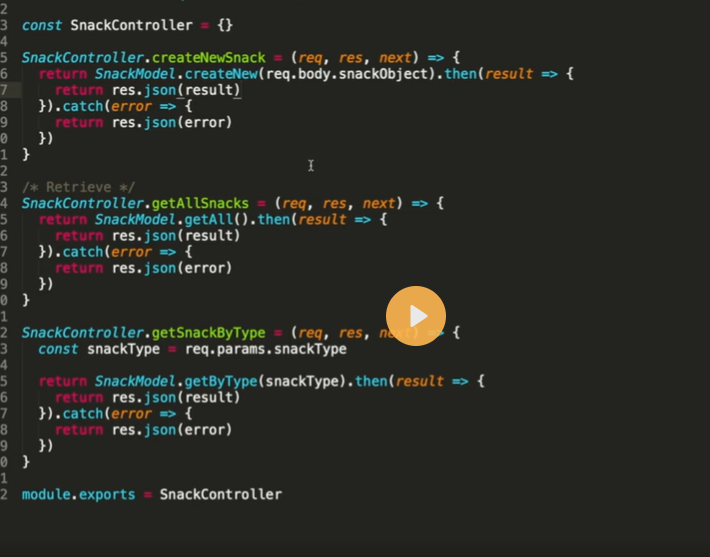
Step 3: Set up the controller to handle the data insertion logic. Create a file named userController.js and add the following code:
const User = require('../models/user');

const createUser = async (req, res) => {
  try {
    const { name, age, email, city } = req.body;

    const user = new User({
      name,
      age,
      email,
      city
    });

    await user.save();

    res.status(201).json({ message: 'User created successfully', user });
  } catch (error) {
    console.error('Error creating user:', error);
    res.status(500).json({ error: 'Internal server error' });
  }
};

module.exports = {
  createUser
};
Step 4: Set up the routes to handle the incoming requests. Create a file named routes.js and add the following code:
const express = require('express');
const userController = require('./controllers/userController');

const router = express.Router();

router.post('/users', userController.createUser);

module.exports = router;
Step 5: Configure the main application file. Create a file named app.js (or any other name you prefer) and add the following code:
const express = require('express');
const routes = require('./routes');

const app = express();

app.use(express.json());
app.use(routes);

app.listen(3000, () => {
  console.log('Server started on port 3000');
});
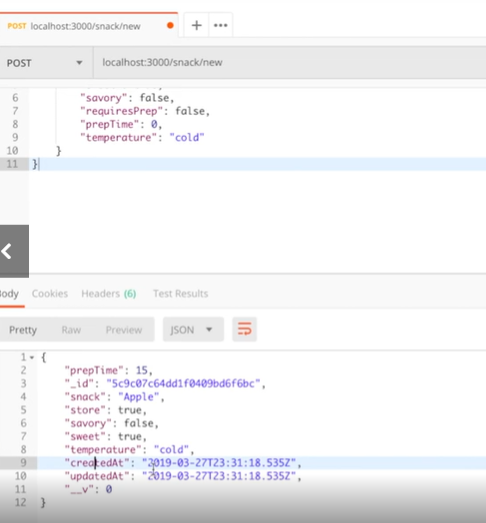
Step 6: Start the server and test the route. Run the application by executing the command node app.js in your terminal or command prompt. Now you can make a POST request to dynamically insert data:
POST http://localhost:3000/users
Content-Type: application/json

{
  "name": "John Doe",
  "age": 30,
  "email": "john@example.com",
  "city": "New York"
}
Send the above request with the appropriate JSON data in the body. You should receive a JSON response indicating that the user was created successfully, along with the inserted user's data. If an error occurs during the insertion, the appropriate status code and error message will be returned.
This example demonstrates how to dynamically insert data using req.body with the help of MVC architecture in Node.js and MongoDB.
===================================================

How to dynamically insert array type data in node js
Certainly! Here's a step-by-step example of how to dynamically insert array data using req.body with the help of MVC (Model-View-Controller) architecture in Node.js with MongoDB:
Step 1: Set up the required modules and connect to your MongoDB database.
const express = require('express');
const mongoose = require('mongoose');

const app = express();

mongoose.connect('mongodb://localhost/mydatabase', {
  useNewUrlParser: true,
  useUnifiedTopology: true,
})
  .then(() => {
    console.log('Connected to MongoDB');
  })
  .catch((error) => {
    console.error('Error connecting to MongoDB:', error);
  });

app.use(express.json());

app.listen(3000, () => {
  console.log('Server started on port 3000');
});
Step 2: Define the model for your collection. In this example, let's create a "Product" model.
const mongoose = require('mongoose');

const productSchema = new mongoose.Schema({
  name: String,
  price: Number,
});

const Product = mongoose.model('Product', productSchema);

module.exports = Product;
Step 3: Set up the controller to handle the data insertion logic. Create a file named productController.js and add the following code:
const Product = require('../models/product');

const createProducts = async (req, res) => {
  try {
    const productsData = req.body;

    const products = await Product.create(productsData);

    res.status(201).json({ message: 'Products created successfully', products });
  } catch (error) {
    console.error('Error creating products:', error);
    res.status(500).json({ error: 'Internal server error' });
  }
};

module.exports = {
  createProducts
};
Step 4: Set up the routes to handle the incoming requests. Create a file named routes.js and add the following code:
const express = require('express');
const productController = require('./controllers/productController');

const router = express.Router();

router.post('/products', productController.createProducts);

module.exports = router;
Step 5: Configure the main application file. Create a file named app.js (or any other name you prefer) and add the following code:
const express = require('express');
const routes = require('./routes');

const app = express();

app.use(express.json());
app.use(routes);

app.listen(3000, () => {
  console.log('Server started on port 3000');
});
Step 6: Start the server and test the route. Run the application by executing the command node app.js in your terminal or command prompt. Now you can make a POST request to dynamically insert array data:
POST http://localhost:3000/products
Content-Type: application/json

[
  {
    "name": "Product 1",
    "price": 10
  },
  {
    "name": "Product 2",
    "price": 20
  },
  {
    "name": "Product 3",
    "price": 30
  }
]
Send the above request with the appropriate JSON data in the body. You should receive a JSON response indicating that the products were created successfully, along with the inserted products' data. If an error occurs during the insertion, the appropriate status code and error message will be returned.
This example demonstrates how to dynamically insert array data using req.body with the help of MVC architecture in Node.js and MongoDB.
How to dynamically insert map type data in node js
Certainly! Here's a step-by-step example of how to dynamically insert map-type data using req.body with the help of MVC (Model-View-Controller) architecture in Node.js with MongoDB:
Step 1: Set up the required modules and connect to your MongoDB database.
const express = require('express');
const mongoose = require('mongoose');

const app = express();

mongoose.connect('mongodb://localhost/mydatabase', {
  useNewUrlParser: true,
  useUnifiedTopology: true,
})
  .then(() => {
    console.log('Connected to MongoDB');
  })
  .catch((error) => {
    console.error('Error connecting to MongoDB:', error);
  });

app.use(express.json());

app.listen(3000, () => {
  console.log('Server started on port 3000');
});
Step 2: Define the model for your collection. In this example, let's create a "Post" model with a map field.
const mongoose = require('mongoose');

const postSchema = new mongoose.Schema({
  title: String,
  content: String,
  metadata: {
    likes: Number,
    views: Number,
    shares: Number
  }
});

const Post = mongoose.model('Post', postSchema);

module.exports = Post;
Step 3: Set up the controller to handle the data insertion logic. Create a file named postController.js and add the following code:
const Post = require('../models/post');

const createPost = async (req, res) => {
  try {
    const { title, content, metadata } = req.body;

    const post = new Post({
      title,
      content,
      metadata
    });

    await post.save();

    res.status(201).json({ message: 'Post created successfully', post });
  } catch (error) {
    console.error('Error creating post:', error);
    res.status(500).json({ error: 'Internal server error' });
  }
};

module.exports = {
  createPost
};
Step 4: Set up the routes to handle the incoming requests. Create a file named routes.js and add the following code:
const express = require('express');
const postController = require('./controllers/postController');

const router = express.Router();

router.post('/posts', postController.createPost);

module.exports = router;
Step 5: Configure the main application file. Create a file named app.js (or any other name you prefer) and add the following code:
const express = require('express');
const routes = require('./routes');

const app = express();

app.use(express.json());
app.use(routes);

app.listen(3000, () => {
  console.log('Server started on port 3000');
});
Step 6: Start the server and test the route. Run the application by executing the command node app.js in your terminal or command prompt. Now you can make a POST request to dynamically insert map-type data:
POST http://localhost:3000/posts
Content-Type: application/json

{
  "title": "My First Post",
  "content": "This is the content of my first post.",
  "metadata": {
    "likes": 10,
    "views": 100,
    "shares": 5
  }
}
Send the above request with the appropriate JSON data in the body. You should receive a JSON response indicating that the post was created successfully, along with the inserted post's data. If an error occurs during the insertion, the appropriate status code and error message will be returned.
This example demonstrates how to dynamically insert map-type data using req.body with the help

Top comments (0)