Implementing Drawer and tab navigation setup without contextprovider
Implementing Drawer and tab navigation setup without contextprovider
To implement the first screen with a country selection that navigates to a screen with a tab navigator and drawer upon selecting a country (like the second screenshot), you can achieve this by using React Navigation.
Here’s how you can set up the two screens and transition between them:
Key Steps:
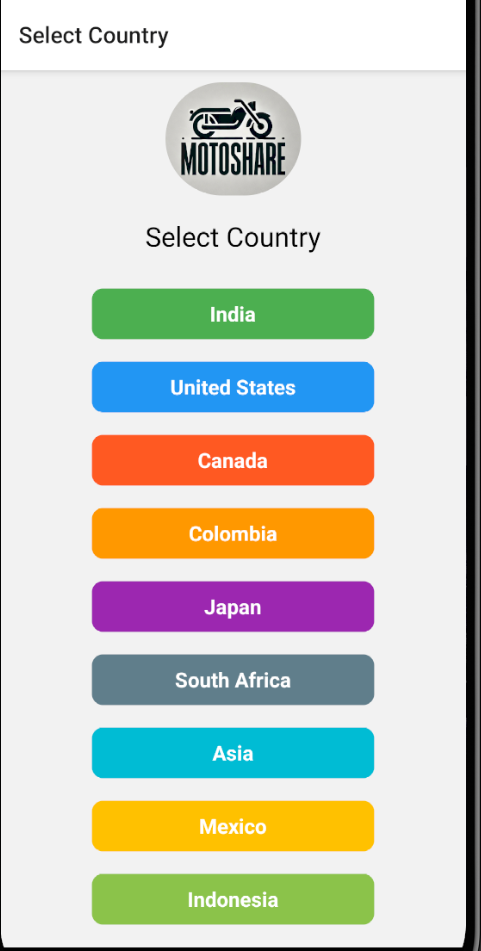
Country Selection Screen: This screen will show a list of countries as buttons.
Main Screen with Drawer and Tab Navigator: After selecting a country, navigate to the main screen, which contains a tab bar and a drawer.
Step 1: Install Required Libraries
Install react-navigation, react-navigation-tabs, react-navigation-drawer, and other necessary libraries if you haven't already.
npm install @react-navigation/native
npm install @react-navigation/drawer
npm install @react-navigation/bottom-tabs
npm install react-native-gesture-handler react-native-reanimated
npm install react-native-screens
Step 2: Country Selection Screen (First Screen)
This is the first screen where the user selects a country.
import React from 'react';
import { View, Text, Button, StyleSheet, ScrollView } from 'react-native';

const countries = [
  "India",
  "United States",
  "Canada",
  "Colombia",
  "Japan",
  "South Africa",
  "Asia",
  "Mexico",
];

const CountrySelectionScreen = ({ navigation }) => {
  const handleCountrySelect = (country) => {
    // Navigate to the main screen after selecting the country
    navigation.navigate('Main', { country });
  };

  return (
    <View style={styles.container}>
      <Text style={styles.title}>Select Country</Text>
      <ScrollView>
        {countries.map((country, index) => (
          <Button
            key={index}
            title={country}
            onPress={() => handleCountrySelect(country)}
          />
        ))}
      </ScrollView>
    </View>
  );
};

const styles = StyleSheet.create({
  container: {
    flex: 1,
    justifyContent: 'center',
    alignItems: 'center',
    padding: 20,
    backgroundColor: '#f0f0f0',
  },
  title: {
    fontSize: 24,
    marginBottom: 20,
    fontWeight: 'bold',
  },
});

export default CountrySelectionScreen;
Step 3: Main Screen with Tab and Drawer Navigation
After selecting a country, the user will navigate to the main screen where a tab navigator and drawer are available.
import React from 'react';
import { NavigationContainer } from '@react-navigation/native';
import { createDrawerNavigator } from '@react-navigation/drawer';
import { createBottomTabNavigator } from '@react-navigation/bottom-tabs';
import { createStackNavigator } from '@react-navigation/stack';

import CountrySelectionScreen from './screens/CountrySelectionScreen';
import HomeScreen from './screens/HomeScreen';
import ProfileScreen from './screens/ProfileScreen';
import SearchScreen from './screens/SearchScreen';
import LoginScreen from './screens/LoginScreen';

const Tab = createBottomTabNavigator();
const Drawer = createDrawerNavigator();
const Stack = createStackNavigator();

// Main tab navigator
const MainTabNavigator = () => {
  return (
    <Tab.Navigator>
      <Tab.Screen name="Home" component={HomeScreen} />
      <Tab.Screen name="Profile" component={ProfileScreen} />
      <Tab.Screen name="Search" component={SearchScreen} />
    </Tab.Navigator>
  );
};

// Main Drawer Navigator
const MainDrawerNavigator = () => {
  return (
    <Drawer.Navigator>
      <Drawer.Screen name="Home" component={MainTabNavigator} />
      <Drawer.Screen name="Login" component={LoginScreen} />
    </Drawer.Navigator>
  );
};

export default function App() {
  return (
    <NavigationContainer>
      <Stack.Navigator>
        {/* Country Selection Screen */}
        <Stack.Screen
          name="CountrySelection"
          component={CountrySelectionScreen}
          options={{ title: 'Select Country' }}
        />
        {/* Main Screen after country selection */}
        <Stack.Screen
          name="Main"
          component={MainDrawerNavigator}
          options={({ route }) => ({ title: route.params.country })}
        />
      </Stack.Navigator>
    </NavigationContainer>
  );
}
Step 4: Home, Profile, Search, and Login Screens
For demonstration purposes, let's create simple Home, Profile, Search, and Login screens.
import React from 'react';
import { View, Text, Button } from 'react-native';

const HomeScreen = ({ navigation }) => {
  return (
    <View>
      <Text>Home Screen</Text>
      <Button title="Go to Profile" onPress={() => navigation.navigate('Profile')} />
    </View>
  );
};

export default HomeScreen;
ProfileScreen.js
import React from 'react';
import { View, Text } from 'react-native';

const ProfileScreen = () => {
  return (
    <View>
      <Text>Profile Screen</Text>
    </View>
  );
};

export default ProfileScreen;
SearchScreen.js
import React from 'react';
import { View, Text } from 'react-native';

const SearchScreen = () => {
  return (
    <View>
      <Text>Search Screen</Text>
    </View>
  );
};

export default SearchScreen;
LoginScreen.js
import React from 'react';
import { View, Text, Button } from 'react-native';

const LoginScreen = () => {
  return (
    <View>
      <Text>Login Screen</Text>
      <Button title="Login" onPress={() => {}} />
    </View>
  );
};

export default LoginScreen;
Step 5: Running the App
Country Selection: The user selects a country from the first screen, which navigates to the main screen.
Main Screen: The main screen shows a tab navigator (Home, Profile, Search) inside a drawer with a login option.
Implementing Drawer and tab navigation setup inside context provider
This React Native setup utilizes Drawer Navigation, Tab Navigation, and a Base URL Provider to manage the app's routing and handle a dynamic API base URL for different countries. Here’s an explanation of each part of the code:
Drawer and Tab Navigation Setup
In this code, we have a combination of Drawer Navigator and Tab Navigator.
createDrawerNavigator is used for creating a navigation drawer where you can include multiple screens, and createBottomTabNavigator is used for the tab-based navigation at the bottom of the screen.
Tab Navigator: The MainTabNavigator wraps the HomeScreen and ProfileScreen within a tab navigation. You can navigate between these two screens by tapping on the tab buttons.
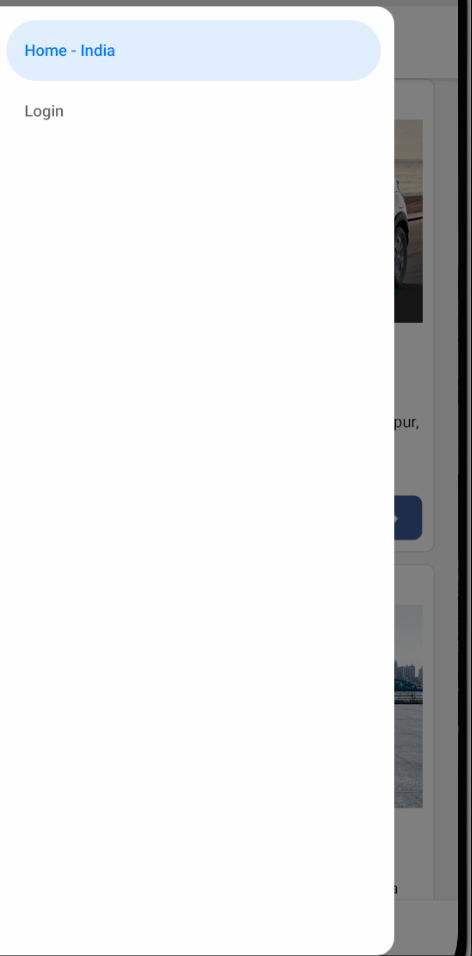
Drawer Navigator: The MainDrawerNavigator is the drawer navigation that contains the Home screen (which is using the MainTabNavigator) and a Login screen. By using the Drawer.Screen, we set the structure of the drawer.
const MainTabNavigator = ({ selectedCountry }) => (
  <Tab.Navigator screenOptions={{ headerShown: false }}>
    <Tab.Screen name="Home">
      {props => <HomeScreen {...props} selectedCountry={selectedCountry} />}
    </Tab.Screen>
    <Tab.Screen name="Profile" component={ProfileScreen} />
  </Tab.Navigator>
);

const MainDrawerNavigator = ({ route }) => {
  const selectedCountry = route?.params?.selectedCountry || '';

  return (
    <Drawer.Navigator>
      <Drawer.Screen
        name="Home"
        options={{ title: `Home - ${selectedCountry}` }}>
        {props => <MainTabNavigator {...props} selectedCountry={selectedCountry} />}
      </Drawer.Screen>
      <Drawer.Screen name="Login" component={LoginScreen} />
    </Drawer.Navigator>
  );
};
- Stack Navigator (Main Flow) In the App function, the BaseUrlProvider is wrapping the app to provide the base URL across all screens. This means that you can dynamically change the base URL depending on the selected country and access it from any screen.
The Stack.Navigator defines the flow of the app, starting with the CountrySelectionPage screen and then moving to the MainDrawerNavigator once the country is selected. This provides the user with an intuitive flow from country selection to the main part of the app.
export default function App() {
  return (
    <BaseUrlProvider> {/* Wrap the app with BaseUrlProvider */}
      <NavigationContainer>
        <Stack.Navigator>
          <Stack.Screen
            name="CountrySelection"
            component={CountrySelectionPage}
            options={{ title: 'Select Country' }}
          />
          <Stack.Screen
            name="Main"
            component={MainDrawerNavigator}
            options={{ headerShown: false }}
          />
        </Stack.Navigator>
      </NavigationContainer>
    </BaseUrlProvider>
  );
}
- BaseUrlProvider - Context to Handle Base URL The BaseUrlProvider is used to manage the API base URL for different countries. The idea is that once a country is selected, we update the base URL using setNewBaseUrl, and this new base URL is available to all screens of the app via React Context.
Context Provider:
The BaseUrlProvider wraps the entire app, ensuring that all components and screens have access to the updated base URL. This is essential when you want to make API requests specific to a country.
Context Update Logic: In the handleCountrySelection function, after selecting a country, we fetch the new base URL for that country and update the context using setNewBaseUrl.
const handleCountrySelection = async (country) => {
  const newBaseUrl = getBaseUrlForCountry(country.id);
  console.log("Navigating to Main with selected country:", country.name);
  console.log("Setting new base URL:", newBaseUrl);

  try {
    // Wait for the base URL to be updated in the context
    await setNewBaseUrl(newBaseUrl); // Ensure the context update is complete

    // Now, after context is updated, navigate to the Main screen
    navigation.navigate('Main', {
      selectedCountry: country.name, // Pass the selected country name to the Main screen
    });
  } catch (error) {
    console.error("Error updating base URL:", error);
  }
};
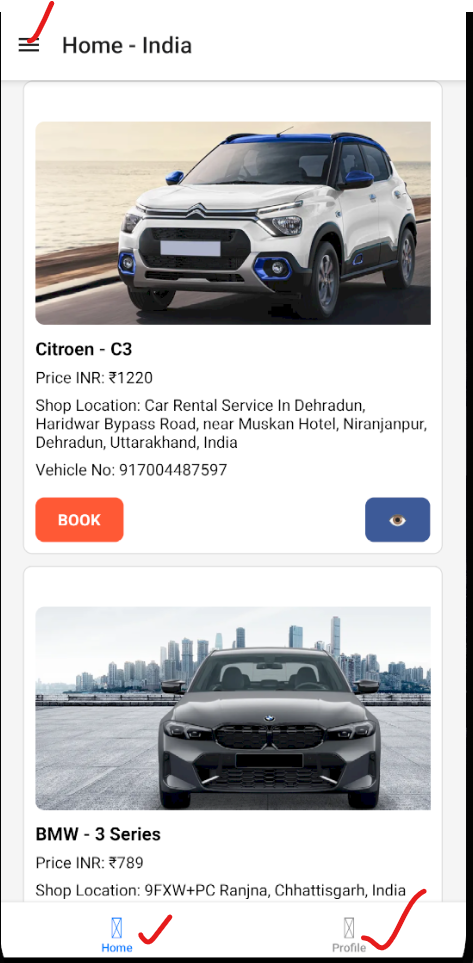
- HomeScreen and Vehicle Data Fetching In the HomeScreen component, vehicle data is fetched and displayed in a FlatList. It utilizes the useMotoshareViewModel custom hook to get the vehicle data.
Data Fetching: Inside useEffect, vehicle data is fetched using the getVehicleData method from the ViewModel. Once the data is fetched, the state filteredVehicleData is updated with the results.
Displaying Data: The FlatList is used to render a list of vehicles with details such as brand, model, price, and location. Each item has buttons for booking the vehicle or viewing more details.
const HomeScreen = () => {
  const [filteredVehicleData, setFilteredVehicleData] = useState([]);
  const navigation = useNavigation();

  // Fetch data when component mounts
  useEffect(() => {
    const fetchData = async () => {
      try {
        const data = await getVehicleData(); // Fetch vehicle data from the ViewModel
        console.log('Fetched vehicles:', data); // Log the fetched data

        if (data && Array.isArray(data)) {
          setFilteredVehicleData(data); // Update the state with the fetched data
        } else {
          setFilteredVehicleData([]); // Reset state if data is not in the expected format
        }
      } catch (error) {
        console.error('Error during data fetching:', error);
        Alert.alert('Error', 'Unable to fetch vehicle data');
      }
    };

    fetchData();
  }, []); // Empty dependency array ensures the effect is only triggered once on mount

  // Function to render each vehicle item in the FlatList
  const renderVehicleItem = ({ item }) => {
    let vehicleImages = [];
    if (item.vechicle_image) {
      try {
        const cleanedData = item.vechicle_image.replace(/^"(.*)"$/, '$1'); // Remove leading and trailing quotes
        vehicleImages = JSON.parse(cleanedData);
      } catch (error) {
        console.error('Error parsing vehicle image data:', error);
      }
    }

    return (
      <View style={styles.vehicleCard}>
        {vehicleImages.length > 0 ? (
          <VehicleImageSlider imageUrls={vehicleImages} />
        ) : (
          <Text>No Images Available</Text>
        )}

        <View style={styles.detailsContainer}>
          <Text style={styles.brandModelText}>{item.brand} - {item.model}</Text>
          <Text style={styles.priceText}>Price INR: ₹{item.price || 'N/A'}</Text>
          <Text style={styles.locationText}>Shop Location: {item.location || 'N/A'}</Text>
          <Text style={styles.vehicleNoText}>Vehicle No: {item.number || 'N/A'}</Text>
        </View>

        <View style={styles.buttonsContainer}>
          <TouchableOpacity
            style={styles.bookButton}
            onPress={() => navigation.navigate('Booking', { vehicle: item })}
          >
            <Text style={styles.buttonText}>BOOK</Text>
          </TouchableOpacity>

          <TouchableOpacity
            style={styles.eyeButton}
            onPress={() => navigation.navigate('VehicleDetails', { vehicle: item })}
          >
            <Text style={styles.buttonText}>👁️</Text>
          </TouchableOpacity>
        </View>
      </View>
    );
  };

  return (
    <View style={styles.container}>
      <FlatList
        data={filteredVehicleData}
        renderItem={renderVehicleItem}
        keyExtractor={(item) => item.id}
        contentContainerStyle={styles.flatListContent}
      />
    </View>
  );
};

Top comments (0)