How to install wsl
how to open wsl in visual studio
How to Copy your website files from Windows to your WSL home directory
How to install wsl
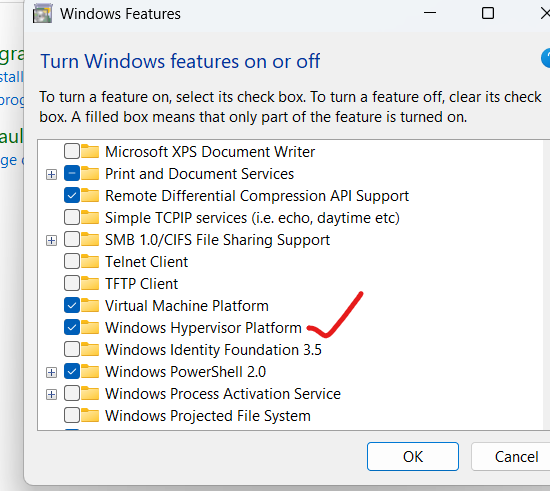
Step1:Enable Required Windows Features
You must have these Windows features enabled:
Virtual Machine Platform
Windows Subsystem for Linux
Windows Hypervisor Platform (sometimes needed)
How to enable:
Open Control Panel → Programs → Turn Windows features on or off.
Check the boxes for:
Windows Subsystem for Linux
Virtual Machine Platform
Windows Hypervisor Platform (if available)
Click OK and restart your PC
step2: open cmd not gitbash
wsl --install
step3:type password
step4: you will get prompt
rakes@Zebronics:/mnt/c/Users/rakes$
step5: press window +R
how to open wsl in visual studio
step 1:open visual studio
step2: Open VS Code.
Go to the Extensions view (Ctrl+Shift+X).
Search for "WSL" or "Remote - WSL".
If it is not installed, click Install.
If it is already installed, ensure it is enabled
step3:Go to the Extensions view (Ctrl+Shift+p)
Press F1 or Ctrl+Shift+P to open the Command Palette.
Type and select WSL: Connect to WSL (or WSL: Connect to WSL using Distro for a specific Linux distribution).
Use the File menu to open a folder located in your WSL filesystem.
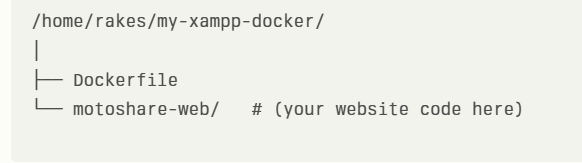
How to Copy your website files from Windows to your WSL home directory
How to Copy your website files from Windows to your WSL home directory
cp -r /mnt/c/xampp/htdocs/motoshare-web ~/motoshare-web

mv /home/rakes/motoshare-web /home/rakes/my-xampp-docker/

Top comments (0)