Keycloak Defination
What Is Keycloak? (Simple Explanation)
Humanized, Easy-to-Understand Definition
What Keycloak Does (In Simple Words)
Why Keycloak Is Used?
Where Keycloak Is Used?
Example in One Line
What Is a Realm?
What Is a Client (Client ID)?
What Is a Redirect URI?
What Is a Web Origin?
How SSO Session Sharing Works
Implemention of login Sharing Across Multiple Domains using single client id
Implemention of login Sharing Across Multiple Domains using multiple client id
How data saved in keycloack and laravel
how to migrate existing user data in laravel in keycloack
Keycloak Defination
Keycloak is an open-source identity and access management (IAM) system created by Red Hat.
It provides secure login, user management, and Single Sign-On (SSO) for websites, mobile apps, and backend services — without writing your own authentication code.
What Is Keycloak? (Simple Explanation)
Keycloak is an open-source identity and access management (IAM) system created by Red Hat.
It provides secure login, user management, and Single Sign-On (SSO) for websites, mobile apps, and backend services — without writing your own authentication code.
In short:
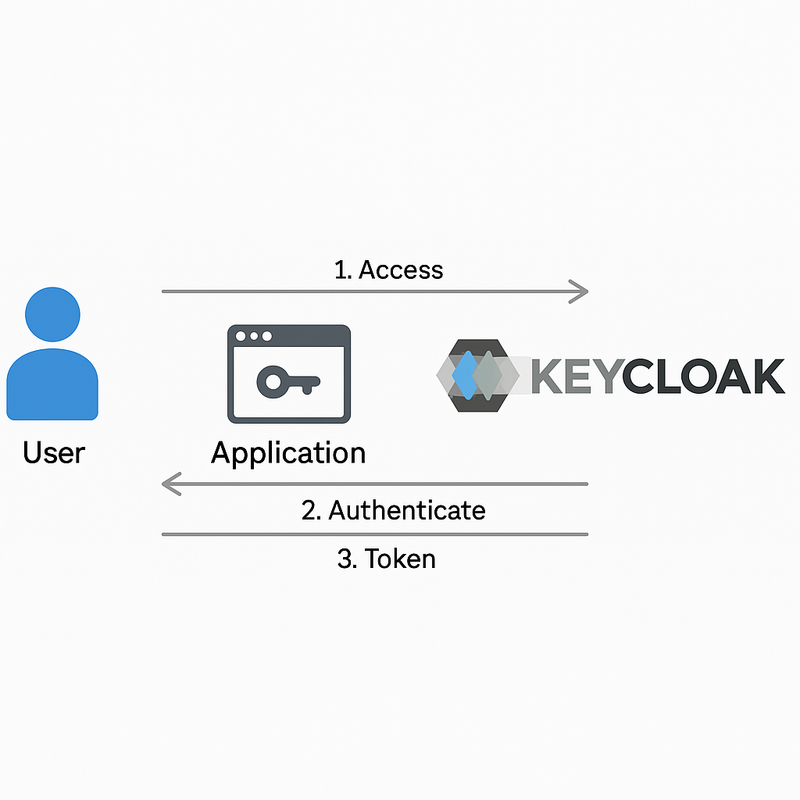
Keycloak handles login so your application doesn’t have to.
Humanized, Easy-to-Understand Definition
Keycloak is like a central login system for all your applications.
Instead of each website having its own login page, user database, and password management, Keycloak provides a single, secure, professional login system that all your apps can use.
What Keycloak Does (In Simple Words)
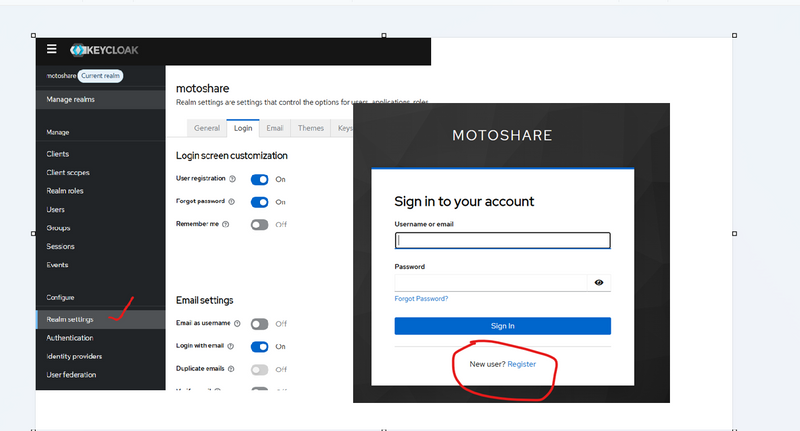
✔ Gives you a login page ready to use
✔ Manages users, passwords, and roles
✔ Allows Google login, Facebook login, etc.
✔ Let’s users log in once and stay logged in across multiple apps
✔ Handles logout everywhere (global logout)
✔ Provides two-factor authentication (2FA)
✔ Provides token-based authentication (JWT, Access Token, ID Token)
✔ Supports SSO across multiple domains and applications
Why Keycloak Is Used?
Because it saves developers from writing complex and risky authentication code.
Without Keycloak:
You manage passwords
You store users
You write login logic
You handle sessions
You build forgot-password
You write 2FA
You integrate Google login manually
You ensure security yourself
With Keycloak:
All of this is already done ✔
Your application just redirects to Keycloak for login and gets a secure token back.
Where Keycloak Is Used?
Multi-domain websites (like your MotoShare)
Enterprise systems with many internal apps
Mobile + Web apps needing shared login
Microservices that require centralized security
SaaS platforms needing tenant-based identity
Government and banking websites
E-commerce + Healthcare systems like MyHospitalNow, MotoShare, PayManagerPro, etc.
Example in One Line
“Login with Keycloak” works exactly like:
“Login with Google”
“Login with Facebook”
“Login with Microsoft”
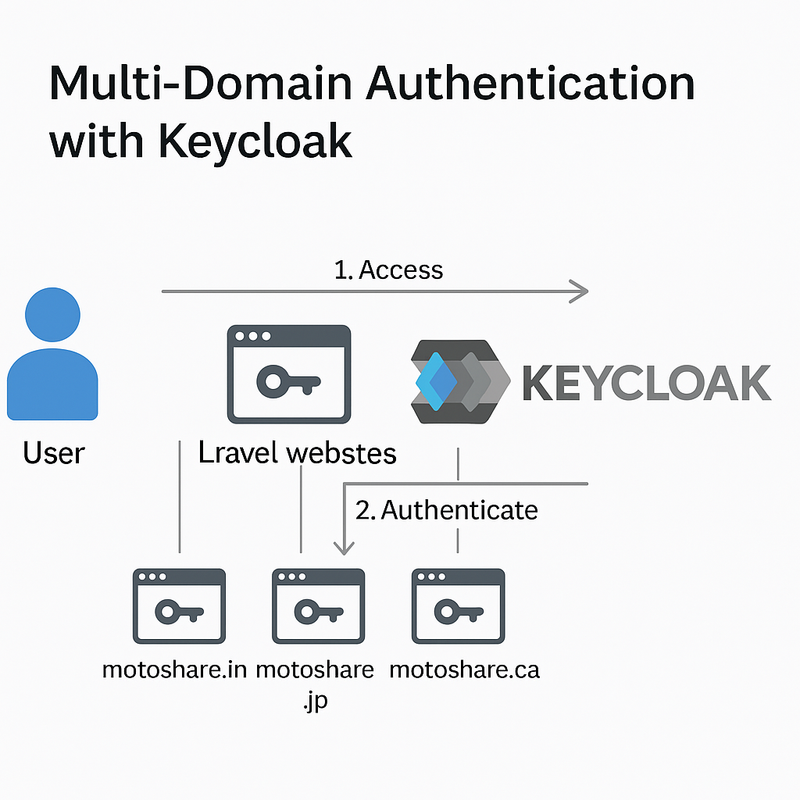
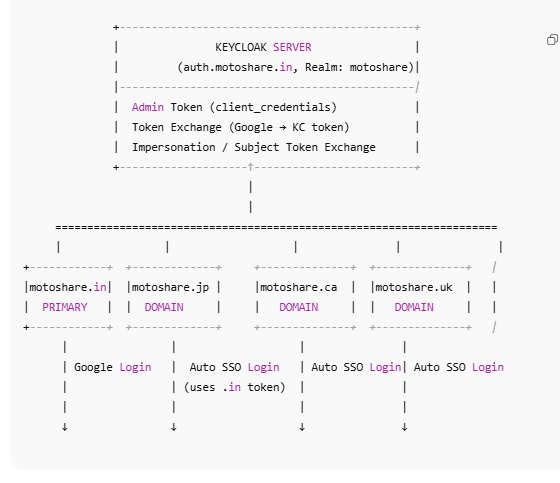
Multi-Domain Keycloak SSO Architecture Diagram
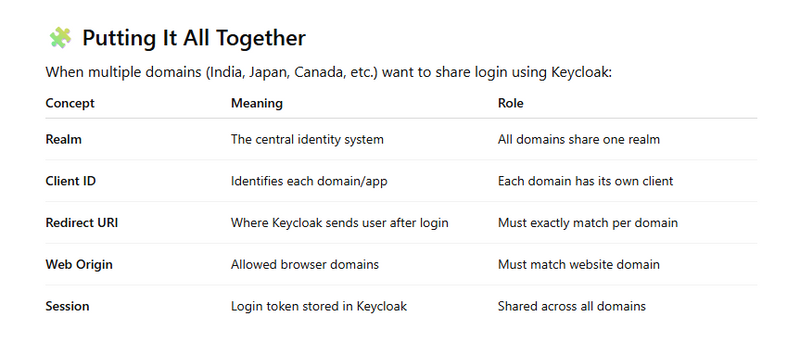
What Is a Realm?
A Realm in Keycloak is like a security container for your entire project.
It stores and manages:
Users
Roles
Groups
Authentication flows
Sessions
Clients (applications)
Each realm works like a separate world, meaning users and login rules inside one realm do not interfere with another realm.
Simple Definition:
A realm is a separate space in Keycloak where you manage all security and identity settings for one system or group of applications.
Example:
If you have multiple applications like:
MotoShare India
MotoShare Japan
MotoShare Canada
And you want all of them to share a single identity system,
you create one realm ― for example, motoshare.
All websites will authenticate inside this one realm.
🧩
What Is a Client (Client ID)?
A Client in Keycloak represents an application that wants to use Keycloak for login.
Every client has a unique Client ID that identifies which application is requesting authentication.
Simple Definition:
A Client ID tells Keycloak “Which application is requesting login?”
Why multiple client IDs?
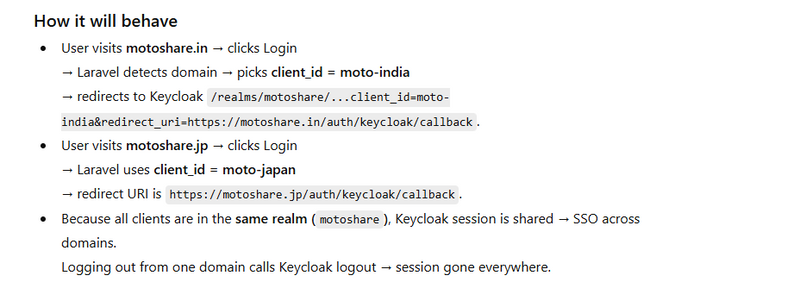
If you have multiple domains like:
motoshare.in → client_id: moto-india
motoshare.jp → client_id: moto-japan
motoshare.ca → client_id: moto-canada
Each domain needs:
Different redirect URIs
Different web origins
Possibly different roles
Different logout URLs
So, you create multiple clients, one for each domain.
🧩
What Is a Redirect URI?
When a user tries to log in, Keycloak authenticates the user and then sends them back to your website.
The place where the user is sent back after login is called the Redirect URI.
Simple Definition:
A Redirect URI is the URL where Keycloak must redirect the user after successful login.
Example:
https://motoshare.jp/auth/keycloak/callback
https://motoshare.in/auth/keycloak/callback
Keycloak will only redirect to approved URIs — this prevents security issues like open redirect attacks.
🧩
What Is a Web Origin?
A Web origin defines which website domains are allowed to make requests to Keycloak.
This is particularly important for:
JavaScript apps
CORS protection
Browser-based flows
Simple Definition:
A Web Origin tells Keycloak which domains are allowed to call it from a browser.
Example:
https://motoshare.jp
https://motoshare.in
🧩
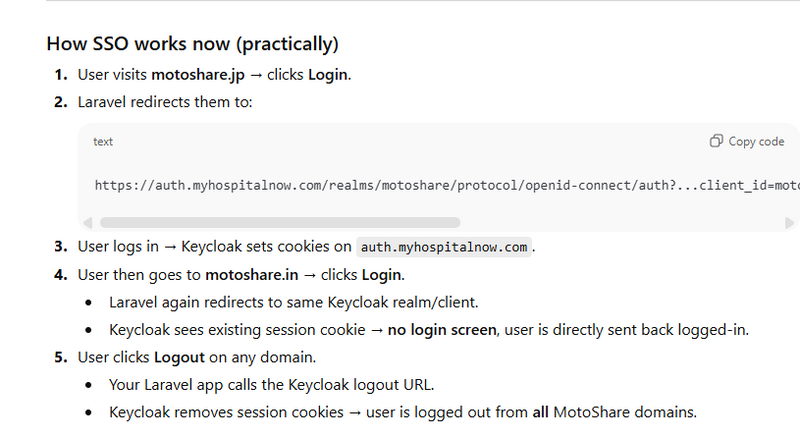
How SSO Session Sharing Works
Keycloak stores session cookies on its own domain, for example:
auth.myhospitalnow.com
This means:
✔ Login on motoshare.jp
→ creates Keycloak session at auth.myhospitalnow.com
✔ Visit motoshare.in
→ it redirects to Keycloak
→ Keycloak sees the existing session
→ auto-login without showing the login form
✔ Logout on any domain
→ Laravel sends logout request to Keycloak
→ Keycloak deletes session
→ Logout happens for all other domains automatically
Implemention of login Sharing Across Multiple Domains using single client id
Nice, this is a good use-case for Keycloak.
I’ll do exactly what you asked:
Step–by–step Keycloak client form (multi-domain)
Step–by–step Laravel code (login + callback + logout)
All written so it works for all your domains:
motoshare.in, motoshare.jp, motoshare.ca, … under one realm.
PART A – Keycloak setup (realm + client)
0️⃣ Realm (once)
You already understand this, but just to be complete:
Realm name: motoshare
This realm will be used by all MotoShare domains.
1️⃣ Create client for websites
Go to: Realm = motoshare → Clients → Create client
Form:
Client type: OpenID Connect
Client ID: motoshare-web
Click Next
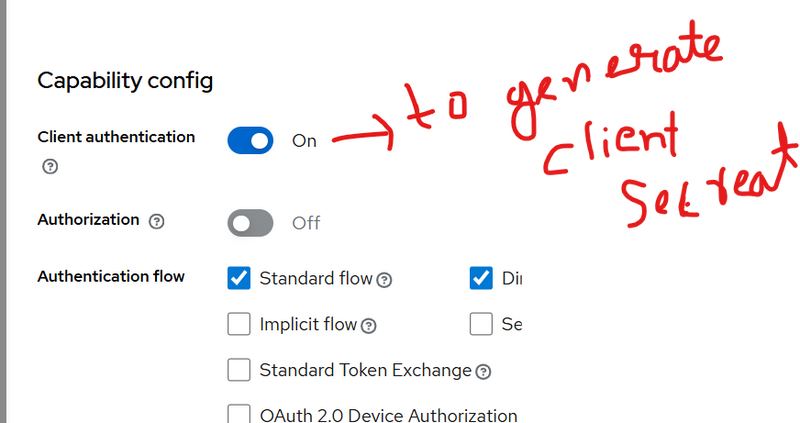
Capability config:
Client authentication: OFF (public client)
Standard flow: ON
Direct access grants: OFF
Service accounts: OFF
Save.
Now you’re on the Settings tab – like in your screenshot.
2️⃣ Fill “Settings” tab for multi-domain
Use these values:
General settings
Client ID: motoshare-web (already set)
Name: MotoShare Website
Other fields: optional.
Access settings
Because you have multiple domains, we will not rely on Root/Home URL.
Root URL: leave empty (recommended)
Home URL: leave empty
If Keycloak UI forces you to set something, use https://motoshare.in,
but it does not affect SSO.
Valid redirect URIs 🔥 (very important)
Add one line per domain where Laravel callback lives:
https://motoshare.in/auth/keycloak/callback
https://motoshare.jp/auth/keycloak/callback
https://motoshare.ca/auth/keycloak/callback
https://motoshare.uk/auth/keycloak/callback
https://motoshare.us/auth/keycloak/callback
https://motoshare.sg/auth/keycloak/callback
https://motoshare.ae/auth/keycloak/callback
https://motoshare.com/auth/keycloak/callback
https://motoshare.ph/auth/keycloak/callback
(Adjust list to your real domains.)
Valid post logout redirect URIs
Where user should land after logout, per domain:
https://motoshare.in/
https://motoshare.jp/
https://motoshare.ca/
https://motoshare.uk/
https://motoshare.us/
https://motoshare.sg/
https://motoshare.ae/
https://motoshare.com/
https://motoshare.ph/
Web origins
Add all domains again (no slash at end):
https://motoshare.in
https://motoshare.jp
https://motoshare.ca
https://motoshare.uk
https://motoshare.us
https://motoshare.sg
https://motoshare.ae
https://motoshare.com
https://motoshare.ph
Click Save.
That’s it on Keycloak side.
PART B – Laravel side (multi-domain aware)
Assumption:
All your MotoShare sites (.in, .jp, .ca, …) are the same Laravel app deployed behind different domains (or same code on multiple servers).
Config below works in all of them.
1️⃣ .env variables
In each MotoShare Laravel project set:
KEYCLOAK_BASE_URL=https://auth.myhospitalnow.com
KEYCLOAK_REALM=motoshare
KEYCLOAK_CLIENT_ID=motoshare-web
Notice: no redirect URI here – we will calculate it dynamically from current domain.
2️⃣ config/keycloak.php
Create config/keycloak.php:
<?php

return [
    'base_url'  => env('KEYCLOAK_BASE_URL', 'https://auth.myhospitalnow.com'),
    'realm'     => env('KEYCLOAK_REALM', 'motoshare'),
    'client_id' => env('KEYCLOAK_CLIENT_ID', 'motoshare-web'),
];
Run:
php artisan config:clear
3️⃣ Routes
In routes/web.php:

use App\Http\Controllers\Auth\KeycloakController;

Route::get('/login', [KeycloakController::class, 'redirectToKeycloak'])->name('login');

Route::get('/auth/keycloak/callback', [KeycloakController::class, 'handleCallback'])
    ->name('keycloak.callback');

Route::post('/logout', [KeycloakController::class, 'logout'])->name('logout');
You can also make logout a GET route if you prefer, but POST is nicer.
4️⃣ Controller – complete flow
Create app/Http/Controllers/Auth/KeycloakController.php:
<?php

namespace App\Http\Controllers\Auth;

use App\Http\Controllers\Controller;
use Illuminate\Http\Request;
use Illuminate\Support\Facades\Http;
use Illuminate\Support\Facades\Auth;
use App\Models\User;

class KeycloakController extends Controller
{
    /**
     * Redirect user to Keycloak login page
     */
    public function redirectToKeycloak(Request $request)
    {
        $baseUrl   = config('keycloak.base_url');    // https://auth.myhospitalnow.com
        $realm     = config('keycloak.realm');       // motoshare
        $clientId  = config('keycloak.client_id');   // motoshare-web

        // redirect_uri must match one of the Valid redirect URIs in Keycloak
        $redirectUri = route('keycloak.callback');   // auto uses current domain

        // Save redirectUri so we can reuse it on callback/logout if needed
        $request->session()->put('kc_redirect_uri', $redirectUri);

        $params = http_build_query([
            'client_id'     => $clientId,
            'redirect_uri'  => $redirectUri,
            'response_type' => 'code',
            'scope'         => 'openid email profile',
        ]);

        $authUrl = "{$baseUrl}/realms/{$realm}/protocol/openid-connect/auth?{$params}";

        return redirect()->away($authUrl);
    }

    /**
     * Handle callback from Keycloak: exchange code for tokens, create/login user
     */
    public function handleCallback(Request $request)
    {
        $code = $request->query('code');

        if (!$code) {
            return abort(400, 'Missing authorization code');
        }

        $baseUrl   = config('keycloak.base_url');
        $realm     = config('keycloak.realm');
        $clientId  = config('keycloak.client_id');
        $redirectUri = $request->session()->get('kc_redirect_uri', route('keycloak.callback'));

        // Token endpoint
        $tokenUrl = "{$baseUrl}/realms/{$realm}/protocol/openid-connect/token";

        $response = Http::asForm()->post($tokenUrl, [
            'grant_type'    => 'authorization_code',
            'client_id'     => $clientId,
            'code'          => $code,
            'redirect_uri'  => $redirectUri,
        ]);

        if ($response->failed()) {
            return abort(500, 'Failed to get tokens from Keycloak');
        }

        $tokens = $response->json();
        $accessToken = $tokens['access_token'] ?? null;
        $idToken     = $tokens['id_token'] ?? null;

        if (!$idToken) {
            return abort(500, 'ID token missing');
        }

        // Decode ID token payload
        $parts   = explode('.', $idToken);
        $payload = json_decode(base64_decode(strtr($parts[1], '-_', '+/')), true);

        $kcUserId   = $payload['sub'] ?? null;
        $email      = $payload['email'] ?? null;
        $firstName  = $payload['given_name'] ?? '';
        $lastName   = $payload['family_name'] ?? '';

        if (!$kcUserId) {
            return abort(500, 'Keycloak user id (sub) missing');
        }

        // Find or create local user (adjust columns to your user table)
        $user = User::firstOrCreate(
            ['kc_user_id' => $kcUserId],
            [
                'name'  => trim($firstName . ' ' . $lastName) ?: $email,
                'email' => $email,
            ]
        );

        // Store tokens in session for logout
        $request->session()->put('kc_tokens', $tokens);

        Auth::login($user, true);

        return redirect()->intended('/'); // or dashboard
    }

    /**
     * Logout locally + from Keycloak (global logout across all domains)
     */
    public function logout(Request $request)
    {
        $baseUrl   = config('keycloak.base_url');
        $realm     = config('keycloak.realm');
        $clientId  = config('keycloak.client_id');

        $tokens = $request->session()->get('kc_tokens', []);
        $idToken = $tokens['id_token'] ?? null;

        // Local Laravel logout
        Auth::logout();
        $request->session()->invalidate();
        $request->session()->regenerateToken();

        // Build post_logout_redirect_uri for **current domain**
        $postLogoutRedirect = url('/');

        // Keycloak end-session endpoint
        $logoutUrl = "{$baseUrl}/realms/{$realm}/protocol/openid-connect/logout";

        $params = [
            'client_id'               => $clientId,
            'post_logout_redirect_uri'=> $postLogoutRedirect,
        ];

        if ($idToken) {
            $params['id_token_hint'] = $idToken;
        }

        // Redirect browser to Keycloak logout
        $logoutQuery = http_build_query($params);
        return redirect()->away("{$logoutUrl}?{$logoutQuery}");
    }
}
This controller:
Works for every MotoShare domain (because route('keycloak.callback') uses current host).
Uses the same realm & client everywhere → SSO.
Stores id_token in session for proper global logout.
5️⃣ Navbar login / logout buttons
In your MotoShare header Blade (common layout):
{{-- Login --}}
<a href="{{ route('login') }}" class="nav-link">
    Login / Register
</a>

{{-- Logout (POST) --}}
<form action="{{ route('logout') }}" method="POST" style="display:inline;">
    @csrf
    <button type="submit" class="nav-link btn btn-link p-0 m-0 align-baseline">
        Logout
    </button>
</form>
No domain-specific code here; same HTML is used on .in, .jp, .ca, etc.
Implemention of login Sharing Across Multiple Domains using multiple client id
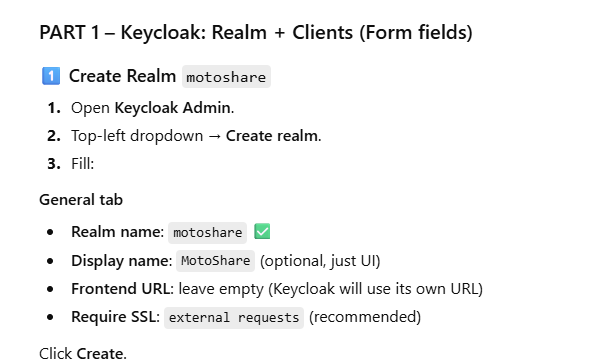
PART 1 – Keycloak: Realm + Clients (Form fields)
1️⃣ Create Realm motoshare
Open Keycloak Admin.
Top-left dropdown → Create realm.
Fill:
General tab
Realm name: motoshare ✅
Display name: MotoShare (optional, just UI)
Frontend URL: leave empty (Keycloak will use its own URL)
Require SSL: external requests (recommended)
Click Create.
Realm is ready.
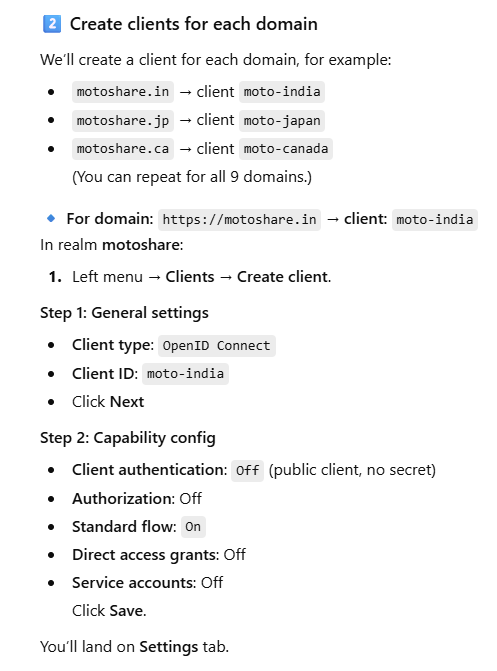
2️⃣ Create clients for each domain
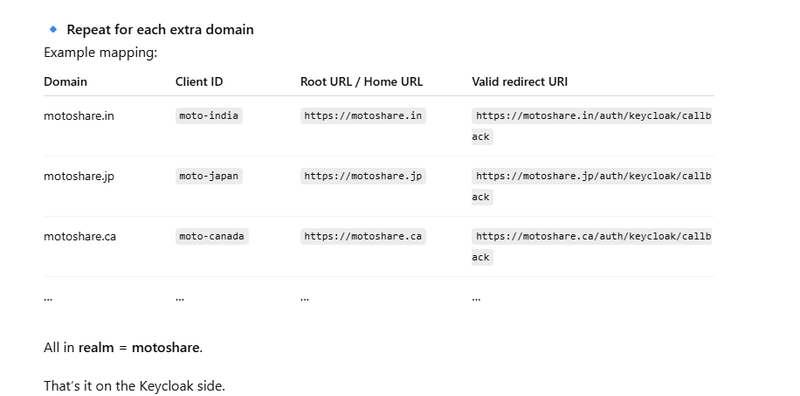
We’ll create a client for each domain, for example:
motoshare.in → client moto-india
motoshare.jp → client moto-japan
motoshare.ca → client moto-canada
(You can repeat for all 9 domains.)
🔹 For domain: https://motoshare.in → client: moto-india
In realm motoshare:
Left menu → Clients → Create client.
Step 1: General settings
Client type: OpenID Connect
Client ID: moto-india
Click Next
Step 2: Capability config
Client authentication: Off (public client, no secret)
Authorization: Off
Standard flow: On
Direct access grants: Off
Service accounts: Off
Click Save.
You’ll land on Settings tab.
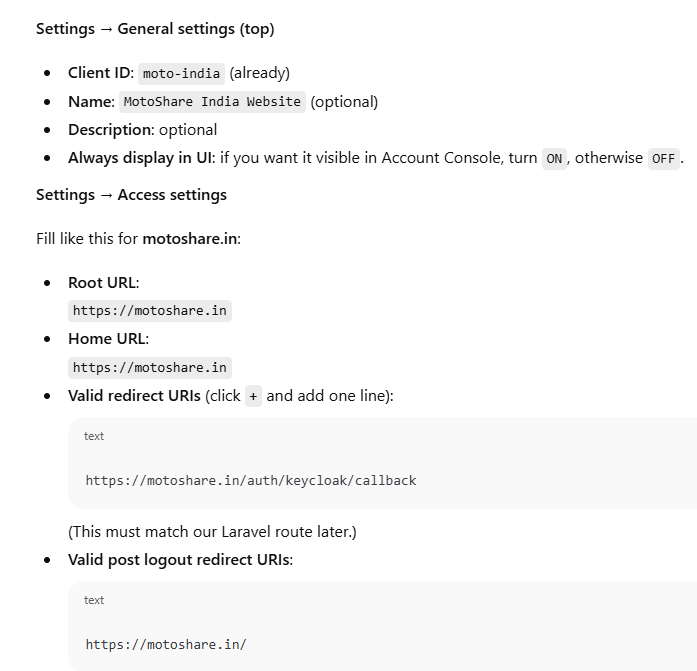
Settings → General settings (top)
Client ID: moto-india (already)
Name: MotoShare India Website (optional)
Description: optional
Always display in UI: if you want it visible in Account Console, turn ON, otherwise OFF.
Settings → Access settings
Fill like this for motoshare.in:
Root URL:
https://motoshare.in
Home URL:
https://motoshare.in
Valid redirect URIs (click + and add one line):
https://motoshare.in/auth/keycloak/callback
(This must match our Laravel route later.)
Valid post logout redirect URIs:
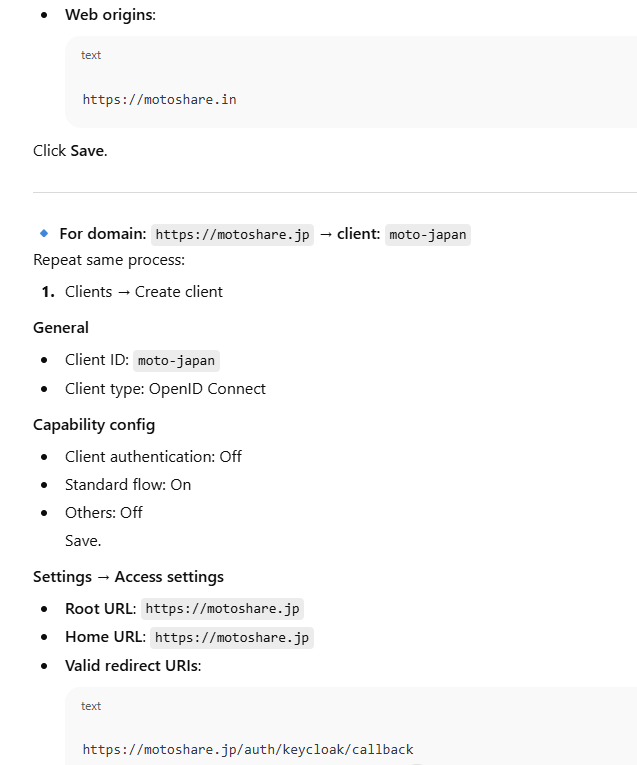
Web origins:
Click Save.
🔹 For domain: https://motoshare.jp → client: moto-japan
Repeat same process:
Clients → Create client
General
Client ID: moto-japan
Client type: OpenID Connect
Capability config
Client authentication: Off
Standard flow: On
Others: Off
Save.
Settings → Access settings
Root URL: https://motoshare.jp
Home URL: https://motoshare.jp
Valid redirect URIs:
https://motoshare.jp/auth/keycloak/callback
Valid post logout redirect URIs:
Web origins:
PART 2 – Laravel: Config + Routes + Controller

1️⃣ .env
In each MotoShare Laravel project (they all talk to same Keycloak):
KEYCLOAK_BASE_URL=https://auth.motoshare.in
KEYCLOAK_REALM=motoshare
KEYCLOAK_CLIENT_ID=motoshare
KEYCLOAK_CLIENT_SECRET=L0JQfUYqSueoxhOSqCi77ihu3LppLsOB


# NEW: Admin service-account client
KEYCLOAK_ADMIN_CLIENT_ID=motoshare-admin
KEYCLOAK_ADMIN_CLIENT_SECRET=6xmOBXIFe9MUCLRM7dqvGkF5M60L0JHG
(We won’t put CLIENT_ID here because it changes per domain.)
2️⃣ config/keycloak.php
Create file:
<?php

return [
    'base_url' => env('KEYCLOAK_BASE_URL', 'https://auth.myhospitalnow.com'),
    'realm'    => env('KEYCLOAK_REALM', 'motoshare'),
];
3️⃣ config/motoshare_clients.php – domain → client map
Create file:
<?php

return [

    'clients' => [

        // India
        'motoshare.in'      => 'moto-india',
        'www.motoshare.in'  => 'moto-india',

        // Japan
        'motoshare.jp'      => 'moto-japan',
        'www.motoshare.jp'  => 'moto-japan',

        // Canada
        'motoshare.ca'      => 'moto-canada',
        'www.motoshare.ca'  => 'moto-canada',

        // Add more domains here
        // 'motoshare.us' => 'moto-usa',
        // 'motoshare.uk' => 'moto-uk',
    ],

];
Then run:
php artisan config:clear
4️⃣ Routes (routes/web.php)
use App\Http\Controllers\Auth\KeycloakController;

// Login redirect to Keycloak
Route::get('/login', [KeycloakController::class, 'redirectToKeycloak'])
    ->name('login');

// Callback from Keycloak
Route::get('/auth/keycloak/callback', [KeycloakController::class, 'handleCallback'])
    ->name('keycloak.callback');

// Logout (Laravel + Keycloak)
Route::post('/logout', [KeycloakController::class, 'logout'])
    ->name('logout');
5️⃣ User model – add Keycloak user id (if not already)
Migration example:
// database/migrations/xxxx_xx_xx_add_kc_user_id_to_users.php

use Illuminate\Database\Migrations\Migration;
use Illuminate\Database\Schema\Blueprint;
use Illuminate\Support\Facades\Schema;

class AddKcUserIdToUsers extends Migration
{
    public function up()
    {
        Schema::table('users', function (Blueprint $table) {
            $table->string('kc_user_id')->nullable()->unique()->after('id');
        });
    }

    public function down()
    {
        Schema::table('users', function (Blueprint $table) {
            $table->dropColumn('kc_user_id');
        });
    }
}
Run:
php artisan migrate
In app/Models/User.php add 'kc_user_id' to $fillable if you use it.
6️⃣ Controller: app/Http/Controllers/Auth/KeycloakController.php
Full code with domain-based client selection:
<?php

namespace App\Http\Controllers\Auth;

use App\Http\Controllers\Controller;
use Illuminate\Http\Request;
use Illuminate\Support\Facades\Http;
use Illuminate\Support\Facades\Auth;
use App\Models\User;

class KeycloakController extends Controller
{
    /**
     * Redirect user to Keycloak login page.
     * Client ID depends on current domain.
     */
    public function redirectToKeycloak(Request $request)
    {
        $baseUrl = config('keycloak.base_url'); // https://auth.myhospitalnow.com
        $realm   = config('keycloak.realm');    // motoshare

        // Current domain: motoshare.in, motoshare.jp, ...
        $domain = $request->getHost();

        // Lookup client_id from our config
        $clientId = config("motoshare_clients.clients.$domain");

        if (!$clientId) {
            abort(500, "No Keycloak client configured for domain: {$domain}");
        }

        // Callback URL must match Valid redirect URI for this domain
        $redirectUri = route('keycloak.callback'); // https://CURRENT_DOMAIN/auth/keycloak/callback

        // Store for later (callback + logout)
        $request->session()->put('kc_redirect_uri', $redirectUri);
        $request->session()->put('kc_client_id', $clientId);

        $queryParams = http_build_query([
            'client_id'     => $clientId,
            'redirect_uri'  => $redirectUri,
            'response_type' => 'code',
            'scope'         => 'openid email profile',
        ]);

        $authUrl = "{$baseUrl}/realms/{$realm}/protocol/openid-connect/auth?{$queryParams}";

        return redirect()->away($authUrl);
    }

    /**
     * Callback from Keycloak: exchange code for tokens, login user locally.
     */
    public function handleCallback(Request $request)
    {
        $code = $request->query('code');
        if (!$code) {
            abort(400, 'Missing authorization code from Keycloak');
        }

        $baseUrl    = config('keycloak.base_url');
        $realm      = config('keycloak.realm');
        $clientId   = $request->session()->get('kc_client_id');
        $redirectUri= $request->session()->get('kc_redirect_uri', route('keycloak.callback'));

        if (!$clientId) {
            abort(500, 'Keycloak client ID missing in session');
        }

        $tokenUrl = "{$baseUrl}/realms/{$realm}/protocol/openid-connect/token";

        $response = Http::asForm()->post($tokenUrl, [
            'grant_type'   => 'authorization_code',
            'client_id'    => $clientId,
            'code'         => $code,
            'redirect_uri' => $redirectUri,
        ]);

        if ($response->failed()) {
            abort(500, 'Failed to fetch tokens from Keycloak');
        }

        $tokens      = $response->json();
        $idToken     = $tokens['id_token']     ?? null;
        $accessToken = $tokens['access_token'] ?? null;

        if (!$idToken) {
            abort(500, 'ID token missing from Keycloak response');
        }

        // Decode ID token
        $parts   = explode('.', $idToken);
        $payload = json_decode(base64_decode(strtr($parts[1], '-_', '+/')), true);

        $kcUserId  = $payload['sub'] ?? null;
        $email     = $payload['email'] ?? null;
        $firstName = $payload['given_name'] ?? '';
        $lastName  = $payload['family_name'] ?? '';

        if (!$kcUserId) {
            abort(500, 'Keycloak user ID (sub) missing in ID token');
        }

        // Create or find local user by kc_user_id
        $user = User::firstOrCreate(
            ['kc_user_id' => $kcUserId],
            [
                'name'  => trim($firstName . ' ' . $lastName) ?: $email,
                'email' => $email,
            ]
        );

        // Save tokens for logout if needed
        $request->session()->put('kc_tokens', $tokens);

        Auth::login($user, true);

        return redirect()->intended('/'); // or to your dashboard
    }

    /**
     * Logout from Laravel and Keycloak.
     */
    public function logout(Request $request)
    {
        $baseUrl = config('keycloak.base_url');
        $realm   = config('keycloak.realm');

        $clientId = $request->session()->get('kc_client_id');
        $tokens   = $request->session()->get('kc_tokens', []);
        $idToken  = $tokens['id_token'] ?? null;

        // Local Laravel logout
        Auth::logout();
        $request->session()->invalidate();
        $request->session()->regenerateToken();

        // Where to go after logout (same domain)
        $postLogoutRedirect = url('/');

        // Build Keycloak logout URL
        $logoutUrl = "{$baseUrl}/realms/{$realm}/protocol/openid-connect/logout";

        $params = [
            'client_id'               => $clientId,
            'post_logout_redirect_uri'=> $postLogoutRedirect,
        ];

        if ($idToken) {
            $params['id_token_hint'] = $idToken;
        }

        $query = http_build_query($params);

        return redirect()->away("{$logoutUrl}?{$query}");
    }
}
7️⃣ Navbar Login / Logout
In your Blade header (for all MotoShare domains):
{{-- Login link --}}
<a href="{{ route('login') }}" class="nav-link">
    Login / Register
</a>

{{-- Logout button (if user is logged in) --}}
@auth
<form action="{{ route('logout') }}" method="POST" style="display:inline;">
    @csrf
    <button type="submit" class="nav-link btn btn-link p-0 m-0 align-baseline">
        Logout
    </button>
</form>
@endauth
How data saved in keycloack and laravel
STEP 1 — Add kc_user_id in Laravel users table
Migration
php artisan make:migration add_kc_user_id_to_users_table
Migration file:
use Illuminate\Database\Migrations\Migration;
use Illuminate\Database\Schema\Blueprint;
use Illuminate\Support\Facades\Schema;

class AddKcUserIdToUsersTable extends Migration
{
    public function up()
    {
        Schema::table('users', function (Blueprint $table) {
            $table->string('kc_user_id')->nullable()->unique()->after('id');
        });
    }

    public function down()
    {
        Schema::table('users', function (Blueprint $table) {
            $table->dropColumn('kc_user_id');
        });
    }
}
Run:
php artisan migrate
✅ STEP 2 — Add Keycloak admin credentials in .env
KEYCLOAK_BASE_URL=https://auth.myhospitalnow.com
KEYCLOAK_REALM=motoshare
KC_ADMIN_USER=admin
KC_ADMIN_PASS=your_admin_password
✅ STEP 3 — Create a Keycloak Service Class
Create file:
app/Services/KeycloakService.php
Paste full code:
<?php
namespace App\Services;
use Illuminate\Support\Facades\Http;
class KeycloakService
{
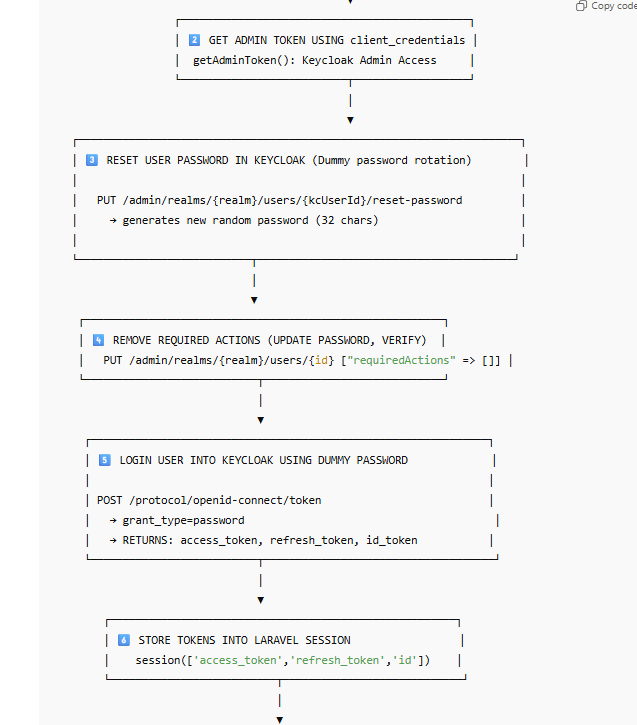
private function getAdminToken()
{
$url = config('keycloak.base_url') . "/realms/master/protocol/openid-connect/token";
$response = Http::asForm()->post($url, [
'client_id' => 'admin-cli',
'username' => env('KC_ADMIN_USER'),
'password' => env('KC_ADMIN_PASS'),
'grant_type'=> 'password',
]);
if ($response->failed()) {
throw new \Exception("Unable to get Keycloak admin token: " . $response->body());
}
return $response['access_token'];
}
public function createUser($email, $firstName, $lastName)
{
$token = $this->getAdminToken();
$url = config('keycloak.base_url') . "/admin/realms/" . config('keycloak.realm') . "/users";
$response = Http::withToken($token)->post($url, [
'username' => $email,
'email' => $email,
'enabled' => true,
'firstName' => $firstName,
'lastName' => $lastName,
]);
if ($response->failed()) {
throw new \Exception("Unable to create Keycloak user: " . $response->body());
}
// Location header contains user ID
$locationHeader = $response->header('Location');
$userId = basename($locationHeader);
return $userId;
}
public function setPassword($kcUserId, $password)
{
$token = $this->getAdminToken();
$url = config('keycloak.base_url') . "/admin/realms/" . config('keycloak.realm') . "/users/{$kcUserId}/reset-password";
$response = Http::withToken($token)->put($url, [
"type" => "password",
"temporary" => false,
"value" => $password
]);
if ($response->failed()) {
throw new \Exception("Unable to set Keycloak password: " . $response->body());
}
}
}
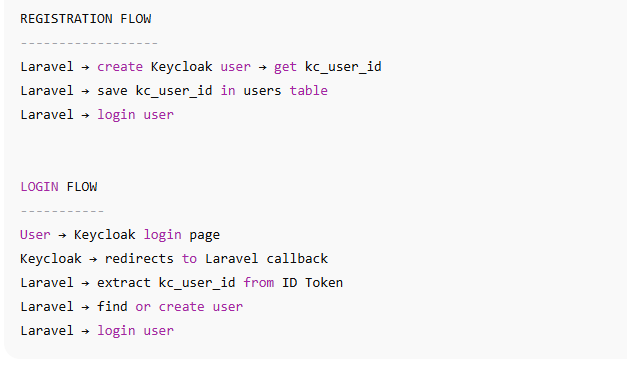
✅ STEP 4 — Laravel Registration: Create User in KEYCLOAK + Laravel
Modify your registration controller:
app/Http/Controllers/Auth/RegisterController.php
Example:
<?php

namespace App\Http\Controllers\Auth;

use App\Http\Controllers\Controller;
use Illuminate\Http\Request;
use App\Models\User;
use App\Services\KeycloakService;
use Illuminate\Support\Facades\Hash;
use Illuminate\Support\Facades\Auth;

class RegisterController extends Controller
{
    public function register(Request $request)
    {
        $request->validate([
            'first_name' => 'required',
            'last_name'  => 'required',
            'email'      => 'required|email|unique:users,email',
            'password'   => 'required|min:6'
        ]);

        $kc = new KeycloakService();

        // 1️⃣ Create user inside Keycloak
        $kcUserId = $kc->createUser(
            $request->email,
            $request->first_name,
            $request->last_name
        );

        // 2️⃣ Set Keycloak password
        $kc->setPassword($kcUserId, $request->password);

        // 3️⃣ Create user inside Laravel
        $user = User::create([
            'kc_user_id' => $kcUserId,
            'name'       => $request->first_name . ' ' . $request->last_name,
            'email'      => $request->email,
            'password'   => Hash::make($request->password),
        ]);

        // 4️⃣ Auto login
        Auth::login($user);

        return redirect()->route('dashboard')->with('success', 'Registration Successful');
    }
}
✅ STEP 5 — Laravel Login via Keycloak (Callback)
When a user logs in via Keycloak, Laravel should save kc_user_id if new.
Your callback must contain:
$kcUserId = $payload['sub']; // Keycloak internal user ID

$user = User::firstOrCreate(
    ['kc_user_id' => $kcUserId],
    [
        'name'  => $firstName . ' ' . $lastName,
        'email' => $email
    ]
);

Auth::login($user, true);
This ensures:
If user exists → login
If new → create
kc_user_id always stored
how to migrate existing user data in laravel in keycloack
PREREQUISITES
You MUST already have:
✔ kc_user_id column in users table
Schema::table('users', function (Blueprint $table) {
    $table->string('kc_user_id')->nullable()->unique();
});
✔ Keycloak admin credentials in .env
KC_ADMIN_USER=admin
KC_ADMIN_PASS=admin_password
KEYCLOAK_BASE_URL=https://auth.myhospitalnow.com
KEYCLOAK_REALM=motoshare
✔ KeycloakService created earlier
⭐ STEP 1 — Create MIGRATION COMMAND in Laravel
This is the easiest and safest method.
📌 1. Create an Artisan command
Run:
php artisan make:command MigrateUsersToKeycloak
📌 2. Open the command file
app/Console/Commands/MigrateUsersToKeycloak.php
Replace with full code:
<?php

namespace App\Console\Commands;

use Illuminate\Console\Command;
use App\Models\User;
use App\Services\KeycloakService;

class MigrateUsersToKeycloak extends Command
{
    protected $signature = 'keycloak:migrate-users';
    protected $description = 'Migrate existing Laravel users to Keycloak';

    public function handle()
    {
        $this->info("Starting migration of users to Keycloak...");
        $kc = new KeycloakService();

        $users = User::whereNull('kc_user_id')->get();

        foreach ($users as $user) {
            try {
                $this->info("➡ Migrating: {$user->email}");

                // Step 1 — Create user in Keycloak
                $kcUserId = $kc->createUser(
                    $user->email,
                    $user->first_name ?? $user->name,
                    $user->last_name ?? ''
                );

                // Step 2 — Set Keycloak password (only if password exists)
                if (!empty($user->password)) {
                    $kc->setPassword($kcUserId, $user->password_raw ?? null);
                }

                // Step 3 — Save Keycloak ID in Laravel
                $user->kc_user_id = $kcUserId;
                $user->save();

                $this->info("✔ Migrated: {$user->email}");

            } catch (\Exception $e) {
                $this->error("❌ Failed for {$user->email}: " . $e->getMessage());
            }
        }

        $this->info("✔ All users migrated successfully.");
    }
}
http://localhost:8080/realms/motoshare/protocol/openid-connect/logout

Top comments (0)