Here's a checklist of different ways to create Docker images, along with examples:
1. Using a Dockerfile
Create a Dockerfile in the project directory.
FROM ubuntu:20.04
RUN apt-get update && apt-get install -y python3
CMD ["python3", "--version"]
Build the image:
docker build -t myapp:1.0 .
Another Example
Docker Container runs as a Root user. This poses a great security threat if you deploy your applications on a large scale inside Docker Containers. You can change or switch to a different user inside a Docker Container using the USER Instruction. For this, you first need to create a user and a group inside the Container.
In this article, we are going to use the USER instruction to switch the user inside the Container from Root to the one which we will create. To do so follow the below steps:
Step 1: Create the Dockerfile
You can specify the instructions to create a new user and group and to switch the user both in the Dockerfile. For this example, we will simply create an Ubuntu Image and use the bash with a different user other than the Root user.
FROM ubuntu:latest
RUN apt-get -y update
RUN groupadd -r user && useradd -r -g user user
USER user
In the above dockerfile, we have pulled the base Image Ubuntu and updated it. We have created a new group called user and a new user inside the group with the same name. Using the USER option, we have then switched the user.
Step 2: Build the Docker Image
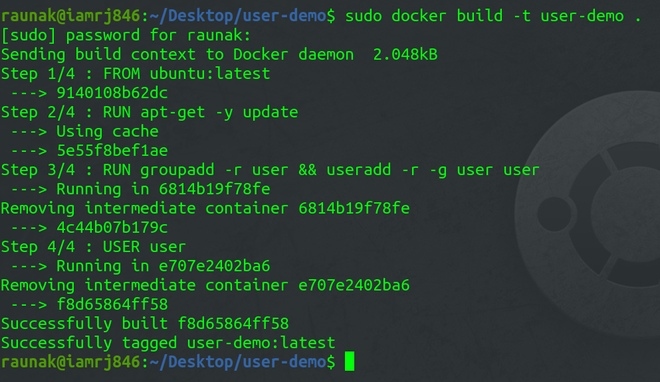
After creating the Dockerfile, we can now create the Docker Image using the Build command.
sudo docker build -t user-demo .
Step 3: Run the Docker Container
Use the Docker Run command to run the Container.
sudo docker run -it user-demo bash

Step 4: Verify the output
You can now check that the default user and the group have now changed to the one we created in the Dockerfile using the id command.
id

2. Using a Remote Dockerfile
Specify a remote Dockerfile URL:
docker build -t myapp:1.0 -f https://raw.githubusercontent.com/username/repo/main/Dockerfile .
3. Building from Different Directory
Build from a different directory:
docker build -t myapp:1.0 -f /path/to/Dockerfile /path/to/build/context
4. Using BuildKit and Build Secrets
Enable BuildKit:
export DOCKER_BUILDKIT=1
Build with secrets:
docker build --secret id=mysecret,src=mysecret.txt -t myapp:1.0 .
5. Building Multi-Stage Dockerfile
Use multi-stage Dockerfile:
FROM node:14 AS builder
WORKDIR /app
COPY . .
RUN npm install && npm run build

FROM nginx:alpine
COPY --from=builder /app/dist /usr/share/nginx/html
The first stage builds the application, and the second stage copies only the necessary artifacts.
6. Using Docker Compose
Create a docker-compose.yml file:
version: '3'
services:
  myapp:
    build:
      context: .
      dockerfile: Dockerfile
    image: myapp:1.0
Build the image using Docker Compose:
docker-compose build
7. Building from a Git Repository
Clone the repository and build the image:
git clone https://github.com/username/repo.git
cd repo
docker build -t myapp:1.0 .
8. Building from a Tarball
Create a tarball of your project:
tar -czvf myapp.tar.gz /path/to/your/project
Load and build the image:
docker load -i myapp.tar.gz
docker build -t myapp:1.0 .
9. Building with BuildKit and Parallelism:
Build with parallelism:
DOCKER_BUILDKIT=1 docker build --progress=plain --output type=local,dest=. -t myapp:1.0
.
These are different approaches to creating Docker images, each with its use case. Choose the method that best fits your project's requirements and your preferred workflow.

Top comments (0)