microservices-in-laravel-framework
laravel-microservices
creating-microservices-in-laravel-repost
QUESTION
Define Microservice ?
Explain Microservice architecture, usage, needs, and advantages.
What is Composer, why we install and update it.
Explain Concept of laravel passport.
What is hasapitoken,notifiable.
Explain Concept of Guard,Api and driver.
Why we Set client credentials in middleware in kernal.php
What is the use php artisan make auth and migrate.
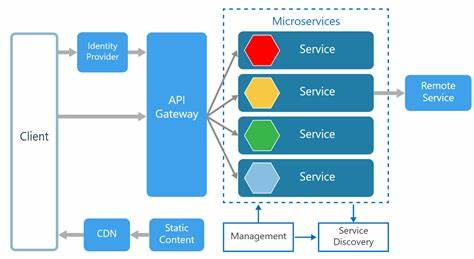
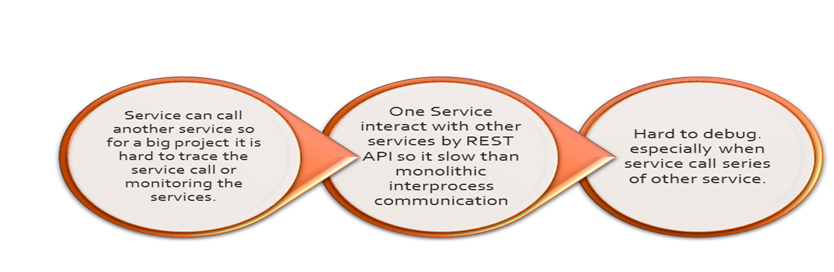
What is role of REST API in Microservice?
Define Microservice
microservice is a collection of freely deployable services.It is an approach to building application software as a collection of independently deployable, compact, modular services. Herein, each service executes a different operation and interacts with one another via a simple, well-defined interface APi

** Explain Microservice architecture, usage, needs, and advantages.**
Microservice architecture

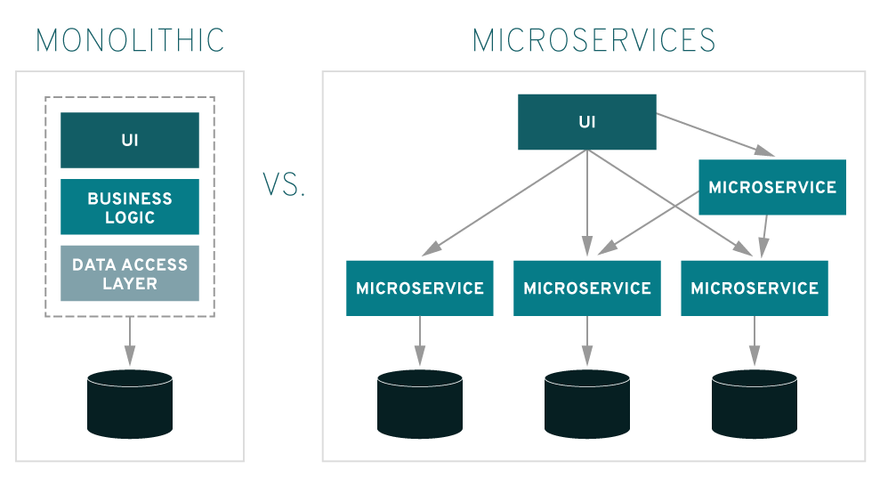
In contrast to the monolithic(formed of a single large block of stone,unchange) architectural style, which is used when an app is constructed as a single structure, microservices is a method to develop a single program as a suite of separate sections, services connected by APIs. It allows the creation of several microservices that can be controlled by various teams and coded in various programming languages
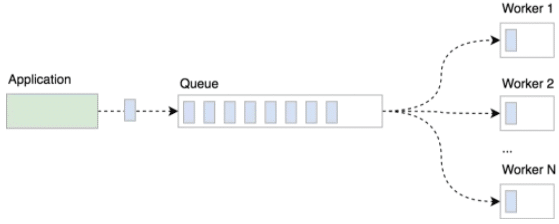
Achieve Seamless Background Task Processing
Speak to us to find how you can achieve a seamless serverless messaging queue and background task solution with free handheld
support.
type of software architecture, unifies massive Laravel applications in a modular way depending on Small Building Blocks that concentrate on a specific duty and activity. Blocks interact with one another via a set of language-independent/language-agnostic APIs
Why we need Microservice ?
microservices-basics
The 3 prime reasons that modern enterprises need microservice architecture are:
● To defend against a failure of traffic or performance surge.
● To scale graciously
● To reduce the number of individuals engaging in each codebase.
Advantages of Laravel Microservices
The microservice design has several advantages. Generally, microservice in Laravel is narrowly targeted, allowing them to be lighter and function considerably faster.
Moreover, it only involves API calls. Different languages may be used for certain services. Notification services, for example, might be written in NodeJs. Therefore,it’s not mandatory to use either Laravel or Lumen.
According to usage, every service can be scaled. In summary, it might work well for huge applications. Besides this, some of the advantages of Laravel Microservices are:
One-on-One Deployment
It is simpler to deploy. There is less danger of system crash when something goes wrong since microservices can be implemented on distinct virtual machines, physical machines, or Docker containers. This is because services are fully independent.
Resilient Module Boundaries
Microservices strengthen modular architecture, which is essential for bigger teams.
The Simplicity of Upgrading & Maintenance
Microservices can easily be upgraded and maintained autonomously because they are built on separation.
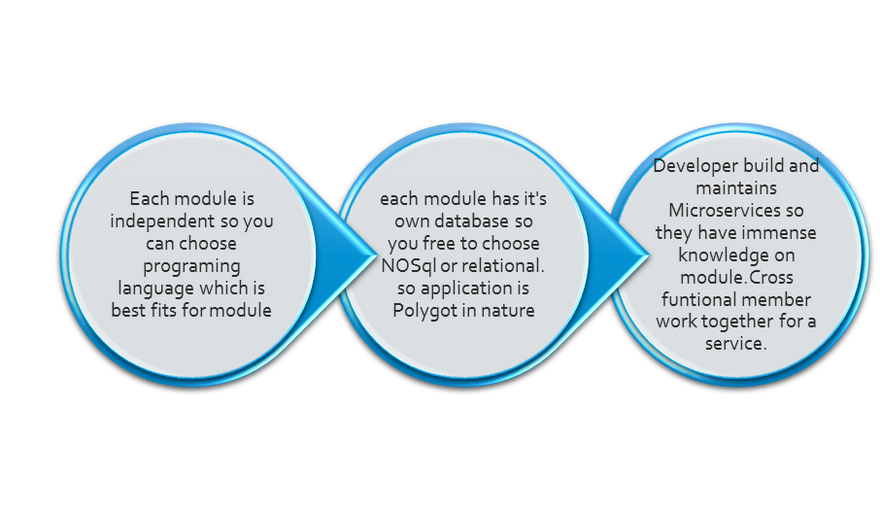
Diversity in Technology
Microservices can be combined by developers using a variety of development frameworks, coding languages, and data-storage systems.
Versatile Across All Coding Languages
Developers can create Microservices in whatever programming language they are comfortable with. Consequently, they can subsequently offer APIs per the REST or RPC protocols.
Get a Customized Roadmap to Success with our Laravel Microservices
Leverage the expertise of our Microservice architecture experts to develop low-latency apps for mission-critical business solutions. Partner with the top Laravel Development Company and relish your success.
When Should You Opt to Go For Laravel Microservices?
Generally, you should use Laravel microservices when your application,
- Is being built from the ground up.
- Is a monolithic program.
- Is rebuilding (or refactoring) a legacy
- Introducing new features to an app that already exists.
- Has a challenge is scaling.
- Has low productivity.
- Becomes challenging to maintain.
- In any of these situations, Laravel microservices framework can be implemented. However, it is frequently employed in order to convert monolithic old applications into a microservices architecture.
In essence, there are 4 basic causes for it:
- Organizational and project scaling challenges emerge because the application grows too large for developers to comprehend.
- The application is divided into various components, each of which has its own separate update and release cycle.
- It is necessary to dynamically scale some system components up and down without affecting other components.
- Different system components have unique industry or technical requirements that compel developers to adopt a programming language or framework other than the team’s standard programming language.
What is Composer, why we install and update it.
Composer is a tool for dependency management in PHP. It allows you to declare the libraries your project depends on and it will manage (install/update) them for you
Composer is an application-level package manager for the PHP programming language that provides a standard format for managing dependencies of PHP software and required libraries.
Composer runs through the command line and installs dependencies (e.g. libraries) for an application. It also allows users to install PHP applications that are available on "Packagist" which is its main repository containing available packages. It also provides autoload capabilities for libraries that specify autoload information to ease usage of third-party code.
Composer is used as an integral part of several popular open-source PHP projects, including Laravel.
After the use of composer install, always use composer update because composer install creates the composer.lock file having all versions of the exact libraries needed to run the Composer. If using composer install, it ignores composer.json and reads only the frozen composer.lock file.
Laravel Passport
Laravel Passport is an easy way to set up an authentication system for your API. As a Laravel package, it uses an OAuth2 server to
perform authentication, creating tokens for user applications that request to interface with the API it protects, and only granting them access if their tokens are validated
Why php artisan make auth and migrate ?
The Passport migrations will create the tables your application needs to store OAuth2 clients and access tokens:
This command will create the encryption keys needed to generate secure access tokens. In addition, the command will create "personal access" and "password grant" clients which will be used to generate access tokens:
guards
Laravel provides different guards like session and token. The session guard maintains the state of the user in each request by cookies, and on the other hand the token guard authenticates the user by checking a valid token in every request.
how-to-create-a-custom-authentication-guard-in-laravel
If the guard defines the logic of authentication, the authentication provider is responsible for retrieving the user from the back-end storage. If the guard requires that the user must be validated against the back-end storage, then the implementation of retrieving the user goes into the authentication provider.
Laravel ships with two default authentication providers—Database and Eloquent. The Database authentication provider deals with the straightforward retrieval of the user credentials from the back-end storage, while Eloquent provides an abstraction layer that does the needful.
In our example, we’ll implement a MongoDB authentication provider that fetches the user credentials from the MongoDB back end.
So that was a basic introduction to guards and providers in the Laravel authentication system. From the next section onwards, we’ll focus on the development of the custom authentication guard and provider!
Let's have a quick look at the list of files that we'll implement throughout the course of this article.
- config/auth.php: It's the authentication configuration file in which we'll add an entry of our custom guard.
- config/mongo.php: It's the file that holds the MongoDB configuration.
- app/Services/Contracts/NosqlServiceInterface.php: It's an interface that our custom Mongo database class implements.
- app/Database/MongoDatabase.php: It's a main database class that interacts with MongoDB.
- app/Models/Auth/User.php: It's the User model class that implements the Authenticable contract.
- app/Extensions/MongoUserProvider.php: It's an implementation of the authentication provider.
- app/Services/Auth/JsonGuard.php: It's an implementation of the authentication guard driver.
- app/Providers/AuthServiceProvider.php: This is an existing file that we'll use to add our service container bindings.
- app/Http/Controllers/MongoController.php: It's a demo controller file that we'll implement to test our custom guard.
Deep Dive Into the Implementation
In this section, we'll go through the implementation of the required files.
The first thing that we need to do is to inform Laravel about our custom guard. Go ahead and enter the custom guard details in the config/auth.php file as shown.
01
02
03
04
05
06
07
08
09
10
11
12
13
14
15
16
17
18
19
20
21
...
...
'guards' => [
'web' => [
'driver' => 'session',
'provider' => 'users',
],
'api' => [
    'driver' => 'token',
    'provider' => 'users',
    'hash' => false,
],

'custom' => [
  'driver' => 'json',
  'provider' => 'mongo',
],
],
...
...
As you can see, we've added our custom guard under the custom key.
Next, we need to add an associated provider entry in the providers section.
01
02
03
04
05
06
07
08
09
10
11
12
13
14
15
16
17
18
...
...
'providers' => [
'users' => [
'driver' => 'eloquent',
'model' => App\User::class,
],
'mongo' => [
'driver' => 'mongo'
],
// 'users' => [
//     'driver' => 'database',
//     'table' => 'users',
// ],
],
...
...
We've added our provider entry under the mongo key.
Finally, let's change the default authentication guard from web to custom.
1
2
3
4
5
6
7
8
...
...
'defaults' => [
'guard' => 'custom',
'passwords' => 'users',
],
...
...
Of course, it won't work yet, as we've not implemented the necessary files yet. And that's what we'll discuss in the next couple of sections.
Set Up the MongoDB Driver
In this section, we'll implement the necessary files that talk to the underlying MongoDB instance.
Let's first create the config/mongo.php configuration file, which holds the default MongoDB connection settings.
1
2
3
4
5
6
7
8
<?php
return [
'defaults' => [
'host' => '{HOST_IP}',
'port' => '{HOST_PORT}',
'database' => '{DB_NAME}'
]
];
Of course, you need to change the placeholder values as per your settings.
Instead of directly creating a class that interacts with MongoDB, we'll create an interface in the first place.
The benefit of creating an interface is that it provides a contract that a developer must adhere to while implementing it. Also, our implementation of MongoDB could be easily swapped with another NoSQL implementation if needed.
Go ahead and create the app/Services/Contracts/NosqlServiceInterface.php interface file with the following contents.
01
02
03
04
05
06
07
08
09
10
11
12
13
14
15
16
17
18
19
20
21
22
23
24
25
26
27
28
29
30
31
32
33
34
35
36
37
38
39
40
41
42
43
<?php
// app/Services/Contracts/NosqlServiceInterface.php
namespace App\Services\Contracts;
Interface NosqlServiceInterface
{
/**
- Create a Document *
- @param string $collection Collection/Table Name
- @param array $document Document
- @return boolean */ public function create($collection, Array $document);
/**
- Update a Document *
- @param string $collection Collection/Table Name
- @param mix $id Primary Id
- @param array $document Document
- @return boolean */ public function update($collection, $id, Array $document);
/**
- Delete a Document *
- @param string $collection Collection/Table Name
- @param mix $id Primary Id
- @return boolean */ public function delete($collection, $id);
/**
- Search Document(s) *
- @param string $collection Collection/Table Name
- @param array $criteria Key-value criteria
- @return array */ public function find($collection, Array $criteria); } It's a pretty simple interface which declares the basic CRUD methods that a class must define that implements this interface.
Now, let's define the app/Database/MongoDatabase.php class with the following contents.
01
02
03
04
05
06
07
08
09
10
11
12
13
14
15
16
17
18
19
20
21
22
23
24
25
26
27
28
29
30
31
32
33
34
35
36
37
38
<?php
// app/Database/MongoDatabase.php
namespace App\Database;
use App\Services\Contracts\NosqlServiceInterface;
class MongoDatabase implements NosqlServiceInterface
{
private $manager;
private $database;
public function __construct($host, $port, $database)
{
$this->database = $database;
$this->manager = new \MongoDB\Driver\Manager( "mongodb://".$host.":".$port."/".$database );
}
/**
-
@see \App\Services\Contracts\NosqlServiceInterface::find()
*/
public function find($collection, Array $criteria)
{
$query = new \MongoDB\Driver\Query($criteria);
$result = $this->manager->executeQuery($this->database.".".$collection, $query);$user = array();
foreach ($result as $row) {
$user['username'] = $row->username;
$user['password'] = $row->password;
}return $user;
}
public function create($collection, Array $document) {}
public function update($collection, $id, Array $document) {}
public function delete($collection, $id) {}
}
Of course, I assume that you've installed MongoDB and the corresponding MongoDB PHP extension.
The __construct method instantiates the MongoClient class with the necessary parameters. The other important method we're interested in is the find method, which retrieves the record based on the criteria provided as method arguments.
So that was the implementation of the MongoDB driver, and I tried to keep it as simple as possible.

Top comments (0)