Building a Real-Time Home Price Prediction Tool with React
How to add new state in exsiting react component
How to store data in database
Building a Real-Time Home Price Prediction Tool with React
Step1: Install Node.js Using the Pre-built Installer
Download the Node.js Installer:
Go to the Node.js official website.
Download the Windows Installer (.msi file) for the LTS version.
step2:Verify Installation:
Open Command Prompt or Git Bash.
Check if Node.js and npm are installed correctly by running the following commands:
node -v
npm -v
npx -v
step2:create project
Create a React App:
With Node.js installed, you can now create a new React application:
npx create-react-app home-price-predictor
===============or==========
npx create-react-app crud-flask --use-npm
This option allows npm to ignore peer dependency conflicts.
Run:
npx create-react-app crud-flask --use-npm
cd crud-flask
npm install --legacy-peer-deps
Force Installation
You can use the --force flag to override the dependency resolution conflicts.
Run:
npx create-react-app crud-flask --use-npm
cd crud-flask
npm install --force
cd home-price-predictor
step3:install dependencies
npm install redux react-redux
npm install redux-devtools-extension redux-thunk
Check package.json
Ensure that the dependencies are listed correctly in your package.json. You should see something like this:
"dependencies": {
  "react": "^17.0.2",
  "react-dom": "^17.0.2",
  "react-redux": "^7.2.4",
  "redux": "^4.1.0",
  "redux-devtools-extension": "^2.13.9",
  "redux-thunk": "^2.3.0"
}
=============or================
npm install redux-devtools-extension redux-thunk --force
step4:create a root React element and render the App component into the DOM, effectively "bootstrapping" your React application.
import React from 'react';
import ReactDOM from 'react-dom/client';
import './index.css';
import App from './App';
import reportWebVitals from './reportWebVitals';

const root = ReactDOM.createRoot(document.getElementById('root'));
root.render(
  <React.StrictMode>
    <App />
  </React.StrictMode>
);

// If you want to start measuring performance in your app, pass a function
// to log results (for example: reportWebVitals(console.log))
// or send to an analytics endpoint. Learn more: https://bit.ly/CRA-vitals
reportWebVitals();
Creating the Root:
ReactDOM.createRoot(document.getElementById('root')): This line finds the DOM element with the ID root and creates a React root using the createRoot method. This is a new way to create a root container in React 18 and above, providing concurrent rendering capabilities.
The root is where the entire React app will be injected into the HTML document. Typically, this root element is found in the index.html file of your public folder, where you have a
Rendering the App:
root.render(...): This method is responsible for rendering the React component tree into the DOM. Here, it renders the App component, wrapped in .
React.StrictMode: This is a tool for highlighting potential problems in an application. It activates additional checks and warnings for its descendants, helping developers identify issues like deprecated APIs, side-effects, and more. It’s only active in development mode and does not affect the production build.
step5: Initial Setup and Configuration
Primary Entry Point: App.js is often the first component that gets rendered in your React application. It's the top-level component that wraps around all other components in your app.
Component Composition: Inside App.js, you import and combine other components to create the overall structure of your application. It's where the "assembly" of the UI begins.
import React from "react";
import { Provider } from "react-redux";
import HomePricePredictor from "./components/HomePricePredictor";
import store from "./store";

function App() {
  return (
    <Provider store={store}>
      <HomePricePredictor />
    </Provider>
  );
}

export default App;
React: Provides the ability to create components using JSX and manages the rendering of these components.
Provider: Connects your React components with the Redux store, allowing state and dispatch to be accessed by any component within the app.
HomePricePredictor: A React component that is likely responsible for interacting with the Redux store and rendering the UI related to home price predictions.
Redux Store: The centralized state management for the application, holding the entire state tree and enabling predictable state transitions.
step6 setting up and managing the state of your React application when using Redux. in store.js
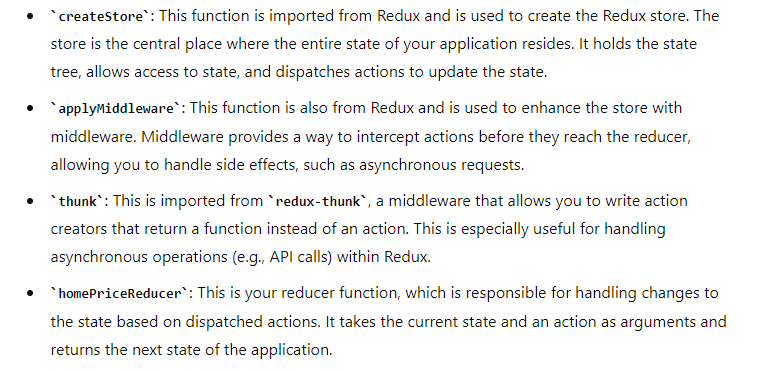
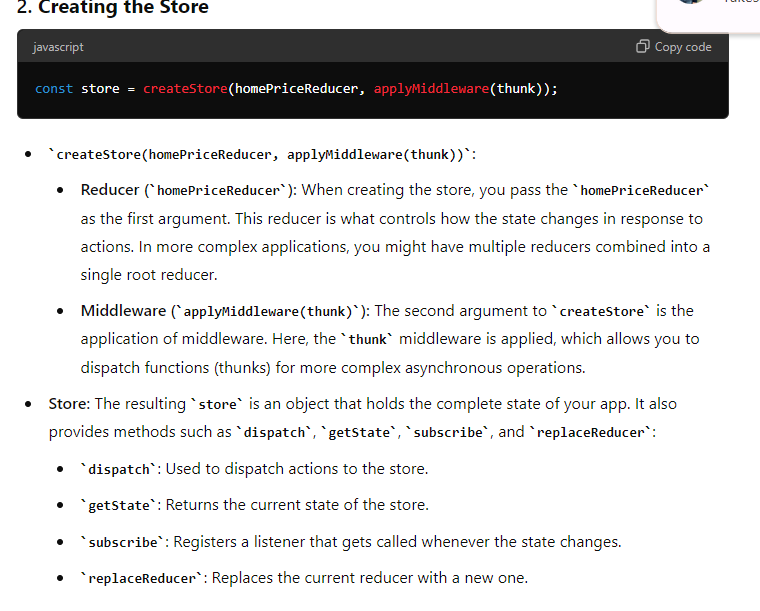
import { createStore, applyMiddleware } from "redux";
import { thunk } from "redux-thunk";  // Named import
import homePriceReducer from "./reducers/homePriceReducer";

const store = createStore(homePriceReducer, applyMiddleware(thunk));

export default store;
export default store;
export default store;: This line exports the store so that it can be used throughout your application. The store is usually imported into the index.js or App.js file and passed to the Provider component from react-redux, which makes the Redux store available to the rest of the application
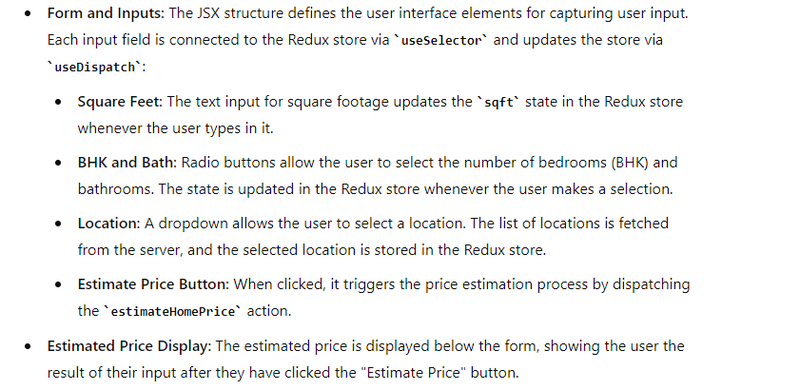
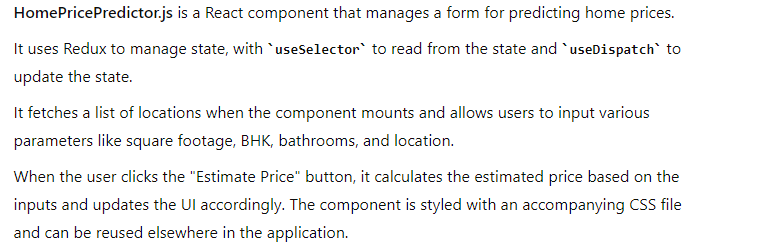
step7: a React component that interacts with a Redux store to manage the state of a home price prediction application
Imports
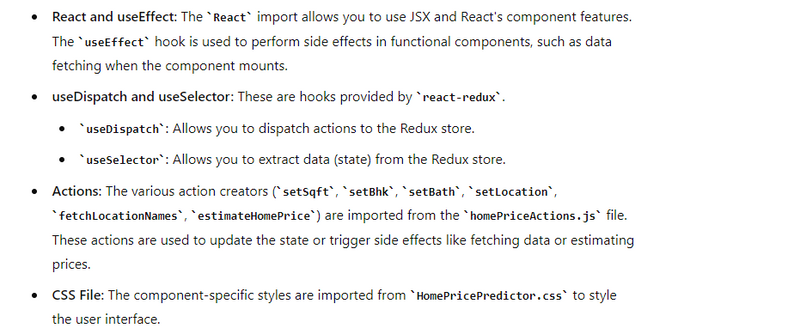
import React, { useEffect } from "react";
import { useDispatch, useSelector } from "react-redux";
import { setSqft, setBhk, setBath, setLocation, fetchLocationNames, estimateHomePrice } from "../actions/homePriceActions";
import './HomePricePredictor.css'
Component Definition
function HomePricePredictor() {
HomePricePredictor: This is a functional component that represents the user interface for predicting home prices. It manages the form inputs for square feet, BHK, bathrooms, and location, and allows the user to estimate the home price.
Redux Hooks and State Variables
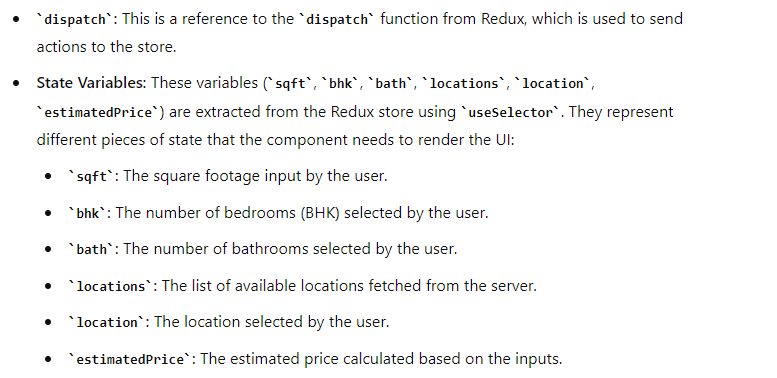
const dispatch = useDispatch();
const sqft = useSelector((state) => state.sqft);
const bhk = useSelector((state) => state.bhk);
const bath = useSelector((state) => state.bath);
const locations = useSelector((state) => state.locations);
const location = useSelector((state) => state.location);
const estimatedPrice = useSelector((state) => state.estimatedPrice)
Side Effect with useEffect
useEffect(() => {
  dispatch(fetchLocationNames());
}, [dispatch]);

Event Handler for Estimating Price
const onClickedEstimatePrice = () => {
  dispatch(estimateHomePrice(sqft, bhk, bath, location));
};

JSX for the UI
return (
  <div>
    <div className="img"></div>
    <form className="form">
      <h2>Area (Square Feet)</h2>
      <label htmlFor="uiSqft"></label>
      <input
        className="area"
        type="text"
        id="uiSqft"
        name="Squareft"
        value={sqft}
        onChange={(e) => dispatch(setSqft(e.target.value))}
      />
      ...
    </form>
  </div>
);
Exporting the Component
export default HomePricePredictor;
export default: This line exports the HomePricePredictor component so that it can be imported and used in other parts of the application, such as in App.js
full code
import React, { useEffect } from "react";
import { useDispatch, useSelector } from "react-redux";
import { setSqft, setBhk, setBath, setLocation, fetchLocationNames, estimateHomePrice } from "../actions/homePriceActions";
import './HomePricePredictor.css';

function HomePricePredictor() {
  const dispatch = useDispatch();
  const sqft = useSelector((state) => state.sqft);
  const bhk = useSelector((state) => state.bhk);
  const bath = useSelector((state) => state.bath);
  const locations = useSelector((state) => state.locations);
  const location = useSelector((state) => state.location);
  const estimatedPrice = useSelector((state) => state.estimatedPrice);

  useEffect(() => {
    dispatch(fetchLocationNames());
  }, [dispatch]);

  const onClickedEstimatePrice = () => {
    dispatch(estimateHomePrice(sqft, bhk, bath, location));
  };

  return (
    <div>
      <div className="img"></div>
      <form className="form">
        <h2>Area (Square Feet)</h2>
        <label htmlFor="uiSqft"></label>
        <input
          className="area"
          type="text"
          id="uiSqft"
          name="Squareft"
          value={sqft}
          onChange={(e) => dispatch(setSqft(e.target.value))}
        />

        <h2>BHK</h2>
        <div className="switch-field">
          {[1, 2, 3, 4, 5].map((val) => (
            <React.Fragment key={val}>
              <input
                type="radio"
                id={`radio-bhk-${val}`}
                name="uiBHK"
                value={val}
                checked={bhk === val}
                onChange={() => dispatch(setBhk(val))}
              />
              <label htmlFor={`radio-bhk-${val}`}>{val}</label>
            </React.Fragment>
          ))}
        </div>

        <h2>Bath</h2>
        <div className="switch-field">
          {[1, 2, 3, 4, 5].map((val) => (
            <React.Fragment key={val}>
              <input
                type="radio"
                id={`radio-bath-${val}`}
                name="uiBathrooms"
                value={val}
                checked={bath === val}
                onChange={() => dispatch(setBath(val))}
              />
              <label htmlFor={`radio-bath-${val}`}>{val}</label>
            </React.Fragment>
          ))}
        </div>

        <h2>Location</h2>
        <div>
          <select
            className="location"
            id="uiLocations"
            value={location}
            onChange={(e) => dispatch(setLocation(e.target.value))}
          >
            <option value="" disabled selected>
              Choose a Location
            </option>
            {locations.map((loc, index) => (
              <option key={index} value={loc}>
                {loc}
              </option>
            ))}
          </select>
        </div>

        <button
          className="submit"
          type="button"
          onClick={onClickedEstimatePrice}
        >
          Estimate Price
        </button>
        <div id="uiEstimatedPrice" className="result">
          <h2>{estimatedPrice}</h2>
        </div>
      </form>
    </div>
  );
}

export default HomePricePredictor;
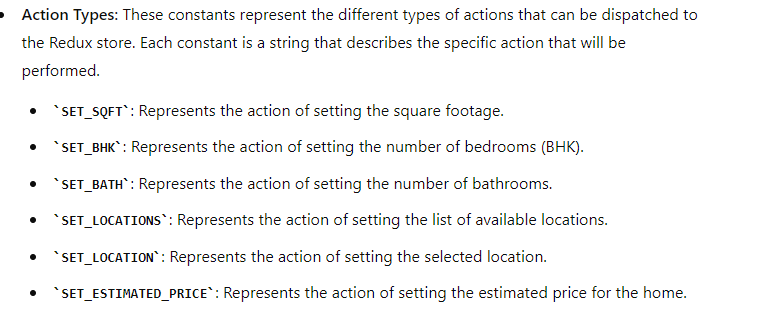
step8:defining and exporting Redux actions and action creators used to manage the state of a home price prediction application. This file includes both standard action creators, which return action objects, and thunk action creators, which allow for asynchronous operations like fetching data from an API. Let's break down the different parts of this file
Action Types
export const SET_SQFT = "SET_SQFT";
export const SET_BHK = "SET_BHK";
export const SET_BATH = "SET_BATH";
export const SET_LOCATIONS = "SET_LOCATIONS";
export const SET_LOCATION = "SET_LOCATION";
export const SET_ESTIMATED_PRICE = "SET_ESTIMATED_PRICE";
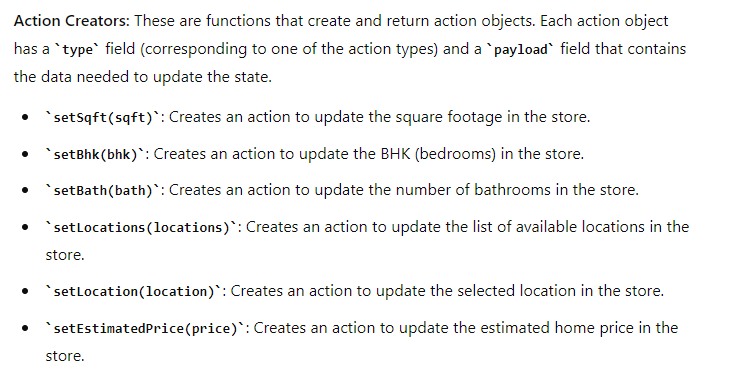
Action Creators
export const setSqft = (sqft) => ({
    type: SET_SQFT,
    payload: sqft,
});

export const setBhk = (bhk) => ({
    type: SET_BHK,
    payload: bhk,
});

export const setBath = (bath) => ({
    type: SET_BATH,
    payload: bath,
});

export const setLocations = (locations) => ({
    type: SET_LOCATIONS,
    payload: locations,
});

export const setLocation = (location) => ({
    type: SET_LOCATION,
    payload: location,
});

export const setEstimatedPrice = (price) => ({
    type: SET_ESTIMATED_PRICE,
    payload: price,
});
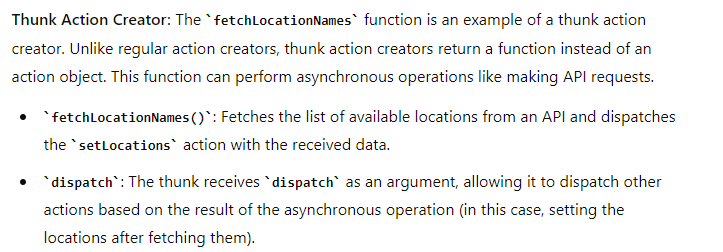
Thunk Action to Fetch Location Names
export const fetchLocationNames = () => {
    return (dispatch) => {
        fetch("http://127.0.0.1:5000/get_location_names")
            .then((response) => response.json())
            .then((data) => {
                dispatch(setLocations(data.locations));
            })
            .catch((error) => {
                console.error("Error fetching locations:", error);
            });
    };
};
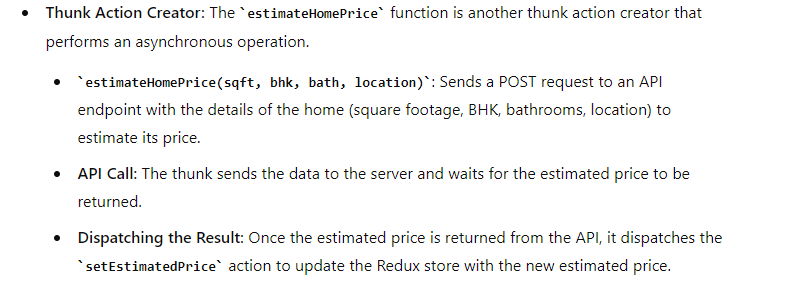
Thunk Action to Estimate Home Price
export const estimateHomePrice = (sqft, bhk, bath, location) => {
    return (dispatch) => {
        const url = "http://127.0.0.1:5000/predict_home_price_react";
        const data = {
            total_sqft: parseFloat(sqft),
            bhk: bhk,
            bath: bath,
            location: location,
        };

        fetch(url, {
            method: "POST",
            headers: {
                "Content-Type": "application/json",
            },
            body: JSON.stringify(data),
        })
        .then((response) => response.json())
        .then((data) => {
            dispatch(setEstimatedPrice(data.estimated_price + " Lakh"));
        })
        .catch((error) => {
            console.error("Error estimating price:", error);
        });
    };
};
full code
// homePriceActions.js

// Action Types
export const SET_SQFT = "SET_SQFT";
export const SET_BHK = "SET_BHK";
export const SET_BATH = "SET_BATH";
export const SET_LOCATIONS = "SET_LOCATIONS";
export const SET_LOCATION = "SET_LOCATION";
export const SET_ESTIMATED_PRICE = "SET_ESTIMATED_PRICE";

// Action Creators
export const setSqft = (sqft) => ({
    type: SET_SQFT,
    payload: sqft,
});

export const setBhk = (bhk) => ({
    type: SET_BHK,
    payload: bhk,
});

export const setBath = (bath) => ({
    type: SET_BATH,
    payload: bath,
});

export const setLocations = (locations) => ({
    type: SET_LOCATIONS,
    payload: locations,
});

export const setLocation = (location) => ({
    type: SET_LOCATION,
    payload: location,
});

export const setEstimatedPrice = (price) => ({
    type: SET_ESTIMATED_PRICE,
    payload: price,
});

// Thunk Action to Fetch Location Names
export const fetchLocationNames = () => {
    return (dispatch) => {
        fetch("http://127.0.0.1:5000/get_location_names")
            .then((response) => response.json())
            .then((data) => {
                dispatch(setLocations(data.locations));
            })
            .catch((error) => {
                console.error("Error fetching locations:", error);
            });
    };
};

// Thunk Action to Estimate Home Price
export const estimateHomePrice = (sqft, bhk, bath, location) => {
    return (dispatch) => {
        const url = "http://127.0.0.1:5000/predict_home_price_react";
        const data = {
            total_sqft: parseFloat(sqft),
            bhk: bhk,
            bath: bath,
            location: location,
        };

        fetch(url, {
            method: "POST",
            headers: {
                "Content-Type": "application/json",
            },
            body: JSON.stringify(data),
        })
        .then((response) => response.json())
        .then((data) => {
            dispatch(setEstimatedPrice(data.estimated_price + " Lakh"));
        })
        .catch((error) => {
            console.error("Error estimating price:", error);
        });
    };
};
step9: define reducer.js is responsible for Reducers are a core concept in Redux, responsible for managing how the state of your application changes in response to actions. The primary role of a reducer is to take the current state and an action, and then return a new state based on that action. The reducer is a pure function, meaning it doesn't produce side effects and always returns the same output given the same inputs.
Imports:
import {
    SET_SQFT,
    SET_BHK,
    SET_BATH,
    SET_LOCATIONS,
    SET_LOCATION,
    SET_ESTIMATED_PRICE,
} from "../actions/homePriceActions";

Initial State:
const initialState = {
    sqft: 1000,
    bhk: 2,
    bath: 2,
    locations: [],
    location: "",
    estimatedPrice: "",
};

Reducer Function:
const homePriceReducer = (state = initialState, action) => {
    switch (action.type) {
        case SET_SQFT:
            return {
                ...state,
                sqft: action.payload,
            };
        case SET_BHK:
            return {
                ...state,
                bhk: action.payload,
            };
        case SET_BATH:
            return {
                ...state,
                bath: action.payload,
            };
        case SET_LOCATIONS:
            return {
                ...state,
                locations: action.payload,
            };
        case SET_LOCATION:
            return {
                ...state,
                location: action.payload,
            };
        case SET_ESTIMATED_PRICE:
            return {
                ...state,
                estimatedPrice: action.payload,
            };
        default:
            return state;
    }
};

full code
// homePriceReducer.js

import {
    SET_SQFT,
    SET_BHK,
    SET_BATH,
    SET_LOCATIONS,
    SET_LOCATION,
    SET_ESTIMATED_PRICE,
} from "../actions/homePriceActions";

const initialState = {
    sqft: 1000,
    bhk: 2,
    bath: 2,
    locations: [],
    location: "",
    estimatedPrice: "",
};

const homePriceReducer = (state = initialState, action) => {
    switch (action.type) {
        case SET_SQFT:
            return {
                ...state,
                sqft: action.payload,
            };
        case SET_BHK:
            return {
                ...state,
                bhk: action.payload,
            };
        case SET_BATH:
            return {
                ...state,
                bath: action.payload,
            };
        case SET_LOCATIONS:
            return {
                ...state,
                locations: action.payload,
            };
        case SET_LOCATION:
            return {
                ...state,
                location: action.payload,
            };
        case SET_ESTIMATED_PRICE:
            return {
                ...state,
                estimatedPrice: action.payload,
            };
        default:
            return state;
    }
};

export default homePriceReducer;
How to add new state in exsiting react component
Add a New Action Type in homePriceActions.js
First, define a new action type for the new state you want to manage. For example, if the new text field is for "property type," you might define a new action type like this:
export const SET_PROPERTY_TYPE = "SET_PROPERTY_TYPE";
- Create an Action Creator in homePriceActions.js Next, create an action creator for updating the new state. This function will generate an action with the type you just defined and the payload containing the new value.
export const setPropertyType = (propertyType) => ({
    type: SET_PROPERTY_TYPE,
    payload: propertyType,
});
- Add the New State to the Initial State in homePriceReducer.js Now, update the initialState in your reducer to include the new state variable with a default value. For example:
const initialState = {
    sqft: 1000,
    bhk: 2,
    bath: 2,
    locations: [],
    location: "",
    estimatedPrice: "",
    propertyType: "",  // New state added here
};
- Handle the New Action in the Reducer (homePriceReducer.js) Next, update the reducer to handle the new action type. Add a new case to the switch statement:
const homePriceReducer = (state = initialState, action) => {
    switch (action.type) {
        // existing cases...

        case SET_PROPERTY_TYPE:
            return {
                ...state,
                propertyType: action.payload,
            };

        default:
            return state;
    }
};
- Update the Component (HomePricePredictor.js) Now, update the component that will use this new piece of state. First, import the new action creator:
import { setPropertyType } from "../actions/homePriceActions";
Use useSelector to access the new state in your component and useDispatch to update it:
const propertyType = useSelector((state) => state.propertyType); // Access the state

const onPropertyTypeChange = (e) => {
    dispatch(setPropertyType(e.target.value)); // Dispatch action on change
};
Finally, add the new text field to your component’s JSX:
<div>
  <h2>Property Type</h2>
  <input
    type="text"
    value={propertyType}
    onChange={onPropertyTypeChange}
  />
</div>
How to store data in database
in homePriceActions.js
export const estimateHomePrice = (sqft, bhk, bath, location) => {
    return (dispatch) => {
        const url = "http://127.0.0.1:5000/predict_home_price_react";
        const data = {
            total_sqft: parseFloat(sqft),
            bhk: bhk,
            bath: bath,
            location: location,
        };

        fetch(url, {
            method: "POST",
            headers: {
                "Content-Type": "application/json",
            },
            body: JSON.stringify(data),
        })
        .then((response) => response.json())
        .then((data) => {
            dispatch(setEstimatedPrice(data.estimated_price + " Lakh"));
        })
        .catch((error) => {
            console.error("Error estimating price:", error);
        });
    };
};
*In backend python flask *
@main.route('/predict_home_price_react', methods=['GET', 'POST'])
def predict_home_price_react():
    data = request.get_json()  # Make sure you're correctly getting JSON data
    if not data:
        return jsonify({'error': 'Invalid input'}), 400

    total_sqft = data.get('total_sqft')
    location = data.get('location')
    bhk = data.get('bhk')
    bath = data.get('bath')

    if not total_sqft or not location or not bhk or not bath:
        return jsonify({'error': 'Missing data'}), 400

    estimated_price = float(util.get_estimated_price(location, total_sqft, bhk, bath))

    # Save to the new HomePricePrediction table
    prediction = HomePricePrediction(
        location=location,
        bhk=bhk,
        bath=bath,
        total_sqft=total_sqft,
        predicted_price=estimated_price
    )
    db.session.add(prediction)
    db.session.commit()
    return jsonify({'estimated_price': estimated_price})

Top comments (0)