django-forms-handling-and-validation
django-form-validation
django-forms
django-form-validation
video
Django Forms Handling & Django Form Validation – Master the Concept
These days websites have become highly personalized resulting to some awesome applications for users. This personalization is an impact of user-data on the server. And, that data is highly valuable for you as it is used to provide a better user experience and more functionality. But, it also has some serious security consequences and legal issues. Therefore, when designing any user-input, keep in mind that user-data is highly valuable.
So the question that should arise in your mind, how do we take user input and utilize the same? The answer is simple through forms.
After completing this Django forms tutorial, you will have a great command over these concepts:
Forms
HTTP, GET & POST Method
Django Forms
Django Form Class
Django Form Validation
django-forms-handling-and-validation
django-form-validation
django-forms
django-form-validation
Django provides a Form class which is used to create HTML forms. It describes a form and how it works and appears.
It is similar to the ModelForm class that creates a form by using the Model, but it does not require the Model.
Each field of the form class map to the HTML form element and each one is a class itself, it manages form data and performs validation while submitting the form.
Lets see an example, in which we are creating some fields too.
from django import forms
class StudentForm(forms.Form):
    firstname = forms.CharField(label="Enter first name",max_length=50)
    lastname  = forms.CharField(label="Enter last name", max_length = 100)
A StudentForm is created that contains two fields of CharField type. Charfield is a class and used to create an HTML text input component in the form.
The label is used to set HTML label of the component and max_length sets length of an input value.
When rendered, it produces the following HTML to the browser.
<label for="id_firstname">Enter first name:</label>
 <input type="text" name="firstname" required maxlength="50" id="id_firstname" />
<label for="id_lastname">Enter last name:</label> <input type="text" name="lastname" required maxlength="100" id="id_lastname" />
Note: Django Form does not include
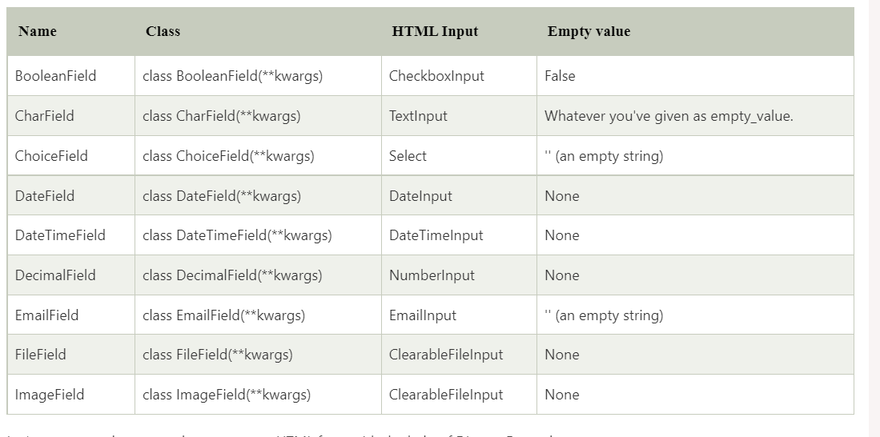
tags, or a submit button. We'll have to provide those ourselves in the template.Commonly used fields and their details are given in the below table.
Let's see a complete example to create an HTML form with the help of Django Form class.
Building a Form in Django
Suppose we want to create a form to get Student information, use the following code.
from django import forms


class StudentForm(forms.Form):
    firstname = forms.CharField(label="Enter first name",max_length=50)
    lastname  = forms.CharField(label="Enter last name", max_length = 100)
Put this code into the forms.py file.
Instantiating Form in Django
Now, we need to instantiate the form in views.py file. See, the below code.
// views.py
from django.shortcuts import render
from myapp.form import StudentForm

def index(request):
    student = StudentForm()
    return render(request,"index.html",{'form':student})
Passing the context of form into index template that looks like this:
// index.html
<!DOCTYPE html>
<html lang="en">
<head>
    <meta charset="UTF-8">
    <title>Index</title>
</head>
<body>
<form method="POST" class="post-form">
        {% csrf_token %}
        {{ form.as_p }}
        <button type="submit" class="save btn btn-default">Save</button>
</form>
</body>
</html>
Provide the URL in urls.py
from django.contrib import admin
from django.urls import path
from myapp import views
urlpatterns = [
    path('admin/', admin.site.urls),
    path('index/', views.index),
]
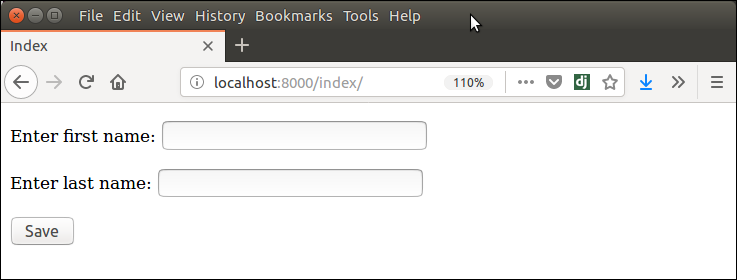
Run Server and access the form at browser by localhost:8000/index, and it will produce the following output.
There are other output options though for the / pairs:
{{ form.as_table }} will render them as table cells wrapped in <tr> tags
{{ form.as_p }} will render them wrapped in <p> tags
{{ form.as_ul }} will render them wrapped in <li> tags
Django Form Validation
Django provides built-in methods to validate form data automatically. Django forms submit only if it contains CSRF tokens. It uses uses a clean and easy approach to validate data.
The is_valid() method is used to perform validation for each field of the form, it is defined in Django Form class. It returns True if data is valid and place all data into a cleaned_data attribute.
Let's see an example that takes user input and validate input as well.
Django Validation Example
This example contains the following files and code.
// models.py
from django.db import models
class Employee(models.Model):
    eid = models.CharField(max_length=20)
    ename = models.CharField(max_length=100)
    econtact = models.CharField(max_length=15)
    class Meta:
        db_table = "employee"
Now, create a form which contains the below code.
// forms.py

from django import forms
from myapp.models import Employee

class EmployeeForm(forms.ModelForm):
    class Meta:
        model = Employee
        fields = "__all__"
Instantiate the form
Instantiate the form, check whether request is post or not. It validate the data by using is_valid() method.
//views.py

def emp(request):
    if request.method == "POST":
        form = EmployeeForm(request.POST)
        if form.is_valid():
            try:
                return redirect('/')
            except:
                pass
    else:
        form = EmployeeForm()
    return render(request,'index.html',{'form':form})
Index template that shows form and errors.
// index.html
<!DOCTYPE html>
<html lang="en">
<head>
    <meta charset="UTF-8">
    <title>Index</title>
</head>
<body>
<form method="POST" class="post-form" enctype="multipart/form-data">
        {% csrf_token %}
        {{ form.as_p }}
        <button type="submit" class="save btn btn-default">Save</button>
</form>
</body>
</html>
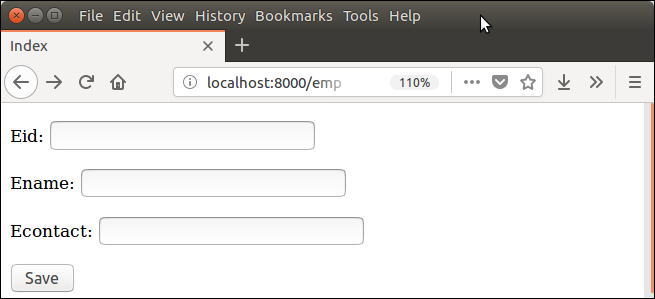
Start server and access the form.
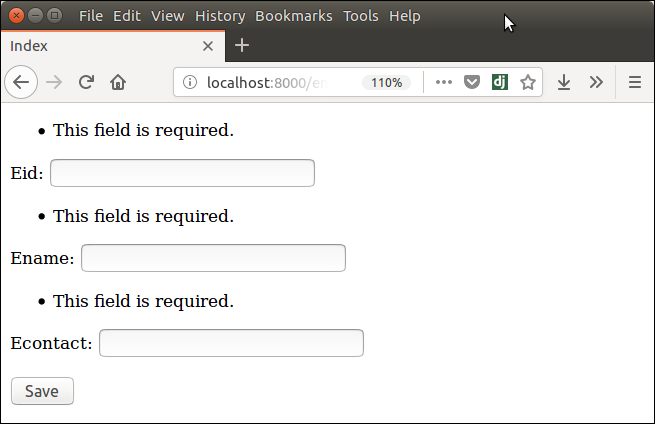
It validates each field and throws errors if any validation fails.

Top comments (0)