Refer here
Refer here
Refer here
django-class-based-views
django-detailview
django-listview
In this tutorial, we will learn about the view component of Django in detail, discuss the difference between class-based views and function-based views and the process of creating views in Django. Before starting this tutorial, we recommend you to complete Django models tutorial as we will be learning how to access the data of models in view.
Django as an MVC architecture follows one design philosophy, loosely coupled. By loosely coupled we mean that modifying an individual component should have a small to no effect on other components.
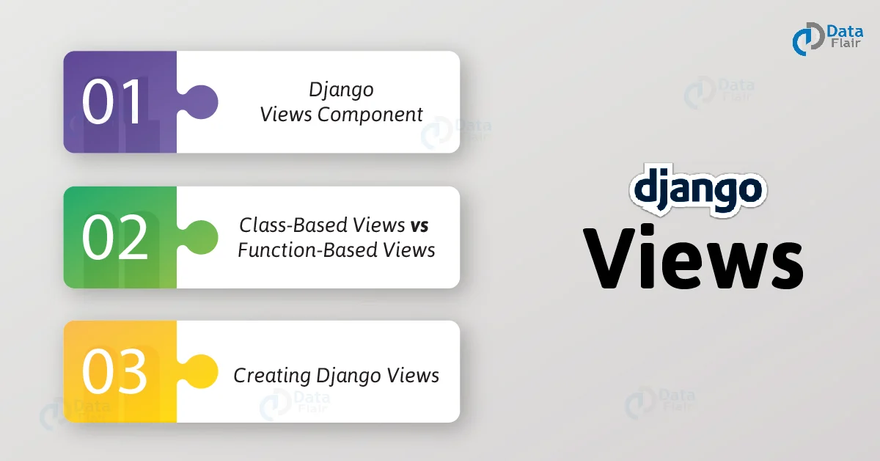
Django Views Component
- Views in MVC Architecture View is a component in Django MVC architecture that contains the logic which is to be displayed to the user. In a traditional MVC architecture, it implements that by coordinating with both model and controller. It poses a problem that the views depends on both model and controller so it renders by two components. This violates the design philosophy of MVC since one component is dependent on other components too much.
Website design changes much often than the business logic and view most of the times contain both of them thus coordinating with both the controller and model. This makes it difficult for front-end and back-end developers to coordinate their data with components for displaying.
- Views in MTV Architecture The above-mentioned problems were solved by Django’s MTV architecture where the view was only containing the business logic, i.e., which webpage to be rendered at what input and also became a mediator between the model and template.
One of the important questions that arise from here – Is view the controller in Django?
The answer is ‘no’ because Django Views are only corresponding to the particular template, they are technically not selecting a model or view by themselves.
This question arises because it is the work of the controller in MVC to select the view for the particular data.
Now, the question that would be arising in your mind – Which component is the controller?
Actually, it’s the Django Framework itself and therefore, it’s the best framework because the controller is the most complex part of the code as it has to control and communicate with every component, efficiently. Therefore, it needs to be written precisely and that is solved by the Django Framework.
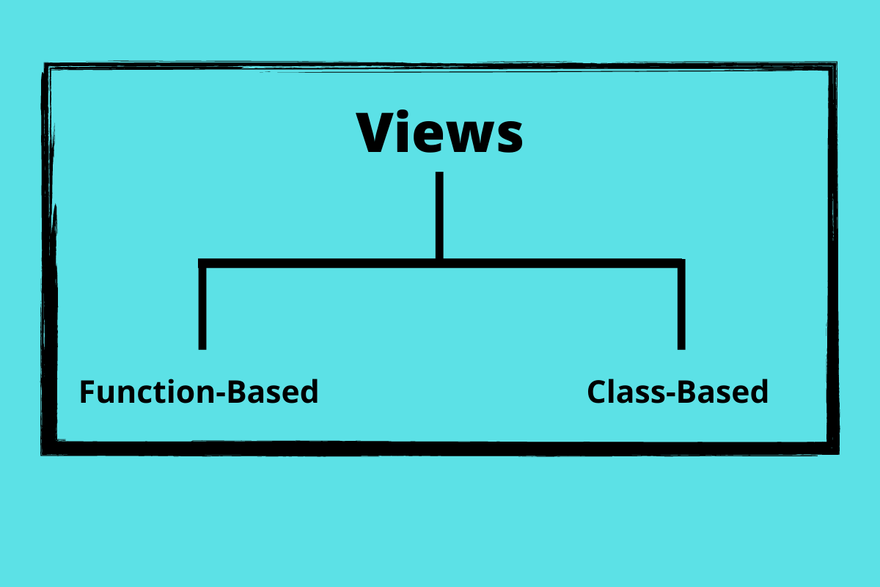
Now, we will discuss the difference between the views supported by Django; Class- based Views and Function-based Views.
Class-Based Views vs Function-Based Views
Class-Based Views
Django firstly started with only Function-Based Views, but then added Class-Based Views as a way to templatize functionality. Therefore, we didn’t have to write boilerplate (i.e. the same code) code over and over again. CBVs is a way to increase productivity and create it so that we don’t have to write much code.
Organization of code in relation to specific HTTP methods (GET, POST, etc.) displays as separate methods instead of conditional branching.
Object directed techniques like mixins (multiple inheritances) factors code into reusable components.
The Class-Based Views don’t take place of Function-Based Views but thanks to the inheritance they are easy in implementing and are more optimal.
Function-Based Views
A View function, or view for short, is a Python function that takes a Web request and gives a Web response. This response is the HTML contents of a Web page, or an XML document, or a redirect, or a 404 error, or an image. The View itself consists of whatever arbitrary logic requires to return that response.
This function is easy in implementing and it’s quite useful but the main drawback is that on a large size Django project, there are generally many similar functions in the views. One instance is that all objects of a Django project have CRUD operations, therefore this code repeats unnecessarily. This was the main reason for the creation of Generic Class-based views.
Creating Django Views in Easy Steps
In the previous tutorial we generated a model now we will be connecting our model with the view. We have actually used view.py in our Django App tutorial but here we will perform it again from the beginning.
Here are the steps to create Django views for our project:
Step 1. In our student app directory create a new python file named urls.py.
Step 2. Inside that file copy this code as it is.
from django.urls import path
from . import views
urlpatterns = [
path('', views.student_show, name = 'student_show'),
]
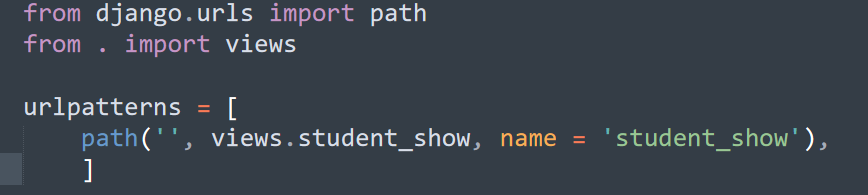
Understanding the code:
Here, we are creating a urls file for our application rather than the whole project. This urls file will contain all the URLs inside it related to our app. Thus, we get a cleaner main urls_config file.
Now, we will be connecting our project with the application.
Step 3. Open the urls.py file of the project that is in the root folder.
Step 4. Now add this item in the urlpatterns list.
path(‘student/’, include(‘student.urls’)),
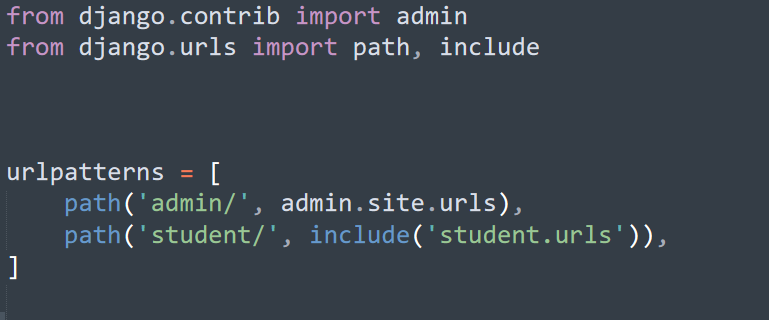
Understanding the Code:
This code is actually directing our main urls file to locate and run urls file in the student directory when the URL contains the ending as student/.
Explore Unique Django Features in detail
Step 5. Now in the student directory, open the views.py file
from django.shortcuts import render
from django.http import HttpResponse
def student_show(request):
    x = []
    for i in range(10):
        x.append(i)
    return HttpResponse("<h1>DataFlair Django Tutorials</h1>The Digits are {0}".format(x))

Understanding the Code:
Here we have imported HttpResponse from the library django.http because we need to respond in the HTTP format. Also, we are passing the parameter request to the function.
Every view function will have their first parameter as request.
After that, we wrote a simple python program of storing digits 0-9 in a list and we passed on that list as a string to the HttpResponse. It will then covert the same as HTTP and that will be returned to our browser as HTML which then renders it that way.
This Views file is special as you can see, we are passing HTML as a string and that presents on the browser.
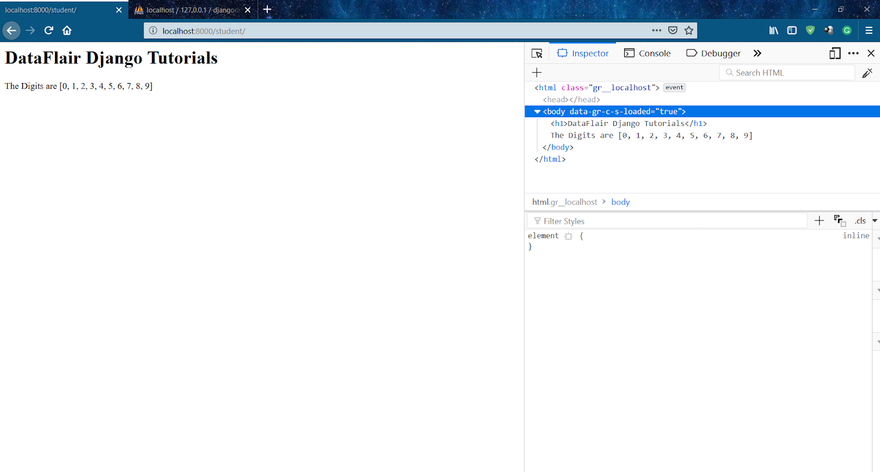
Step 6. To run this view simply type in the url bar, http://localhost:8000/student/
Make sure to run the Django server. Now, you can imagine, with that level of integration of python with the web, you can easily play with your data in Django.
The output of the above view should be:
Django View Simple Example
//views.py
import datetime
# Create your views here.
from django.http import HttpResponse
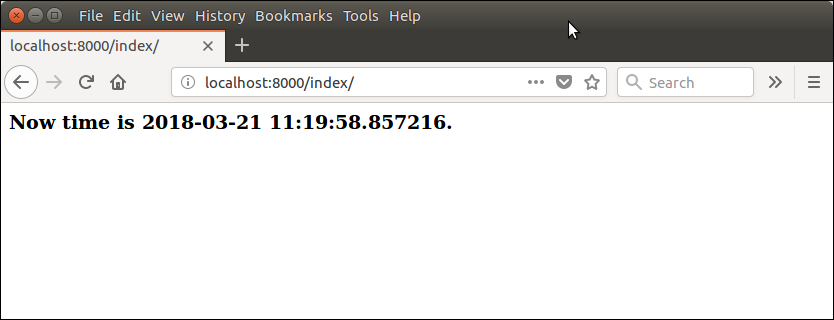
def index(request):
now = datetime.datetime.now()
html = "<html><body><h3>Now time is %s.</h3></body></html>" % now
return HttpResponse(html) # rendering the template in HttpResponse
Let's step through the code.
First, we will import DateTime library that provides a method to get current date and time and HttpResponse class.
Next, we define a view function index that takes HTTP request and respond back.
View calls when gets mapped with URL in urls.py. For example
path('index/', views.index),
Output:
Django View Example
// views.py
from django.shortcuts import render
# Create your views here.
from django.http import HttpResponse, HttpResponseNotFound
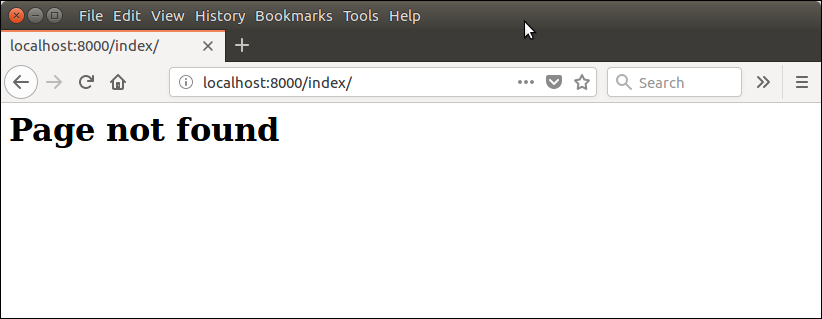
def index(request):
a = 1
if a:
return HttpResponseNotFound('<h1>Page not found</h1>')
else:
return HttpResponse('<h1>Page was found</h1>') # rendering the template in HttpResponse
Output:
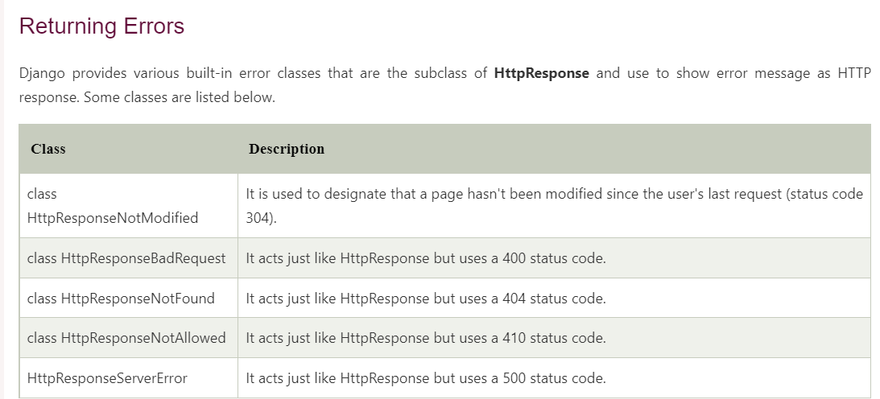
Django View HTTP Decorators
HTTP Decorators are used to restrict access to view based on the request method.
These decorators are listed in django.views.decorators.http and return a django.http.HttpResponseNotAllowed if the conditions are not met.
Syntax
require_http_methods(request_method_list)
Django Http Decorator Example
//views.py
from django.shortcuts import render
# Create your views here.
from django.http import HttpResponse, HttpResponseNotFound
from django.views.decorators.http import require_http_methods
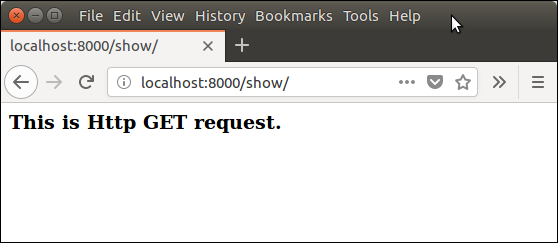
@require_http_methods(["GET"])
def show(request):
return HttpResponse('<h1>This is Http GET request.</h1>')
This method will execute only if the request is an HTTP GET request.
//urls.py
from django.contrib import admin
from django.urls import path
from myapp import views
urlpatterns = [
    path('admin/', admin.site.urls),
    path('index/', views.index),
    path('show/',  views.show),
]
Output:
What exactly is a view?
View function or simply a view can be thought of as a python function which, on taking up request returns a specific response to it. The response can be anything from a simple text to an HTML file to something like an image etc.
In a typical web application, we have views such as:
- Homepage View
- Detail/instruction View
- Help page View
- FAQ View And so on.
Each view has a different URL endpoint that can be requested and it links to a particular view function in views.py
Now we will look into different types of views.
Function-based Views
In this type, Views are written as Python functions taking in request(HttpRequest) object as argument and returning a corresponding response(HttpResponse).
Django function-based views are used to make CRUD operations(Create, Retrieve, Update, and Delete). You will learn more about this later.
So all 4 will have different View – create view, Retrieve view, update view, delete view
Class-based Views
As the names suggest, the views are written as Classes instead of Functions to return the HTTP response to the particular requests. Hence in this, we can have all CRUD as methods thus having all of them in the same view.
Also, class-based Views are dived further into many types, few of which are important and we are going to learn in the upcoming articles.
Detail View
List View
Mixins
Now since we are dealing with responses and mainly HTTP responses, we should learn what they are.
HTTP Status Codes
These HTTP attributes are used to give more information to the client regarding the responses from the webserver. The most common and frequently used HTTP attributes that we need to learn are:
HTTP 200 – status OK
This means that the status is OK, which can be thought of as that everything was carried out correctly.HTTP 201 – status created
This means that the status is created, we might use this one under Create/POST method.HTTP 400 – Bad request
This means that the server will not process the request.HTTP 404 – Not Found
This means that the server is unable to find the response that it needs to return
Addition of HTTP Attributes to Views
Now we will add the HTTP attribute in the response. For that, we use the function called status.
In the function views, add the code:
return HttpResponse("Hello World",status = 200)
Now let’s look into the views.py and learn what we are doing there.
Views.py
We’ll understand the different types of views here.
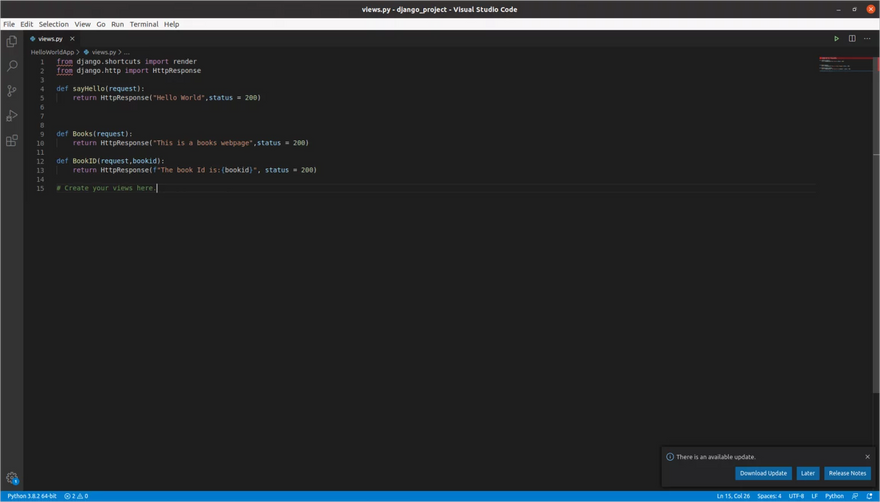
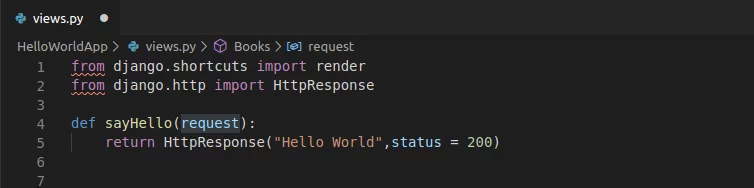
- View having text as response Here as you can see we used function-based Views to write up the sayHello, Books, BookID View.
Here in the View function, we are making the request as the argument and then returning a HttpResponse(‘Hello World’).
So here basically, the response we are sending back is just the word Hello World.
And that’s it, we can now run the server and test the code.


- View having HTML line and image as response Here we have stored HTML code in a variable called HTML. And then we are sending it as a response back. In the HTML code, we are sending a heading and a picture named Lena.jpg
In the function sayHello add the code:
html = "<h1>Hello There This is a HTML file</h1><img src="lena.png" alt="picture" width = "104" height="142">

And that’s it, we can now run the server and test the code.


Top comments (0)