Template
Component
Computed Properties
Watch Property
Question:
what is differene between method and Computed Properties
refer
refer
refer
How to display the HTML content on the web browser
why use Component
refer
why use watch property
refer
Template
Vue.js uses an HTML-based template syntax that facilitates Vue.js developers to declaratively bind the rendered DOM to the underlying Vue instance's data. All Vue.js templates are valid HTML that can be parsed by spec-compliant browsers and HTML parsers.
If you choose the simple interpolation method i.e., with double curly brackets to display the HTML content on the web browser, it will show the wrong result.
<html>
   <head>
      <title>Vue.js Template</title>
      <link rel="stylesheet" href="index.css">
        <script src="https://cdn.jsdelivr.net/npm/vue/dist/vue.js"></script>
    </head>
    <body>
      <div id = "app">
         <h1>Firstname : {{firstname}}</h1>
         <h1>Lastname : {{lastname}}</h1>
         <div>{{htmlcontent}}</div>
      </div>
      <script src="index.js"></script>
   </body>
</html>
Index.js file:
var vm = new Vue({
   el: '#app',
   data: {
      firstname : "Albert",
      lastname : "Pinto",
      htmlcontent : "<div><h1>This is Vue.js Template Example</h1></div>"
   }
})
Index.css file:
html, body {
    margin: 5px;
    padding: 0;
}
After the execution of the program, you will see the following output:
Output:
This is a component example
This is a component example
Component
It is used to create custom elements that can be reused in HTML. Components are the reusable Vue.js instances with a name. We can use a component as a custom element inside a root Vue.js instance.
<html>
   <head>
      <title>Vue.js Component</title>
      <link rel="stylesheet" href="index.css">
        <script src="https://cdn.jsdelivr.net/npm/vue/dist/vue.js"></script>
    </head>
    <body>
      <div id = "component_test1">
         <testcomponent></testcomponent>
      </div>
      <div id = "component_test2">
         <testcomponent></testcomponent>
      </div>
      <script src="index.js"></script>
   </body>
</html>
Index.js file:
Vue.component('testcomponent',{
   template : '<div><h1>This is a component example</h1></div>'
});
var vm = new Vue({
   el: '#component_test1'
});
var vm1 = new Vue({
   el: '#component_test2'
});
Let's use a simple CSS file to make the output more attractive.
Index.css file:
html, body {
    margin: 5px;
    padding: 0;
}
After the execution of the program, you will see the following output:
Output:
This is a component example
This is a component example
Example Explanation
In the above example, we have created two div with id component_test1 and component_test2 in the Index.html file. Once a component is created, the name of the component becomes the custom element and we can use this custom element in the Vue instance element created, i.e. inside the div with ids component_test1 and component_test2. Here, we have used a test component as the name of the component and the same name is used as the custom element inside the divs.
<div id = "component_test1">
   <testcomponent></testcomponent>
</div>
<div id = "component_test2">
   <testcomponent></testcomponent>
</div>
In the Index .js file, we have created two Vue.js instances with the respective div ids.
var vm = new Vue({
   el: '#component_test1'
});
var vm1 = new Vue({
   el: '#component_test2'
});
We have created a common component to use with both the view instances.
Vue.component('testcomponent',{
   template : '<div><h1>This is a component example</h1></div>'
** Dynamic Components**
Dynamic components are created using the keyword and it is bound using a property as shown in the following example.
Example
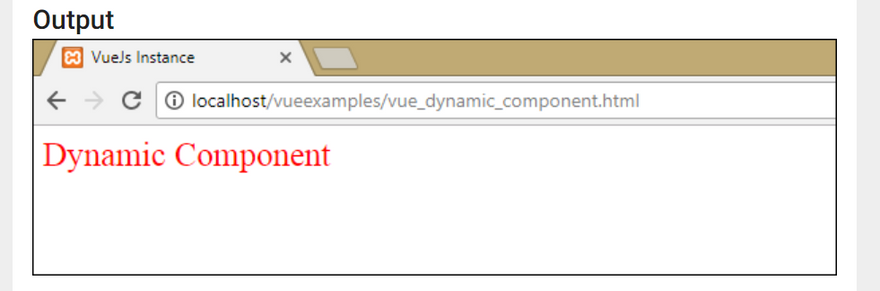
<html>
   <head>
      <title>VueJs Instance</title>
      <script type = "text/javascript" src = "js/vue.js"></script>
   </head>
   <body>
      <div id = "databinding">
         <component v-bind:is = "view"></component>
      </div>
      <script type = "text/javascript">
         var vm = new Vue({
            el: '#databinding',
            data: {
               view: 'component1'
            },
            components: {
               'component1': {
                  template: '<div><span style = "font-size:25;color:red;">Dynamic Component</span></div>'
               }
            }
         });
      </script>
   </body>
</html>
Output
Computed Properties
They don’t accept arguments and they are very handy for composing new data from existing sources, they get dynamic values based on other properties.
🍬 Imagine the same dispenser but this on the display has always the number of candies (updated) and you don’t need to press any button.
They are often used to do calculation and at the end to return a value.
i.e. You are rendering a list of items ordered by date.
Basically you can think of a computed value as a derived value that will be automatically updated whenever one of the underlying values used to calculate it is updated. You don't call a computed and it doesn't accept any parameters. You reference a computed property just like you would a data property.
<html>
<head>
<title>Vue.js Computed Property</title>
<link rel="stylesheet" href="index.css">
<script src="https://cdn.jsdelivr.net/npm/vue/dist/vue.js"></script>
</head>
<body>
<div id="com_props">
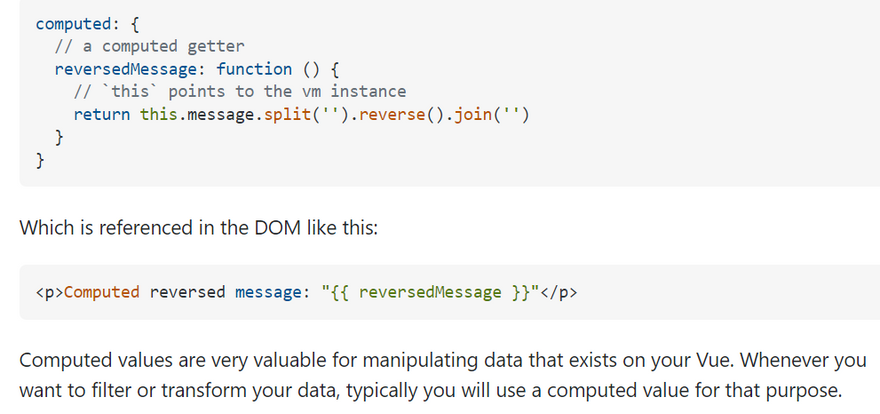
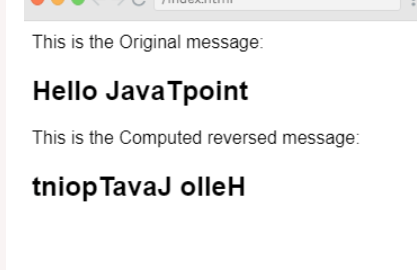
This is the Original message:<h2> {{ message }}</h2>
This is the Computed reversed message: <h2> {{ reversedMessage }}</h2>
</div>
<script src="index.js"></script>
</body>
</html>
Index.js file:
var vm = new Vue({
  el: '#com_props',
  data: {
    message: 'Hello JavaTpoint'
  },
  computed: {
    // a computed getter
    reversedMessage: function () {
      // `this` points to the vm instance
      return this.message.split('').reverse().join('')
    }
  }
})
Let's use a simple CSS file to make the output more attractive.
Index.css file:
html, body {
    margin: 5px;
    padding: 0;
}
After the execution of the program, you will see the following output:
Output:
Watch Property
refer
The Vue.js Watcher or watch property allows the developers to listen to the component data and run whenever they change a particular property. The watcher or watch property is a unique Vue.js feature that lets you keep an eye on one property of the component state and run a function when that property value changes.
Let's take an example to see and learn about the Watch property in VueJS. See the following examples to understand the concept of watcher or watch property.
Index.html file:
<html>
<head>
<title>Vue.js Watch Property</title>
<link rel="stylesheet" href="index.css">
<script src="https://cdn.jsdelivr.net/npm/vue/dist/vue.js"></script>
</head>
<body>
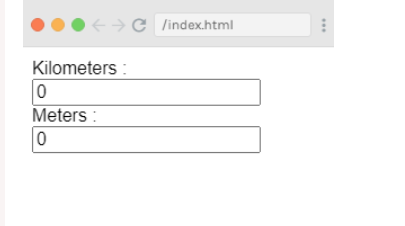
<div id = "wat_pro">
Kilometers : <input type = "text" v-model = "kilometers"><br/>
Meters : <input type = "text" v-model = "meters">
</div>
<script src="index.js"></script>
</body>
</html>
Index.js file:
var vm = new Vue({
            el: '#wat_pro',
            data: {
               kilometers : 0,
               meters:0
            },
            methods: {
            },
            computed :{
            },
            watch : {
               kilometers:function(val) {
                  this.kilometers = val;
                  this.meters = val * 1000;
               },
               meters : function (val) {
                  this.kilometers = val/ 1000;
                  this.meters = val;
               }
            }
         })
Let's use a simple CSS file to make the output more attractive.
Index.css file:
html, body {
    margin: 5px;
    padding: 0;
}
After the execution of the program, you will see the following output:
Output:
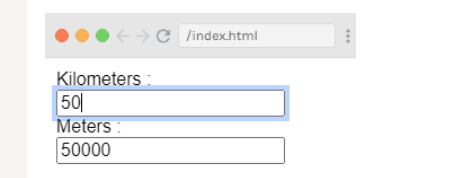
You can see that the output has the 0 entry in its textboxes. If you enter some values in the kilometers textbox you can see the changes in the meters textbox and vice-versa. Let's enter 50 in kilometers textbox and see the result.
Output:
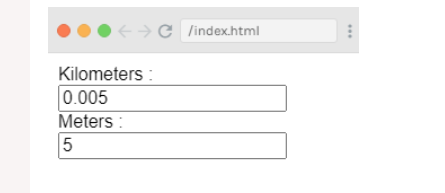
Now, enter some value in the meter textbox and see the changes in the kilometers textbox. Let's enter 5 in the meter textbox and see the result in the output.

Top comments (0)