What are the common task performed by mount
When updated Hook and updating Hook function is called
How blade file maps to the respective Livewire component class
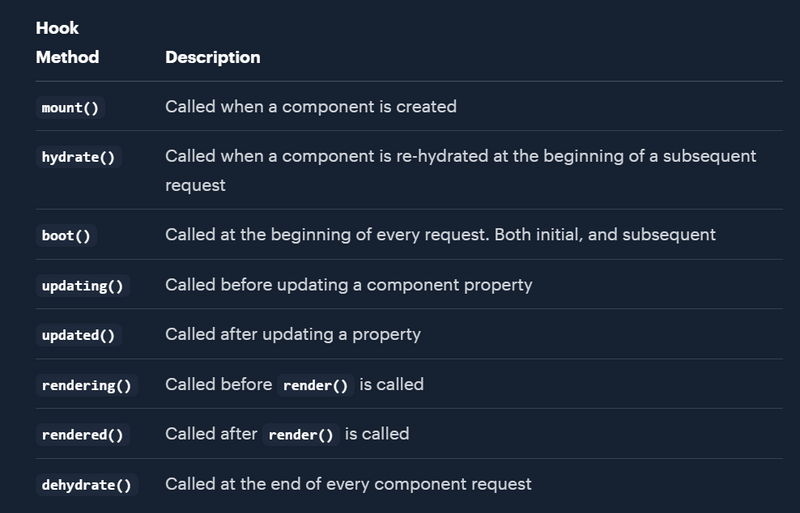
Livewire provides a variety of lifecycle hooks that allow you to execute code at specific points during a component's lifecycle. These hooks enable you to perform actions before or after particular events, such as initializing the component, updating properties, or rendering the template.
Mount
In a standard PHP class, a constructor (__construct()) takes in outside parameters and initializes the object's state. However, in Livewire, you use the mount() method for accepting parameters and initializing the state of your component.
Livewire components don't use __construct() because Livewire components are re-constructed on subsequent network requests, and we only want to initialize the component once when it is first created.
Here's an example of using the mount() method to initialize the name and email properties of an UpdateProfile component:
use Illuminate\Support\Facades\Auth;
use Livewire\Component;

class UpdateProfile extends Component
{
    public $name;

    public $email;

    public function mount()
    {
        $this->name = Auth::user()->name;

        $this->email = Auth::user()->email;
    }

    // ...
}
As mentioned earlier, the mount() method receives data passed into the component as method parameters:
use Livewire\Component;
use App\Models\Post;

class UpdatePost extends Component
{
    public $title;

    public $content;

    public function mount(Post $post)
    {
        $this->title = $post->title;

        $this->content = $post->content;
    }

    // ...
}
The mount() method is a crucial part of using Livewire. The following documentation provides further examples of using the mount() method to accomplish common tasks:
What are the common task performed by mount
Initializing properties
Receiving data from parent components
Accessing route parameters
How to Initializing properties using mount with examples in laravel livewire
In a Laravel Livewire application, initializing properties using mount typically involves setting up the initial state of the component. Here's a CRUD (Create, Read, Update, Delete) example using Livewire with mount to initialize properties:
Assuming we're building a simple CRUD application for managing tasks, let's create a Livewire component named TaskManager.
Create Livewire Component:
Use Artisan to generate a new Livewire component.
php artisan make:livewire TaskManager
Define Component Logic:
Open the generated app/Http/Livewire/TaskManager.php file and define the component logic including properties initialization in the mount method.
<?php

namespace App\Http\Livewire;

use Livewire\Component;
use App\Models\Task;

class TaskManager extends Component
{
    public $tasks;

    public $newTaskTitle;

    public function mount()
    {
        $this->tasks = Task::all();
        $this->newTaskTitle = '';
    }

    public function render()
    {
        return view('livewire.task-manager');
    }

    // Add CRUD methods here
}
Create Blade View:
Create a Blade view file resources/views/livewire/task-manager.blade.php where you'll define the component's UI.
<div>
    <!-- Display existing tasks -->
    @foreach($tasks as $task)
        <div>{{ $task->title }}</div>
    @endforeach

    <!-- Form to create new task -->
    <form wire:submit.prevent="createTask">
        <input type="text" wire:model="newTaskTitle">
        <button type="submit">Add Task</button>
    </form>
</div>
Implement CRUD Operations:
Add CRUD methods to the TaskManager Livewire component to handle creating, reading, updating, and deleting tasks.
public function createTask()
{
    $this->validate([
        'newTaskTitle' => 'required'
    ]);

    Task::create([
        'title' => $this->newTaskTitle
    ]);

    $this->tasks = Task::all();
    $this->newTaskTitle = '';
}
Add methods for updating and deleting tasks as needed
This example demonstrates how to initialize properties using the mount method in a Laravel Livewire component. In this case, we initialize the $tasks property with all existing tasks from the database and $newTaskTitle with an empty string. This ensures that the component starts with the correct initial state when it's rendered.
how to Receiving data from parent components using mount
In Laravel Livewire, you can receive data from parent components using the mount method. This is useful when you need to pass data to a Livewire component from another component or a Blade view. Below is an example of receiving data from a parent component using mount in a CRUD (Create, Read, Update, Delete) example:
Assuming we have a parent component named TaskManagerParent and a child component named TaskManagerChild.
Create Parent Component:
Create a new Livewire parent component using Artisan.
php artisan make:livewire TaskManagerParent
Define Parent Component Logic:
Open the generated app/Http/Livewire/TaskManagerParent.php file and define the logic to pass data to the child component.
<?php

namespace App\Http\Livewire;

use Livewire\Component;

class TaskManagerParent extends Component
{
    public $tasks = [
        ['title' => 'Task 1'],
        ['title' => 'Task 2'],
        ['title' => 'Task 3'],
    ];

    public function render()
    {
        return view('livewire.task-manager-parent');
    }
}
Create Child Component:
Create a new Livewire child component.
php artisan make:livewire TaskManagerChild
Define Child Component Logic:
Open the generated app/Http/Livewire/TaskManagerChild.php file and define the logic to receive data from the parent component using the mount method.
<?php
namespace App\Http\Livewire;

use Livewire\Component;

class TaskManagerChild extends Component
{
    public $tasks;

    public function mount($tasks)
    {
        $this->tasks = $tasks;
    }

    public function render()
    {
        return view('livewire.task-manager-child');
    }
}
Pass Data to Child Component:
In the Blade view of the parent component (resources/views/livewire/task-manager-parent.blade.php), include the child component and pass data to it using the wire:model directive.
<div>
    @livewire('task-manager-child', ['tasks' => $tasks])
</div>
Render Child Component:
Create the Blade view for the child component (resources/views/livewire/task-manager-child.blade.php) and render the received data.
<div>
    @foreach($tasks as $task)
        <div>{{ $task['title'] }}</div>
    @endforeach
</div>
In this example, the parent component TaskManagerParent passes the $tasks data array to the child component TaskManagerChild. The child component receives this data in its mount method and assigns it to its own $tasks property. Finally, the child component renders the received data in its Blade view.
how to Accessing route parameters using mount
To access route parameters using the mount method in Laravel Livewire, you can leverage the mount method's parameter list to receive the route parameters. Here's how you can do it in a CRUD example:
Let's assume we have a route defined as /tasks/{id} where {id} represents the ID of a task. We'll create a Livewire component to display and manage the details of a specific task.
Create Livewire Component:
Generate a new Livewire component.
php artisan make:livewire TaskManager
Define Component Logic:
Open the generated app/Http/Livewire/TaskManager.php file and use the mount method to access the route parameter.
<?php

namespace App\Http\Livewire;

use Livewire\Component;
use App\Models\Task;

class TaskManager extends Component
{
    public $task;

    public function mount($id)
    {
        $this->task = Task::findOrFail($id);
    }

    public function render()
    {
        return view('livewire.task-manager');
    }

    // Add CRUD methods here
}
Create Blade View:
Create a Blade view file resources/views/livewire/task-manager.blade.php where you'll define the component's UI.
<div>
    <h1>{{ $task->title }}</h1>
    <p>{{ $task->description }}</p>
    <!-- Add edit/delete buttons or other UI elements here -->
</div>
Define Route:
Define the route with the {id} parameter pointing to the TaskManager component.
// routes/web.php

use App\Http\Livewire\TaskManager;

Route::get('/tasks/{id}', TaskManager::class);
Access the Component:
Now, when you visit a URL like /tasks/1, Livewire will automatically instantiate the TaskManager component and call its mount method with the route parameter 1. Inside the mount method, we fetch the task with ID 1 from the database and assign it to the $task property.
With this setup, you can access route parameters using the mount method in Laravel Livewire. In this example, we fetch the task corresponding to the provided ID and make it available to the component's Blade view for rendering.
When updated Hook and updating Hook function is called
In Laravel Livewire, the updated and updating lifecycle hooks are called when a public property is updated. These hooks allow you to perform actions before or after the property is updated.
Here's when these lifecycle hooks are called:
updated Hook:
- The
updated hook is called after the component's data is updated. It provides you with the ability to perform actions after the data has been updated. - This hook is useful for performing actions that depend on the updated data or for triggering other updates within the component.
- The updated hook is called after the render cycle, so any changes made here won't cause additional re-renders.
You can define an updated method in your Livewire component class to handle this hook
.
updating Hook:The
updating hook is called before the component's data is updated. It provides you with the ability to intercept the update process and perform additional logic.This hook is useful for performing
validation,modifying the incoming data, orpreventing certain updatesaltogether.Returning false from the updating hook will prevent the update from proceeding.
You can define an updating method in your Livewire component class to handle this hook
let's create a simple CRUD example using Laravel Livewire and explain how to use the updating() and updated() lifecycle hooks.
In this example, we'll create a basic CRUD application for managing users. We'll use the updating() and updated() hooks to demonstrate how to perform actions before and after updating data in a Livewire component.
Create a Livewire Component for Managing Users:
php artisan make:livewire UserManagement
This command will generate a new Livewire component named UserManagement.
Define Routes:
Define the routes in your routes/web.php file:
use App\Http\Controllers\UserManagementController;

Route::get('/user-management', [UserManagementController::class, 'index'])->name('user-management.index');
Implement the UserManagement Livewire Component:
// app/Http/Livewire/UserManagement.php

namespace App\Http\Livewire;

use Livewire\Component;
use App\Models\User;

class UserManagement extends Component
{
    public $users;

    public $userId;
    public $name;
    public $email;

    public function mount()
    {
        $this->users = User::all();
    }

    public function updating($field)
    {
        // This method is called before updating any property in the Livewire component
        // Here, you can perform validation or manipulation of the data before it is updated

        // Example: Capitalize the name before updating
        if ($field == 'name') {
            $this->name = ucwords($this->name);
        }
    }

    public function updated($field)
    {
        // This method is called after updating any property in the Livewire component
        // Here, you can perform any post-update actions

        // Example: Log the field that was updated
        logger()->info("The $field field was updated.");
    }

    public function render()
    {
        return view('livewire.user-management');
    }

    public function editUser($userId)
    {
        $user = User::findOrFail($userId);
        $this->userId = $user->id;
        $this->name = $user->name;
        $this->email = $user->email;
    }

    public function updateUser()
    {
        $this->validate([
            'name' => 'required|string|max:255',
            'email' => 'required|string|email|max:255|unique:users,email,' . $this->userId,
        ]);

        $user = User::findOrFail($this->userId);
        $user->update([
            'name' => $this->name,
            'email' => $this->email,
        ]);

        $this->resetForm();
    }

    public function resetForm()
    {
        $this->userId = null;
        $this->name = '';
        $this->email = '';
        $this->users = User::all();
    }
}
Create Blade View for User Management:
Note
How blade file maps to the respective Livewire component class
In Laravel Livewire, when you place a Livewire component's Blade file in the resources/views/livewire directory, it automatically maps to the respective Livewire component class. This means you don't need to explicitly specify the Livewire component's Blade file path in your Livewire component class
<!-- resources/views/livewire/user-management.blade.php -->

<div>
    <h2>User Management</h2>

    <ul>
        @foreach ($users as $user)
            <li>
                {{ $user->name }} - {{ $user->email }}
                <button wire:click="editUser({{ $user->id }})">Edit</button>
            </li>
        @endforeach
    </ul>

    <form wire:submit.prevent="updateUser">
        <input type="hidden" wire:model="userId">
        <input type="text" wire:model="name" placeholder="Name">
        @error('name') <span>{{ $message }}</span> @enderror

        <input type="email" wire:model="email" placeholder="Email">
        @error('email') <span>{{ $message }}</span> @enderror

        <button type="submit">Update User</button>
    </form>
</div>
Implement UserManagementController:
// app/Http/Controllers/UserManagementController.php

namespace App\Http\Controllers;

use Illuminate\Http\Request;

class UserManagementController extends Controller
{
    public function index()
    {
        return view('livewire.user-management');
    }
}
Set Up Database and Run Migrations:
Ensure you have a users table in your database with the necessary columns (id, name, email). If not, create it and run migrations:
php artisan migrate
Include Livewire Scripts in Layout:
Ensure Livewire scripts are included in your layout file (resources/views/layouts/app.blade.php).
<!-- resources/views/layouts/app.blade.php -->

<!DOCTYPE html>
<html lang="en">
<head>
    <!-- Include other meta tags, stylesheets, etc. -->
    @livewireStyles
</head>
<body>
    <!-- Include other HTML content -->

    @livewireScripts
</body>
</html>
In this example, the updating() method is used to capitalize the user's name before updating, and the updated() method is used to log which field was updated after the update operation.
This demonstrates how to use the updating() and updated() lifecycle hooks in Laravel Livewire to perform actions before and after updating data in a Livewire component.
.
NOTE
the $field parameter represents the name of the property that is being updated. This parameter is automatically provided by Livewire and does not need to be explicitly passed
QUESTIONS
Why we use hooks
When we enable hooks?
When we called different kind of lifecycle hooks
Why Livewire component use mount instead of construct()
How mount method accepts parameter using livewire component
What are the common task performed by mount
When we call updated and updating lifecycle hooks
What are the action is taken by updated and updating lifecycle hooks
how to clear public property
updated hook is called after the component's data is updated
Answer
1.hooks that allow you to execute code at specific points during a component's lifecycle
2.hooks enable you to perform actions before or after particular events, such as initializing the component, updating properties, or rendering the template
3 see charts screenshots
4 constructor is called one time when class is created to initialize object state while mount is called to initializing the state of your component.Livewire components don't use __construct() because Livewire components are re-constructed on subsequent network requests, and we only want to initialize the component once when it is first created
5.the mount() method receives data passed into the component as method parameters
6 see above
7 see above
8 validation , capitalize, manipulating public property
9 reset form

Top comments (0)