Real time application of mixin in flutter
Coding Example of mixins
Reuse App bar action
In Flutter, mixins are a way to reuse a class's code in multiple class hierarchies. They allow you to add functionality to a class without using inheritance. Mixins are used primarily for sharing code among different classes without creating a deep inheritance hierarchy.
Here's an example of how mixins are used in Flutter:
// Define a mixin
mixin LoggingMixin {
  void log(String message) {
    print(message);
  }
}

// Create a class that uses the mixin
class MyClass with LoggingMixin {
  void doSomething() {
    log("Doing something...");
  }
}

void main() {
  var myObject = MyClass();
  myObject.doSomething(); // This will log "Doing something..."
}
In this example, we define a mixin called LoggingMixin that provides a log method for logging messages. Then, we create a class MyClass that uses the LoggingMixin with the with keyword. This means that instances of MyClass will have access to the log method, even though LoggingMixin is not a parent class of MyClass.
Mixins are particularly useful in Flutter for various purposes:
Reusability: You can define mixins for common functionality and apply them to multiple classes, reducing code duplication.
Separation of Concerns: Mixins allow you to separate different aspects of functionality into separate mixins, making your code more organized and maintainable.
Avoiding Deep Inheritance: Instead of creating deep inheritance hierarchies, which can become complex and hard to manage, mixins provide a way to add functionality without affecting the class hierarchy.
Customization: You can mix in multiple mixins to create a class with a combination of behaviors from different mixins, providing flexibility and customization.
Flutter itself uses mixins extensively in its framework to add functionality to widgets, such as StatefulWidget, SingleTickerProviderStateMixin for animations, and more.
In summary, mixins in Flutter are a powerful way to share and reuse code across different classes, promoting code reusability and maintainability in your Flutter applications.
Mixins in Flutter are a versatile tool that can be used in various real-time applications to add functionality to different classes without deep inheritance hierarchies. Here are four different real-time application scenarios where mixins can be employed:
Chat Application with Typing Indicator:
In a chat application, you can use a mixin to implement a typing indicator feature. Create a TypingIndicatorMixin with methods to show and hide typing indicators. Mix this into the chat screen, so when a user starts typing, you can show the indicator, and when they stop, hide it.
mixin TypingIndicatorMixin {
  void showTypingIndicator() {
    // Show typing indicator logic
  }

  void hideTypingIndicator() {
    // Hide typing indicator logic
  }
}
E-commerce App with Favorites:
In an e-commerce application, you can use a mixin for favorite functionality. Create a FavoritesMixin with methods to add and remove items from the user's favorites. Mix this into product detail screens, allowing users to manage their favorites.
mixin FavoritesMixin {
  void addToFavorites() {
    // Add item to favorites logic
  }

  void removeFromFavorites() {
    // Remove item from favorites logic
  }
}
Media Player with Playlist:
In a media player app, you can use mixins for playlist management. Create a PlaylistMixin with methods to add, remove, and play songs. Mix this into different screens, like the playlist view and now playing view.
mixin PlaylistMixin {
  void addToPlaylist() {
    // Add song to playlist logic
  }

  void removeFromPlaylist() {
    // Remove song from playlist logic
  }

  void playSong() {
    // Play song logic
  }
}
Task Management App with Prioritization:
In a task management application, you can use a mixin for prioritizing tasks. Create a PriorityMixin with methods to set and change task priorities. Mix this into the task detail screen.
mixin PriorityMixin {
  void setPriority(int priority) {
    // Set task priority logic
  }

  void changePriority(int newPriority) {
    // Change task priority logic
  }
}
In each of these scenarios, mixins provide a clean and modular way to add specific functionality to different parts of the application without duplicating code or creating complex class hierarchies. They promote code reuse and maintainability in Flutter applications.
Sure, let's create a simple Flutter application that uses mixins to add logging functionality to different classes. In this example, we'll have two classes, User and Product, and we'll use a LoggingMixin to add logging capabilities to both of them.
import 'package:flutter/material.dart';

// Define a mixin for logging
mixin LoggingMixin {
  void log(String message) {
    print(message);
  }
}

// Create a class for a user with the logging mixin
class User with LoggingMixin {
  final String name;
  User(this.name);

  void updateUserProfile() {
    log("Updating user profile: $name");
    // Additional logic for updating the user profile
  }
}

// Create a class for a product with the logging mixin
class Product with LoggingMixin {
  final String name;
  final double price;
  Product(this.name, this.price);

  void addToCart() {
    log("Adding $name to cart. Price: \$${price.toStringAsFixed(2)}");
    // Additional logic for adding the product to the cart
  }
}

void main() {
  runApp(MyApp());
}

class MyApp extends StatelessWidget {
  @override
  Widget build(BuildContext context) {
    return MaterialApp(
      home: Scaffold(
        appBar: AppBar(
          title: Text('Mixin Example'),
        ),
        body: Center(
          child: Column(
            mainAxisAlignment: MainAxisAlignment.center,
            children: <Widget>[
              ElevatedButton(
                onPressed: () {
                  User user = User('John');
                  user.updateUserProfile();
                },
                child: Text('Update User Profile'),
              ),
              ElevatedButton(
                onPressed: () {
                  Product product = Product('Widget', 19.99);
                  product.addToCart();
                },
                child: Text('Add Product to Cart'),
              ),
            ],
          ),
        ),
      ),
    );
  }
}
In this Flutter application:
We define a LoggingMixin with a log method for logging.
We create two classes, User and Product, and both use the LoggingMixin by including it with the with keyword.
In the main function, we create instances of User and Product and call their respective methods, which use the log method from the LoggingMixin.
When you run this Flutter app, you can see that both the User and Product classes can log messages using the log method provided by the LoggingMixin. This demonstrates how mixins can be used to add shared functionality to different classes in a real-time application.
Chat Application
Certainly! Let's create a simple Chat Application with a typing indicator feature using mixins in Flutter. We'll follow these steps:
Create a Flutter project and set up the basic structure.
Define a TypingIndicatorMixin with methods to show and hide typing indicators.
Create a chat screen and mix in the TypingIndicatorMixin.
Use buttons to simulate user typing and show/hide the typing indicator.
Here are the step-by-step examples:
Step 1: Create a Flutter project and set up the basic structure.
flutter create chat_app
cd chat_app
Step 2: Define a TypingIndicatorMixin with methods to show and hide typing indicators.
mixin TypingIndicatorMixin {
  bool _isTyping = false;

  void showTypingIndicator() {
    _isTyping = true;
    print('Typing...');
  }

  void hideTypingIndicator() {
    _isTyping = false;
    print('Not typing.');
  }

  bool get isTyping => _isTyping;
}
Step 3: Create a chat screen and mix in the TypingIndicatorMixin.
// lib/screens/chat_screen.dart
import 'package:flutter/material.dart';
import '../mixins/typing_indicator_mixin.dart';

class ChatScreen extends StatefulWidget with TypingIndicatorMixin {
  @override
  _ChatScreenState createState() => _ChatScreenState();
}

class _ChatScreenState extends State<ChatScreen> {
  @override
  Widget build(BuildContext context) {
    return Scaffold(
      appBar: AppBar(
        title: Text('Chat App'),
      ),
      body: Center(
        child: Column(
          mainAxisAlignment: MainAxisAlignment.center,
          children: <Widget>[
            Text('Chat Screen'),
            SizedBox(height: 20),
            ElevatedButton(
              onPressed: () {
                setState(() {
                  widget.showTypingIndicator();
                });
              },
              child: Text('Start Typing'),
            ),
            ElevatedButton(
              onPressed: () {
                setState(() {
                  widget.hideTypingIndicator();
                });
              },
              child: Text('Stop Typing'),
            ),
            if (widget.isTyping)
              Text('Typing Indicator is ON')
            else
              Text('Typing Indicator is OFF'),
          ],
        ),
      ),
    );
  }
}
Step 4: Use buttons to simulate user typing and show/hide the typing indicator.
Now, you can run the app and navigate to the ChatScreen. When you click the "Start Typing" button, the typing indicator will be shown, and when you click the "Stop Typing" button, it will be hidden. The TypingIndicatorMixin is used to manage the typing indicator state.
This example demonstrates how mixins can be used in a Flutter chat application to add the typing indicator feature in a clean and modular way. You can expand upon this by integrating it into a full-fledged chat application with real-time messaging capabilities.
Task Management App with Prioritization
Let's create a simple Task Management App with a prioritization feature using mixins in Flutter. We'll follow these steps:
Create a Flutter project and set up the basic structure.
Define a PriorityMixin with methods to set and change task priorities.
Create a task detail screen and mix in the PriorityMixin.
Use buttons to simulate setting and changing task priorities.
Here are the step-by-step examples:
Step 1: Create a Flutter project and set up the basic structure.
flutter create task_manager_app
cd task_manager_app
Step 2: Define a PriorityMixin with methods to set and change task priorities.
// lib/mixins/priority_mixin.dart

mixin PriorityMixin {
  int _priority = 0; // Default priority

  void setPriority(int priority) {
    if (priority >= 0 && priority <= 5) {
      _priority = priority;
      print('Priority set to $_priority');
    } else {
      print('Invalid priority');
    }
  }

  void changePriority(int newPriority) {
    if (_priority + newPriority >= 0 && _priority + newPriority <= 5) {
      _priority += newPriority;
      print('Priority changed to $_priority');
    } else {
      print('Invalid priority change');
    }
  }

  int get priority => _priority;
}
Step 3: Create a task detail screen and mix in the PriorityMixin.
// lib/screens/task_detail_screen.dart
import 'package:flutter/material.dart';
import '../mixins/priority_mixin.dart';

class TaskDetailScreen extends StatefulWidget with PriorityMixin {
  @override
  _TaskDetailScreenState createState() => _TaskDetailScreenState();
}

class _TaskDetailScreenState extends State<TaskDetailScreen> {
  @override
  Widget build(BuildContext context) {
    return Scaffold(
      appBar: AppBar(
        title: Text('Task Detail'),
      ),
      body: Center(
        child: Column(
          mainAxisAlignment: MainAxisAlignment.center,
          children: <Widget>[
            Text('Task Detail Screen'),
            SizedBox(height: 20),
            ElevatedButton(
              onPressed: () {
                setState(() {
                  widget.setPriority(3); // Set priority to 3
                });
              },
              child: Text('Set Priority to 3'),
            ),
            ElevatedButton(
              onPressed: () {
                setState(() {
                  widget.changePriority(1); // Increase priority by 1
                });
              },
              child: Text('Increase Priority by 1'),
            ),
            Text('Task Priority: ${widget.priority}'),
          ],
        ),
      ),
    );
  }
}
Step 4: Use buttons to simulate setting and changing task priorities.
Now, you can run the app and navigate to the TaskDetailScreen. When you click the "Set Priority to 3" button, the task's priority will be set to 3, and when you click the "Increase Priority by 1" button, it will increase the priority by 1. The PriorityMixin is used to manage the task's priority state.
This example demonstrates how mixins can be used in a Flutter Task Management App to handle task prioritization in a clean and modular way. You can extend this by integrating it into a full-fledged task management application with task lists and more features.
Coding Example of mixins
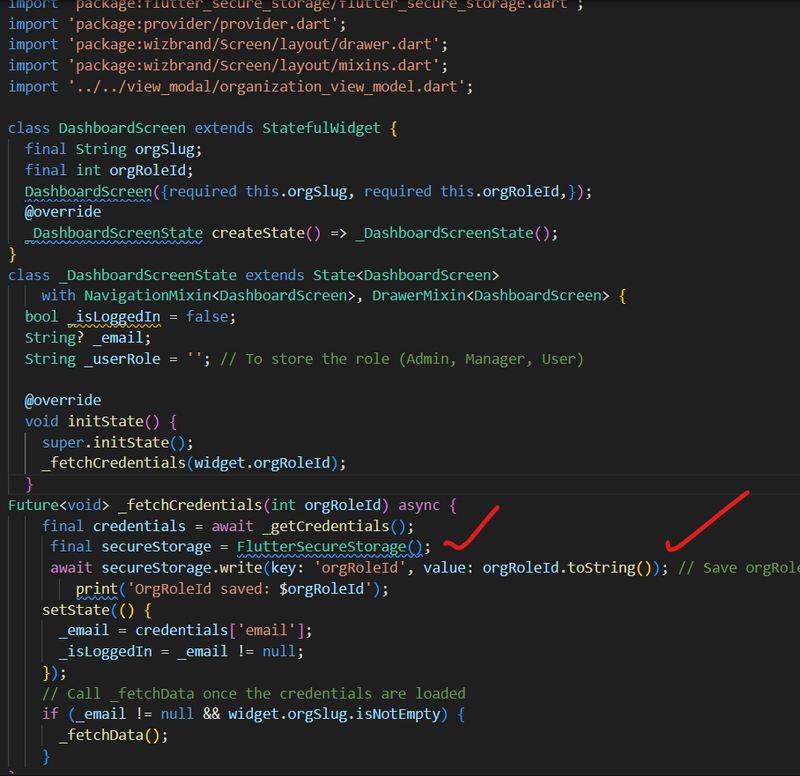
save the data using flutter secure storage dependency
  final secureStorage = FlutterSecureStorage();
     await secureStorage.write(key: 'orgRoleId', value: orgRoleId.toString()); // Save orgRoleId
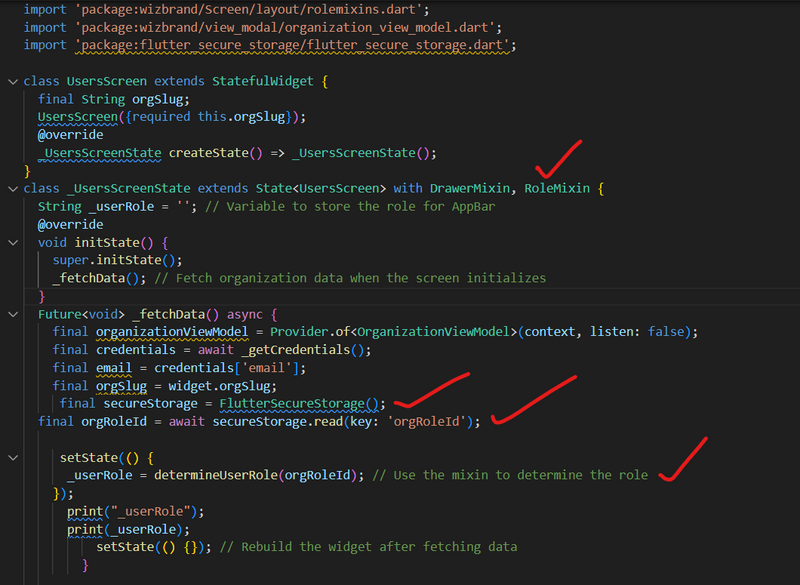
Get data using flutter secure storage
  final orgSlug = widget.orgSlug;
     final secureStorage = FlutterSecureStorage();
  final orgRoleId = await secureStorage.read(key: 'orgRoleId');

     setState(() {
      _userRole = determineUserRole(orgRoleId); // Use the mixin to determine the role
    });
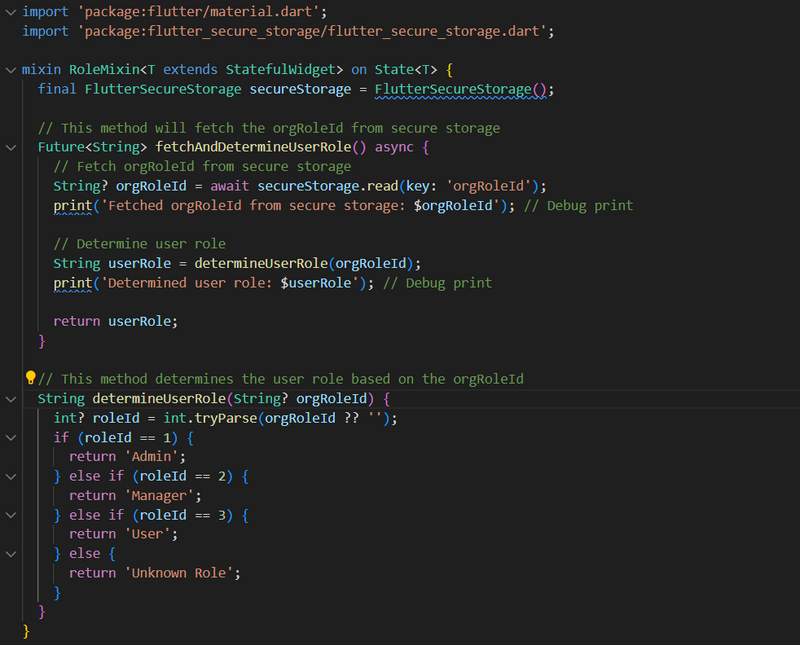
apply logic in mixins dart file
Reuse App bar action
mixin dart file
import 'package:flutter/material.dart';
import 'package:wizbrand/Screen/Auth/loginscreen.dart';
import 'package:wizbrand/Screen/Influencer/createorg.dart';
import 'package:wizbrand/Screen/Influencer/dashboard.dart';
import 'package:wizbrand/Screen/Influencer/organizationScreen.dart';
import 'package:wizbrand/Screen/layout/basescreen.dart';

mixin NavigationMixin<T extends StatefulWidget> on State<T> {
  Widget buildBaseScreen({required Widget body, required int currentIndex, required String title}) {
    return BaseScreen(
      currentIndex: currentIndex,
      title: title,
      body: body,
    );
  }

  List<Widget> buildAppBarActions(BuildContext context) {
    return [
      IconButton(
        icon: Icon(Icons.home, color: Colors.white),
        onPressed: () {
          Navigator.push(
            context,
            MaterialPageRoute(builder: (context) => HomeScreen()), // Replace HomeScreen with your actual screen
          );
        },
      ),
      IconButton(
        icon: Icon(Icons.business, color: Colors.white),
        onPressed: () {
          Navigator.push(
            context,
            MaterialPageRoute(builder: (context) => OrganizationScreen()), // Replace OrganizationScreen with your actual screen
          );
        },
      ),
    ];
  }
}
Apply reusability in dart file
Include NavigationMixin
class _ProjectScreenState extends State<ProjectScreen> with DrawerMixin, RoleMixin, NavigationMixin {
Include buildAppBarActions
appBar: AppBar(
  automaticallyImplyLeading: true,
  backgroundColor: Colors.blue,
  centerTitle: true,
  title: Text(
    'Projects - $_userRole', // Display role dynamically in the AppBar
    style: TextStyle(color: Colors.white),
  ),
 actions: buildAppBarActions(context),
),
Add parameter currentIndex,title in buildBaseScreen
buildBaseScreen(
            body: Padding(
              padding: const EdgeInsets.all(16.0),
              child: Column(
                crossAxisAlignment: CrossAxisAlignment.start,
                children: [
                  // Your existing body content...
                ],
              ),
            ),
            currentIndex: 0, // Set an appropriate index
            title: 'Projects', // Set the title as needed
          ),
Update Widget buildBaseScreen Your Method:
Widget buildBaseScreen({required Widget body, required int currentIndex, required String title}) {
  return Container(
    decoration: BoxDecoration(
      color: Colors.white,
    ),
    child: Column(
      children: [
        // Optionally, add a title if needed
        Padding(
          padding: const EdgeInsets.all(16.0),
          child: Text(
            title,
            style: TextStyle(fontSize: 24, fontWeight: FontWeight.bold),
          ),
        ),
        Expanded(child: body),
      ],
    ),
  );
}

Top comments (0)