In Laravel, access tokens and refresh tokens are commonly used for authentication and authorization in API development. Here's a checklist of interview questions on access tokens and refresh tokens in Laravel, along with examples:
Question
why access token is used
who manage access token
why refresh token is used
how to protect route or controller
who checks validity of access token
how to authenticate users for routes
What is an Access Token?
Example: An access token is a string representing the authorization granted to the client. In Laravel, Passport is a common package used for managing access tokens.
What is a Refresh Token?
Example: A refresh token is used to obtain a new access token when the current one expires. It provides a way to maintain authentication without requiring the user to log in again.
How does Laravel Passport handle OAuth2 Tokens?
Example: Laravel Passport provides a full OAuth2 server implementation for Laravel applications. It simplifies the process of issuing access tokens, refresh tokens, and managing clients.
Explain the OAuth2 Authorization Grant Types.
Example: Laravel Passport supports various grant types, including Authorization Code, Implicit, Password, and Client Credentials grants.
How to install Laravel Passport?
Example: composer require laravel/passport, followed by php artisan migrate and php artisan passport:install.
Explain the process of obtaining an Access Token using Laravel Passport.
Example: A client makes a POST request to the /oauth/token endpoint with the client credentials and user credentials. Laravel Passport responds with an access token and a refresh token.
How to protect routes with Passport in Laravel?
Example: Use the auth:api middleware on the routes or controllers you want to protect. This middleware checks the validity of the access token.
Explain the concept of Scopes in Laravel Passport.
Example: Scopes define the permissions associated with an access token. You can define and assign scopes to control the level of access granted to a client.
How to refresh an Access Token using Laravel Passport?
Example: Send a POST request to the /oauth/token endpoint with the client credentials, grant_type set to refresh_token, and the refresh token.
What is the purpose of the Passport auth middleware?
Example: The auth middleware is used to authenticate users for routes that require an authenticated user. It checks the validity of the access token.
Explain the role of Laravel Passport Providers.
Example: Passport uses providers to retrieve users and clients. The AuthServiceProvider defines the Passport routes and bindings.
How to handle token expiration and refresh in a Laravel API?
Example: Use Laravel Passport middleware to automatically refresh the access token if it has expired. Handle refresh token revocation and regeneration.
What is the purpose of the Laravel Passport Personal Access Client?
Example: The personal access client allows trusted clients to request tokens without the need for user authentication, suitable for trusted applications.
Explain the steps to revoke an Access Token or Refresh Token.
Example: Use Laravel Passport's revoke method to revoke a token. For example, DB::table('oauth_access_tokens')->where('id', $tokenId)->update(['revoked' => true]).
How to customize responses in Laravel Passport?
Example: Laravel Passport allows you to customize the responses by extending the Response class. You can override methods to format success and error responses.
What is an Access Token
To explain the concept of Access Tokens in Laravel using the Passport package, let's go through a simple example. Laravel Passport provides a full OAuth2 server implementation for Laravel applications.
Install Laravel Passport:
composer require laravel/passport
Run Migrations:
php artisan migrate
Install Passport:
php artisan passport:install
This command will create the encryption keys needed to generate secure access tokens.
Update User Model:
Open your User model (usually located at App\Models\User.php) and make it implement Laravel\Passport\HasApiTokens:
use Laravel\Passport\HasApiTokens;

class User extends Authenticatable
{
    use HasApiTokens, Notifiable;

    // Rest of the model code...
}
Create a Passport Client:
php artisan passport:client --password
This command will create a new client that uses the Password Grant Tokens, suitable for personal access tokens.
Create API Routes:
In your routes/api.php, define routes that require authentication:
Route::middleware('auth:api')->get('/user', function (Request $request) {
    return $request->user();
});
Controller for Token Generation:
Create a controller to handle token generation. For example, ApiTokenController.php:
<?php
namespace App\Http\Controllers;
use Illuminate\Http\Request;
use Illuminate\Support\Facades\Auth;
class ApiTokenController extends Controller
{
public function generateToken(Request $request)
{
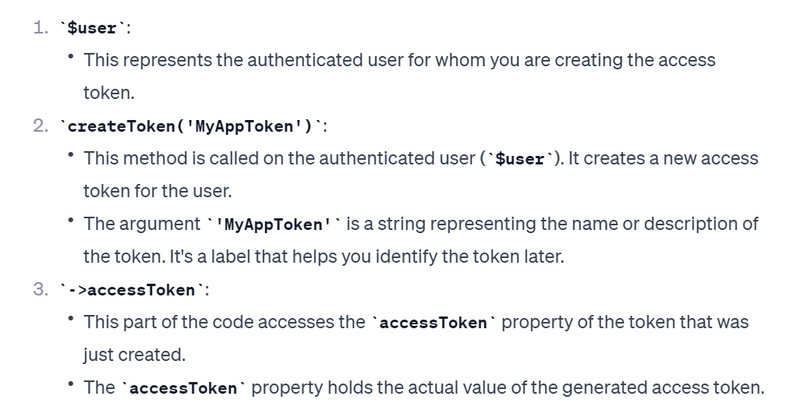
$credentials = $request->only('email', 'password');
if (Auth::attempt($credentials)) {
$user = Auth::user();
$token = $user->createToken('MyAppToken')->accessToken;
return response()->json(['access_token' => $token], 200);
} else {
return response()->json(['error' => 'Unauthorized'], 401);
}
}
}
This controller attempts to authenticate the user with the provided credentials and generates an access token if successful.
Define API Routes for Token Generation:
In routes/api.php:
Route::post('/generate-token', 'ApiTokenController@generateToken');
Testing:
Use a tool like Postman or cURL to send a POST request to /api/generate-token with the user credentials (email and password).
Example cURL command:
curl -X POST -H "Content-Type: application/json" -d '{"email": "user@example.com", "password": "password"}' http://your-app-url/api/generate-token
The response should contain an access_token.
This example demonstrates a simple implementation of generating an access token using Laravel Passport. In a real-world scenario, you would secure your endpoints and manage access based on scopes, client credentials, etc.
// Authenticate the user and generate the access token
$user = Auth::user();
$token = $user->createToken('MyAppToken')->accessToken;

// Use the $token for making authenticated requests to protected routes
$response = Http::withHeaders([
    'Authorization' => 'Bearer ' . $token,
])->get('http://your-api-url/protected-route');
What is a Refresh Token
In Laravel Passport, refresh tokens are used to obtain a new access token when the current access token expires. Here's an example to demonstrate how refresh tokens work:
Install Laravel Passport:
composer require laravel/passport
Run Migrations:
php artisan migrate
Install Passport:
php artisan passport:install
Update User Model:
Open your User model (usually located at App\Models\User.php) and make it implement Laravel\Passport\HasApiTokens:
use Laravel\Passport\HasApiTokens;

class User extends Authenticatable
{
    use HasApiTokens, Notifiable;

    // Rest of the model code...
}
Create API Routes:
In your routes/api.php, define routes that require authentication:
Route::middleware('auth:api')->get('/user', function (Request $request) {
    return $request->user();
});
Controller for Token Generation:
Create a controller to handle token generation. For example, ApiTokenController.php:
<?php

namespace App\Http\Controllers;

use Illuminate\Http\Request;
use Illuminate\Support\Facades\Auth;

class ApiTokenController extends Controller
{
    public function generateToken(Request $request)
    {
        $credentials = $request->only('email', 'password');

        if (Auth::attempt($credentials)) {
            $user = Auth::user();
            $tokenResult = $user->createToken('MyAppToken');
            $accessToken = $tokenResult->accessToken;
            $refreshToken = $tokenResult->refreshToken;

            return response()->json([
                'access_token' => $accessToken,
                'refresh_token' => $refreshToken,
            ], 200);
        } else {
            return response()->json(['error' => 'Unauthorized'], 401);
        }
    }
}
In this controller, when a user successfully logs in, both an access token and a refresh token are generated and returned.
Define API Routes for Token Generation:
In routes/api.php:
Route::post('/generate-token', 'ApiTokenController@generateToken');
Testing:
Use a tool like Postman or cURL to send a POST request to /api/generate-token with the user credentials (email and password).
Example cURL command:
curl -X POST -H "Content-Type: application/json" -d '{"email": "user@example.com", "password": "password"}' http://your-app-url/api/generate-token
The response should contain both an access_token and a refresh_token.
Using Refresh Token to Obtain a New Access Token:
To use the refresh token to obtain a new access token, create a new route and controller method:
// Add this route to routes/api.php
Route::post('/refresh-token', 'ApiTokenController@refreshToken');
Update the ApiTokenController.php:
public function refreshToken(Request $request)
{
    $refreshToken = $request->input('refresh_token');

    $tokenResult = Auth::guard('api')->refresh($refreshToken);

    return response()->json([
        'access_token' => $tokenResult->accessToken,
        'expires_at' => $tokenResult->token->expires_at,
    ], 200);
}
With this route, you can now send a POST request to /api/refresh-token with the refresh_token obtained earlier. The response will contain a new access_token.
This example demonstrates a simple implementation of generating both an access token and a refresh token using Laravel Passport and using the refresh token to obtain a new access token when needed. In a production environment, you would want to implement additional security measures and handle token expiration more robustly.
How does Laravel Passport handle OAuth2 Tokens
Laravel Passport provides a convenient and feature-rich way to handle OAuth2 tokens in Laravel applications. Here's a step-by-step example to illustrate how Laravel Passport handles OAuth2 tokens:
Install Laravel Passport:
composer require laravel/passport
Run Migrations:
php artisan migrate
Install Passport:
php artisan passport:install
This command generates encryption keys needed to generate secure access tokens.
Update User Model:
Open your User model (App\Models\User.php) and make it implement Laravel\Passport\HasApiTokens:
use Laravel\Passport\HasApiTokens;

class User extends Authenticatable
{
    use HasApiTokens, Notifiable;

    // Rest of the model code...
}
Create API Routes:
In your routes/api.php, define routes that require authentication:
Route::middleware('auth:api')->get('/user', function (Request $request) {
    return $request->user();
});
Generate Personal Access Client:
php artisan passport:client --personal
This command creates a client that will be responsible for issuing personal access tokens.
Controller for Token Generation:
Create a controller to handle token generation. For example, ApiTokenController.php:
<?php

namespace App\Http\Controllers;

use Illuminate\Http\Request;
use Illuminate\Support\Facades\Auth;

class ApiTokenController extends Controller
{
    public function generateToken(Request $request)
    {
        $user = Auth::user();
        $token = $user->createToken('MyAppToken')->accessToken;

        return response()->json(['access_token' => $token], 200);
    }
}
This controller method generates an access token for the authenticated user.
Define API Routes for Token Generation:
In routes/api.php:
Route::post('/generate-token', 'ApiTokenController@generateToken');
Testing:
Use a tool like Postman or cURL to send a POST request to /api/generate-token. Include the user's credentials if necessary.
Example cURL command:
curl -X POST -H "Content-Type: application/json" -d '{"email": "user@example.com", "password": "password"}' http://your-app-url/api/generate-token
The response should contain an access_token.
Now, let's break down what's happening in this example:
Personal Access Token:
Laravel Passport allows the creation of personal access tokens that are associated with a user.
The createToken method is used to generate a personal access token for the authenticated user.
Access Token Response:
The response from the generateToken method includes the generated access token, which can be used to make authenticated requests to protected routes.
Middleware:
The auth:api middleware is used in the API routes to protect them, ensuring that only requests with a valid access token are allowed.
This example demonstrates the basic usage of Laravel Passport for handling OAuth2 tokens, specifically personal access tokens. In a real-world scenario, you might need to consider additional features such as token expiration, refresh tokens, and scopes based on your application's requirements.
Explain the OAuth2 Authorization Grant Types
OAuth2 Authorization Grant Types are mechanisms used to obtain authorization from the resource owner (user) for client applications. Laravel Passport supports various grant types. Here's an example illustrating different grant types in Laravel Passport:
Install Laravel Passport:
composer require laravel/passport
Run Migrations:
php artisan migrate
Install Passport:
php artisan passport:install
Update User Model:
Open your User model (App\Models\User.php) and make it implement Laravel\Passport\HasApiTokens:
use Laravel\Passport\HasApiTokens;

class User extends Authenticatable
{
    use HasApiTokens, Notifiable;

    // Rest of the model code...
}
Create API Routes:
In your routes/api.php, define routes that require authentication:
Route::middleware('auth:api')->get('/user', function (Request $request) {
    return $request->user();
});
Generate Personal Access Client:
php artisan passport:client --personal
This command creates a client that will be responsible for issuing personal access tokens.
Controller for Token Generation:
Create a controller to handle token generation. For example, ApiTokenController.php:
<?php

namespace App\Http\Controllers;

use Illuminate\Http\Request;
use Illuminate\Support\Facades\Auth;

class ApiTokenController extends Controller
{
    public function generateToken(Request $request)
    {
        $user = Auth::user();
        $token = $user->createToken('MyAppToken')->accessToken;

        return response()->json(['access_token' => $token], 200);
    }
}
This controller method generates a personal access token for the authenticated user.
Define API Routes for Token Generation:
In routes/api.php:
Route::post('/generate-token', 'ApiTokenController@generateToken');
Now, let's explore different OAuth2 Authorization Grant Types:
Authorization Code Grant Type:
This is suitable for web applications.
Create a route for authorization:
Route::get('/authorize', 'AuthController@redirectToProvider');
Route::get('/callback', 'AuthController@handleProviderCallback');
Create AuthController.php:
<?php

namespace App\Http\Controllers;

use Laravel\Socialite\Facades\Socialite;

class AuthController extends Controller
{
    public function redirectToProvider()
    {
        return Socialite::driver('provider')->redirect();
    }

    public function handleProviderCallback()
    {
        $user = Socialite::driver('provider')->user();

        // Process user data and issue access token
        // ...

        return redirect('/home');
    }
}
Implicit Grant Type:
This is suitable for single-page applications.
Create a route for authorization:
Route::get('/authorize-implicit', 'ImplicitAuthController@redirectToProvider');
Route::get('/callback-implicit', 'ImplicitAuthController@handleProviderCallback');
Create ImplicitAuthController.php:
<?php

namespace App\Http\Controllers;

use Laravel\Socialite\Facades\Socialite;

class ImplicitAuthController extends Controller
{
    public function redirectToProvider()
    {
        return Socialite::driver('provider')->redirect();
    }

    public function handleProviderCallback()
    {
        $user = Socialite::driver('provider')->user();

        // Process user data and issue access token
        // ...

        return redirect('/home');
    }
}
Password Grant Type:
This is suitable for trusted clients.
Create a route for token exchange:
Route::post('/token', 'TokenController@getAccessToken');
Create TokenController.php:
<?php

namespace App\Http\Controllers;

use Illuminate\Http\Request;
use Illuminate\Support\Facades\Route;

class TokenController extends Controller
{
    public function getAccessToken(Request $request)
    {
        $tokenRequest = Request::create(
            '/oauth/token',
            'POST',
            [
                'grant_type' => 'password',
                'client_id' => env('PASSPORT_CLIENT_ID'),
                'client_secret' => env('PASSPORT_CLIENT_SECRET'),
                'username' => $request->username,
                'password' => $request->password,
                'scope' => '',
            ]
        );

        $response = Route::dispatch($tokenRequest);

        return $response;
    }
}
These examples demonstrate how Laravel Passport handles different OAuth2 Authorization Grant Types. Adapt the code according to your specific use case, configure the Socialite provider, and ensure you have the necessary routes and controllers in place.
How to protect routes with Passport in Laravel?
o protect routes with Laravel Passport, you can use the auth:api middleware, which is included with Passport. Here's a step-by-step example:
Install Laravel Passport:
composer require laravel/passport
Run Migrations:
php artisan migrate
Install Passport:
php artisan passport:install
This command generates encryption keys needed to generate secure access tokens.
Update User Model:
Open your User model (App\Models\User.php) and make it implement Laravel\Passport\HasApiTokens:
use Laravel\Passport\HasApiTokens;

class User extends Authenticatable
{
    use HasApiTokens, Notifiable;

    // Rest of the model code...
}
Create API Routes:
In your routes/api.php, define routes that require authentication:
Route::middleware('auth:api')->get('/user', function (Request $request) {
    return $request->user();
});
This example route is protected by the auth:api middleware, meaning that only requests with a valid access token will be allowed.
Testing:
Use a tool like Postman or cURL to send a GET request to /api/user. Make sure to include the access token in the Authorization header.
Example cURL command:
curl -H "Authorization: Bearer YOUR_ACCESS_TOKEN" http://your-app-url/api/user
The response should contain the authenticated user's information.
This example demonstrates protecting a route using the auth:api middleware. Ensure that you include the access token in the Authorization header when making requests to protected routes.
concept of Scopes in Laravel Passport
Scopes in Laravel Passport allow you to define specific permissions or access levels for different types of actions within your API. With scopes, you can control what resources a client can access and what actions it can perform. Here's an example illustrating the concept of scopes in Laravel Passport:
Install Laravel Passport:
composer require laravel/passport
Run Migrations:
php artisan migrate
Install Passport:
php artisan passport:install
This command generates encryption keys needed to generate secure access tokens.
Update User Model:
Open your User model (App\Models\User.php) and make it implement Laravel\Passport\HasApiTokens:
use Laravel\Passport\HasApiTokens;

class User extends Authenticatable
{
    use HasApiTokens, Notifiable;

    // Rest of the model code...
}
Create API Routes with Scopes:
In your routes/api.php, define routes that require authentication and specify the required scopes:
use Illuminate\Http\Request;

Route::middleware('auth:api')->get('/user', function (Request $request) {
    return $request->user();
})->middleware('scope:user-info');

Route::middleware('auth:api')->get('/posts', function () {
    // Logic to fetch posts...
})->middleware('scope:view-posts');
In this example, the /user route requires the user-info scope, and the /posts route requires the view-posts scope.
Create Scopes:
Open your AuthServiceProvider.php (App\Providers\AuthServiceProvider.php) and define your scopes in the boot method:
use Laravel\Passport\Passport;

public function boot()
{
    $this->registerPolicies();

    Passport::routes();

    Passport::tokensCan([
        'user-info' => 'Access user information',
        'view-posts' => 'View posts',
    ]);
}
This code defines two scopes: user-info and view-posts, each with a description.
Testing:
Use a tool like Postman or cURL to send requests to the protected routes with the appropriate scope. Include the access token in the Authorization header.
Example cURL commands:
# Request to /user with 'user-info' scope
curl -H "Authorization: Bearer YOUR_ACCESS_TOKEN" http://your-app-url/api/user

# Request to /posts with 'view-posts' scope
curl -H "Authorization: Bearer YOUR_ACCESS_TOKEN" http://your-app-url/api/posts
Ensure that the access token has the necessary scope to access the corresponding route.
.
How to refresh an Access Token using Laravel Passport
To refresh an access token using Laravel Passport, you can use the /oauth/token endpoint with the "refresh_token" grant type. Here's an example:
Create a new route for refreshing tokens:
Open your routes/api.php file and add the following route:
Route::post('/refresh-token', 'ApiTokenController@refreshToken');
Create a new controller method for refreshing tokens:
Create a new controller or use an existing one. For example, ApiTokenController.php:
<?php

namespace App\Http\Controllers;

use Illuminate\Http\Request;

class ApiTokenController extends Controller
{
    public function refreshToken(Request $request)
    {
        $request->validate([
            'refresh_token' => 'required',
        ]);

        $http = new \GuzzleHttp\Client;

        try {
            $response = $http->post(config('app.url') . '/oauth/token', [
                'form_params' => [
                    'grant_type' => 'refresh_token',
                    'refresh_token' => $request->refresh_token,
                    'client_id' => config('passport.client_id'),
                    'client_secret' => config('passport.client_secret'),
                    'scope' => '',
                ],
            ]);

            return response()->json(json_decode((string) $response->getBody(), true));
        } catch (\GuzzleHttp\Exception\BadResponseException $e) {
            if ($e->getCode() === 401) {
                return response()->json('Invalid refresh token', $e->getCode());
            }

            return response()->json('Unable to refresh token', $e->getCode());
        }
    }
}
Make sure to replace config('passport.client_id') and config('passport.client_secret') with your actual Passport client credentials.
Testing:
Use a tool like Postman or cURL to send a POST request to /api/refresh-token with the refresh token in the request body.
Example cURL command:
curl -X POST -H "Content-Type: application/json" -d '{"refresh_token": "YOUR_REFRESH_TOKEN"}' http://your-app-url/api/refresh-token
The response should contain a new access token and, optionally, a new refresh token.
This example demonstrates how to refresh an access token using Laravel Passport. It's important to handle token refresh securely and consider factors such as token expiration and refresh token rotation based on your application's needs. Adjust the code according to your specific use case and security requirements.
purpose of the Passport auth middleware
The auth:api middleware in Laravel Passport is used to protect routes and ensure that only authenticated users with a valid access token can access them. This middleware is designed specifically for API routes and integrates with Laravel Passport for OAuth2 authentication. Here's an example illustrating the purpose of the Passport auth:api middleware:
Install Laravel Passport:
composer require laravel/passport
Run Migrations:
php artisan migrate
Install Passport:
php artisan passport:install
This command generates encryption keys needed to generate secure access tokens.
Update User Model:
Open your User model (App\Models\User.php) and make it implement Laravel\Passport\HasApiTokens:
use Laravel\Passport\HasApiTokens;

class User extends Authenticatable
{
    use HasApiTokens, Notifiable;

    // Rest of the model code...
}
Create API Routes with auth:api Middleware:
In your routes/api.php, define routes that require authentication using the auth:api middleware:
use Illuminate\Http\Request;

Route::middleware('auth:api')->get('/user', function (Request $request) {
    return $request->user();
});

Route::middleware('auth:api')->get('/posts', function () {
    // Logic to fetch posts...
});
These routes are protected by the auth:api middleware, meaning that only requests with a valid access token will be allowed.
Testing:
Use a tool like Postman or cURL to send requests to the protected routes. Include the access token in the Authorization header.
Example cURL commands:
# Request to /user with access token
curl -H "Authorization: Bearer YOUR_ACCESS_TOKEN" http://your-app-url/api/user

# Request to /posts with access token
curl -H "Authorization: Bearer YOUR_ACCESS_TOKEN" http://your-app-url/api/posts
Ensure that the access token has the necessary scopes to access the corresponding route.
The purpose of the auth:api middleware is to ensure that only authenticated users with a valid access token can access protected API routes. It integrates seamlessly with Laravel Passport, making it easy to secure your API endpoints and control access based on OAuth2 authentication. Adjust the routes and middleware usage based on your specific API requirements.
Role of Laravel Passport Providers
Laravel Passport Providers play a crucial role in handling the authentication and authorization processes for your application. They define how the authentication and authorization mechanisms interact with your user model, clients, and access tokens. Let's go through the purpose and role of Laravel Passport Providers with an example:
Install Laravel Passport:
composer require laravel/passport
Run Migrations:
php artisan migrate
Install Passport:
php artisan passport:install
This command generates encryption keys needed to generate secure access tokens.
Update User Model:
Open your User model (App\Models\User.php) and make it implement Laravel\Passport\HasApiTokens:
use Laravel\Passport\HasApiTokens;

class User extends Authenticatable
{
    use HasApiTokens, Notifiable;

    // Rest of the model code...
}
Create Passport Providers:
Laravel Passport comes with three main providers: UserProvider, ClientProvider, and TokenRepository. You can customize them based on your needs.
Open your AuthServiceProvider.php (App\Providers\AuthServiceProvider.php) and override the register method to define your Passport providers:
use Laravel\Passport\Passport;
use Laravel\Passport\Bridge;

public function register()
{
    Passport::useClientModel(\App\Models\Client::class);
    Passport::useTokenModel(\App\Models\Token::class);
}
In this example, we're using a custom Client model and a custom Token model.
Create Custom Models:
Create the custom Client and Token models, extending the Passport default models:
php artisan make:model Models\Client
php artisan make:model Models\Token
Update the generated models (Client.php and Token.php) as needed for your application.
Update config/auth.php:
Open your config/auth.php file and update the providers section:
'providers' => [
    'users' => [
        'driver' => 'eloquent',
        'model' => App\Models\User::class,
    ],

    'clients' => [
        'driver' => 'eloquent',
        'model' => App\Models\Client::class,
    ],
],
This configuration tells Laravel to use the custom Client model for the clients provider.
Testing:
Now, you can use Passport for authentication and authorization in your application, and it will interact with your custom Client and Token models.
The purpose of Passport Providers is to allow you to customize the underlying models used for clients and tokens in your OAuth2 authentication flow. By defining custom models, you can extend the default behavior provided by Passport and tailor it to your application's requirements. The example above demonstrates how to use custom models for clients and tokens with Laravel Passport. Adjust the code according to your specific use case and customization needs.
How to to handle token expiration and refresh in a Laravel API?
Handling token expiration and refresh in a Laravel API involves implementing a token refresh mechanism and checking the expiration of access tokens. Laravel Passport provides support for token refresh out of the box. Below is an example illustrating how to handle token expiration and refresh in a Laravel API using Laravel Passport:
Install Laravel Passport:
composer require laravel/passport
Run Migrations:
php artisan migrate
Install Passport:
php artisan passport:install
This command generates encryption keys needed to generate secure access tokens.
Update User Model:
Open your User model (App\Models\User.php) and make it implement Laravel\Passport\HasApiTokens:
use Laravel\Passport\HasApiTokens;

class User extends Authenticatable
{
    use HasApiTokens, Notifiable;

    // Rest of the model code...
}
Create API Routes:
In your routes/api.php, define routes that require authentication:
use Illuminate\Http\Request;

Route::middleware('auth:api')->get('/user', function (Request $request) {
    return $request->user();
});
Token Expiration and Refresh Middleware:
Laravel Passport automatically handles token expiration, but you can create a middleware to check the expiration time and refresh the token when necessary. Create a middleware, for example, TokenExpirationMiddleware:
php artisan make:middleware TokenExpirationMiddleware
Update the middleware (app/Http/Middleware/TokenExpirationMiddleware.php):
<?php

namespace App\Http\Middleware;

use Closure;
use Illuminate\Support\Facades\Auth;

class TokenExpirationMiddleware
{
    public function handle($request, Closure $next)
    {
        // Check if the access token is expired
        if (Auth::guard('api')->check() && Auth::guard('api')->token()->expires_at->isPast()) {
            // Refresh the access token
            $newToken = Auth::guard('api')->user()->createToken('MyAppToken');

            // Attach the new token to the request
            $request->headers->set('Authorization', 'Bearer ' . $newToken->accessToken);
        }

        return $next($request);
    }
}
Register the middleware in the app/Http/Kernel.php:
protected $middlewareGroups = [
    'api' => [
        // ... Other middleware
        \App\Http\Middleware\TokenExpirationMiddleware::class,
    ],
];
Testing:
Make requests to the protected route and observe that Laravel Passport will automatically refresh the token when it's expired.
Example cURL command:
curl -H "Authorization: Bearer YOUR_ACCESS_TOKEN" http://your-app-url/api/user
Ensure that the access token has the necessary scopes to access the corresponding route.
Purpose of the Laravel Passport Personal Access Client
.The Laravel Passport Personal Access Client is a convenient feature provided by Laravel Passport for issuing personal access tokens. Personal access tokens are typically used for trusted clients and are not associated with a specific user. These tokens are useful for scenarios where a specific client (e.g., a mobile app or a JavaScript application) needs to access resources on the server without the need for user interaction.
Here's an example illustrating the purpose of the Laravel Passport Personal Access Client:
Install Laravel Passport:
composer require laravel/passport
Run Migrations:
php artisan migrate
Install Passport:
php artisan passport:install
This command generates encryption keys needed to generate secure access tokens.
Create Personal Access Client:
Laravel Passport provides an Artisan command to create a personal access client:
php artisan passport:client --personal
This command will prompt you to provide a name for the client. Choose a meaningful name that reflects the purpose of the client.
Use Personal Access Token in Code:
Once the personal access client is created, you can use it to generate access tokens in your code. For example, you might create a route that issues a personal access token:
use Illuminate\Http\Request;
use Laravel\Passport\ClientRepository;
use Laravel\Passport\TokenRepository;

Route::get('/issue-token', function (Request $request, ClientRepository $clientRepository, TokenRepository $tokenRepository) {
    $client = $clientRepository->personalAccessClient();
    $token = $tokenRepository->createPersonalAccessToken($client, null, 'YourTokenName');

    return response()->json(['access_token' => $token->accessToken]);
});
This example demonstrates creating a route that issues a personal access token for the personal access client. The generated access token can then be used to make requests to your API.
Testing:
Use a tool like Postman or cURL to send a request to the /issue-token route and obtain a personal access token.
Example cURL command:
curl -X GET http://your-app-url/issue-token
The response should contain the generated personal access token.
The purpose of the Laravel Passport Personal Access Client is to simplify the process of issuing personal access tokens for trusted clients. These tokens are useful for scenarios where user authentication might not be necessary, such as when a backend service needs to communicate with your API. Adjust the code based on your specific use case and requirements.
Summary
What is an Access Token
What is a Refresh Token
How does Laravel Passport handle OAuth2 Tokens
Explain the OAuth2 Authorization Grant Types
How to install Laravel Passport
How to protect routes with Passport in Laravel
Explain the concept of Scopes in Laravel Passport.
How to refresh an Access Token using Laravel Passport?
What is the purpose of the Passport auth middleware
Explain the role of Laravel Passport Providers
What is the purpose of the Laravel Passport Personal Access Client

Top comments (0)