Apply authentication in template files using if condition
Apply authentication in template files using login required with django all auth package
Apply authentication in template files using login required without django all auth package
Apply authentication in template files using custom_auth_backend.py
Apply authentication in route using middleware
Apply authentication in template files
Step 1: Set up a new Django project and create a new Django app.
Assuming you have Django installed, open a terminal and run the following commands:
django-admin startproject myproject
cd myproject
python manage.py startapp myapp
Step 2: Install the django-allauth package.
In the terminal, run the following command to install the package:
pip install django-allauth
Step 3: Configure the settings.
Open myproject/settings.py and make the following updates:
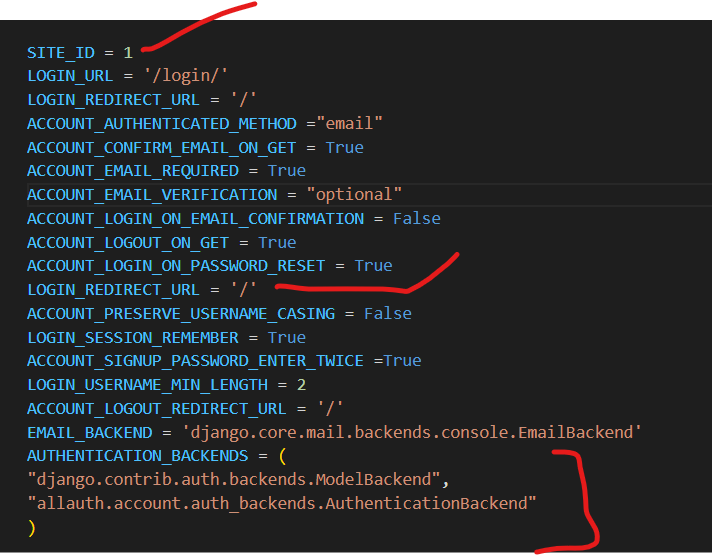
Add 'django.contrib.sites' and 'allauth' to the INSTALLED_APPS list.
Set SITE_ID = 1 (if not already set).
Add 'allauth.account' and 'allauth.socialaccount' to the INSTALLED_APPS list.
Add 'allauth.account.auth_backends.AuthenticationBackend' to the AUTHENTICATION_BACKENDS list.
Add the following line to the bottom of the file:

LOGIN_REDIRECT_URL = '/'
Step 4: Create the necessary views.
Open myapp/views.py and add the following code:
from django.shortcuts import render

def home_view(request):
    return render(request, 'home.html')
Step 5: Define the necessary URLs.
Open myproject/urls.py and add the following code:
from django.urls import path, include
from myapp.views import home_view

urlpatterns = [
    path('', home_view, name='home'),
    path('accounts/', include('allauth.urls')),
]
============================
set url in project level
set url in app level
Step 6: Create the necessary templates.
Create a directory called templates inside the myapp directory, and inside that, create an HTML file called home.html:
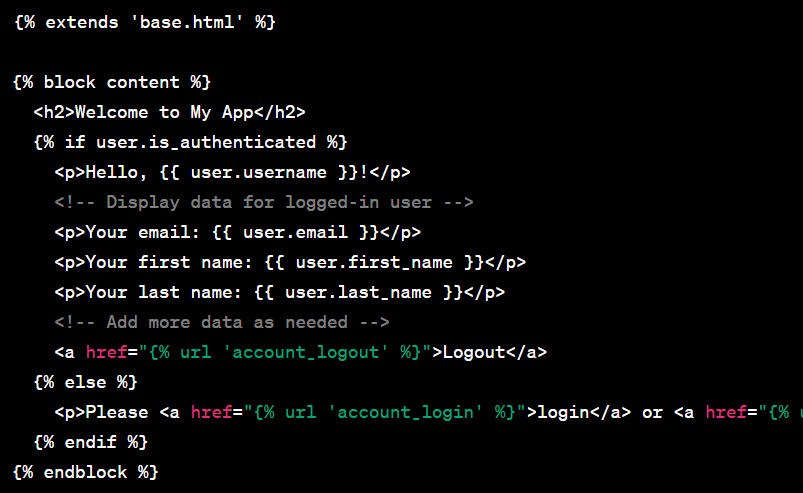
home.html:
{% extends 'base.html' %}

{% block content %}
  <h2>Welcome to My App</h2>
  {% if user.is_authenticated %}
    <p>Hello, {{ user.username }}!</p>
    <a href="{% url 'account_logout' %}">Logout</a>
  {% else %}
    <p>Please <a href="{% url 'account_login' %}">login</a> or <a href="{% url 'account_signup' %}">sign up</a>.</p>
  {% endif %}
{% endblock %}
Step 7: Update the main template.
Open myapp/templates/base.html (if it doesn't exist, create it) and add the following code:
<!DOCTYPE html>
<html>
<head>
  <title>My App</title>
</head>
<body>
  {% block content %}
  {% endblock %}
</body>
</html>
Step 8: Run migrations and start the development server.
In the terminal, run the following commands:
python manage.py makemigrations
python manage.py migrate
python manage.py runserver
Now you can visit http://localhost:8000 in your browser and see the login and signup links. When users sign up or log in, they will be redirected to the homepage (/) after authentication.
Apply authentication in template files using login required with django all auth package
Step 1: Set up a new Django project and create a new Django app.
Assuming you have Django installed, open a terminal and run the following commands:
django-admin startproject myproject
cd myproject
python manage.py startapp myapp
Step 2: Install the django-allauth package.
In the terminal, run the following command to install the package:
pip install django-allauth
Step 3: Configure the settings.
Open myproject/settings.py and make the following updates:
Add 'django.contrib.sites' and 'allauth' to the INSTALLED_APPS list.
Set SITE_ID = 1 (if not already set).
Add 'allauth.account' and 'allauth.socialaccount' to the INSTALLED_APPS list.
Add 'allauth.account.auth_backends.AuthenticationBackend' to the AUTHENTICATION_BACKENDS list.
Add the following line to the bottom of the file:

LOGIN_REDIRECT_URL = '/'
Step 4: Create the necessary views.
Open myapp/views.py and add the following code:
Step 5: Define the necessary URLs.
Open myproject/urls.py and add the following code:
from django.urls import path, include
from myapp.views import home_view

urlpatterns = [
    path('', home_view, name='home'),
    path('accounts/', include('allauth.urls')),
]
============================
set url only in project level
Step 6: Create the necessary templates.
Create a directory called templates inside the myapp directory, and inside that, create an HTML file called home.html:
home.html:
<!doctype html>
<html lang="en">
  <head>
    <!-- Required meta tags -->
    <meta charset="utf-8">
    <meta name="viewport" content="width=device-width, initial-scale=1, shrink-to-fit=no">

    <!-- Bootstrap CSS -->
    <link rel="stylesheet" href="https://cdn.jsdelivr.net/npm/bootstrap@4.3.1/dist/css/bootstrap.min.css" integrity="sha384-ggOyR0iXCbMQv3Xipma34MD+dH/1fQ784/j6cY/iJTQUOhcWr7x9JvoRxT2MZw1T" crossorigin="anonymous">

    <title>Home Page</title>
  </head>
  <body>
    <h1>Welcome, {{ username }}!</h1>
    <p>Your access token: {{ access_token }}</p>
    <p>Your refresh token: {{ refresh_token }}</p>


    <a href="{% url 'logout' %}" class="btn btn-primary">Logout</a>

    <script src="https://code.jquery.com/jquery-3.3.1.slim.min.js" integrity="sha384-q8i/X+965DzO0rT7abK41JStQIAqVgRVzpbzo5smXKp4YfRvH+8abtTE1Pi6jizo" crossorigin="anonymous"></script>
    <script src="https://cdn.jsdelivr.net/npm/popper.js@1.14.7/dist/umd/popper.min.js" integrity="sha384-UO2eT0CpHqdSJQ6hJty5KVphtPhzWj9WO1clHTMGa3JDZwrnQq4sF86dIHNDz0W1" crossorigin="anonymous"></script>
    <script src="https://cdn.jsdelivr.net/npm/bootstrap@4.3.1/dist/js/bootstrap.min.js" integrity="sha384-JjSmVgyd0p3pXB1rRibZUAYoIIy6OrQ6VrjIEaFf/nJGzIxFDsf4x0xIM+B07jRM" crossorigin="anonymous"></script>

    <script src="https://code.jquery.com/jquery-3.6.0.min.js"></script>
    <script>
        $(document).ready(function() {
            // Retrieve access token and refresh token from the page
            console.log("here data comes");
            var access_token = "{{ access_token }}";
            var refresh_token = "{{ refresh_token }}";
            // Store tokens in the local storage
            localStorage.setItem('access_token', access_token);
            localStorage.setItem('refresh_token', refresh_token);
        });
    </script>
  </body>
</html>
output

Another Example
To implement login required to display student records using Django Allauth package, you can follow these steps:
Install Django Allauth:
Open your terminal or command prompt.
Run the command pip install django-allauth to install the Django Allauth package.
Add 'allauth' and 'allauth.account' to the INSTALLED_APPS list in your project's settings.py file.
Configure the authentication backend in the AUTHENTICATION_BACKENDS setting by adding 'allauth.account.auth_backends.AuthenticationBackend'.
Configure Django Allauth:
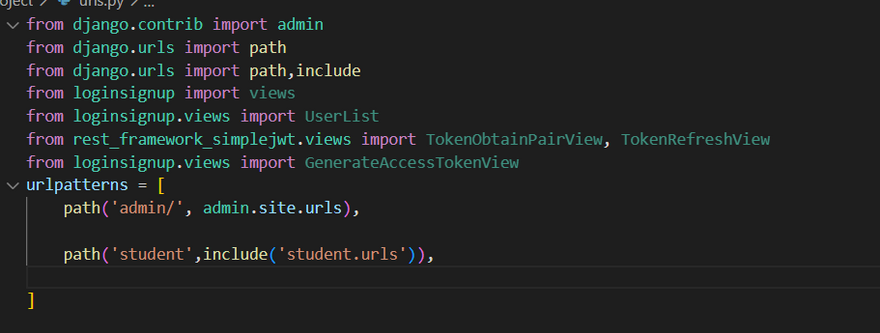
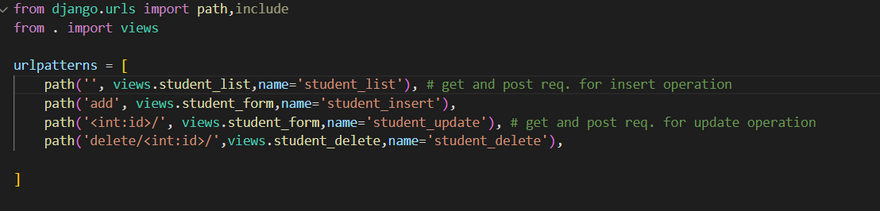
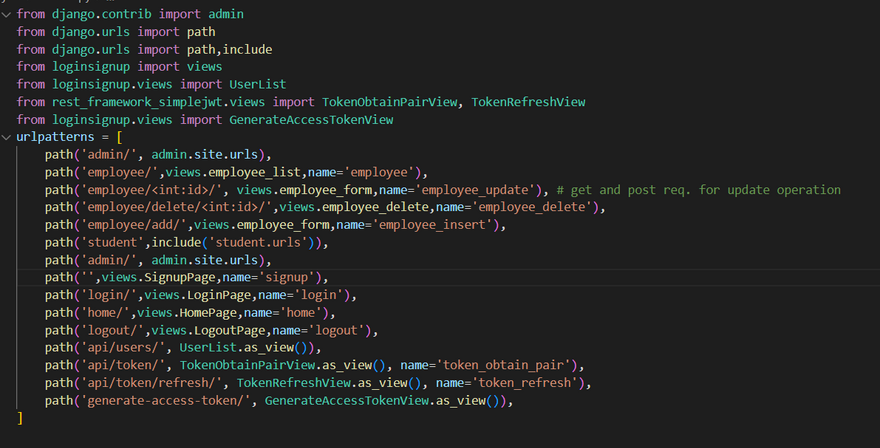
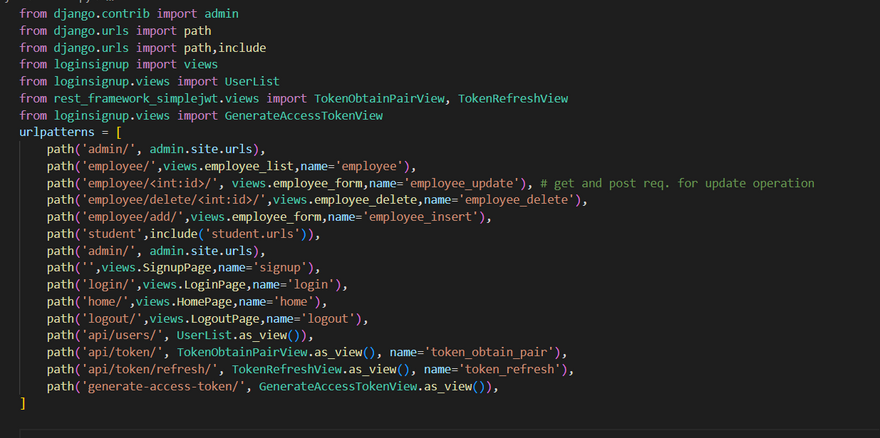
In your project's urls.py file, import include from django.urls and add the following URL patterns:
from django.urls import include, path

urlpatterns = [
    # Other URL patterns
    path('accounts/', include('allauth.urls')),
]
Create a Student Model:
Define a Student model in your Django app's models.py file, representing the student records.
Include relevant fields such as name, roll_number, grade, etc.
from django.db import models

class Student(models.Model):
    name = models.CharField(max_length=100)
    roll_number = models.CharField(max_length=20)
    grade = models.CharField(max_length=10)
    # Other fields
Create a Student List View:
Create a view in your Django app's views.py file that displays the list of students.
Decorate the view function or class with the @login_required decorator from django.contrib.auth.decorators to require authentication.
Retrieve the list of students from the database and pass it to the template for rendering.
from django.shortcuts import render
from django.contrib.auth.decorators import login_required
from .models import Student

@login_required
def student_list(request):
    students = Student.objects.all()
    return render(request, 'student_list.html', {'students': students})
Create a Student List Template:
Create a template file named student_list.html in your app's templates directory.
Iterate over the students passed from the view and display the student records.
{% extends 'base.html' %}

{% block content %}
    <h1>Student List</h1>
    <ul>
        {% for student in students %}
            <li>{{ student.name }} - {{ student.roll_number }} - {{ student.grade }}</li>
        {% endfor %}
    </ul>
{% endblock %}
Login and Access Student List:
Start the development server by running python manage.py runserver.
Navigate to the login page (e.g.,
http://localhost:8000/accounts/login/) and log in with valid credentials.
After successful login, you will be redirected to the student list page (e.g., http://localhost:8000/students/), where you can view the student records
.
If a user tries to access the student list page without logging in, they will be redirected to the login page.
Note: Make sure you have configured your Django project's authentication settings correctly, including the AUTH_USER_MODEL and other relevant settings.
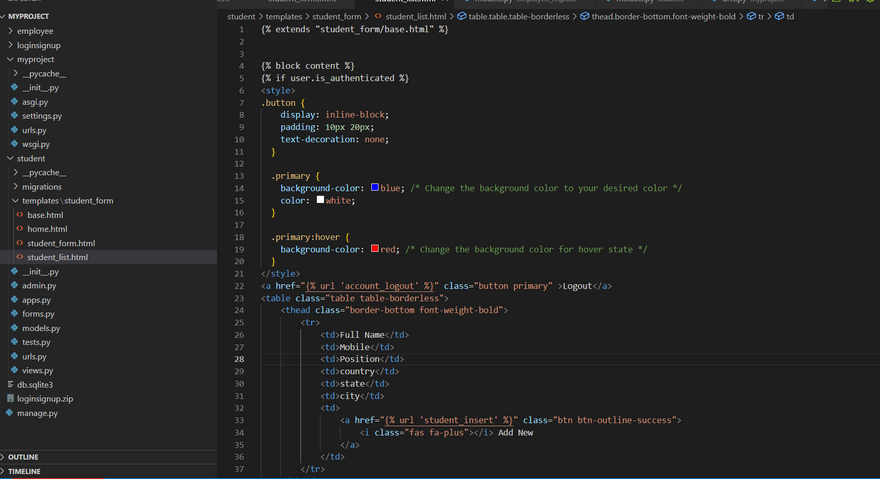
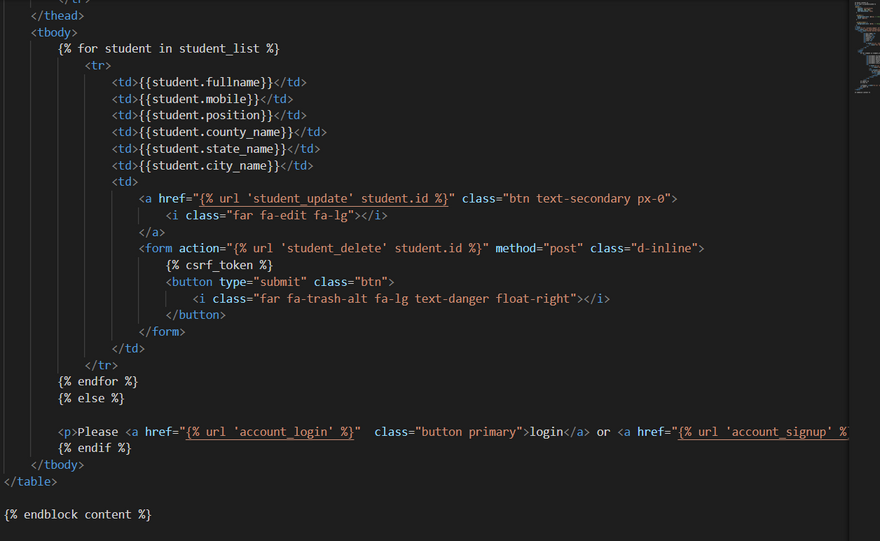
Apply authentication in template files using login required without django all auth package
In your project's urls.py file, import include from django.urls and add the following URL patterns:
Create a Student Model:
Define a Student model in your Django app's models.py file, representing the student records.
Include relevant fields such as name, roll_number, grade, etc.
from django.db import models
from sorl.thumbnail import ImageField

# Create your models here.

class Position(models.Model):
    title = models.CharField(max_length=50)

    def __str__(self):
        return self.title

class Employee(models.Model):
    fullname = models.CharField(max_length=100)
    emp_code = models.CharField(max_length=3)
    mobile= models.CharField(max_length=15)
    position= models.ForeignKey(Position,on_delete=models.CASCADE)
    image = ImageField()
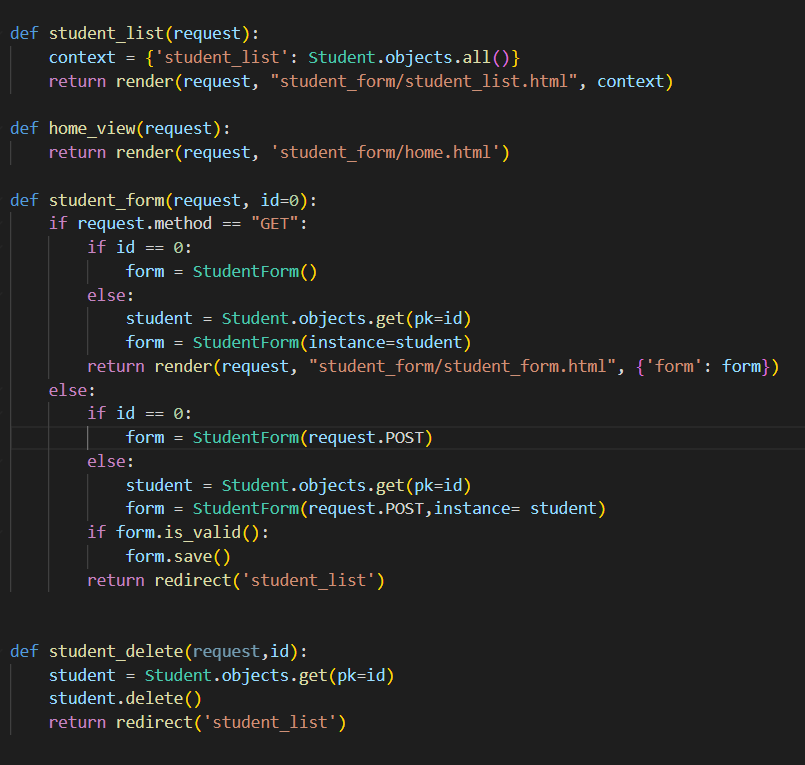
Create a Student List View:
Create a view in your Django app's views.py file that displays the list of students.
Decorate the view function or class with the @login_required decorator from django.contrib.auth.decorators to require authentication.
Retrieve the list of students from the database and pass it to the template for rendering.
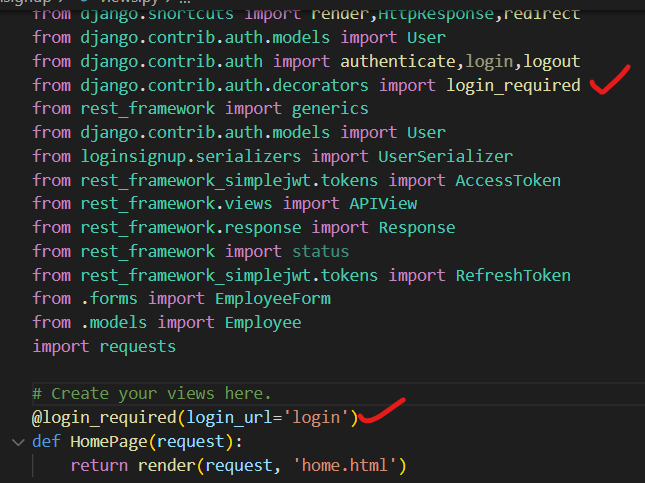
from django.shortcuts import render

# Create your views here.
from django.shortcuts import render,HttpResponse,redirect
from django.contrib.auth.models import User
from django.contrib.auth import authenticate,login,logout
from django.contrib.auth.decorators import login_required
from rest_framework import generics
from django.contrib.auth.models import User
from loginsignup.serializers import UserSerializer
from rest_framework_simplejwt.tokens import AccessToken
from rest_framework.views import APIView
from rest_framework.response import Response
from rest_framework import status
from rest_framework_simplejwt.tokens import RefreshToken
from .forms import EmployeeForm
from .models import Employee
import requests

# Create your views here.
@login_required(login_url='login')
def HomePage(request):
    return render(request, 'home.html')

def SignupPage(request):
    if request.method=='POST':
        uname=request.POST.get('username')
        email=request.POST.get('email')
        pass1=request.POST.get('password1')
        pass2=request.POST.get('password2')
        user = authenticate(username=uname, password=pass1)

        if pass1!=pass2:
            return HttpResponse("Your password and confrom password are not Same!!")
        else:

            my_user=User.objects.create_user(uname,email,pass1)
            my_user.save()
            return redirect('login')

    return render (request,'signup.html')

def LoginPage(request):
    if request.method=='POST':
        username=request.POST.get('username')
        pass1=request.POST.get('pass')
        user=authenticate(request,username=username,password=pass1)
        if user is not None:

            response = requests.post('http://localhost:8000/api/token/', data={
                'username': username,
                'password': pass1
            })

            if response.status_code == 200:

                refresh = RefreshToken.for_user(user)
            access_token = str(refresh.access_token)

            return render (request,'home.html', {'username': username, 'access_token': access_token,'refresh_token': refresh})

        else:
            return HttpResponse ("Username or Password is incorrect!!!")

    return render (request,'login.html')

def LogoutPage(request):
    logout(request)
    return redirect('login')

class UserList(generics.ListAPIView):
    queryset = User.objects.all()
    serializer_class = UserSerializer
class GenerateAccessTokenView(APIView):
    def post(self, request):
        username = request.data.get('username')
        password = request.data.get('password')
        user = authenticate(username=username, password=password)
        if user is not None:
            access_token = AccessToken.for_user(user)
            return Response({'access_token': str(access_token)})
        else:
            return Response({'error': 'Invalid credentials'}, status=400)
def employee_list(request):
    context = {'employee_list': Employee.objects.all()}
    return render(request, "employee_list.html", context)
def employee_form(request, id=0):
    if request.method == "GET":
        if id == 0:
            form = EmployeeForm()
        else:
            employee = Employee.objects.get(pk=id)
            form = EmployeeForm(instance=employee)
        return render(request, "employee_form.html", {'form': form})
    else:
        if id == 0:
            form = EmployeeForm(request.POST)
        else:
            employee = Employee.objects.get(pk=id)
            form = EmployeeForm(request.POST,instance= employee)
        if form.is_valid():
            form.save()
        return redirect('/employee')
def employee_delete(request,id):
    employee = Employee.objects.get(pk=id)
    employee.delete()
    return redirect('/employee')
Create a Student List Template:
Create a template file named student_list.html in your app's templates directory.
Iterate over the students passed from the view and display the student records.
<!doctype html>
<html lang="en">
  <head>
    <!-- Required meta tags -->
    <meta charset="utf-8">
    <meta name="viewport" content="width=device-width, initial-scale=1, shrink-to-fit=no">

    <!-- Bootstrap CSS -->
    <link rel="stylesheet" href="https://cdn.jsdelivr.net/npm/bootstrap@4.3.1/dist/css/bootstrap.min.css" integrity="sha384-ggOyR0iXCbMQv3Xipma34MD+dH/1fQ784/j6cY/iJTQUOhcWr7x9JvoRxT2MZw1T" crossorigin="anonymous">

    <title>Home Page</title>
  </head>
  <body>
    <h1>Welcome, {{ username }}!</h1>
    <p>Your access token: {{ access_token }}</p>
    <p>Your refresh token: {{ refresh_token }}</p>


    <a href="{% url 'logout' %}" class="btn btn-primary">Logout</a>

    <script src="https://code.jquery.com/jquery-3.3.1.slim.min.js" integrity="sha384-q8i/X+965DzO0rT7abK41JStQIAqVgRVzpbzo5smXKp4YfRvH+8abtTE1Pi6jizo" crossorigin="anonymous"></script>
    <script src="https://cdn.jsdelivr.net/npm/popper.js@1.14.7/dist/umd/popper.min.js" integrity="sha384-UO2eT0CpHqdSJQ6hJty5KVphtPhzWj9WO1clHTMGa3JDZwrnQq4sF86dIHNDz0W1" crossorigin="anonymous"></script>
    <script src="https://cdn.jsdelivr.net/npm/bootstrap@4.3.1/dist/js/bootstrap.min.js" integrity="sha384-JjSmVgyd0p3pXB1rRibZUAYoIIy6OrQ6VrjIEaFf/nJGzIxFDsf4x0xIM+B07jRM" crossorigin="anonymous"></script>

    <script src="https://code.jquery.com/jquery-3.6.0.min.js"></script>
    <script>
        $(document).ready(function() {
            // Retrieve access token and refresh token from the page
            console.log("here data comes");
            var access_token = "{{ access_token }}";
            var refresh_token = "{{ refresh_token }}";
            // Store tokens in the local storage
            localStorage.setItem('access_token', access_token);
            localStorage.setItem('refresh_token', refresh_token);
        });
    </script>
  </body>
</html>
Login and Access Student List:
Start the development server by running python manage.py runserver.
Navigate to the login page (e.g.,
http://localhost:8000/accounts/login/) and log in with valid credentials.
After successful login, you will be redirected to the student list page (e.g., http://localhost:8000/students/), where you can view the student records
.
If a user tries to access the student list page without logging in, they will be redirected to the login page.
Note: Make sure you have configured your Django project's authentication settings correctly, including the AUTH_USER_MODEL and other relevant settings.
Apply authentication in template files using custom_authentication
To apply custom login authentication to display student data only when the user is logged in, you can follow these steps:
Define a custom authentication backend:
Create a file named custom_auth_backend.py in your Django project.
Implement a custom authentication backend by subclassing
django.contrib.auth.backends.ModelBackend.
Override the authenticate method to perform your custom authentication logic, such as validating the login credentials against your user model.
Return the authenticated user or None if authentication fails.
Example custom_auth_backend.py:
from django.contrib.auth.backends import ModelBackend
from django.contrib.auth import get_user_model

class CustomAuthBackend(ModelBackend):
    def authenticate(self, request, username=None, password=None, **kwargs):
        User = get_user_model()
        try:
            user = User.objects.get(username=username)
            if user.check_password(password):
                return user
        except User.DoesNotExist:
            pass
        return None
Configure the custom authentication backend:
Open your Django project's settings.py file.
Add the path to your custom authentication backend class in the AUTHENTICATION_BACKENDS setting.
Example settings.py:

python
Copy code
AUTHENTICATION_BACKENDS = [
    'myproject.custom_auth_backend.CustomAuthBackend',
    'django.contrib.auth.backends.ModelBackend',
]
Protect the student data view:
Open the file containing your view that displays the student data (e.g., views.py).
Import the login_required decorator from django.contrib.auth.decorators.
Apply the login_required decorator to your view function or class-based view.
This decorator ensures that only authenticated users can access the view, redirecting them to the login page if they are not authenticated.
Example views.py:
from django.contrib.auth.decorators import login_required
from django.shortcuts import render

@login_required
def student_data(request):
    # Your view logic to retrieve and display student data
    return render(request, 'student_data.html')
Create the login page:
Create a template file named login.html in your project's templates directory.
Add a login form to the login.html template, allowing users to input their login credentials.
Submit the login form to the appropriate URL (e.g., /login/) using the POST method.
Example login.html:
<form action="/login/" method="post">
    {% csrf_token %}
    <input type="text" name="username" placeholder="Username" required>
    <input type="password" name="password" placeholder="Password" required>
    <button type="submit">Login</button>
</form>
Configure the login URL:
Open your Django project's urls.py file.
Add a URL pattern for the login view, mapping it to the appropriate view function or class-based view.
Ensure that the URL pattern matches the action attribute of your login form in login.html.
Example urls.py:
from django.urls import path
from . import views

urlpatterns = [
    path('login/', views.login_view, name='login'),
    # Other URL patterns for your project
]
Handle the login form submission:
Open the file containing your login view (e.g., views.py).
Import the authenticate and login functions from
`django.contrib.auth
Apply authentication in route using middleware
To apply custom login authentication using route middleware to display student data only when the user is logged in, you can follow these steps:
Create a custom route middleware:
Create a file named custom_auth_middleware.py in your Django project.
Implement a custom route middleware by defining a class that subclasses django.middleware.BaseMiddleware.
Override the call method to perform your custom authentication logic, such as checking if the user is authenticated and redirecting if not.
Use the request.path attribute to determine the current URL and apply authentication logic based on that.
Return the appropriate response or call the next middleware if authentication passes.
Example custom_auth_middleware.py:
from django.shortcuts import redirect

class CustomAuthMiddleware:
    def __init__(self, get_response):
        self.get_response = get_response

    def __call__(self, request):
        # Check if the user is not authenticated and the current URL is not the login page
        if not request.user.is_authenticated and request.path != '/login/':
            return redirect('/login/')  # Redirect to the login page

        response = self.get_response(request)
        return response
Configure the custom route middleware:
Open your Django project's settings.py file.
Add the path to your custom route middleware class in the MIDDLEWARE setting.
Place it in the desired position in the middleware stack.
Example settings.py:
MIDDLEWARE = [
    # Other middleware classes
    'myproject.custom_auth_middleware.CustomAuthMiddleware',
]
Protect the student data route:
Open the file containing your route definitions (e.g., urls.py).
Import the login_required decorator from django.contrib.auth.decorators.
Apply the login_required decorator to the route function or class-based view that displays the student data.
This decorator ensures that only authenticated users can access the route, redirecting them to the login page if they are not authenticated.
Example urls.py:
from django.urls import path
from . import views
from django.contrib.auth.decorators import login_required

urlpatterns = [
    path('student-data/', login_required(views.student_data), name='student_data'),
    # Other route definitions
]
Create the login page:
Create a template file named login.html in your project's templates directory.
Add a login form to the login.html template, allowing users to input their login credentials.
Submit the login form to the appropriate URL (e.g., /login/) using the POST method.
Example login.html:
<form action="/login/" method="post">
    {% csrf_token %}
    <input type="text" name="username" placeholder="Username" required>
    <input type="password" name="password" placeholder="Password" required>
    <button type="submit">Login</button>
</form>
Handle the login form submission:
Open the file containing your login view (e.g., views.py).
Import the authenticate and login functions from django.contrib.auth.
Implement the logic to authenticate the user and log them in.
If authentication is successful, redirect the user to the protected student data route.
Example views.py:
from django.shortcuts import render, redirect
from django.contrib.auth import

Top comments (0)