how to create database using mongo db
how to create table or Collection in mongodb
Different data type in mongodb
how to data in Collection mongodb
Methods for Performing Queries in mongodb
Limiting Queries results in mongodb
Update and Delete Queries results in mongodb
Apply Aggregation Method in mongodb
Indexing in mongodb
Concept of Sharding in mongodb
Replication in mongodb
Export in mongodb
Backup in mongodb
Regular Expression in mongodb
To create a database using MongoDB, you can follow the steps below:
Start the MongoDB server by running the following command:
mongod
Open another terminal or command prompt and start the MongoDB shell by running the following command:
mongo
To create a new database, use the use command followed by the name of the database. For example, to create a database called mydb, run the following command:
use mydb
Once you have switched to the new database, you can start inserting data into it. To create a new collection in the database, use the db.createCollection() command. For example, to create a collection called users, run the following command:
db.createCollection("users")
This will create a new collection called users in the mydb database.
To insert data into the users collection, use the
db.collectionName.insert() command.
For example, to insert a new user with a name and age field, run the following command:
db.users.insert({name: "John", age: 30})
This will insert a new document with a name field set to "John" and an age field set to 30 into the users collection.
You can query the data in the collection by using the db.collectionName.find() command. For example, to retrieve all the documents in the users collection, run the following command:
db.users.find()
This will retrieve all the documents in the users collection.
==================================================================
how to create table in mongodb
In MongoDB, tables are referred to as collections. Here is an example of how to create a collection in MongoDB:
Start by opening the MongoDB shell by typing mongo in your command line.
Once you are in the MongoDB shell, select the database where you want to create the collection using the use command. For example, to select a database called "mydb", you would type:
use mydb
To create a new collection, use the db.createCollection() method, followed by the name of the collection you want to create. For example, to create a collection called "users", you would type:
db.createCollection("users")
This will create an empty collection called "users" in the current database.
You can also specify additional options when creating the collection, such as the maximum size or the storage engine to use. For example, to create a collection with a maximum size of 100 MB and using the WiredTiger storage engine, you would type:
db.createCollection("users", {
    capped: true,
    size: 100000000,
    storageEngine: {
        wiredTiger: {}
    }
})
This will create a new collection called "users" with the specified options.
That's it! You have now created a collection in MongoDB. You can start inserting documents into the collection using the insert() or insertOne() methods.
Creation of collection can be done using db.createCollection(name, options). But, typically you will not require building or constructing a collection of your own. MongoDB does this creation task automatically as you start to insert some documents for making a database. Here is a syntax that will tell you how to create your collection in MongoDB:
db.createCollection(collection_name, options)
Here, db.createCollection() is the method used; "name" is a data type - string which is specifying the name of the collection to be formed. "options" is an added document type which helps in specifying the size of memory along with indexing the collection in the database. This parameter is an optional one.
The following example shows the syntax of the createCollection() method with its options:
db.createCollection(<collection_name>, { capped: <boolean>,
                              autoIndexId: <boolean>,
                              size: <number>,
                              max: <number>,
                              storageEngine: <document>,
                              validator: <document>,
                              validationLevel: <string>,
                              validationAction: <string>,
                              indexOptionDefaults: <document>,
                              viewOn: <string>,
                              pipeline: <pipeline>,
                              collation: <document>,
                              writeConcern: <document>} )
Here is the detailing of some important fields that can be used as options in the create createCollection() method:
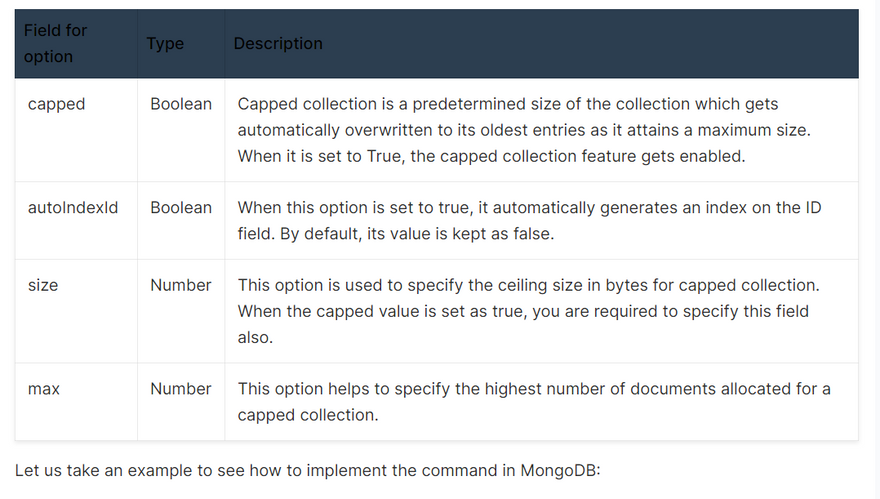
Let us take an example to see how to implement the command in MongoDB:
db.createCollection("MyCollection")
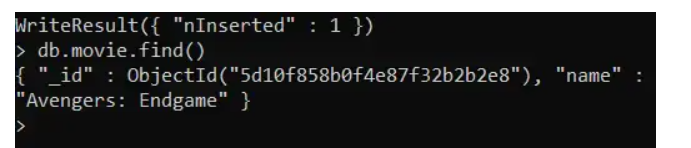
MongoDB can create collections automatically as documents are inserted automatically. Let us take a situation where you want to insert a document using insert() in a collection named "movie"; you can type the command something like this:
db.movie.insert({"name":"Avengers: Endgame"})
The above operation will automatically create a collection if the collection with this name does not currently exist. Also, if you want to check an inserted document, you can use the find() method. Its syntax is:
db.collection_name.find()
Different data type in mongodb
Data type is an essential component of a language or script that is used to define the type of data being used in framing the database. It is important for you to know that MongoDB stores data in BSON format. In this chapter, you will learn about the different data types that exist in MongoDB, along with their implementation techniques.
JSON based databases usually return query results which can be effortlessly parsed, having modest or nix transformation, straightforwardly by the use of JavaScript along with most well-liked programming languages - dropping the quantity of logic one needs for building your application layer.
In the case of MongoDB, data representation is done in JSON document format, but here the JSON is binary-encoded, which is termed as BSON. BSON is the extended version of the JSON model, which is providing additional data types, makes performance to be competent to encode and decode in diverse languages and ordered fields.
Remote procedure calls in MongoDB can be made by using the BSON format. MongoDB has a unique way of representing data types in which each data type is associated with an alias as well as a number that is usually used to search or find any specific record within a MongoDB database. MongoDB allows its users to implement different variations of data types:
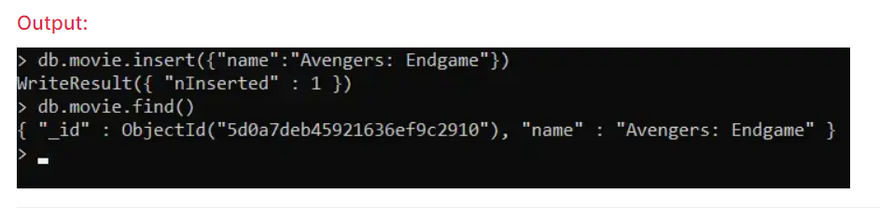
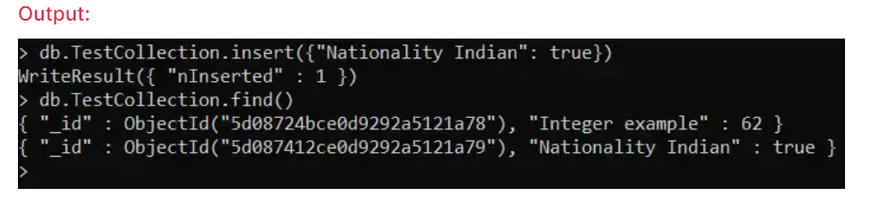
Integer is a data type that is used for storing a numerical value, i.e., integers as you can save in other programming languages. 32 bit or 64-bit integers are supported, which depends on the server.
db.TestCollection.insert({"Integer example": 62})
Boolean is implemented for storing a Boolean (i.e., true or false) values.
db.TestCollection.insert({"Nationality Indian": true})
dropping a collection in MongoDB
For dropping a collection in MongoDB, you have to make use of the collection.drop() method. This will eliminate the collection from the database completely and will not leave any indexes that are connected to this drop collection. It is also to be noted that, this collection dropping method has no argument in it and will pop up with errors in case arguments are passed. All the indexes associated with the collection gets dropped once this method is executed.
The syntax for using this method is:
db.collection_name.drop()
Here is an example that is showing the use of the drop() method:
Continuing from the example in the previous lesson where you have created a collection inside the my_project_db database. Now use this database to remove or drop the movie collection and see the changes:
use my_project_db
db.movie.drop()
show collections
Methods for Performing Queries in mongodb
CRUD operation is one of the essential concepts of a database system. Inserting data in the database comes under one of the CRUD operations. If you do not insert data in your database, you will not be able to continue with other activities within your document. In this chapter, you will learn about the different concepts and methods that are related to the insert operation in MongoDB.
operation in MongoDB.
The insert operation is one of the crucial operations in the database system. MongoDB supports the below mentioned three methods to insert document data in your database:
insert()
insertOne()
insertMany()
The insert() method
The insert() method is used to insert one or multiple documents in a collection. The collection name is associated with the insert() method and the parameters. The syntax to insert a single document is shown below:
Syntax
db.collection_Name.insert(JSON document)
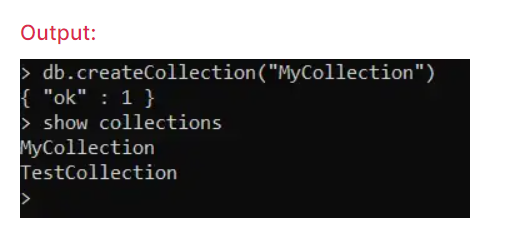
In the above syntax, the document will consist of { name: "data_value" }. As it is a JSON document, these documents will consist of the data as name-value pairs, surrounded by curly braces, i.e. {}.
db.movie.insert({"name":"Avengers: Endgame"})
db.movie.find()
The _id which is provided by MongoDB is a 12-byte value of ObjectId which is prepared from the following values:
- a 4-byte value denoting the seconds as Unix epoch,
- a 3-byte device identifier value,
- a 2-byte processing id,
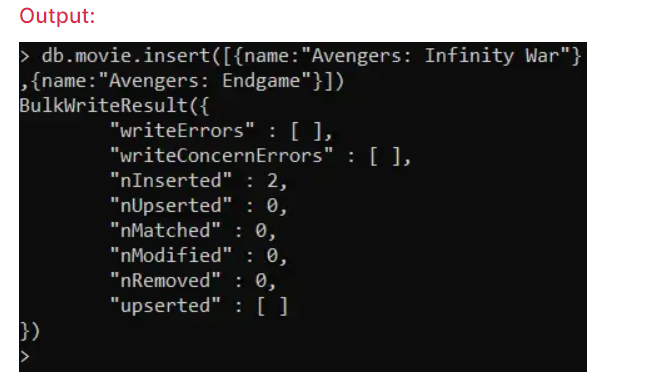
- a 3 byte counter which is a random value. It is also possible for you to insert multiple document values in a particular insert() method.
Let us take an example where you can insert multiple documents at a time:
Output
db.movie.insert(
[
  { name: "Avengers: Infinity War" },
  { name: "Avengers: Endgame" }
]
)
It is to be noted that the documents are supplied in the form of an array. Document values are packed or enclosed in square brackets [] and separated by commas.
Executing the above statements will pop up with messages something like this:
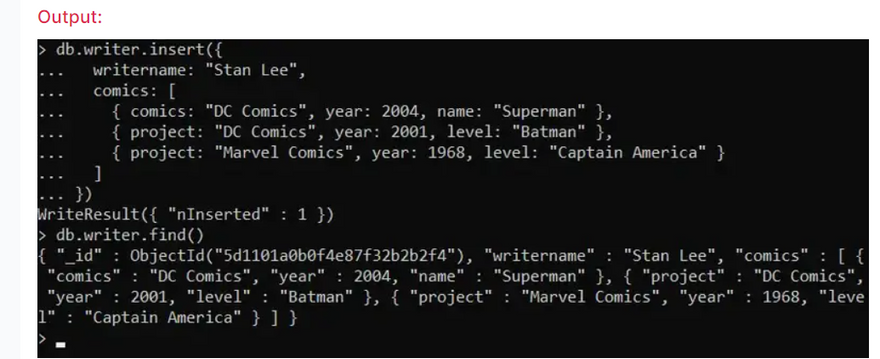
Embedded Document
MongoDB also allow users to create document containing other documents, arrays of values, as well as arrays of documents.
db.writer.insert({
  writername: "Stan Lee",
  comics: [
    { comics: "DC Comics", year: 2004, name: "Superman" },
    { project: "DC Comics", year: 2001, level: "Batman" },
    { project: "Marvel Comics", year: 1968, level: "Captain America" }
  ]
})
Insert one()
Another way to insert documents is by using the insertOne() method for a single document in a collection:
db.movie.insertOne({ _id: 2, writername: "Stan Lee", name: "Aquaman" })
In this case, you have a particular non-existent collection of data. In the case of the insert() method, a precise collection will get produced in case it does not exist previously.
Here you will observe that the output appeared to be different in format than that of insert() method:

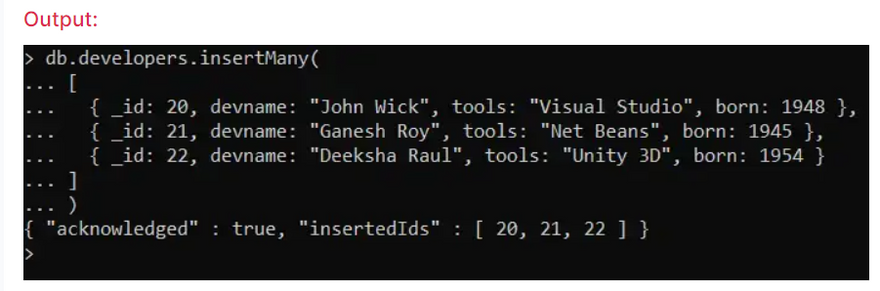
insertMany()
As the name is explaining its working, is used for inserting multiple documents:
db.developers.insertMany(
[
  { _id: 20, devname: "John Wick", tools: "Visual Studio", born: 1948 },
  { _id: 21, devname: "Ganesh Roy", tools: "Net Beans", born: 1945 },
  { _id: 22, devname: "Deeksha Raul", tools: "Unity 3D", born: 1954 }
]
)
Methods for Performing Queries in mongodb
Queries are another essential element of a database system. When your database is having all the data fed into it, and you want to retrieve the data by executing some command, MongoDB allows you to do that. In this chapter, you will learn about the different ways of how queries can be made using MongoDB.
A query in a database system is a command that is used for extracting data from a database and display it in a readable form. Every query associated with the database system is associated with any particular language (such as SQL for structured data, MongoDB for unstructured data). Queries can be explained by taking a suitable example:
Let us assume a situation where your database has an employee table, and you wish to track the sales performance ID, so you have to write a query to ask your database to fetch for you the list of all the sales performance with the highest sales data in the top. This is where the queries of a database language become useful.
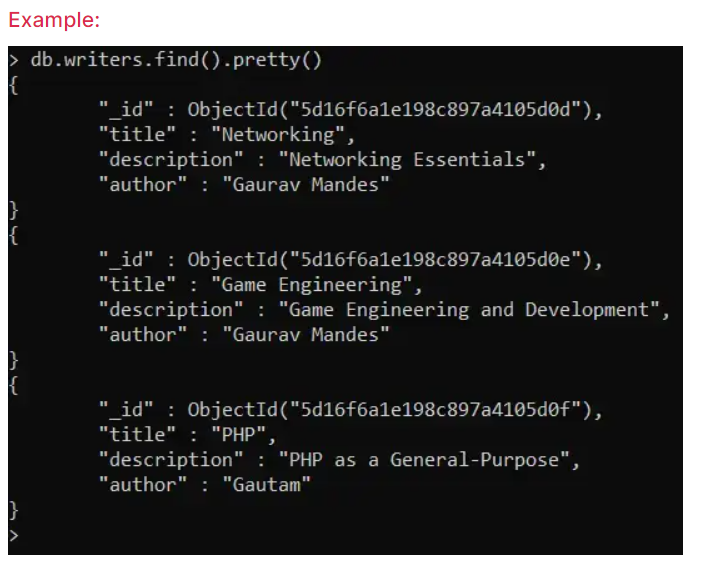
The find() method: This method is used for querying data from a MongoDB collection.
The basic syntax for using this method is:
Syntax
db.collection_name.find()
Output
db.writers.find()
Various other options can be used to make the query specific. It will be discussed below.
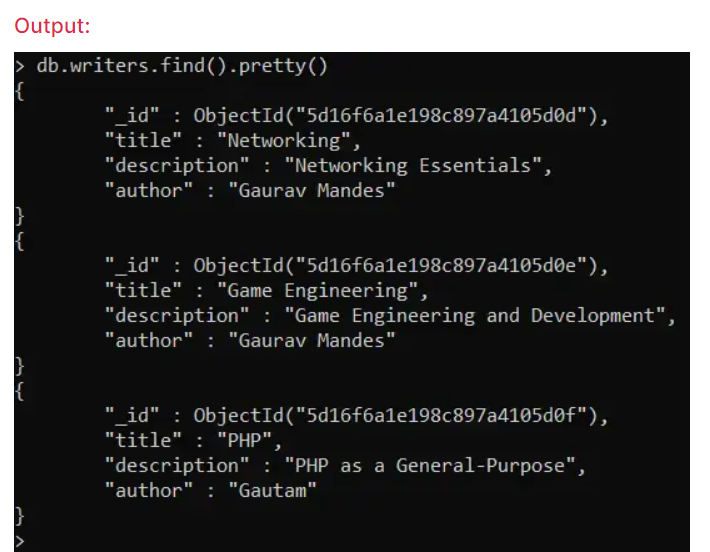
The pretty() method: This method is used for giving a proper format to the output extracted by the query.
The basic syntax for using this method is:
Syntax
db.collection_name.find().pretty()
Example
db.writers.find().pretty()
Here is how they can be implemented:
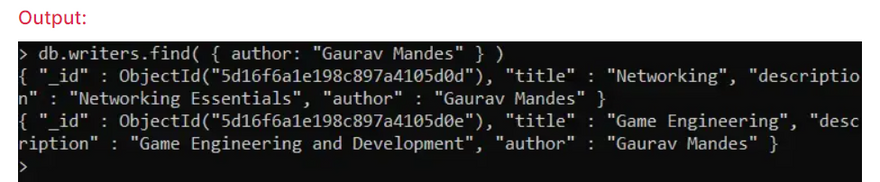
Filtering Criteria in MongoDB Queries
It is also possible to filter your results by giving or adding some specific criteria in which you are interested to. For example, if you wish to see the Gaurav Mandes data, you can add a specific attribute to the find() to fetch the data of Gaurav Mandes from that particular database.
Example
db.writers.find( { author: "Gaurav Mandes" } )
AND Condition
MongoDB also allows you in specifying data values of the documents holding two or more specified values to be fetched from the query. Here are two examples showing the use of specifying queries using AND.
db.writers.find( { tools: "Visual Studio", born: 1948} )
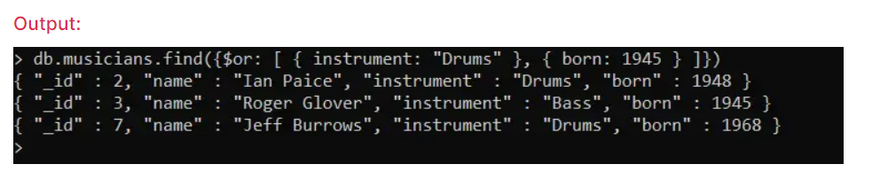
OR Conditon
MongoDB allows users to specify either one or multiple values to be true. According to this, till one of the conditions is true, the document data will get returned. Here is an example showing the use of OR condition:
db.musicians.find({$or: [ { instrument: "Drums" }, { born: 1945 } ] } )
In Operator
The $in operator is another special operator used in queries for providing a list of values in the query. When your document holds any of those provided values, it gets returned. Here is an example:
db.musicians.find( { "instrument": { $in: [ "Keyboards", "Bass" ] } } )

Sure, I can provide you with an example to illustrate the difference between find() and find.pretty() methods in MongoDB.
Consider the following sample collection called users:
{ "_id": 1, "name": "Alice", "age": 25 }
{ "_id": 2, "name": "Bob", "age": 30 }
{ "_id": 3, "name": "Charlie", "age": 35 }
{ "_id": 4, "name": "David", "age": 40 }
Now, let's say we want to retrieve all the documents where the age field is greater than or equal to 30.
Using the find() method, we can write the following query:
db.users.find({ age: { $gte: 30 } })
This will return the following output:
{ "_id": 2, "name": "Bob", "age": 30 }
{ "_id": 3, "name": "Charlie", "age": 35 }
{ "_id": 4, "name": "David", "age": 40 }
As you can see, the output returned by the find() method is in a compact format, with all the matching documents listed one after the other.
On the other hand, using the find.pretty() method, we can write the following query:
db.users.find({ age: { $gte: 30 } }).pretty()
This will return the following output:
{
    "_id" : 2,
    "name" : "Bob",
    "age" : 30
}
{
    "_id" : 3,
    "name" : "Charlie",
    "age" : 35
}
{
    "_id" : 4,
    "name" : "David",
    "age" : 40
}
As you can see, the output returned by the find.pretty() method is more formatted and visually appealing. Each matching document is displayed on a separate line, and the fields are indented and aligned for better readability.
Methods for Projection Queries in mongodb
Protection queries are a particular type of MongoDB queries where you can specify fields you want to get in the output. MongoDB allows you to perform a query for a collection by using the db.collection.find() method, where you have to mention the field that needs to be explicitly returned. This can be done by explicitly incorporating the field names in your query, and adding a 1 or 0 with them for specifying whether this needs to be returned or not. Such kinds of parameters are called projection parameter. When a projection parameter is associated with a value 1, it will show the value according to the query and hide when the projection parameter has a value 0.
Here is an example where the Without projection parameter is not used:
db.writers.find()
Another example where the projection parameter is used:
db.writers.find( { "author": "Gaurav Mandes" }, { _id:0, author:1, title:1 } )

In the example above, the _id field is excluded, which automatically gets added, and the title and author fields are displayed.
Limiting Query Result
MongoDB allows you to specify the maximum number of documents to return by making use of the limit() method which will return only the number of documents you need. And as soon as you prepare a MongoDB query for the collection with the help of db.collection.find() method, you can add on the limit() method for specifying the limit.
Here is an example where the Limit method is not used:
db.writers.find().pretty()

In the above example, you can see that three results are showing as output.
Another example where the Limit method is used:
db.writers.find().pretty().limit(2)
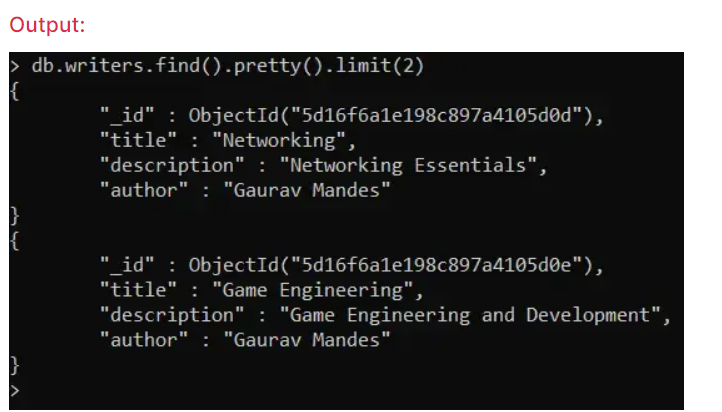
In the above example where the limit() method is used, you can see that only two results are seen in the form of output because we have passed the parameter in the limit() method to display only two records.
It is also possible to skip some documents from a MongoDB database. You can perform such operations using the skip() method of MongoDB. In other words, it can be said that users have the power to manage or regulate where MongoDB begins returning the query results.
db.writers.find().pretty().skip(1)
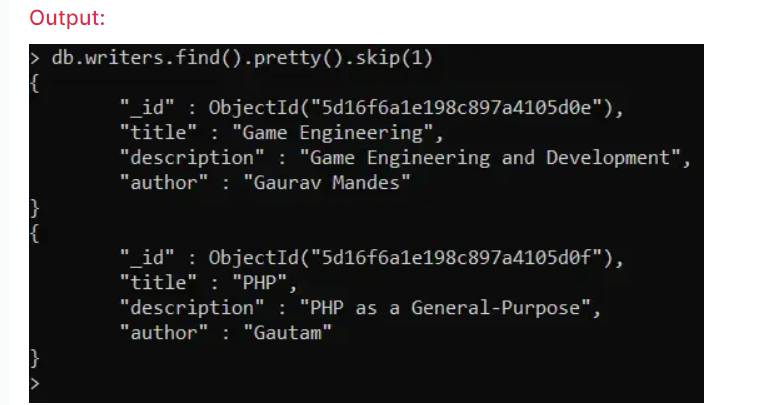
In the above example where the skip() method is used, you can see that only two results are seen in the form of output because we have skipped the first result.
Update and Delete Queries results in mongodb
Updating the database is another essential operation that every database system must have. If you have put some data in your database and want to alter the values of any particular document, you need to use the update operation. In this chapter, you will learn about how to update data within MongoDB database.
Use of Update Operation in MongoDB
The update operation in a database is used to change or update values in a document. MongoDB makes use of the update() method for updating the documents within a MongoDB collection. For updating any specific documents, a new criterion can be incorporated with the update statement, which will only update the selected documents.
You have to put some specific condition in the form of the parameter to update the document in MongoDB. Here is a stepwise representation of how this can be performed:
Make use of the update() method.
- Prefer the circumstance that you wish to implement for deciding which document needs an update in their database. Let us assume an example where you want to update your document which is having an id 4.
- Then make use of the set command for modifying the Field Name.
- Select which Field Name you wish for modifying and go into the new value consequently .
db.collection.update(
   <query>,
   <update>,
   {
     upsert: <boolean>,
     multi: <boolean>,
     writeConcern: <document>,
     collation: <document>,
     arrayFilters: [ <filterdocument1>, ... ]
   }
)
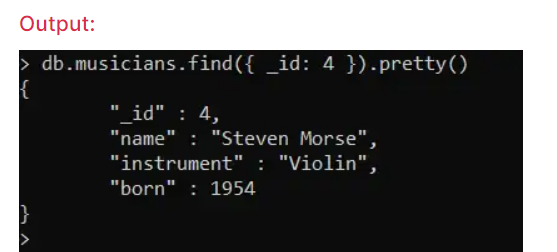
First, let's select a record to update:
Example
db.musicians.find({ _id: 4 }).pretty()
So, now let us update the list of instrument played by this person, by making use of the $set operator for updating a single field.
db.musicians.update(

{_id: 4},
{
  $set: { instrument: ["Vocals", "Violin", "Octapad"] }
}
)
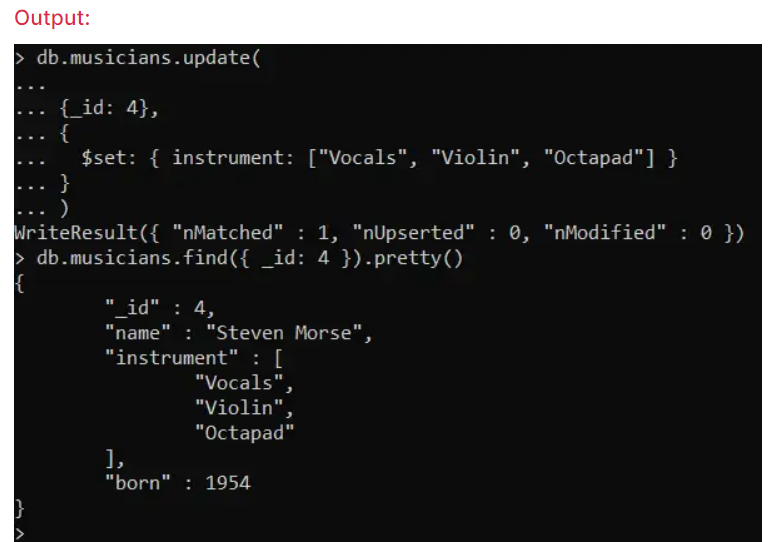
In case your field does not subsist in the current document, the $set operator will insert a new field with the specified value, until and unless it violates the type constraint.
MongoDB users can also make use of { multi: true } for updating multiple documents which will meet the query criteria.
Making use of { upsert: true } for creating a new document is also possible as no document goes with the query.
Save() method
As you have encountered so far the update() method which helps in updating the Mongo database values in any existing document; on the other hand, the save() method is used to replace a document with another document conceded in the form of a parameter.
In other words, it can be said that the save() is a blend of both update() as well as insert(). As the save() method is used, the document that exists will get updated. Otherwise, when it does not exist, it will create one. When an _id field is not specified, MongoDB automatically creates a document with this _id containing an ObjectId value (as conducted by the insert() method).
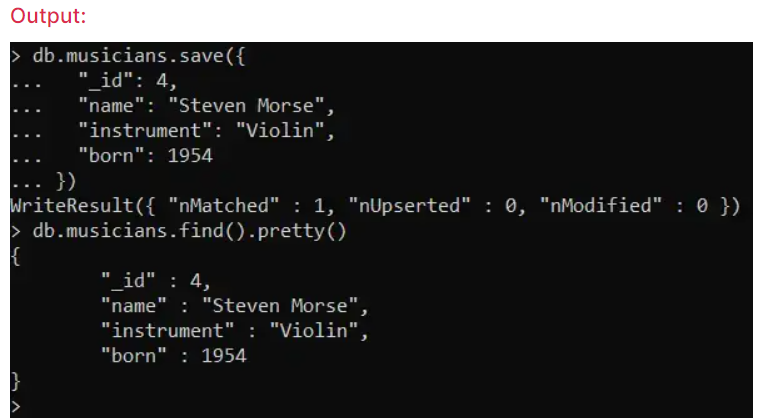
db.musicians.save({
  "_id": 4,
  "name": "Steven Morse",
  "instrument": "Violin",
  "born": 1954
})
Deleting Document in MongoDb
After creating an updating the document, a situation might occur where you want to delete any document or a set of documents. MongoDB also allows you to delete any particular document or multiple collections of documents. In this chapter, you will learn about how to delete documents from a MongoDB database.
MongoDB allows you to delete a document or documents collectively using its one of the three methods. Three methods provided by MongoDB for deleting documents are:
- db.collection.deleteOne()
- db.collection.remove()
- db.collection.deleteMany() This method is used to delete only a single document, even when more than one document matches with the criteria. Here is an example of using this db.collection.deleteOne() method for deleting the single document. To perform this process here, we have created a database and saved all the data separately.
deleteOne Method
db.programmers.insert(
[
  { name: "James Gosling" },
  { name: "Dennis Ritchie" },
  { name: "Bjarne Stroustrup" }
]
)
Once the insertion process is done, you can run the query (mentioned below) to return multiple results:
db.programmers.find()
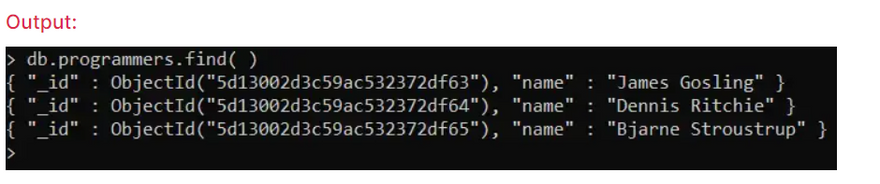
Once you execute the above line, you will find that some documents match your query criteria and will get displayed as output. Now, you can make use of the following criteria to delete the documents.
db.programmers.deleteOne( { name: { $in: [ "Dennis Ritchie", "Bjarne Stroustrup"] } } )

Executing this statement, you will notice that, although two documents match the criteria, only one document gets deleted.
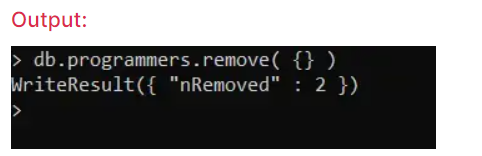
Deletes Each Document
It is possible for you to delete all your existing documents in a collection by simply excluding the filter criteria that is mentioned in the parenthesis () and specifying the document names within it. Now, to delete all documents from the programmers' collection, you have to write the query like this:
Delete Each Document
db.programmers.remove( {} )
But, when the filtering is done for removing elements, the db.collection.remove() method will document which matches the specified criteria.
Here, we delete all documents where the artist name is "James Gosling".
db.programmers.remove( { name: "James Gosling" } )
MongoDB allows you to delete multiple documents using the db.collection.deleteMany() method. This method deletes all your documents whichever match its criteria mentioned in the parameter. To check its implementation of db.collection.deleteMany() method, you can use the method the same way as done previously:
db.programmers.deleteMany( { name: { $in: [ "Dennis Ritchie", "Bjarne Stroustrup" ] } } )

In this way, continuing from the previous example implementation, now all the records were also deleted, and the deleteMany() method was used this time. Now, if you try to find the documents using find() method, it won't show any result of your query or search.
Apply Aggregation Method in mongodb
When MongoDB users want to gather metrics from a MongoDB database, aggregation of MongoDB is the best tool for this. Bundling the data from numerous record sources which are then operated in various ways on a pool of data for returning a combined result is what MongoDB allows its users. In this chapter, you will learn about the concept of aggregation that s supported by MongoDB.
In MongoDB, aggregation can be defined as the operation that is used for processing various types of data in the collection, which returns a calculated result. The concept of aggregation mainly clusters out your data from multiple different documents which are then used and operates in lots of ways (on these clustered data) to return a combined result which can bring new information to the existing database. You can relate aggregation to that of the count(*) along with the 'group by' used in SQL since both are equivalent in terms of the working.
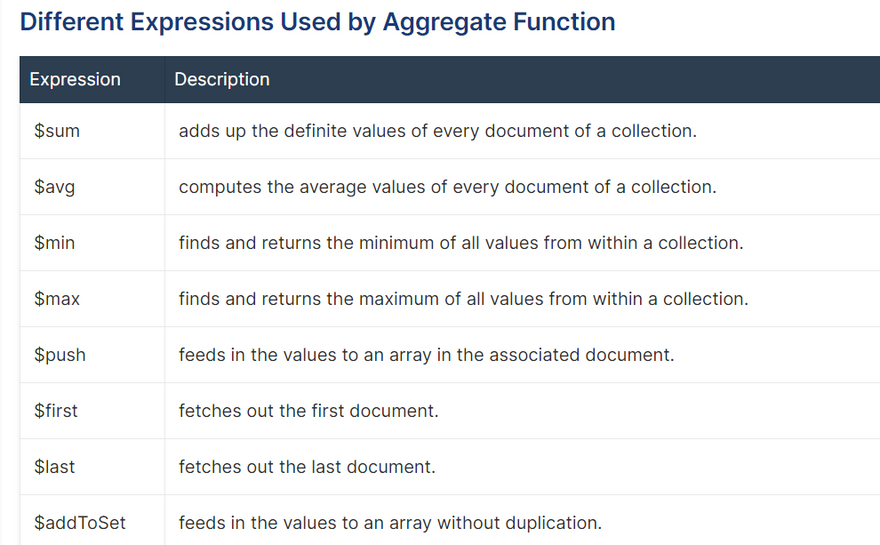
MongoDB offers three different ways of performing aggregation:
- The aggregation pipeline.
- The map-reduce function.
- Single purpose aggregation methods . MongoDB's aggregate function will cluster out the records in the form of a collection which can be then employed for providing operations like total number(sum), mean, minimum and maximum, etc. from the aggregated group of data extracted.
For performing such an aggregate function, the aggregate() method is used. The syntax of this method looks something like this:
db.collection_name.aggregate(aggregate_operation)
aggregate() method
Now, let us see how the aggregate() method works:
Consider a collection named programmers, which has the following data. You have used the find() method to take a look at all the different data available within it:
db.programmers.find()

db.programmers.aggregate([{$group : {_id: "$type", TotalRecords: {$sum : 1}}}])

The above-executed aggregate() method will give the result shown. It says that there are three records which do not have any specific type and are available within the collection "programmers" for aggregating. Hence, the above aggregation method has clustered the collection's data in its best possible way.
Another example where we have a collection named writers, which has the following data:
Now, execute the aggregate() method:
db.writers.aggregate([{$group : {_id : "$author", TotalBooksWritten : {$sum : 1}}}])

Sorting Method
Sorting is one of the necessary database operations. It helps to simplify readability and sort the data as per the requirement. In this chapter, you will learn about sorting concept and how it can be implemented in the MongoDB database.
Sorting in Database
Sorting can be defined as the ordering of data in the increase as well as decreasing manner based on a number of linear relationships among the various data items residing in the database. Sorting can be performed on entities like information (which includes names and facts), numbers as well as records. Sorting also increases the readability and uniformity to the displayed data from the database.
Sorting Method of MongoDB
For sorting your MongoDB documents, you need to make use of the sort() method. This method will accept a document that has a list of fields and the order for sorting. For indicating the sorting order, you have to set the value 1 or -1 with the specific entity based on which the ordering will be set and displayed. One indicates organizing data in ascending order while -1 indicates organizing in descending order.
The basic syntax for the sort() method is:
db.collection_name.find().sort({FieldName1: sort order 1 or -1, FieldName2: sort order})
Consider a collection that is having the following data:
{ "_id" : ObjectId(5983548781331abf45ec5), "topic":"Cyber Security"}
{ "_id" : ObjectId(5565548781331aef45ec6), " topic ":"Digital Privacy"}
{ "_id" : ObjectId(5983549391331abf45ec7), " topic ":"Application Security Engineering"}
Suppose I want to get data only from the topic field from all the documents in ascending order, then it will be executed like this:
db.techSubjects.find({}, {"topic":1, _id:0}).sort({"topic":1})
MongoDB projection is used to display only selected fields of the document.
The above statement will result in:

It is to be noted that in case you do not state or explicitly define the sorting preference (1 or -1), then, the sort() method will exhibit your documents in ascending order by default.
To display the topic field of all the techSubjects in descending order:

Keep in mind that you can also sort the documents based on the field you do not want to display.
You can also specify the sorting of parameters through a new field name for the calculated metadata which you can specify under the $meta expression as a value. Here is a sample document that specifies a descending sort using the metadata "textCount":
{ count: { $meta: "textCount" } }
Here this specified metadata will determine the sort order.
Here is the syntax:
db.collection_name.find(
<MongoDB query statement>,
{ value: { $meta: <metadataKeyword> } }
)
db.techWriter.find({},
{ count: { $meta: "textCount" } }
).sort( { count: { $meta: "textCount" } } )
Advertisements
In MongoDB, you can sort the documents returned by a query using the sort() method. The sort() method takes one or more fields to sort by, and the direction of the sort (ascending or descending).
To sort the documents based on a query condition, you can include the query criteria along with the sort fields in the find() method. For example, let's say we have a collection of books with the following documents:
{ "_id": 1, "title": "The Great Gatsby", "author": "F. Scott Fitzgerald", "published_year": 1925 }
{ "_id": 2, "title": "To Kill a Mockingbird", "author": "Harper Lee", "published_year": 1960 }
{ "_id": 3, "title": "The Catcher in the Rye", "author": "J.D. Salinger", "published_year": 1951 }
To retrieve all documents where the published_year is greater than 1950, sorted by published_year in ascending order, you can use the following query:
db.books.find({ published_year: { $gt: 1950 } }).sort({ published_year: 1 })
This will return the following output:
{ "_id": 3, "title": "The Catcher in the Rye", "author": "J.D. Salinger", "published_year": 1951 }
{ "_id": 2, "title": "To Kill a Mockingbird", "author": "Harper Lee", "published_year": 1960 }
As you can see, the sort() method has sorted the documents in ascending order based on the published_year field, as specified in the query.
If you want to sort the documents in descending order, you can use -1 instead of 1 in the sort() method. For example, to retrieve the same documents sorted by published_year in descending order, you can use the following query:
db.books.find({ published_year: { $gt: 1950 } }).sort({ published_year: -1 })
This will return the following output:
{ "_id": 2, "title": "To Kill a Mockingbird", "author": "Harper Lee", "published_year": 1960 }
{ "_id": 3, "title": "The Catcher in the Rye", "author": "J.D. Salinger", "published_year": 1951 }
As you can see, the sort() method has sorted the documents in descending order based on the published_year field, as specified in the query.
Indexing
Indexing is a necessary operation in MongoDB which brings efficiency in various execution of statements. In this chapter, you will learn about the concept of indexing and how it can be implemented in the MongoDB database.
The concept of indexing is crucial for any database, and so for MongoDB also. Databases having indexes make queries performance more efficient. When you have a collection with thousands of documents and no indexing is done, your query will keep on finding certain documents sequentially. This would require more time to find the documents. But if your documents have indexes, MongoDB would restrict make it specific the number of documents to be searched within your collection.
In the MongoDB to create an index, the ensureIndex() method is used.
db.collection_name.ensureIndex( {KEY:1, KEY:2} )
Here in the above syntax, the key is a field name that you want to make an index and it will be 1 and -1 to make it on ascending or descending order.
Suppose we have the field name PhoneNo in the user's collection and you want to index it, then you have to type the syntax in this way:
db.Users.ensureIndex({"PhoneNo":1})
MongoDB ensureIndex method is Deprecated since version 3.0.0 and db.collection.ensureIndex() is now an alias for db.collection.createIndex().
Syntax
db.collection_name.createIndex( {KEY:1, KEY:2} )
Example
db.Users.createIndex({"PhoneNo":1})
Indexing in MongoDB is a way to optimize the performance of database queries by creating a data structure that allows for faster lookup of data based on certain criteria. In MongoDB, indexes are similar to those in traditional relational databases and allow for faster data retrieval by creating a reference to the data in the collection.
Let's take an example of a collection called "users" that contains documents representing users in a system. Each document in the collection contains the following fields: "name", "email", "phone", and "age". Assume that there are millions of documents in the collection and we want to retrieve all the users with a certain age, say 25.
Without an index, MongoDB would have to scan every document in the collection and check the "age" field to find all the users with the age of 25. This process can be slow and inefficient, especially if the collection is large.
To improve the performance of the query, we can create an index on the "age" field using the following command:
db.users.createIndex( { age: 1 } )
This creates an ascending index on the "age" field. Now, when we run a query to find all the users with an age of 25, MongoDB can use the index to quickly locate the relevant documents without scanning every document in the collection:
db.users.find( { age: 25 } )
This query will use the index to retrieve all the documents with an age of 25 much faster than it would without the index.
In addition to the basic index above, MongoDB also supports a wide range of index types, including compound indexes, geospatial indexes, text indexes, and others. These indexes can be customized based on specific query patterns to further optimize query performance.
Indexes in any database are essential in improving the performance of their data retrieval speed, and the same is true for MongoDB. By using indexes, performance in MongoDB queries becomes more efficient. In this chapter, you will learn about the different indexing techniques and their limitations.
Let us consider a situation where you wish to look for user documents depending on the user's tags. For this, you have to create an index on your tag array within your collection. For building an index based array, you have to create separate index entries for each of its fields. Let us see how it can be implemented.
If you consider the below-mentioned document of users collection:
{
  "location": {
    "city": "Calgary, Alberta",
    "country": " Canada"
  },
  "tags": [
    "techwriter",
    "developer",
    "programmer"
  ],
  "name": "James Gosling"
}
For creating the index on tag array, you have to implement, i.e. execute the following code:
db.users.ensureIndex ( {"tags": 1} )
Let us consider a situation where you wish to look for documents depending on the city and country fields (from the above example). As all the fields are part of the location sub-document field, you will have to generate an index on every field of sub-document. To create an index on each of the two fields of your sub-document, you have to make use of the below-mentioned code:
db.users.ensureIndex( {"location.city":1,"location.country":1} )
After creating an index, the search operation in any sub-document field can be performed using the index:
db.users.find({"location.city":"Los Angeles"})
There are various limitations associated with indexing in MongoDB. These are:
Extra Overhead: All of the indexes occupy certain space as well as bring a cost on every insertion, updating and deleting operations. Hence, if you hardly ever make use of your collection for reading operations, it does not make any sense of using indexes.
RAM Usage: Because all of MongoDB indexes get stored in RAM, you must make sure that the entire size of your index doesn't go beyond the RAM limit. And, if such a scenario occurs, it will begin deleting some indexes, degrading the performance of indexing.
Query Limitations: Indexing cannot be implemented in queries that make use of:
Regular expressions and or negation operators such as $nin, $not, etc.
The $where clause
Any arithmetic operators such as $mod, etc.
Index Key Limits: In the earlier version, i.e. 2.6, MongoDB does not produce an index when the value of the obtainable index field goes beyond the limit of the index key.
Indexes of a particular collection cannot exceed more than 64.
Name Length of the index: The fully qualified name of the index that comprises of the namespace followed by the dot separators (which looks something like: ..$), cannot go beyond the length of 128 characters.
Quantity of Indexed Fields within a compound index cannot exceed more than 32 fields.
Advance Indexing
Indexes in any database are essential in improving the performance of their data retrieval speed, and the same is true for MongoDB. By using indexes, performance in MongoDB queries becomes more efficient. In this chapter, you will learn about the different indexing techniques and their limitations.
Indexing Array Field
Let us consider a situation where you wish to look for user documents depending on the user's tags. For this, you have to create an index on your tag array within your collection. For building an index based array, you have to create separate index entries for each of its fields. Let us see how it can be implemented.
If you consider the below-mentioned document of users collection:
{
  "location": {
    "city": "Calgary, Alberta",
    "country": " Canada"
  },
  "tags": [
    "techwriter",
    "developer",
    "programmer"
  ],
  "name": "James Gosling"
}
For creating the index on tag array, you have to implement, i.e. execute the following code:
db.users.ensureIndex ( {"tags": 1} )
Indexing Field for Documents
Let us consider a situation where you wish to look for documents depending on the city and country fields (from the above example). As all the fields are part of the location sub-document field, you will have to generate an index on every field of sub-document. To create an index on each of the two fields of your sub-document, you have to make use of the below-mentioned code:
db.users.ensureIndex( {"location.city":1,"location.country":1} )
After creating an index, the search operation in any sub-document field can be performed using the index:
db.users.find({"location.city":"Los Angeles"})
There are various limitations associated with indexing in MongoDB. These are:
Limitation for threshold for Indexing
Extra Overhead: All of the indexes occupy certain space as well as bring a cost on every insertion, updating and deleting operations. Hence, if you hardly ever make use of your collection for reading operations, it does not make any sense of using indexes.
RAM Usage: Because all of MongoDB indexes get stored in RAM, you must make sure that the entire size of your index doesn't go beyond the RAM limit. And, if such a scenario occurs, it will begin deleting some indexes, degrading the performance of indexing.
Query Limitations: Indexing cannot be implemented in queries that make use of:
Regular expressions and or negation operators such as $nin, $not, etc.
The $where clause
Any arithmetic operators such as $mod, etc.
Index Key Limits: In the earlier version, i.e. 2.6, MongoDB does not produce an index when the value of the obtainable index field goes beyond the limit of the index key.
Indexes of a particular collection cannot exceed more than 64.
Name Length of the index: The fully qualified name of the index that comprises of the namespace followed by the dot separators (which looks something like: ..$), cannot go beyond the length of 128 characters.
Quantity of Indexed Fields within a compound index cannot exceed more than 32 fields.
Advertisements.
Concept of Replication
Synchronizing the same set of data across multiple servers is a common practice that is followed to ensure the availability of data across various servers. In MongoDB, replication can be implemented for the processing where it is taken care of that same data is accessible on more than a single MongoDB server. Through this concept of MongoDB, the availability of data increases. In this chapter, you will learn about this concept.
How concept of replication offers
The concept of replication offers redundancy or duplication of data, which accordingly augments data availability as numerous copies of data will be accessible from different database servers. Replication also helps in protecting a database from the loss of a particular server. Data can be recovered in case there are a hardware failure or service interruptions through this concept and approach. As there are additional copies of the same data on various servers, a single server can prove worthy in case of disaster recovery, reporting, or act as backup.
Advantage and Disadvantage of Replication
Here are some of the essential points that you can keep in mind before implementing the concept of data replication in MongoDB:
Advantage
- Helps in disaster recovery and backup of data.
- 24 by 7 (24 x 7) availability of every data.
- Data can be kept safe through this redundant backup approach.
Minimizes downtime for maintenance.
DisadvantageMore space required.
Redundant data is stored, so more space and server processing required.
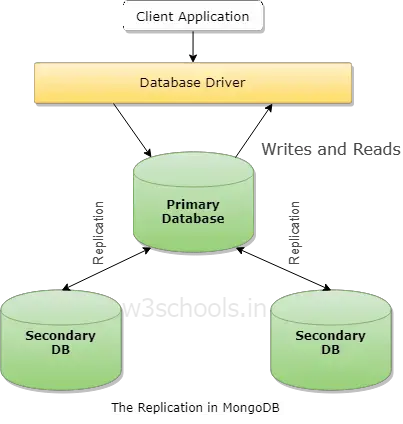
How Replication works in MongoDb
MongoDB makes use of a replica set to achieve replication. Replica sets are collections of mongod instances which targets to host the identical dataset. There is only one primary node associated with the replica set.
- To perform this, a minimum of three nodes are required.
- In this operation of replication, MongoDB assumes one node of replica set as the primary node and the remaining are secondary nodes.
- From within the primary node, data gets replicated to secondary nodes.
- New primary nodes get elected in case there is automatic maintenance or failover Here is a block diagram of how the replication in MongoDB takes place:
Setup your Replica set
Now, you will convert a standalone MongoDB instance to a replica set. For this, you have to take the following measures first:
- Stop your currently executing MongoDB server.
- Restart the MongoDB server by indicating 'replSet' option. The necessary syntax is --replSet
mongod --port "PORT" --dbpath "your_db_complete_path" --replSet "instanceName_of_Replica_set"
mongod --port 27017 --dbpath " C:\Program Files\MongoDB\Server\4.0\data" --replSet rs0
So the above command will:
- Initiate a mongod instance having the name rs0 and is running on port 27017.
- Initiate the command prompt and hook up to your mongod instance.
- Be executing the command rs.initiate() will help start a new replica set.
- Ensure the configuration of a replica set and execute the command rs.conf(). Also, employ the method/command rs.status() for checking the status of the replica set
Include Member to Replica Set
Start your mongod instances on different machines. Then, initiate your mongo client application and use the method/command rs.add() which is used to include members. The syntax of this method is:
rs.add (hostname : PORT)
Here is an example of how to implement the same:
rs.add ("mongod1.net : 27017")
In MongoDB, there are a few ways to replicate data across multiple servers. The most common method is to use Replica Sets. A Replica Set is a group of MongoDB servers that maintain identical copies of the same data. The primary node receives all write operations, while secondary nodes replicate data from the primary node and can be used for read operations.
Here is an example of how to create a Replica Set in MongoDB:
Start three MongoDB instances, each with a unique port number. For example:
mongod --port 27017 --dbpath /data/db1 --replSet rs0
mongod --port 27018 --dbpath /data/db2 --replSet rs0
mongod --port 27019 --dbpath /data/db3 --replSet rs0
Connect to one of the MongoDB instances using the mongo shell:
mongo --port 27017
Initialize the Replica Set:
rs.initiate(
   {
      _id: "rs0",
      members: [
         { _id: 0, host: "localhost:27017" },
         { _id: 1, host: "localhost:27018" },
         { _id: 2, host: "localhost:27019" }
      ]
   }
)
Check the status of the Replica Set:
rs.status()
This will show you the current state of the Replica Set, including which node is the primary node and which nodes are secondary nodes.
Once you have set up the Replica Set, you can connect to it using the MongoDB URI format:
mongodb://<username>:<password>@<host1>:<port1>,<host2>:<port2>,<host3>:<port3>/<database>?replicaSet=<replica-set-name>
For example, if your Replica Set is named "rs0" and you have set up authentication, you could connect using the following URI:
mongodb://myuser:mypassword@localhost:27017,localhost:27018,localhost:27019/mydatabase?replicaSet=rs0
From this point on, any write operations performed on the primary node will be replicated to the secondary nodes, ensuring that all nodes maintain identical copies of the data.
What is Sharding
A single set of data can be stored in multiple machines. MongoDB supports such an essential feature concerning to database. MongoDB fulfills the approach to meet the demand for data growth. In this chapter, you will learn about this MongoDB feature name - sharding.
What are Shards
Sharding is an approach of distributing data across different machines. In other words, it can be said that the sharding concept is used for splitting large data sets into undersized data sets across several MongoDB instances. This concept is employed for supporting deployments of data having huge data sets that perseveres high throughput operations.
Ways of Addressing System Growth
There are database situations where the data sets in MongoDB will grow so massive, that MongoDB statements, operations, and queries against such large data sets can cause a tremendous amount of CPU utilization on that particular server. Such situations can be tacked in MongoDB using this concept of "sharding", where the data sets are split across numerous instances of MongoDB. That extensive collection of data sets can be actually split across several small-sized collections called "Shards". But, logically, all the shards perform the work as a single collection.
There is a parallel concept that is implemented for understanding sharding. System growth or scaling (which is used to increase the efficiency and working power of a system) can be addressed in 2 different ways. These are -
Vertical Scaling engages escalating the ability of a single server by making use of a more powerful CPU, where additional RAMs are incorporated, as well as the amount of storage has also increased. Restrictions
Horizontal Scaling engages segregating the data set of a single system as well as its workload over several servers, where similar servers are interconnected for increasing the capacity as per requirement. Here each server may not have high speed or capacity, but all of them together can handle the workload and provide efficient work than that of a single high-speed server.
Hence, sharding uses the concept of horizontal scaling to support the processing of large data sets.
Why Sharding Concept to be Adopted
- Data replication can be done where master node absorbs and stores all the new data
- Simple queries can perform the task efficiently since data sets are segmented into small size
- A particular replica set has a restriction of 12 nodes only
- Memory cannot be outsized enough in case your dataset is large
- It becomes too expensive to have a vertical scaling
- Local disk won't be large enough and so multiple servers can be an alternative Implementing the concept of sharding can be done with the use of clusters (which can be defined as a collection of MongoDB instances). Various shard components include:
The shard - which is a MongoDB instance that embraces a part or subset of the data.
Config server - which is a MongoDB instance holding the metadata regarding the cluster. It holds various MongoDB instances that are associated with shard data.
A router - is mainly accountable for re-directing the instructions sent from the client to the authoritative servers.
Construct another database for your config server using the command:
mkdir /data/configdb
As configuration mode initiates the MongoDB instance. Let suppose; the server name is ServG:
mongod -configdb ServG: 27019
Initiate your mongos instance by identifying configuration server:
mongos -configdb ServG: 27019
Connect to the instance of Mongo from mongo shell:
mongo -host ServG -port 27017
When your other servers (Server K and Server R) are ready to be added with the cluster, type the command:
sh.addShard("ServK:27017")
sh.addShard("ServR:27017")
Allow the sharding for your database. If you want to shard the database techwriterDb the command will be:
sh.enableSharding(techwriterDb)
You can also allow sharding for your collection like this:
sh.shardCollection("db.techwriter" , { "writerID" : 1 , "writername" : "James Gosling"})
Concept of Sharding
Sharding in MongoDB is a way to distribute data across multiple servers, or shards, to improve performance and scalability. By distributing the data across multiple shards, the system can handle larger datasets and higher traffic loads.
Here is an example of how to set up sharding in MongoDB:
Start the MongoDB config server(s), which store metadata about the sharded cluster, using the mongod command:
mongod --configsvr --replSet configReplSet --dbpath /data/configdb1 --port 27019
Start the MongoDB shard server(s), which hold a subset of the data, using the mongod command:
mongod --shardsvr --replSet shardReplSet1 --dbpath /data/shard1 --port 27018
mongod --shardsvr --replSet shardReplSet2 --dbpath /data/shard2 --port 27020
Initialize the replica sets for each shard:
rs.initiate(
   {
      _id: "shardReplSet1",
      members: [
         { _id: 0, host: "localhost:27018" },
         { _id: 1, host: "localhost:27021" },
         { _id: 2, host: "localhost:27024" }
      ]
   }
)
rs.initiate(
   {
      _id: "shardReplSet2",
      members: [
         { _id: 0, host: "localhost:27020" },
         { _id: 1, host: "localhost:27023" },
         { _id: 2, host: "localhost:27026" }
      ]
   }
)
Start the MongoDB mongos instances, which act as a router between the client and the sharded cluster:
mongos --configdb configReplSet/localhost:27019 --port 27017
Connect to the mongos instance using the mongo command:
mongo --port 27017
Add the shards to the sharded cluster using the sh.addShard() command:
sh.addShard("shardReplSet1/localhost:27018")
sh.addShard("shardReplSet2/localhost:27020")
Create a sharded collection using the sh.enableSharding() and sh.shardCollection() commands:
use mydatabase
sh.enableSharding("mydatabase")
sh.shardCollection("mydatabase.mycollection", { "shardKeyField": "hashed" })
In this example, we have set up two shards and a mongos instance to route requests to the appropriate shard. We have also created a sharded collection and specified the shard key field to be hashed.
When a client inserts a document into the sharded collection, MongoDB hashes the value of the shard key field and routes the document to the appropriate shard based on the hash value. This ensures that data is evenly distributed across the shards and that queries can be executed in parallel on multiple shards.
How to export and import the data in Mongodb
The data that has been prepared, i.e., inserted and updated might require to be pushed outside the database as a backup or for other similar purposes. MongoDB allows its users to perform that. In this chapter, you will learn about mongoexport command, which is used in MongoDB to export the data from the database.
What Does Export the Data
Data export is either an automatic or semi-automated task that changes a file from one format to another so that it can be used externally by other applications. It involves "interpreting" a set of data from one format used in a particular application into another. Such type of interpretation process gets accomplished either automatically or through the user's intervention.
Exporting Data from MongoDB
MongoDB provides a utility called mongoexport to its users, through which users can export data from MongoDB databases to a JSON file format or a CSV file format. This utility is to be found in the MongoDB's bin subfolder (the path can be read like this: /mongodb/bin). As you run this feature, and while running, supply the database name, the name of the collection as well as the file you wish to export to, it performs the exporting task.
EXporting MongoDb Collection to Json file
So, for performing the exporting of data, you have first to open a new terminal or command prompt window (cmd) and then write the appropriate command like this:
mongoexport --db techwriter --collection techwriter --out /data/dump/tw/tw.json
In case you discover that the above code is not running the mongoexport command, then it is for sure that you have either exited from the mongo utility or else you have opened a new Terminal or command prompt (cmd) window before executing this mongoexport, as it comes under a separate service. The mongoexport statement written above will assume that your MongoDB bin folder is in your PATH, but if it is not in the place, then you have to specify the full path of the mongoexport file which will be as follows: /mongodb/bin/mongoexport or whatever path you have for the established directory of MongoDB.
In case, you do not offer a path for your exported file; the file gets created wherever (the path) you are residing at the time of running the command. Moreover giving the full path, or navigating to where you want your exported data file to be will make the task neat and easy to access.
Exporting MongoDB Collection to CSV file
Till now, you have encountered how to export files in JSON format. Now, there is another file format which is proven to be the right way of representing data - the CSV (comma-separated value) file. For exporting your data to a CSV file, you have to add -type = csv to your command.
mongoexport --db techwriter --collection writers -type = csv --fields _id, writername --out /data/dump/tw/techwriter.csv
Also, you can identify the fields in the documents for exporting. In this example, you have use mongoexport utility for exporting the techwriter collection to a CSV file. Exporting of _id and writername fields are done here. Also, note that the file name has a .csv extension.
Additional Attribute of MongoExport Utility
You can make use of -limit, --sort and -skip attributes to your mongoexport statement like this:
mongoexport --db techwriter --collection writers --limit 4 --out /data/dump/tw.json
mongoexport --db techwriter --collection writers --limit 3 --sort '{_id: 2}' --out /data/dump/tw_sorted.json
mongoexport --db techwriter --collection writers --limit 6 --sort '{_id: 2}' --skip 2 --out /data/dump/tw_sorted_skipped.json
MongoDB provides several tools to export and import data, including the mongoexport and mongoimport command-line utilities. These tools allow you to export data from a MongoDB instance to a file and import data from a file into a MongoDB instance.
Here is an example of how to export and import data in MongoDB using these tools:
Export data using mongoexport command:
mongoexport --db mydatabase --collection mycollection --out /data/mycollection.json
This command exports data from the mydatabase database and mycollection collection to a JSON file at /data/mycollection.json.
Import data using mongoimport command:
mongoimport --db mydatabase --collection mycollection --file /data/mycollection.json
This command imports data from the mycollection.json file into the mydatabase database and mycollection collection.
In addition to exporting and importing data to and from JSON files, you can also use other file formats, such as CSV and BSON.
Here is an example of how to export and import data using BSON format:
Export data using mongodump command:
mongodump --db mydatabase --collection mycollection --out /data/mycollection_backup
This command exports data from the mydatabase database and mycollection collection to a BSON backup file at /data/mycollection_backup.
Import data using mongorestore command:
mongorestore --db mydatabase --collection mycollection /data/mycollection_backup/mydatabase/mycollection.bson
This command imports data from the BSON backup file into the mydatabase database and mycollection collection.
These are just a few examples of how to export and import data in MongoDB. The tools provide many options to customize the export and import process, such as specifying a query to filter the data, setting the format of the output file, and more.
concept of Data backup in MongoDb
The concept of backup and restore of data is a common practice followed, and it varies from system to system. Different approaches are used to backup the information that is residing within your database. MongoDB allows you to backup and restores the data, and in this chapter, you will learn about how this concept can be implemented in MongoDB.
Performing a backup of data is one of the essential and extremely required processes or operation in the database management system. The main motive for this is it becomes intricate to predict how and when your database's data get lost or damaged. Hence, it is a perfect and finest practice to adopt as your database gets set up, try to make sure that the backup of data gets created in lest of any loss occurs. Data backup means the copying of data from your existing database that helps in reusability or re-availability of the data sets when a catastrophic event takes place upon the data.
MongoDB officially supports two fully-managed techniques of backups. These are:
Continuous Backup: This follows the approach of incremental backup of your data sets in a cluster. Also, it ensures that your backups are done usually just a few seconds later than the operation being performed in the system.
Cloud Provider Snapshots: This is another form of storage which provides backup storage in local machine or system by making use of the native snapshot property provided by the cluster's cloud service provider.
Dump MongoDB Data
For creating a backup of your database in MongoDB, make use of the command mongodump. This command directly dumps all your data that are residing in your server into the dump directory. mongodump only detain the documents that are residing in your database as its backup data and does not contain index data. Then, mongorestore or mongod have to rebuild the indexes once the data is restored.
Instruction For DataBackup
For performing the data backup properly, you have to make use of the below-mentioned steps:
- Initiate the MongoDB server using this command: mongod
- Then, in a new terminal/command prompt (cmd) in administrative mode initiate the MongoDB client system using the command: mongo
- Go to the necessary collection and execute the command: mongodump.
- As you run that command, you will see that all the data from the collection (e.g., my_project_db) got dumped . NOTE: Usually, mongodump comprehends the data from your database and then generates a BSON file where the data gets dumped.
Backup Data
MongoDB provides several options for backing up data, including the mongodump and mongorestore command-line utilities. These tools allow you to create a backup of your data in a BSON format, which can be easily restored in case of a data loss or corruption.
Here is an example of how to backup data in MongoDB using the mongodump utility:
Create a backup of a specific database:
mongodump --db mydatabase --out /data/mydatabase_backup
This command creates a backup of the mydatabase database and saves it to the /data/mydatabase_backup directory.
Create a backup of a specific collection:
mongodump --db mydatabase --collection mycollection --out /data/mycollection_backup
This command creates a backup of the mycollection collection in the mydatabase database and saves it to the /data/mycollection_backup directory.
Create a backup of all databases:
mongodump --out /data/all_databases_backup
This command creates a backup of all databases on the MongoDB instance and saves them to the /data/all_databases_backup directory.
Once you have created a backup using mongodump, you can restore the data using the mongorestore utility.
Here is an example of how to restore data in MongoDB using the mongorestore utility:
Restore a specific database:
mongorestore --db mydatabase /data/mydatabase_backup/mydatabase
This command restores the mydatabase database from the backup in the /data/mydatabase_backup/mydatabase directory.
Restore a specific collection:
mongorestore --db mydatabase --collection mycollection /data/mycollection_backup/mydatabase/mycollection.bson
This command restores the mycollection collection in the mydatabase database from the backup file at /data/mycollection_backup/mydatabase/mycollection.bson.
Restore all databases:
mongorestore --dir /data/all_databases_backup
This command restores all databases from the backup in the /data/all_databases_backup directory.
These are just a few examples of how to backup and restore data in MongoDB. The tools provide many options to customize the backup and restore process, such as compressing the backup data, specifying a subset of data to backup or restore, and more.
Regular Expressions are one of the precious components of programming that verifies different collection of patterns, especially in the form of strings. Regular Expressions abbreviated as regex are used as part of different languages for searching the patterns or words in a collection of strings. In this chapter, you will learn about the regular expression in MongoDB.
What Are Re
Regular expressions are a pattern matching technique provided by MongoDB as a feature that is used to search for a string within documents. You may encounter a situation where you may know what exact field value you are searching for. So, in such scenarios, regular expressions help in assisting and retrieving datasets based on pattern matches while searching.
Technically, MongoDB makes use of the PCRE (Perl Compatible Regular Expression) as its regular expression language for implementing regex features. Contrasting to that of text search, in MongoDB, you do not need to perform any configuration for using regular expressions.
The $regex operator of MongoDB is implemented for searching any specific string from the collection. Here is an example that shows how it is usually done.
Consider a dataset which has your Student collection containing the Field names as "StudentName".:
Here in the code mentioned below, you can use a regex operator like this for specifying the search criteria.
db.Student.find( {StudentName : {$regex: "Es" }} ).forEach(printjson)
Here you are trying to find all students' names that have the characters 'Es' in it. So, you can make use of the $regex operator for defining the search criteria of 'Es'. Again, the "printjson" is implemented for printing each document that gets returned by your search query in an enhanced manner.
For making the searching case insensitive, you have to make use of the $options factor with the value $i. Here is a code snippet that will try to find strings with the word "Esha", irrespective of the cases:
db.Student.find( {StudentName : {$regex : "es", $options:"$i"} }).forEach(printjson)
As you make use of the regex operator, you can also offer additional options by implementing the $options as a keyword. Let us consider a scenario, where you wish to locate all the documents having 'es' within their Student Name, avoiding the case sensitivity or insensitivity. In such a scenario, you have to make use of the $options.
db.Student.find({StudentName:{$regex: "es", $options:'i'} }).forEach(printjson)
There is another way to do pattern matching, which is without the regex operator. Here is a code snippet that shows how to implement regex operation without using the $regex operator.
db.Student.find({ StudentName: /Es/}).forEach(printjson)
Here, the "//" options mainly designate a MongoDb operation that is for specifying your searching standard within the mentioned delimiters.
Therefore, the above statement or command is also looking for the name of the student, which has the string "Es" within the student name of the student document.
When your document fields indexed, the search query will make use of those indexed values for matching the regular expression.
In case, the regular expression you have implemented is prefix expression; then all the matched elements are meant to begin with assured string characters.

Top comments (0)