What is AWS IAM?
Way of Creating IAM Policies
What is AWS IAM?
AWS IAM stands for Amazon Web Services Identity and Access Management. It is a service that helps you manage access/permissions to AWS resources. You can use AWS IAM to create and manage AWS users and groups and use permissions to allow and deny their access to AWS resources. Not only that, but you can also specify permissions to certain actions that can be performed on those resources, giving you lots of flexibility to set specific boundaries to resources.
A policy is an entity that, when attached to an identity or resource, defines their permissions. You can use the AWS Management Console, AWS CLI, or AWS API to create customer managed policies in IAM. Customer managed policies are standalone policies that you administer in your own AWS account. You can then attach the policies to identities (users, groups, and roles) in your AWS account.
A policy that is attached to an identity in IAM is known as an identity-based policy. Identity-based policies can include AWS managed policies, customer managed policies, and inline policies. AWS managed policies are created and managed by AWS. You can use them, but you can't manage them. An inline policy is one that you create and embed directly to an IAM group, user, or role. Inline policies can't be reused on other identities or managed outside of the identity where it exists. For more information, see Adding and removing IAM identity permissions.
Use customer managed policies instead of inline policies. It's also best to use customer managed policies instead of AWS managed policies. AWS managed policies usually provide broad administrative or read-only permissions. For greatest security, grant least privilege, which is granting only the permissions required to perform specific job tasks.
When you create or edit IAM policies, AWS can automatically perform policy validation to help you create an effective policy with least privilege in mind. In the AWS Management Console, IAM identifies JSON syntax errors, while IAM Access Analyzer provides additional policy checks with recommendations to help you further refine your policies. To learn more about policy validation, see Validating IAM policies. To learn more about IAM Access Analyzer policy checks and actionable recommendations, see IAM Access Analyzer policy validation.
Way of Creating IAM Policies
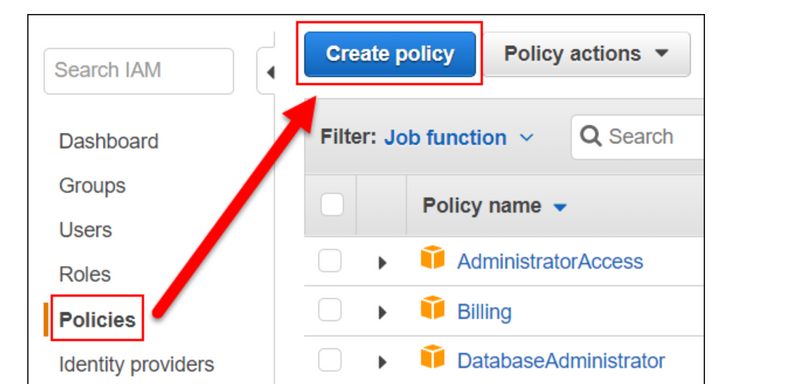
Creating IAM policies (console)
Creating IAM policies (AWS CLI)
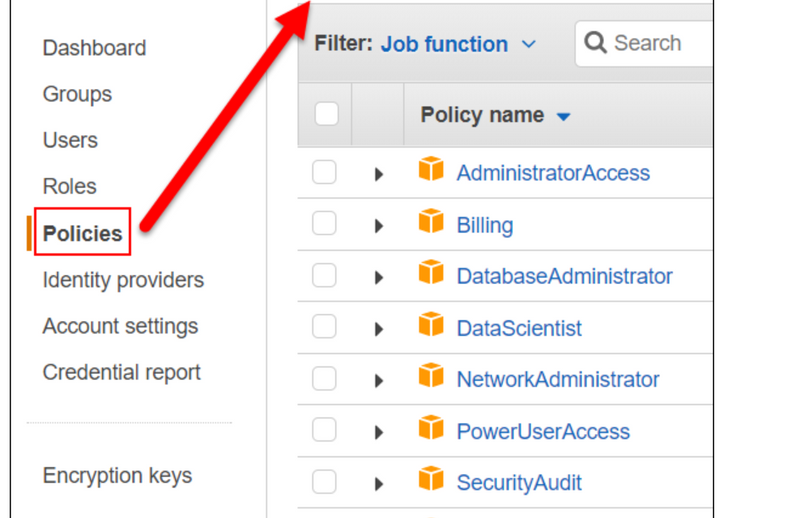
Creating IAM policies (console)
A policy is an entity that, when attached to an identity or resource, defines their permissions. You can use the AWS Management Console to create customer managed policies in IAM. Customer managed policies are standalone policies that you administer in your own AWS account. You can then attach the policies to identities (users, groups, and roles) in your AWS account.
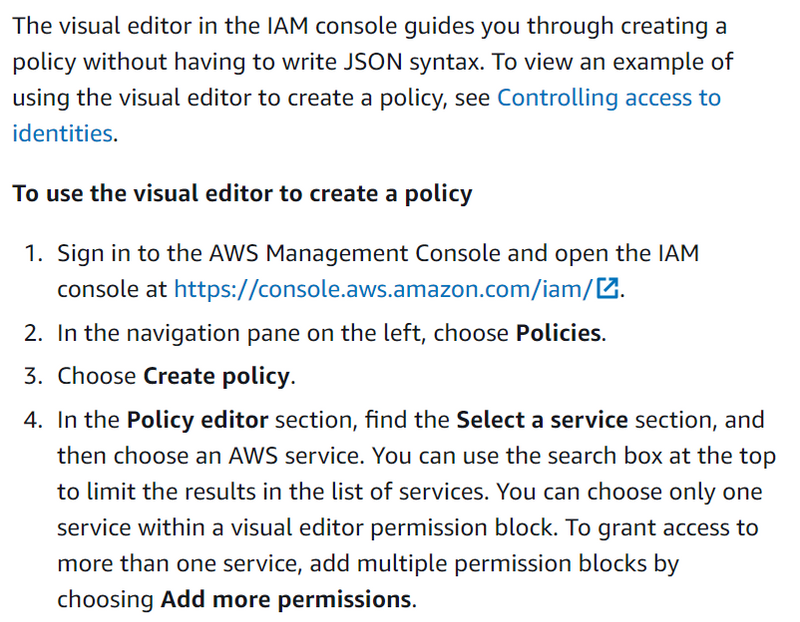
Creating IAM policies
You can create a customer managed policy in the AWS Management Console using one of the following methods:
*JSON *— Paste and customize a published example identity-based policy.
*Visual editor *— Construct a new policy from scratch in the visual editor. If you use the visual editor, you do not have to understand JSON syntax.
*Import *— Import and customize a managed policy from within your account. You can import an AWS managed policy or a customer managed policy that you previously created.
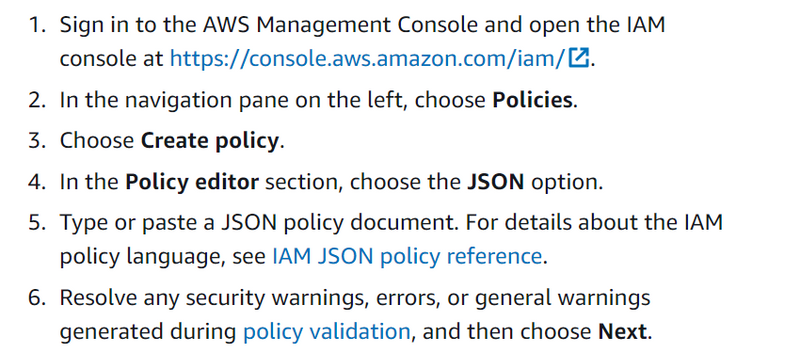
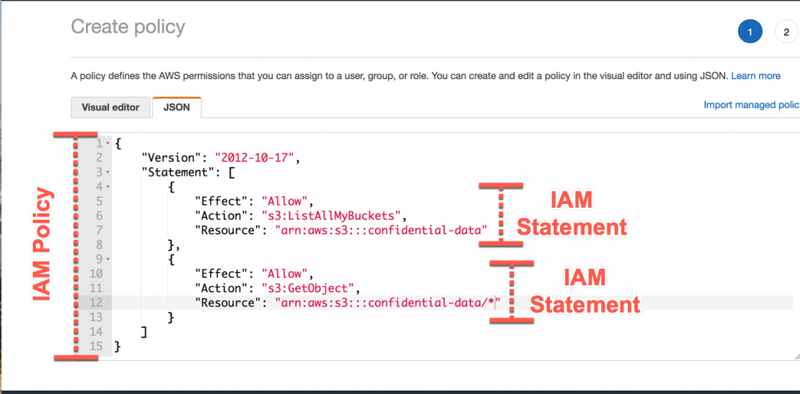
Creating policies using the JSON editor
You can type or paste policies in JSON by choosing the JSON option. This method is useful for copying an example policy to use in your account. Or, you can type your own JSON policy document in the JSON editor. You can also use the JSON option to toggle between the visual editor and JSON to compare the views.
When you create or edit a policy in the JSON editor, IAM performs policy validation to help you create an effective policy. IAM identifies JSON syntax errors, while IAM Access Analyzer provides additional policy checks with actionable recommendations to help you further refine the policy.
A JSON policy document consists of one or more statements. Each statement should contain all the actions that share the same effect (Allow or Deny) and support the same resources and conditions. If one action requires you to specify all resources ("*") and another action supports the Amazon Resource Name (ARN) of a specific resource, they must be in two separate JSON statements. For details about ARN formats, see Amazon Resource Name (ARN) in the AWS General Reference Guide. For general information about IAM policies, see Policies and permissions in IAM. For information about the IAM policy language, see IAM JSON policy reference.
To use the JSON policy editor to create a policy

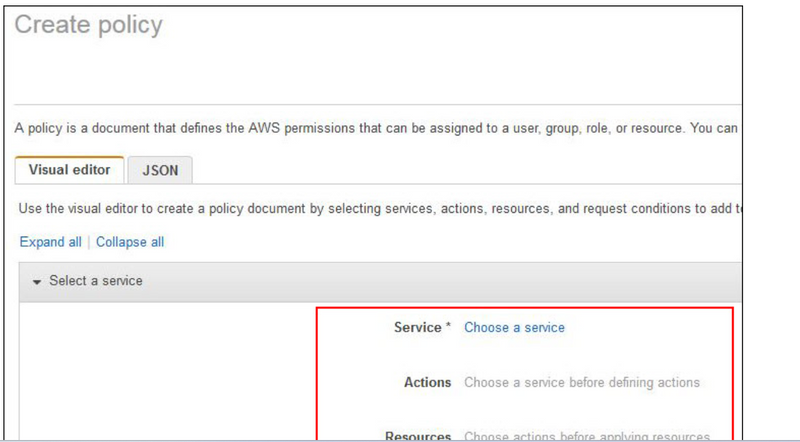
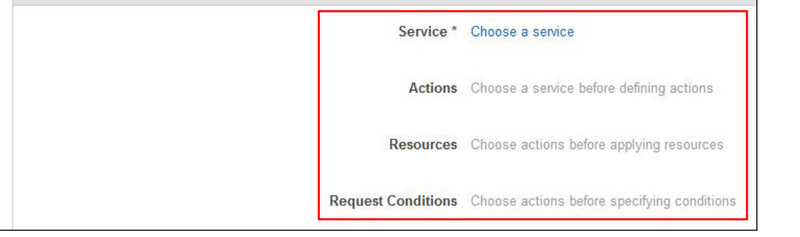
Creating policies with the visual editor

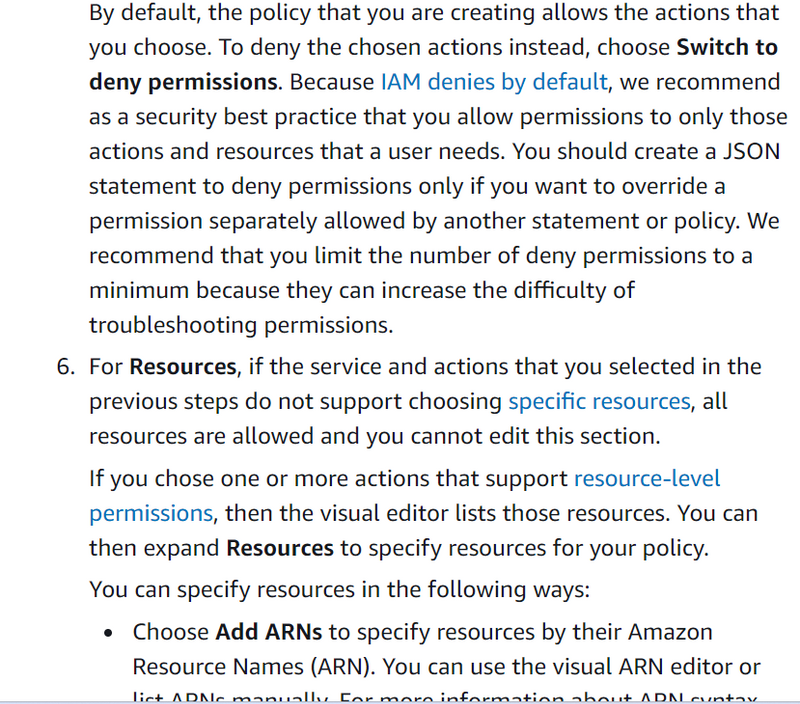


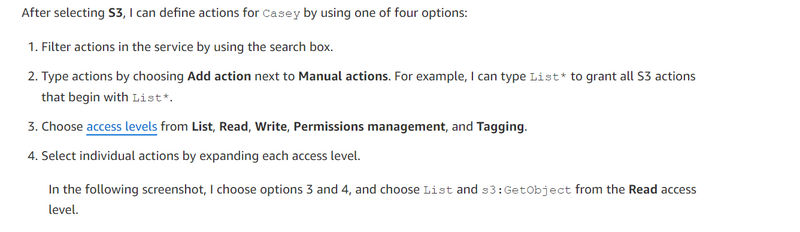
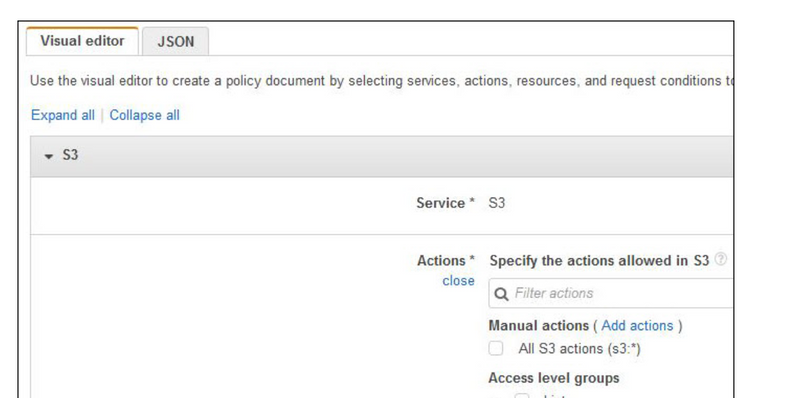
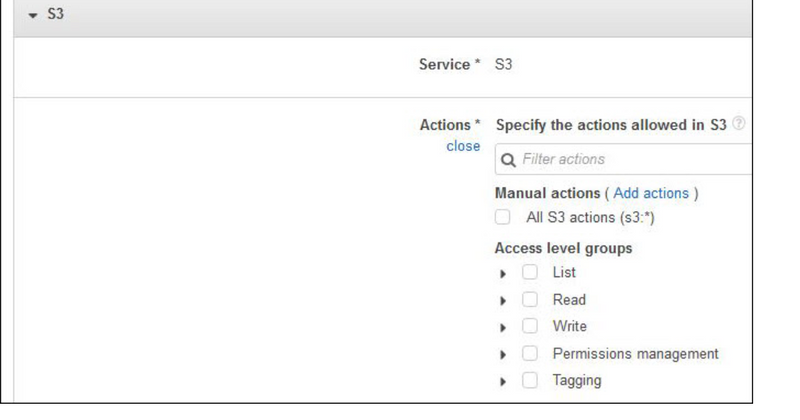
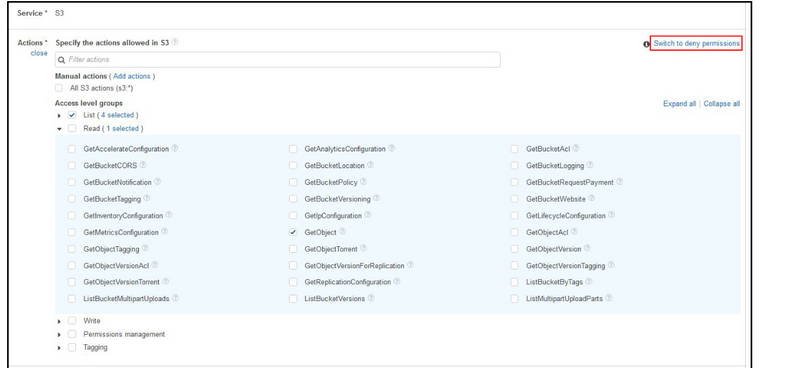
Note: By default, all actions you choose will be allowed. To deny actions, choose Switch to deny permissions in the upper right corner of the Actions section.
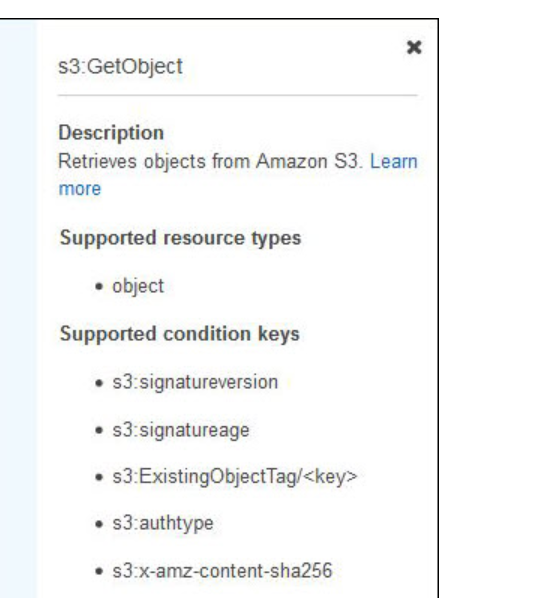
As shown in the preceding screenshot, if I choose the question mark icon next to GetObject, I can see the description and supported resources and conditions for this action, which can help me scope permissions.
The visual editor makes it easy to decide which actions I should select by providing in an integrated documentation panel the action description, supported resources or conditions, and any required actions for every AWS service action. Some AWS service actions have required actions, which are other AWS service actions that need to be granted in a policy for an action to run. For example, the AWS Directory Service action, ds:CreateDirectory, requires seven Amazon EC2 actions to be able to create a Directory Service directory.
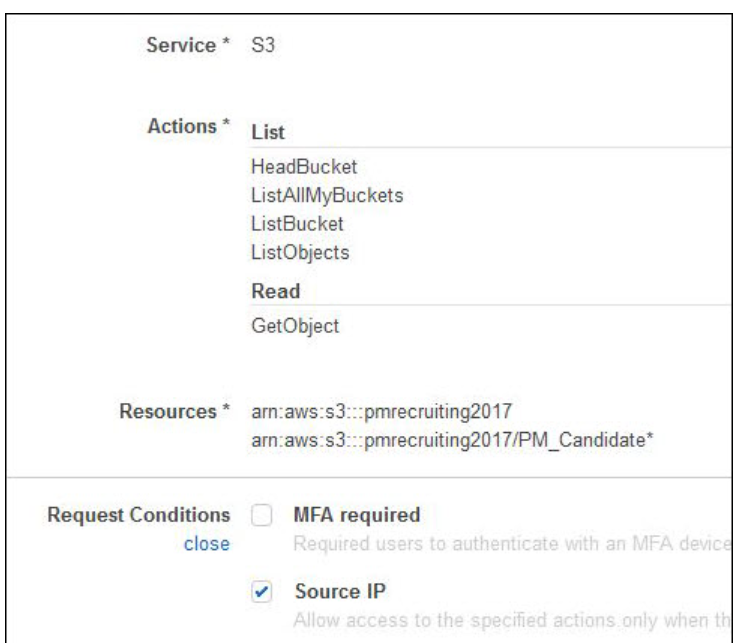
Choose resources
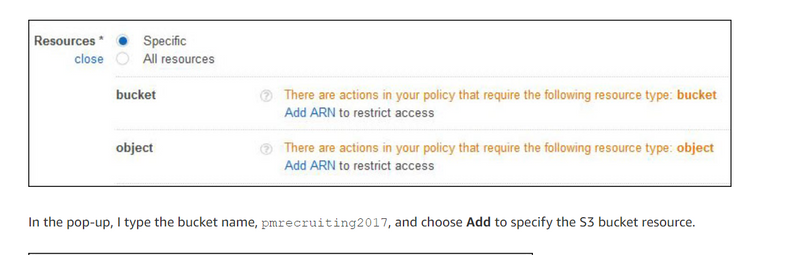
In the Resources section, I can choose the resources on which actions can be taken. I choose Resources and see two ways that I can define or select resources:
Define specific resources
Select all resources
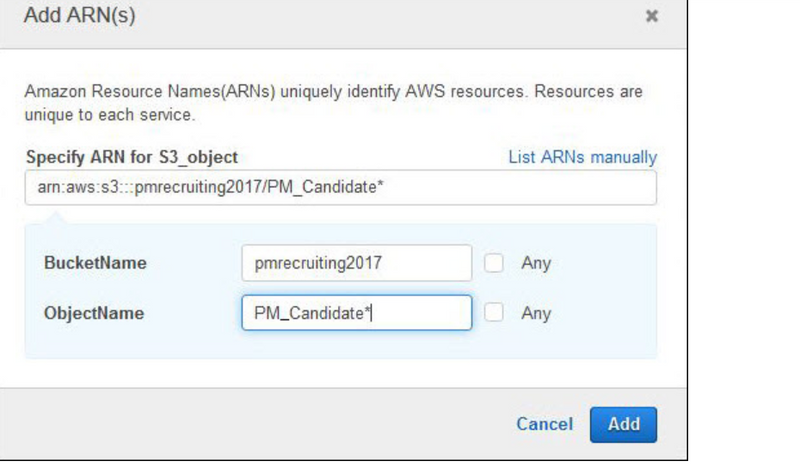
Specific is the default option, and only the applicable resources are presented based on the service and actions I chose previously. Because I want to grant Casey access to some objects in a specific bucket, I choose Specific and choose Add ARN under bucket.
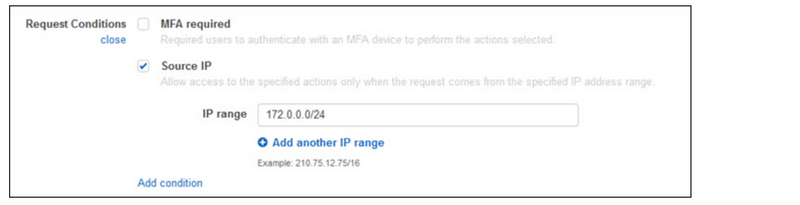
Specify request conditions
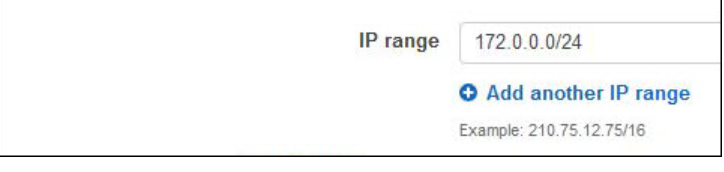
For additional security, I specify a condition to restrict access to the S3 bucket from inside our internal network. To do this, I choose Specify request conditions in the Request Conditions section, and choose the Source IP check box. A condition is composed of a condition key, an operator, and a value. I choose aws:SourceIp for my Key so that I can control from where the S3 files can be accessed. By default, IpAddress is the Operator, and I set the Value to my internal network.
To add other conditions, choose Add condition and choose Save changes after choosing the key, operator, and value.
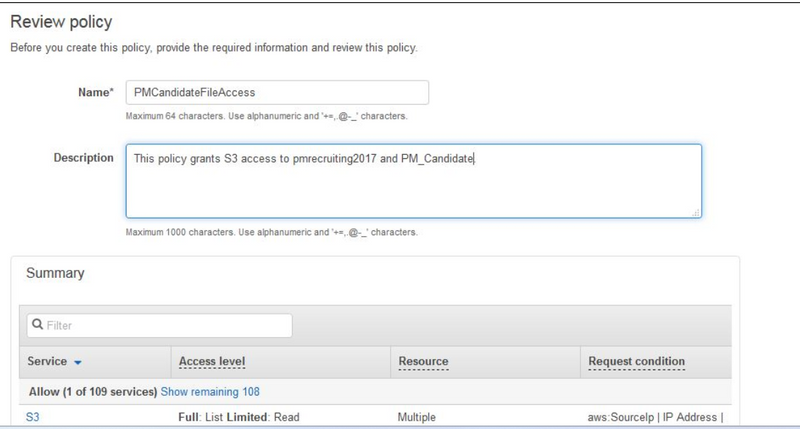
After specifying my request condition, I am now able to review all the elements of these S3 permissions.
Next, I can choose to grant permissions for another service by choosing Add new permissions (bottom left of preceding screenshot), or I can review and create this new policy. Because I have granted all the permissions Casey needs, I choose Review policy. I type a name and a description, and I review the policy summary before choosing Create policy.
Now that I have created the policy, I attach it to Casey by choosing the Attached entities tab of the policy I just created. I choose Attach and choose Casey. I then choose Attach policy. Casey should now be able to access the interview files she needs to review.
access_policies_create-console
aws-tutorials-how-to-create-a-bucket-and-access-a-object

Top comments (0)