Enabling or disabling a button using AJAX and jQuery after success when click button
Enabling or disabling a button using AJAX and jQuery after success when submit form
Enabling or disabling a button using AJAX and jQuery after success
Enabling or disabling a button using AJAX and jQuery can be done in a few different ways. Here are two examples:
Using the .prop() method in a jQuery AJAX success callback:
$(document).ready(function() {
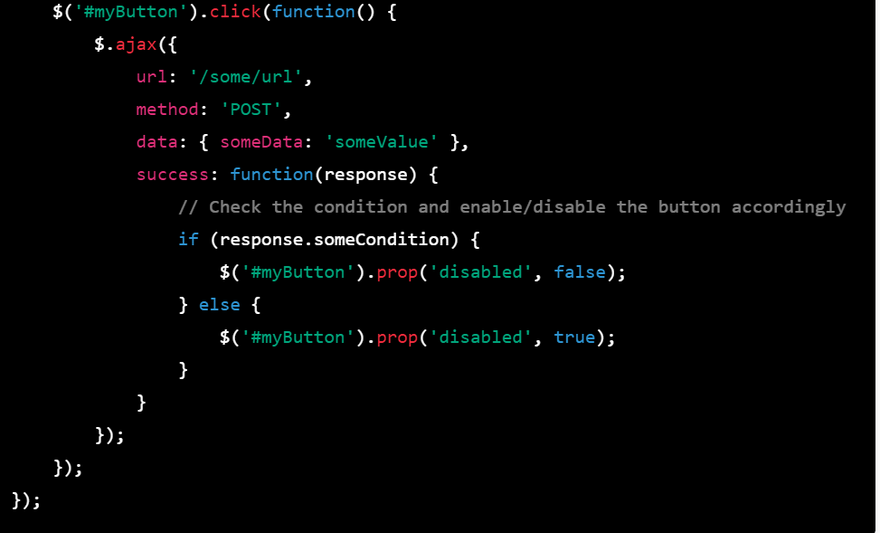
$('#myButton').click(function() {
$.ajax({
url: '/some/url',
method: 'POST',
data: { someData: 'someValue' },
success: function(response) {
// Check the condition and enable/disable the button accordingly
if (response.someCondition) {
$('#myButton').prop('disabled', false);
} else {
$('#myButton').prop('disabled', true);
}
}
});
});
});
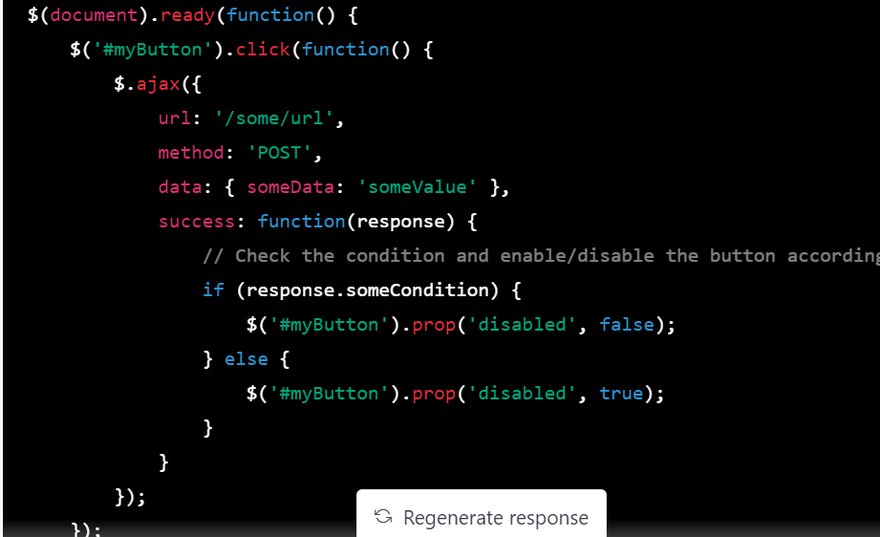
In this example, we are attaching a click event handler to a button with the ID myButton. When the button is clicked, we make an AJAX request to a server-side URL and pass some data. In the AJAX success callback, we check the response for a certain condition and enable or disable the button using jQuery's .prop() method accordingly.
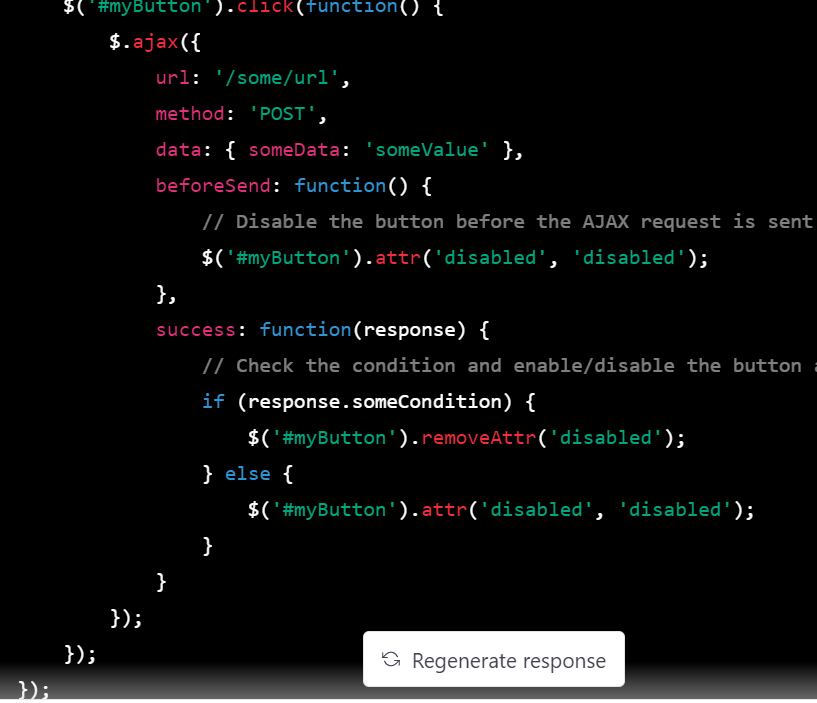
Using the .attr() method in a jQuery AJAX beforeSend callback:
$(document).ready(function() {
$('#myButton').click(function() {
$.ajax({
url: '/some/url',
method: 'POST',
data: { someData: 'someValue' },
beforeSend: function() {
// Disable the button before the AJAX request is sent
$('#myButton').attr('disabled', 'disabled');
},
success: function(response) {
// Check the condition and enable/disable the button accordingly
if (response.someCondition) {
$('#myButton').removeAttr('disabled');
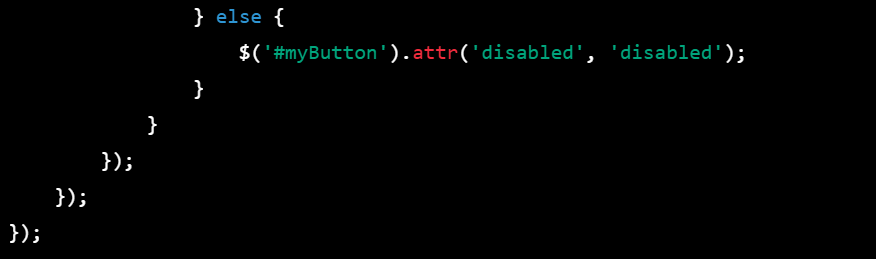
} else {
$('#myButton').attr('disabled', 'disabled');
}
}
});
});
});
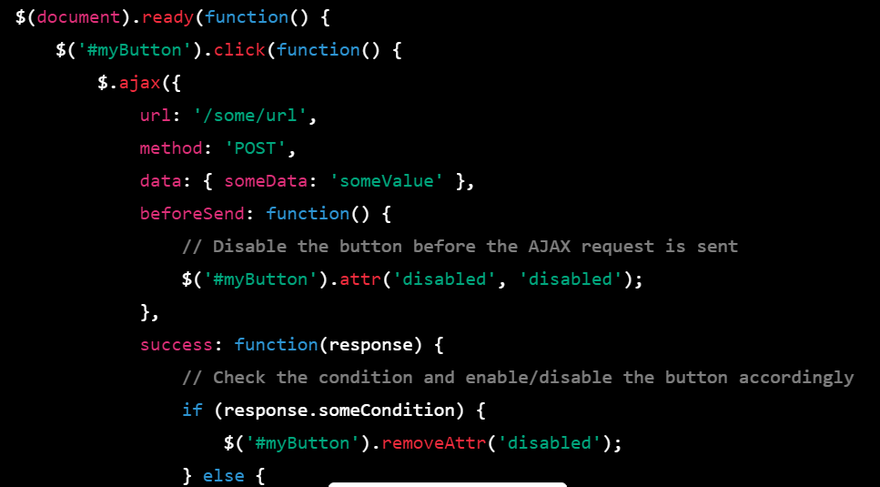
In this example, we are attaching a click event handler to a button with the ID myButton. When the button is clicked, we make an AJAX request to a server-side URL and pass some data. Before the AJAX request is sent, we disable the button using jQuery's .attr() method in the beforeSend callback. In the AJAX success callback, we check the response for a certain condition and enable or disable the button using .removeAttr() or .attr() methods respectively.
Note that in both examples, you may need to modify the condition and the button ID to match your specific use case.
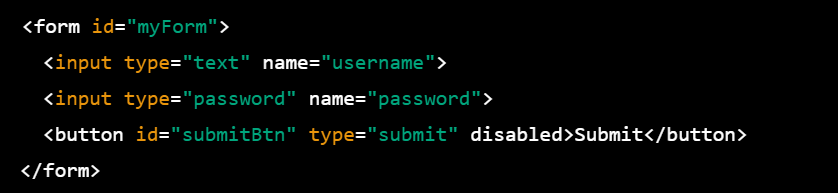
Enabling or disabling a button using AJAX and jQuery after success when submit form
<form id="myForm">
  <input type="text" name="username">
  <input type="password" name="password">
  <button id="submitBtn" type="submit" disabled>Submit</button>
</form>
$(document).ready(function() {
  $('#myForm').submit(function(event) {
    event.preventDefault();
    $('#submitBtn').prop('disabled', true);
    $.ajax({
      url: 'some-url.php',
      type: 'POST',
      data: $(this).serialize(),
      success: function(response) {
        // If the AJAX request is successful, enable the button
        $('#submitBtn').prop('disabled', false);
      },
      error: function() {
        // If the AJAX request fails, enable the button
        $('#submitBtn').prop('disabled', false);
      }
    });
  });
});
============or=============
$(document).ready(function() {
    $('#myButton').click(function() {
        $.ajax({
            url: '/some/url',
            method: 'POST',
            data: { someData: 'someValue' },
            success: function(response) {
                // Check the condition and enable/disable the button accordingly
                if (response.someCondition) {
                    $('#myButton').prop('disabled', false);
                } else {
                    $('#myButton').prop('disabled', true);
                }
            }
        });
    });
});
In this example, we are attaching a click event handler to a button with the ID myButton. When the button is clicked, we make an AJAX request to a server-side URL and pass some data. In the AJAX success callback, we check the response for a certain condition and enable or disable the button using jQuery's .prop() method accordingly.
Using the .attr() method in a jQuery AJAX beforeSend callback:
$(document).ready(function() {
    $('#myButton').click(function() {
        $.ajax({
            url: '/some/url',
            method: 'POST',
            data: { someData: 'someValue' },
            beforeSend: function() {
                // Disable the button before the AJAX request is sent
                $('#myButton').attr('disabled', 'disabled');
            },
            success: function(response) {
                // Check the condition and enable/disable the button accordingly
                if (response.someCondition) {
                    $('#myButton').removeAttr('disabled');
                } else {
                    $('#myButton').attr('disabled', 'disabled');
                }
            }
        });
    });
});
In this example, we are attaching a click event handler to a button with the ID myButton. When the button is clicked, we make an AJAX request to a server-side URL and pass some data. Before the AJAX request is sent, we disable the button using jQuery's .attr() method in the beforeSend callback. In the AJAX success callback, we check the response for a certain condition and enable or disable the button using .removeAttr() or .attr() methods respectively.
Note that in both examples, you may need to modify the condition and the button ID to match your specific use case.

Top comments (0)