1.download and install pycharm then create project(reference.
2.activate virtual environment.
3.install existing dependencies.
4.perform crud operationreference.
5.run project
How to install flask and run application
Python or executable is not recognized in your system
flask_sqlalchemy module is not installed in your current Python environment
The system cannot find the path specified venv.
How to connect database in flask
How to create table using flask_sqlalchemy
To run a Flask application in PyCharm, follow these steps:
Step 1: Install Flask
First, ensure that Flask is installed in your Python environment. You can install it via pip:
pip install Flask
Step 2: Create a Flask Application
Create a new Flask application in PyCharm. Here’s a basic example:
Create a new Python file (e.g., app.py) in your project.
Add the following basic Flask code to app.py:
from flask import Flask

app = Flask(__name__)

@app.route('/')
def hello_world():
    return 'Hello, World!'

if __name__ == '__main__':
    app.run(debug=True)
Step 3: Configure the Flask Run/Debug Configuration in PyCharm
Open the Run/Debug Configurations:
- Go to the top-right corner of PyCharm.
Click on the dropdown menu (usually showing "Add Configuration...") and select "Edit Configurations
."
Add a new configuration:Click the + button to add a new configuration.
Select "Python" from the list
.
Set up the configuration:
Name: Give a name to your configuration (e.g., "Run Flask").
Script path: Select the path to your app.py file.
Python interpreter: Ensure that the correct Python interpreter is selected.
Parameters: Leave it empty or set any additional command-line arguments you need.
Working directory: Set this to your project's root directory.
Environment variables: Add FLASK_APP=app.py if needed.
Save the configuration by clicking "OK."
Step 4: Run the Flask Application
Select your configuration: In the dropdown in the top-right corner of PyCharm, select the configuration you just created (e.g., "Run Flask").
Run the configuration: Click the green "Run" button (or press Shift + F10).
Your Flask application should now start, and you can access it in your browser at http://127.0.0.1:5000/ or whichever address and port you have configured.
Python or executable is not recognized in your system
The error message indicates that the Python executable is not recognized in your system. This could be because Python is not installed or the path to Python is not correctly configured in your system's PATH. Here's how to resolve this:
Step 1: Install Python
If Python is not installed, you can download and install it from the official Python website:
Download Python:
- Go to the official Python download page.
Download the latest version of Python for Windows
.
Run the Python Installer`:Important: During installation, make sure to check the box that says "Add Python to PATH."
Click "Install Now" to install Python with default settings
.
Verify the Installation:After installation, open a new Command Prompt and type python --version to verify that Python was installed correctly.
You should see the Python version number, indicating that Python is now recognized
.
Step 2: Configure Python PATH (If Necessary)
If Python is already installed but not recognized, you may need to add Python to your system's PATH manually:
Find the Python installation directory:
Python is usually installed in a directory like C:\Users\YourUsername\AppData\Local\Programs\Python\PythonXX, where XX is the version number.
Add Python to the PATH:
Go to the Windows Start Menu, search for "Environment Variables," and select "Edit the system environment variables."
In the System Properties window, click the "Environment Variables" button.
In the Environment Variables window, find the "Path" variable in the "System variables" section, and click "Edit."
Add the following paths:
C:\Users\YourUsername\AppData\Local\Programs\Python\PythonXX\

C:\Users\YourUsername\AppData\Local\Programs\Python\PythonXX\Scripts\
Click "OK" to save the changes.
Restart the Command Prompt:
Close and reopen the Command Prompt to apply the changes.
Run python --version again to verify that Python is recognized.
Step 3: Install pip and Required Packages
Ensure pip is installed:
After setting up Python, pip (the Python package installer) should be installed automatically.
Verify it by running pip --version in the Command Prompt.
Install psycopg2-binary:
Run the following command in the Command Prompt:
pip install psycopg2-binary
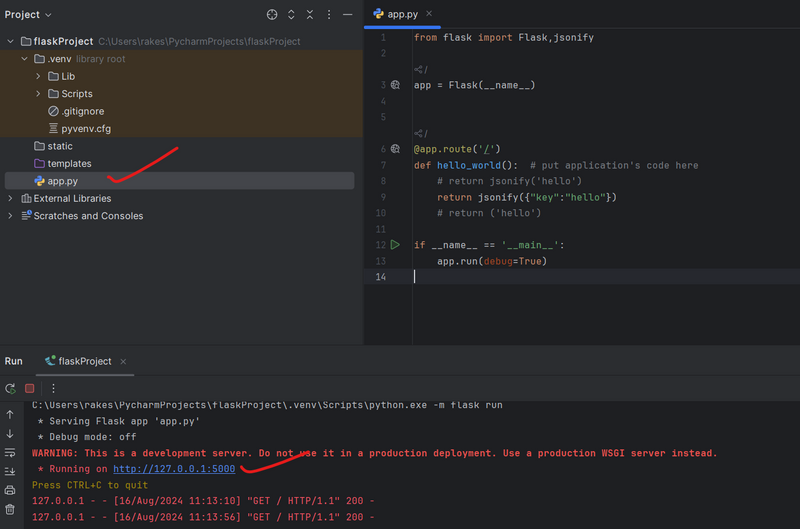
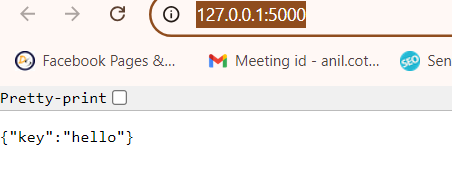
Run your First App
`
from flask import Flask,jsonify
app = Flask(name)
@app.route('/')
def hello_world(): # put application's code here
# return jsonify('hello')
return jsonify({"key":"hello"})
# return ('hello')
if name == 'main':
app.run(debug=True)
`
flask_sqlalchemy module is not installed in your current Python environment
Step 1: Activate Your Virtual Environment
Ensure that your virtual environment is activated. In your terminal or command prompt, navigate to your project directory and activate the virtual environment:
Windows:
step1
.venv\Scripts\activate
step2
pip install flask_sqlalchemy
`
C:\Users\rakes\PycharmProjects\flaskProject>.venv\Scripts\activate
(.venv) C:\Users\rakes\PycharmProjects\flaskProject>pip install flask_sqlalchemy
`
The system cannot find the path specified venv
error:
Solution
It seems that your virtual environment may not have been created properly, or it might be located in a different directory. Here’s how you can troubleshoot and resolve the issue:
- Verify the Existence of the Virtual Environment First, check if the virtual environment folder (venv) exists in your project directory.
In your project directory (C:\Users\rakes\PycharmProjects\fastApiProject), look for a folder named venv. This folder should contain Scripts, Lib, and other subdirectories.
- Create a Virtual Environment (if it doesn’t exist) If the venv folder doesn’t exist, you can create a new virtual environment by running:
python -m venv venv
This will create a venv folder in your current directory.
- Activate the Virtual Environment Once the virtual environment is created, activate it:
On Windows:
.\venv\Scripts\activate
now , we can perform
`
C:\Users\rakes\PycharmProjects\fastApiProject>python -m venv venv
C:\Users\rakes\PycharmProjects\fastApiProject>.\venv\Scripts\activate
`
How to connect database in flask
`
from flask_sqlalchemy import SQLAlchemy
app = Flask(name)
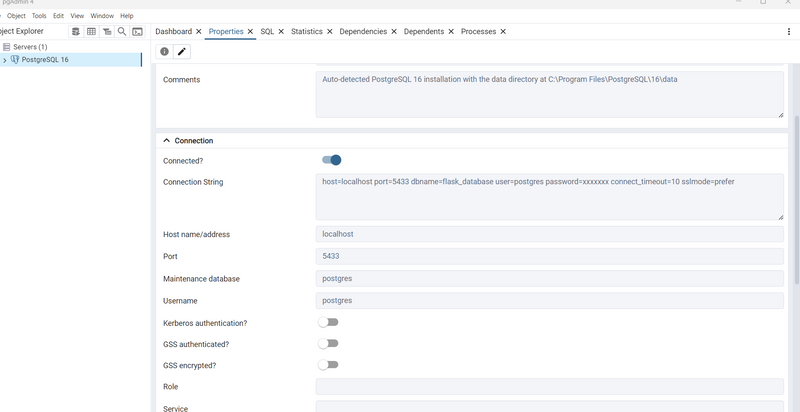
app.config['SQLALCHEMY_DATABASE_URI'] = 'postgresql://postgres:root@localhost:5433/flask_database'
app.config['SQLALCHEMY_TRACK_MODIFICATIONS'] = False
Initialize the database
db = SQLAlchemy(app)
`
How to see username and password in pgmyadmin
Steps to Change the Password in pgAdmin:
Open pgAdmin:
Launch pgAdmin on your system.
Connect to Your Server:
In the left-hand tree view (Object browser), locate and expand your PostgreSQL server instance.
Right-click on the server name and select "Connect" if it's not already connected.
Expand the Databases Section:
Expand the "Databases" section by clicking on it. This will list all the databases under your server.
Open the "Login/Group Roles" Section:
Expand the "Login/Group Roles" section under the server. This is where all the database users (roles) are listed.
Locate and Right-Click the User:
Find the user (role) for which you want to change the password.
Right-click on the user and select "Properties."
Change the Password:
In the "Properties" window, navigate to the "Definition" tab.
In the "Password" field, enter the new password.
Re-enter the password in the "Confirm password" field.
How to create table using flask_sqlalchemy
`
class Task(db.Model):
# table = 'tasks'
id = db.Column(db.Integer, primary_key=True, autoincrement=True)
title = db.Column(db.String(200), nullable=False)
done = db.Column(db.Boolean, default=False)
with app.app_context():
db.create_all()
`
full code
`
from flask import Flask,jsonify
from flask_sqlalchemy import SQLAlchemy
app = Flask(name)
app.config['SQLALCHEMY_DATABASE_URI'] = 'postgresql://postgres:root@localhost:5433/flask_database'
app.config['SQLALCHEMY_TRACK_MODIFICATIONS'] = False
Initialize the database
db = SQLAlchemy(app)
class Task(db.Model):
# table = 'tasks'
id = db.Column(db.Integer, primary_key=True, autoincrement=True)
title = db.Column(db.String(200), nullable=False)
done = db.Column(db.Boolean, default=False)
with app.app_context():
db.create_all()
@app.route('/')
def hello_world(): # put application's code here
# return jsonify('hello')
return jsonify({"key":"hello"})
# return ('hello')
@app.route('/tasks')
def get_tasks():
tasks = Task.query.all()
task_list = [
{'id': task.id, 'title': task.title, 'done': task.done} for task in tasks
]
return jsonify({"tasks": task_list})
if name == 'main':
app.run(debug=True)
`
Reference


Top comments (0)