What is Redux
Why use Redux in Flutter
Counter example of Redux
CRUD example of Redux
It provides a centralized store for storing the state of an application, and it follows the unidirectional data flow pattern. In Flutter, Redux can be used to manage the state of an application, making it easier to understand, maintain, and scale.
What is Redux
Redux is a predictable state management library that is based on the principles of Flux architecture. It is designed to make it easy to manage the state of an application in a centralized and consistent way. The core concepts of Redux are:
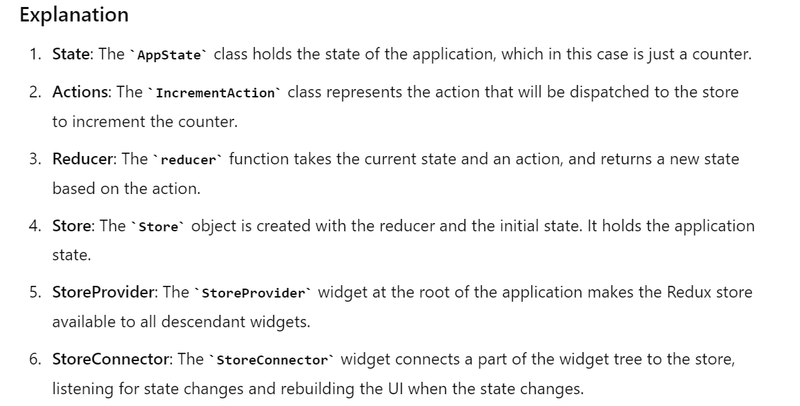
State: The state of an application is the data that changes over time, such as user data, API responses, or UI state.
Actions: Actions are events that are dispatched from the view layer to modify the state of the application. Actions have a type and can also have payload data.
Reducer: The reducer is a pure function that takes the current state and an action as inputs and returns the updated state. The reducer defines how the state should be updated based on the action type.
Store: The store is the central place where the state of the application is stored. The store is created by passing the reducer function to it.
Why use Redux in Flutter
Flutter provides a rich set of built-in widgets and tools for building complex UIs. However, as the size and complexity of a Flutter application grow, it becomes more challenging to manage the state of the application. This is where Redux comes in. By using Redux, you can centralize the state of your application and make it easier to manage.
Some of the benefits of using Redux in Flutter are:
Predictable state management: With Redux, the state of the application is managed in a centralized and consistent way. This makes it easier to understand how the state changes over time and debug any issues that may arise.
Scalability: As the size and complexity of a Flutter application grows, Redux makes it easier to manage the state of the application. By following the core concepts of Redux, you can quickly scale the state management of your application.
Reusable code: By centralizing the state of the application, you can write reusable code that can be shared across different parts of the application.
Easy to test: Because the reducer is a pure function, it is easy to write automated tests. This makes it easier to ensure that the state of the application is being updated correctly
Example
Using Redux to manage state in a Flutter application involves understanding the key concepts of Redux: actions, reducers, state, and the store. Here's a step-by-step guide to implement Redux in Flutter with a simple counter example.
Step 1: Add Dependencies
First, add the necessary dependencies to your pubspec.yaml file:
dependencies:
  flutter:
    sdk: flutter
  flutter_redux: ^0.8.0
  redux: ^5.0.0
Run flutter pub get to install the dependencies.
Step 2: Define the State
Create a class that represents the state of your application. In this example, the state will only have a single integer to represent the counter value.
class AppState {
  final int counter;

  AppState({this.counter = 0});
}
Step 3: Define Actions
Actions are the messages sent to the store to update the state. Define an action for incrementing the counter.
class IncrementAction {}
Step 4: Create the Reducer
Reducers take the current state and an action as arguments and return a new state. Define a reducer to handle the increment action.
AppState reducer(AppState state, dynamic action) {
  if (action is IncrementAction) {
    return AppState(counter: state.counter + 1);
  }
  return state;
}
Step 5: Create the Store
Create the Redux store that holds the application state.
import 'package:redux/redux.dart';

final store = Store<AppState>(
  reducer,
  initialState: AppState(),
);
Step 6: Provide the Store
Wrap your main application with StoreProvider to make the store available throughout the widget tree.
import 'package:flutter/material.dart';
import 'package:flutter_redux/flutter_redux.dart';

void main() {
  runApp(MyApp());
}

class MyApp extends StatelessWidget {
  @override
  Widget build(BuildContext context) {
    return StoreProvider(
      store: store,
      child: MaterialApp(
        home: CounterApp(),
      ),
    );
  }
}
Step 7: Create the UI
Use StoreConnector and StoreProvider to connect your UI to the Redux store. StoreConnector listens for changes in the store and rebuilds the UI accordingly.
import 'package:flutter/material.dart';
import 'package:flutter_redux/flutter_redux.dart';

class CounterApp extends StatelessWidget {
  @override
  Widget build(BuildContext context) {
    return Scaffold(
      appBar: AppBar(
        title: Text('Redux Counter Example'),
      ),
      body: Center(
        child: Column(
          mainAxisAlignment: MainAxisAlignment.center,
          children: [
            StoreConnector<AppState, int>(
              converter: (store) => store.state.counter,
              builder: (context, counter) {
                return Text(
                  'Counter Value: $counter',
                  style: TextStyle(fontSize: 24),
                );
              },
            ),
            SizedBox(height: 20),
            ElevatedButton(
              onPressed: () {
                StoreProvider.of<AppState>(context).dispatch(IncrementAction());
              },
              child: Text('Increment'),
            ),
          ],
        ),
      ),
    );
  }
}
Full Example
Here is the complete code for a simple Flutter app using Redux to manage a counter state:
import 'package:flutter/material.dart';
import 'package:flutter_redux/flutter_redux.dart';
import 'package:redux/redux.dart';

// State
class AppState {
  final int counter;

  AppState({this.counter = 0});
}

// Actions
class IncrementAction {}

// Reducer
AppState reducer(AppState state, dynamic action) {
  if (action is IncrementAction) {
    return AppState(counter: state.counter + 1);
  }
  return state;
}

void main() {
  final store = Store<AppState>(reducer, initialState: AppState());

  runApp(MyApp(store: store));
}

class MyApp extends StatelessWidget {
  final Store<AppState> store;

  MyApp({required this.store});

  @override
  Widget build(BuildContext context) {
    return StoreProvider(
      store: store,
      child: MaterialApp(
        home: CounterApp(),
      ),
    );
  }
}

class CounterApp extends StatelessWidget {
  @override
  Widget build(BuildContext context) {
    return Scaffold(
      appBar: AppBar(
        title: Text('Redux Counter Example'),
      ),
      body: Center(
        child: Column(
          mainAxisAlignment: MainAxisAlignment.center,
          children: [
            StoreConnector<AppState, int>(
              converter: (store) => store.state.counter,
              builder: (context, counter) {
                return Text(
                  'Counter Value: $counter',
                  style: TextStyle(fontSize: 24),
                );
              },
            ),
            SizedBox(height: 20),
            ElevatedButton(
              onPressed: () {
                StoreProvider.of<AppState>(context).dispatch(IncrementAction());
              },
              child: Text('Increment'),
            ),
          ],
        ),
      ),
    );
  }
}

CRUD example of Redux
Using Redux to manage CRUD (Create, Read, Update, Delete) operations in a Flutter application involves creating actions, reducers, and a store to manage the state of a list of items. Here’s a step-by-step guide with an example:
Step 1: Add Dependencies
Add the necessary dependencies to your pubspec.yaml file:
dependencies:
  flutter:
    sdk: flutter
  flutter_redux: ^0.8.0
  redux: ^5.0.0
Run flutter pub get to install the dependencies.
Step 2: Define the State
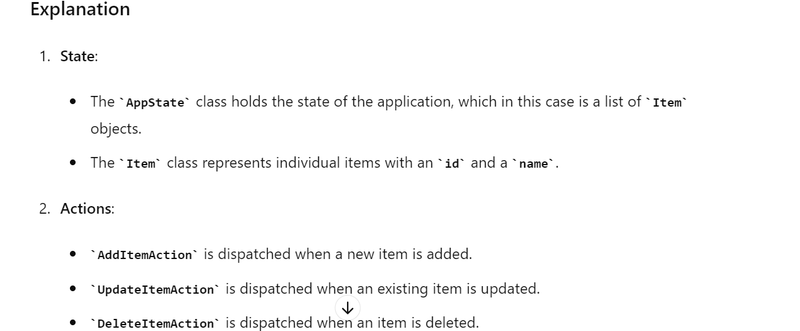
Create a class that represents the state of your application. In this example, the state will have a list of items.
class AppState {
  final List<Item> items;

  AppState({this.items = const []});
}

class Item {
  final String id;
  final String name;

  Item({required this.id, required this.name});
}
Step 3: Define Actions
Actions are the messages sent to the store to update the state. Define actions for creating, reading, updating, and deleting items.
class AddItemAction {
  final Item item;

  AddItemAction(this.item);
}

class UpdateItemAction {
  final Item item;

  UpdateItemAction(this.item);
}

class DeleteItemAction {
  final String id;

  DeleteItemAction(this.id);
}
Step 4: Create the Reducer
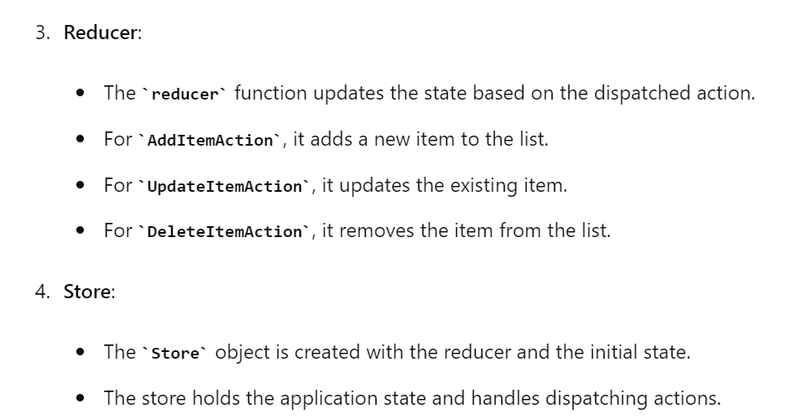
Reducers take the current state and an action as arguments and return a new state. Define a reducer to handle the CRUD actions.
AppState reducer(AppState state, dynamic action) {
  if (action is AddItemAction) {
    return AppState(items: List.from(state.items)..add(action.item));
  } else if (action is UpdateItemAction) {
    return AppState(items: state.items.map((item) {
      return item.id == action.item.id ? action.item : item;
    }).toList());
  } else if (action is DeleteItemAction) {
    return AppState(items: state.items.where((item) => item.id != action.id).toList());
  }
  return state;
}
Step 5: Create the Store
Create the Redux store that holds the application state.
import 'package:redux/redux.dart';

final store = Store<AppState>(
  reducer,
  initialState: AppState(),
);
Step 6: Provide the Store
Wrap your main application with StoreProvider to make the store available throughout the widget tree.
import 'package:flutter/material.dart';
import 'package:flutter_redux/flutter_redux.dart';

void main() {
  runApp(MyApp());
}

class MyApp extends StatelessWidget {
  @override
  Widget build(BuildContext context) {
    return StoreProvider(
      store: store,
      child: MaterialApp(
        home: ItemListScreen(),
      ),
    );
  }
}
Step 7: Create the UI
Use StoreConnector and StoreProvider to connect your UI to the Redux store. Create a UI to display the list of items and buttons to perform CRUD operations.
import 'package:flutter/material.dart';
import 'package:flutter_redux/flutter_redux.dart';

class ItemListScreen extends StatelessWidget {
  @override
  Widget build(BuildContext context) {
    return Scaffold(
      appBar: AppBar(
        title: Text('Redux CRUD Example'),
      ),
      body: Column(
        children: [
          Expanded(
            child: StoreConnector<AppState, List<Item>>(
              converter: (store) => store.state.items,
              builder: (context, items) {
                return ListView.builder(
                  itemCount: items.length,
                  itemBuilder: (context, index) {
                    final item = items[index];
                    return ListTile(
                      title: Text(item.name),
                      trailing: Row(
                        mainAxisSize: MainAxisSize.min,
                        children: [
                          IconButton(
                            icon: Icon(Icons.edit),
                            onPressed: () {
                              _showUpdateDialog(context, item);
                            },
                          ),
                          IconButton(
                            icon: Icon(Icons.delete),
                            onPressed: () {
                              StoreProvider.of<AppState>(context).dispatch(DeleteItemAction(item.id));
                            },
                          ),
                        ],
                      ),
                    );
                  },
                );
              },
            ),
          ),
          Padding(
            padding: const EdgeInsets.all(8.0),
            child: ElevatedButton(
              onPressed: () {
                _showAddDialog(context);
              },
              child: Text('Add Item'),
            ),
          ),
        ],
      ),
    );
  }

  void _showAddDialog(BuildContext context) {
    final TextEditingController nameController = TextEditingController();
    showDialog(
      context: context,
      builder: (context) {
        return AlertDialog(
          title: Text('Add Item'),
          content: TextField(
            controller: nameController,
            decoration: InputDecoration(labelText: 'Item Name'),
          ),
          actions: [
            TextButton(
              onPressed: () {
                final String name = nameController.text;
                if (name.isNotEmpty) {
                  final String id = DateTime.now().toString();
                  final Item newItem = Item(id: id, name: name);
                  StoreProvider.of<AppState>(context).dispatch(AddItemAction(newItem));
                  Navigator.of(context).pop();
                }
              },
              child: Text('Add'),
            ),
          ],
        );
      },
    );
  }

  void _showUpdateDialog(BuildContext context, Item item) {
    final TextEditingController nameController = TextEditingController(text: item.name);
    showDialog(
      context: context,
      builder: (context) {
        return AlertDialog(
          title: Text('Update Item'),
          content: TextField(
            controller: nameController,
            decoration: InputDecoration(labelText: 'Item Name'),
          ),
          actions: [
            TextButton(
              onPressed: () {
                final String name = nameController.text;
                if (name.isNotEmpty) {
                  final updatedItem = Item(id: item.id, name: name);
                  StoreProvider.of<AppState>(context).dispatch(UpdateItemAction(updatedItem));
                  Navigator.of(context).pop();
                }
              },
              child: Text('Update'),
            ),
          ],
        );
      },
    );
  }
}
Here is the complete code for a simple Flutter app using Redux to manage CRUD operations for a list of items:
import 'package:flutter/material.dart';
import 'package:flutter_redux/flutter_redux.dart';
import 'package:redux/redux.dart';

// State
class AppState {
  final List<Item> items;

  AppState({this.items = const []});
}

class Item {
  final String id;
  final String name;

  Item({required this.id, required this.name});
}

// Actions
class AddItemAction {
  final Item item;

  AddItemAction(this.item);
}

class UpdateItemAction {
  final Item item;

  UpdateItemAction(this.item);
}

class DeleteItemAction {
  final String id;

  DeleteItemAction(this.id);
}

// Reducer
AppState reducer(AppState state, dynamic action) {
  if (action is AddItemAction) {
    return AppState(items: List.from(state.items)..add(action.item));
  } else if (action is UpdateItemAction) {
    return AppState(items: state.items.map((item) {
      return item.id == action.item.id ? action.item : item;
    }).toList());
  } else if (action is DeleteItemAction) {
    return AppState(items: state.items.where((item) => item.id != action.id).toList());
  }
  return state;
}

void main() {
  final store = Store<AppState>(reducer, initialState: AppState());

  runApp(MyApp(store: store));
}

class MyApp extends StatelessWidget {
  final Store<AppState> store;

  MyApp({required this.store});

  @override
  Widget build(BuildContext context) {
    return StoreProvider(
      store: store,
      child: MaterialApp(
        home: ItemListScreen(),
      ),
    );
  }
}

class ItemListScreen extends StatelessWidget {
  @override
  Widget build(BuildContext context) {
    return Scaffold(
      appBar: AppBar(
        title: Text('Redux CRUD Example'),
      ),
      body: Column(
        children: [
          Expanded(
            child: StoreConnector<AppState, List<Item>>(
              converter: (store) => store.state.items,
              builder: (context, items) {
                return ListView.builder(
                  itemCount: items.length,
                  itemBuilder: (context, index) {
                    final item = items[index];
                    return ListTile(
                      title: Text(item.name),
                      trailing: Row(
                        mainAxisSize: MainAxisSize.min,
                        children: [
                          IconButton(
                            icon: Icon(Icons.edit),
                            onPressed: () {
                              _showUpdateDialog(context, item);
                            },
                          ),
                          IconButton(
                            icon: Icon(Icons.delete),
                            onPressed: () {
                              StoreProvider.of<AppState>(context).dispatch(DeleteItemAction(item.id));
                            },
                          ),
                        ],
                      ),
                    );
                  },
                );
              },
            ),
          ),
          Padding(
            padding: const EdgeInsets.all(8.0),
            child: ElevatedButton(
              onPressed: () {
                _showAddDialog(context);
              },
              child: Text('Add Item'),
            ),
          ),
        ],
      ),
    );
  }

  void _showAddDialog(BuildContext context) {
    final TextEditingController nameController = TextEditingController();
    showDialog(
      context: context,
      builder: (context) {
        return AlertDialog(
title: Text('Add Item'),
          content: TextField(
            controller: nameController,
            decoration: InputDecoration(labelText: 'Item Name'),
          ),
          actions: [
            TextButton(
              onPressed: () {
                final String name = nameController.text;
                if (name.isNotEmpty) {
                  final String id = DateTime.now().toString();
                  final Item newItem = Item(id: id, name: name);
                  StoreProvider.of<AppState>(context).dispatch(AddItemAction(newItem));
                  Navigator.of(context).pop();
                }
              },
              child: Text('Add'),
            ),
          ],
        );
      },
    );
  }

  void _showUpdateDialog(BuildContext context, Item item) {
    final TextEditingController nameController = TextEditingController(text: item.name);
    showDialog(
      context: context,
      builder: (context) {
        return AlertDialog(
          title: Text('Update Item'),
          content: TextField(
            controller: nameController,
            decoration: InputDecoration(labelText: 'Item Name'),
          ),
          actions: [
            TextButton(
              onPressed: () {
                final String name = nameController.text;
                if (name.isNotEmpty) {
                  final updatedItem = Item(id: item.id, name: name);
                  StoreProvider.of<AppState>(context).dispatch(UpdateItemAction(updatedItem));
                  Navigator.of(context).pop();
                }
              },
              child: Text('Update'),
            ),
          ],
        );
      },
    );
  }
}
Full Example Code
Here's the complete code for the Redux CRUD example in a Flutter application:
import 'package:flutter/material.dart';
import 'package:flutter_redux/flutter_redux.dart';
import 'package:redux/redux.dart';

// State
class AppState {
  final List<Item> items;

  AppState({this.items = const []});
}

class Item {
  final String id;
  final String name;

  Item({required this.id, required this.name});
}

// Actions
class AddItemAction {
  final Item item;

  AddItemAction(this.item);
}

class UpdateItemAction {
  final Item item;

  UpdateItemAction(this.item);
}

class DeleteItemAction {
  final String id;

  DeleteItemAction(this.id);
}

// Reducer
AppState reducer(AppState state, dynamic action) {
  if (action is AddItemAction) {
    return AppState(items: List.from(state.items)..add(action.item));
  } else if (action is UpdateItemAction) {
    return AppState(items: state.items.map((item) {
      return item.id == action.item.id ? action.item : item;
    }).toList());
  } else if (action is DeleteItemAction) {
    return AppState(items: state.items.where((item) => item.id != action.id).toList());
  }
  return state;
}

void main() {
  final store = Store<AppState>(reducer, initialState: AppState());

  runApp(MyApp(store: store));
}

class MyApp extends StatelessWidget {
  final Store<AppState> store;

  MyApp({required this.store});

  @override
  Widget build(BuildContext context) {
    return StoreProvider(
      store: store,
      child: MaterialApp(
        home: ItemListScreen(),
      ),
    );
  }
}

class ItemListScreen extends StatelessWidget {
  @override
  Widget build(BuildContext context) {
    return Scaffold(
      appBar: AppBar(
        title: Text('Redux CRUD Example'),
      ),
      body: Column(
        children: [
          Expanded(
            child: StoreConnector<AppState, List<Item>>(
              converter: (store) => store.state.items,
              builder: (context, items) {
                return ListView.builder(
                  itemCount: items.length,
                  itemBuilder: (context, index) {
                    final item = items[index];
                    return ListTile(
                      title: Text(item.name),
                      trailing: Row(
                        mainAxisSize: MainAxisSize.min,
                        children: [
                          IconButton(
                            icon: Icon(Icons.edit),
                            onPressed: () {
                              _showUpdateDialog(context, item);
                            },
                          ),
                          IconButton(
                            icon: Icon(Icons.delete),
                            onPressed: () {
                              StoreProvider.of<AppState>(context).dispatch(DeleteItemAction(item.id));
                            },
                          ),
                        ],
                      ),
                    );
                  },
                );
              },
            ),
          ),
          Padding(
            padding: const EdgeInsets.all(8.0),
            child: ElevatedButton(
              onPressed: () {
                _showAddDialog(context);
              },
              child: Text('Add Item'),
            ),
          ),
        ],
      ),
    );
  }

  void _showAddDialog(BuildContext context) {
    final TextEditingController nameController = TextEditingController();
    showDialog(
      context: context,
      builder: (context) {
        return AlertDialog(
          title: Text('Add Item'),
          content: TextField(
            controller: nameController,
            decoration: InputDecoration(labelText: 'Item Name'),
          ),
          actions: [
            TextButton(
              onPressed: () {
                final String name = nameController.text;
                if (name.isNotEmpty) {
                  final String id = DateTime.now().toString();
                  final Item newItem = Item(id: id, name: name);
                  StoreProvider.of<AppState>(context).dispatch(AddItemAction(newItem));
                  Navigator.of(context).pop();
                }
              },
              child: Text('Add'),
            ),
          ],
        );
      },
    );
  }

  void _showUpdateDialog(BuildContext context, Item item) {
    final TextEditingController nameController = TextEditingController(text: item.name);
    showDialog(
      context: context,
      builder: (context) {
        return AlertDialog(
          title: Text('Update Item'),
          content: TextField(
            controller: nameController,
            decoration: InputDecoration(labelText: 'Item Name'),
          ),
          actions: [
            TextButton(
              onPressed: () {
                final String name = nameController.text;
                if (name.isNotEmpty) {
                  final updatedItem = Item(id: item.id, name: name);
                  StoreProvider.of<AppState>(context).dispatch(UpdateItemAction(updatedItem));
                  Navigator.of(context).pop();
                }
              },
              child: Text('Update'),
            ),
          ],
        );
      },
    );
  }
}


Top comments (0)