invalid_client (Client authentication failed)
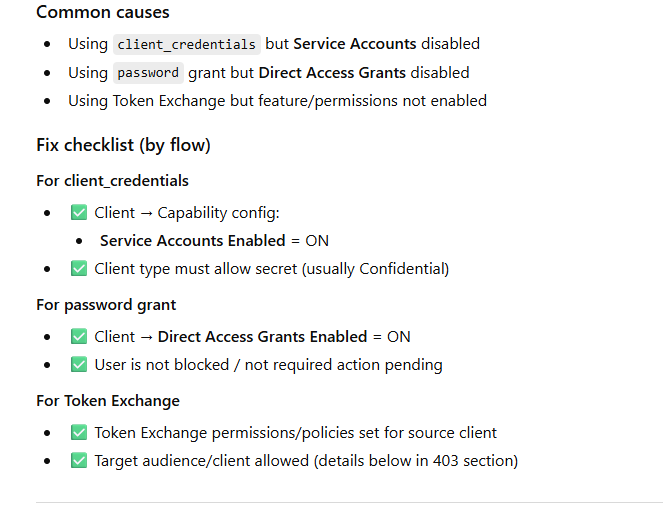
unauthorized_client (Client not allowed for this grant / flow)
invalid_grant (Bad username/password, expired code, wrong redirect_uri)
invalid_token (Token expired / wrong audience / wrong signature)
CORS errors (Browser blocks the request)
403 Forbidden / “Insufficient permissions” (Admin API / Token exchange)
invalid_scope (Scopes not allowed)
Practical Debugging Pattern (use this in your blog)
Userinfo (standard OIDC profile endpoint) using jwt
Debugging in visual studio
401 error
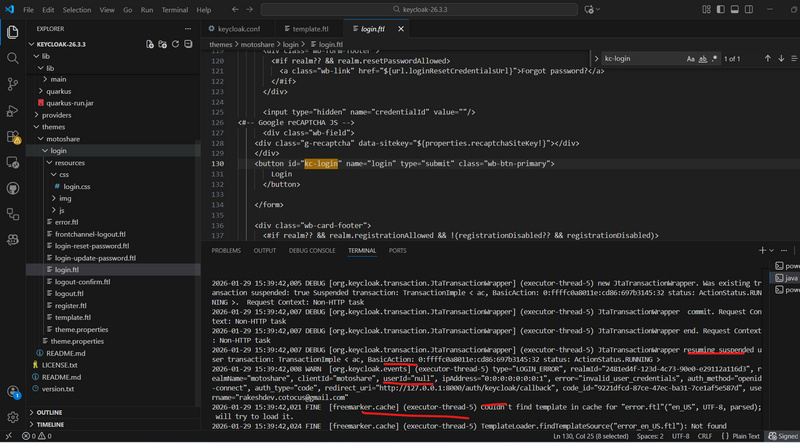
session is not created
Check Keycloak logs for the real error
curl -X POST "https://auth.motoshare.in/realms/motoshare/protocol/openid-connect/token" \
  -H "Content-Type: application/x-www-form-urlencoded" \
  -d "grant_type=urn:ietf:params:oauth:grant-type:token-exchange" \
  -d "client_id=motoshare" \
  -d "client_secret=YOUR_SECRET" \
  -d "requested_token_type=urn:ietf:params:oauth:token-type:access_token"
Correct Token Exchange CURL (Full Example)
STEP 1: First obtain a user access token
curl -X POST "https://auth.motoshare.in/realms/motoshare/protocol/openid-connect/token" \
  -H "Content-Type: application/x-www-form-urlencoded" \
  -d "grant_type=password" \
  -d "client_id=motoshare" \
  -d "client_secret=L0JQfUYqSueoxhOSqCi77ihu3LppLsOB" \
  -d "username=rakeshdev.cotocus@gmail.com" \
  -d "password=rkgmkgskg@1234"
STEP 2: Perform token exchange using that access token
curl -X POST "https://auth.motoshare.in/realms/motoshare/protocol/openid-connect/token" \
  -H "Content-Type: application/x-www-form-urlencoded" \
  -d "grant_type=urn:ietf:params:oauth:grant-type:token-exchange" \
  -d "client_id=motoshare" \
  -d "client_secret=L0JQfUYqSueoxhOSqCi77ihu3LppLsOB" \
  -d "subject_token=THE_USER_ACCESS_TOKEN" \
  -d "subject_token_type=urn:ietf:params:oauth:token-type:access_token" \
  -d "requested_token_type=urn:ietf:params:oauth:token-type:access_token"
how-to-run-keycloak-in-production-with-apache-and-systemd-step-by-step-guide
STEP 1 — Check Keycloak logs for the real error
Run:
journalctl -u keycloak -f
or
tail -n 200 /opt/auth.motoshare.in/standalone/log/server.log
./kc.sh build // inside bin run thiscommand
sudo systemctl daemon-reload
sudo systemctl enable keycloak
sudo systemctl start keycloak
sudo systemctl status keycloak
sudo systemctl restart keycloak
sudo cp -r /opt/lampp/htdocs/motoshare.jp/motoshare-web/keycloak-phone-otp-authenticator-1.0.0.jar /opt/auth.motoshare.in/providers/
sudo cp -r /opt/lampp/htdocs/motoshare.jp/motoshare-web/keycloak-unified-phone-email-authenticator-1.0.0.jar /opt/auth.motoshare.in/providers/
sudo cp -r /opt/lampp/htdocs/motoshare.jp/motoshare-web/motoshare-phoneotp/ /opt/auth.motoshare.in/themes/
sudo cp -r /opt/keycloack/keycloak-unified-phone-email-authenticator-1.0.0.jar /opt/auth.motoshare.in/providers/
sudo cp -r /opt/keycloack/motoshare-phoneotp/ /opt/auth.motoshare.in/themes/
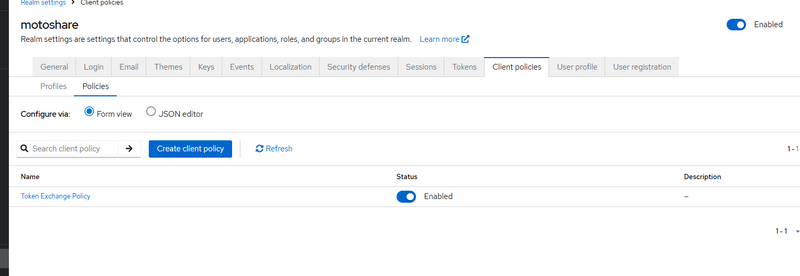
How to enable token exchange
nano /opt/auth.motoshare.in/conf/keycloak.conf
features=token-exchange,token-exchange-standard,persistent-user-sessions
cd /opt/auth.motoshare.in/bin
./kc.sh build

sudo systemctl restart keycloak
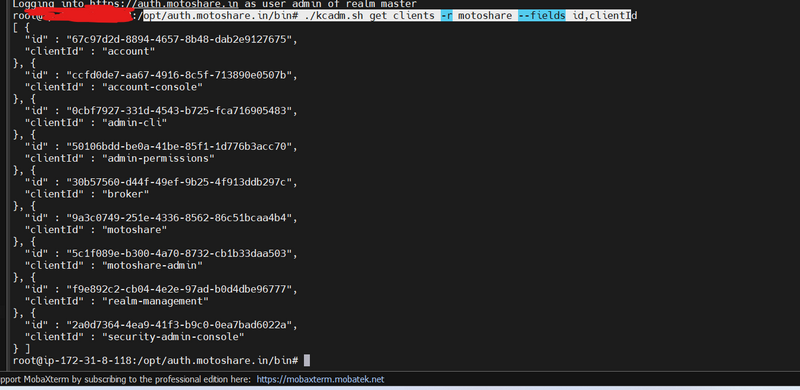
How to get client id and client secreat by command
opt/auth.motoshare.in/bin# ./kcadm.sh get clients -r motoshare --fields id,clientI
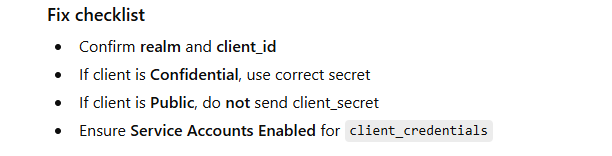
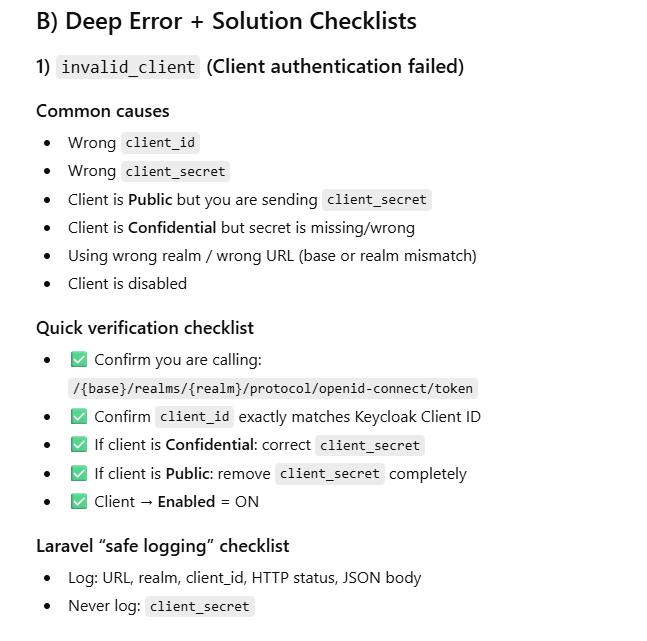
invalid_client (Client authentication failed)
Why it happens (theory)
Keycloak can’t authenticate your client application. Usually:
wrong client_id
wrong client_secret
client is set to Public but you’re sending a secret (or vice-versa)
you’re using the wrong realm URL
Example (Node.js: token request using client_secret)
import fetch from "node-fetch";

const KC_BASE = "http://localhost:8080";
const REALM = "master";
const CLIENT_ID = "myapp";
const CLIENT_SECRET = "WRONG_SECRET"; // ❌

async function getToken() {
  const url = `${KC_BASE}/realms/${REALM}/protocol/openid-connect/token`;

  const body = new URLSearchParams({
    grant_type: "client_credentials",
    client_id: CLIENT_ID,
    client_secret: CLIENT_SECRET
  });

  const res = await fetch(url, {
    method: "POST",
    headers: { "Content-Type": "application/x-www-form-urlencoded" },
    body
  });

  const data = await res.json();
  console.log(res.status, data);
}

getToken();
in laravel
<?php

namespace App\Http\Controllers;

use Illuminate\Support\Facades\Http;
use Illuminate\Support\Facades\Log;

class KeycloakTokenController extends Controller
{
    public function clientCredentialsToken()
    {
        $kcBase   = rtrim(env('KEYCLOAK_BASE_URL', 'http://localhost:8080'), '/');
        $realm    = env('KEYCLOAK_REALM', 'master');
        $clientId = env('KEYCLOAK_CLIENT_ID', 'myapp');
        $secret   = env('KEYCLOAK_CLIENT_SECRET', 'WRONG_SECRET'); // ❌ for testing

        $tokenUrl = "{$kcBase}/realms/{$realm}/protocol/openid-connect/token";

        $response = Http::asForm()
            ->timeout(20)
            ->post($tokenUrl, [
                'grant_type'    => 'client_credentials',
                'client_id'     => $clientId,
                'client_secret' => $secret,
            ]);

        // Always log safely (never log secrets)
        Log::info('[KC] client_credentials token response', [
            'url' => $tokenUrl,
            'status' => $response->status(),
            'body' => $response->json(),
            'client_id' => $clientId,
            'realm' => $realm,
        ]);

        return response()->json([
            'status' => $response->status(),
            'data' => $response->json(),
        ], $response->status());
    }
}
2) Route
use App\Http\Controllers\KeycloakTokenController;

Route::get('/debug/kc-token', [KeycloakTokenController::class, 'clientCredentialsToken']);
3) .env (example)
KEYCLOAK_BASE_URL=http://localhost:8080
KEYCLOAK_REALM=master
KEYCLOAK_CLIENT_ID=myapp
KEYCLOAK_CLIENT_SECRET=xxxxx
Example (Password grant fails because Direct Access Grants off)
curl -X POST "http://localhost:8080/realms/master/protocol/openid-connect/token" \
  -H "Content-Type: application/x-www-form-urlencoded" \
  -d "grant_type=password" \
  -d "client_id=myapp" \
  -d "client_secret=xxxxx" \
  -d "username=test" \
  -d "password=Secret123"
curl -X POST "https://auth.motoshare.in/realms/motoshare/protocol/openid-connect/token" \
  -H "Content-Type: application/x-www-form-urlencoded" \
  -d "grant_type=password" \
  -d "client_id=motoshare" \
  -d "client_secret=qOPC04bglJ9bsIWzGfqfpVIsjogYbDj4" \
  -d "username=rakeshdev.cotocus@gmail.com" \
  -d "password=rkgmkgskg@1234"
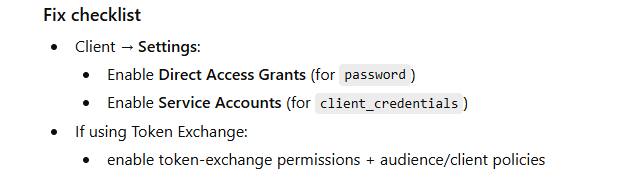
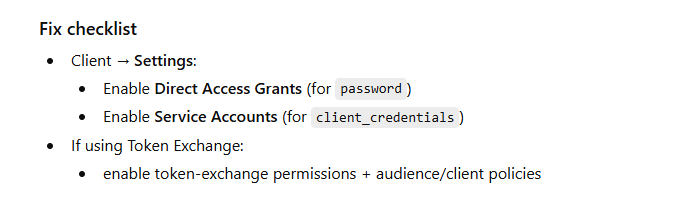
unauthorized_client (Client not allowed for this grant / flow)
Why it happens (theory)
Client is valid, but the grant type / flow is not enabled, e.g.:
trying client_credentials but service account disabled
trying password grant but “Direct Access Grants” disabled
trying Token Exchange but feature/permissions not configured
Example (Password grant fails because Direct Access Grants off)
curl -X POST "http://localhost:8080/realms/master/protocol/openid-connect/token" \
  -H "Content-Type: application/x-www-form-urlencoded" \
  -d "grant_type=password" \
  -d "client_id=myapp" \
  -d "client_secret=xxxxx" \
  -d "username=test" \
  -d "password=Secret123"
invalid_grant (Bad username/password, expired code, wrong redirect_uri)
Why it happens (theory)
Keycloak accepted the client, but the user-side grant is invalid:
wrong username/password
user disabled / required actions pending
using auth code but code already used/expired
redirect_uri mismatch for authorization code flow
Example (Laravel: exchange authorization code)
public function callback(Request $request)
{
    $code = $request->query('code');
    if (!$code) abort(400, 'Missing code');

    $tokenUrl = config('services.keycloak.base_url') . "/realms/" . config('services.keycloak.realm')
        . "/protocol/openid-connect/token";

    $redirectUri = route('kc.callback'); // MUST match exactly what Keycloak expects

    $res = Http::asForm()->post($tokenUrl, [
        'grant_type' => 'authorization_code',
        'client_id' => config('services.keycloak.client_id'),
        'client_secret' => config('services.keycloak.client_secret'),
        'code' => $code,
        'redirect_uri' => $redirectUri,
    ]);

    if (!$res->ok()) {
        \Log::error("[KC] token exchange failed", [
            'status' => $res->status(),
            'body' => $res->json(),
            'redirect_uri' => $redirectUri,
        ]);
        abort(401, 'Keycloak token exchange failed');
    }

    return $res->json();
}
Fix checklist
Verify redirect_uri exact match (scheme, host, path, trailing slash)
Check if user must complete required actions (update password / verify email)
Ensure code is used only once and quickly (auth codes are short-lived)

invalid_token (Token expired / wrong audience / wrong signature)
Why it happens (theory)
Your API received a token but can’t accept it:
token expired
token signed by different realm/issuer
token audience doesn’t include your API client
you validated with wrong JWKS URL
Example (Laravel middleware: basic token validation via introspection)
public function handle($request, Closure $next)
{
    $token = $request->bearerToken();
    if (!$token) return response()->json(['message' => 'Missing Bearer token'], 401);

    $introspectUrl = config('services.keycloak.base_url') . "/realms/" . config('services.keycloak.realm')
        . "/protocol/openid-connect/token/introspect";

    $res = Http::asForm()->post($introspectUrl, [
        'client_id' => config('services.keycloak.client_id'),
        'client_secret' => config('services.keycloak.client_secret'),
        'token' => $token,
    ]);

    $data = $res->json();
    if (!$res->ok() || empty($data['active'])) {
        \Log::warning("[KC] invalid token", ['status' => $res->status(), 'body' => $data]);
        return response()->json(['message' => 'Invalid or expired token'], 401);
    }

    return $next($request);
}
Fix checklist
Confirm issuer/realm matches
Ensure token has correct aud (audience)
Use correct JWKS or introspection client creds
Handle refresh properly if token expired
CORS errors (Browser blocks the request)
Why it happens (theory)
Keycloak is fine, but the browser blocks due to missing CORS headers for your origin.
Example symptom
Console shows: CORS policy: No 'Access-Control-Allow-Origin'...
Fix checklist
Keycloak client → Web Origins: add your frontend origin
Example: http://localhost:3000
Also set Valid Redirect URIs properly
Prefer server-side token exchange when possible
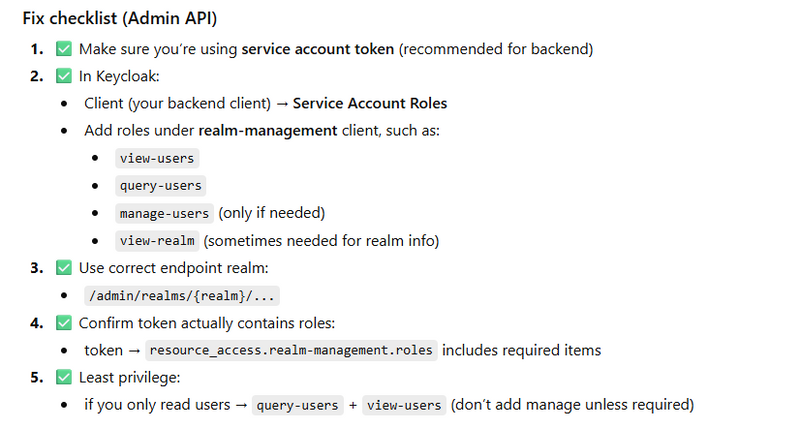
403 Forbidden / “Insufficient permissions” (Admin API / Token exchange)
What it means
You have a token, but it does not have required roles to call Admin endpoints.
Common causes
Using a user token without admin roles
Using service account token but missing realm-management roles
Using wrong realm token for a different realm’s admin endpoint
Why it happens (theory)
You authenticated, but Keycloak denies the action because:
missing realm roles / client roles
service account lacks permissions
token exchange not allowed to that target/audience
Example (Laravel: calling Admin API without proper role)
$adminUrl = $kcBase . "/admin/realms/$realm/users";

$res = Http::withToken($adminAccessToken)->get($adminUrl);

if ($res->status() === 403) {
    \Log::error("[KC] admin api forbidden", ['body' => $res->json()]);
    // Usually means service account missing roles like view-users / query-users / manage-users
}
$res = Http::withToken($adminToken)
    ->timeout(20)
    ->get("{$kcBase}/admin/realms/{$realm}/users", ['max' => 10]);

if ($res->status() === 403) {
    \Log::error('[KC] Admin API forbidden', [
        'status' => $res->status(),
        'body' => $res->json(),
        'realm' => $realm,
        'endpoint' => 'users list',
    ]);
}
Fix checklist
For Admin API:
Assign service account roles (realm-management client roles)
For Token Exchange:
configure permissions/policies for exchanging + target audience

invalid_scope (Scopes not allowed)
Why it happens (theory)
You requested scopes that:
aren’t configured for that client
aren’t permitted by client scopes / consent rules
What it means (simple theory)
Your request contains a scope value Keycloak will not grant for that client/user/flow.
Most common causes (real)
Asking for a scope that the client doesn’t have permission to use
Asking offline_access when it’s not enabled/allowed
Asking custom scope not mapped to any client scope
Token Exchange: asking scopes not permitted for exchanged token
Some clients require consent; scope requires consent but not granted
Example (Laravel) requesting scopes
$response = Http::asForm()->post($tokenUrl, [
    'grant_type' => 'client_credentials',
    'client_id' => $clientId,
    'client_secret' => $secret,
    'scope' => 'openid profile email offline_access', // may trigger invalid_scope
]);
Example
-d "scope=openid profile email offline_access some_custom_scope"
Fix checklist
Client Scopes: add/assign scope properly
If you need refresh tokens: ensure offline_access is allowed + flow supports it
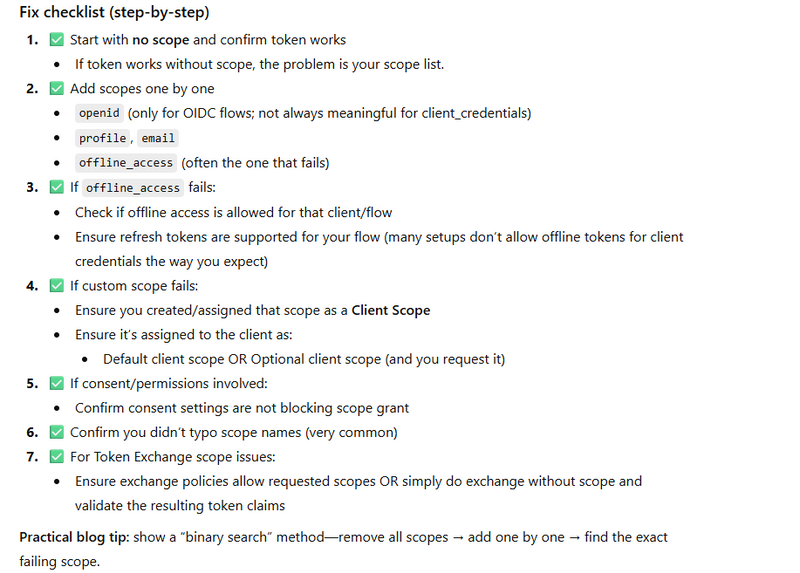
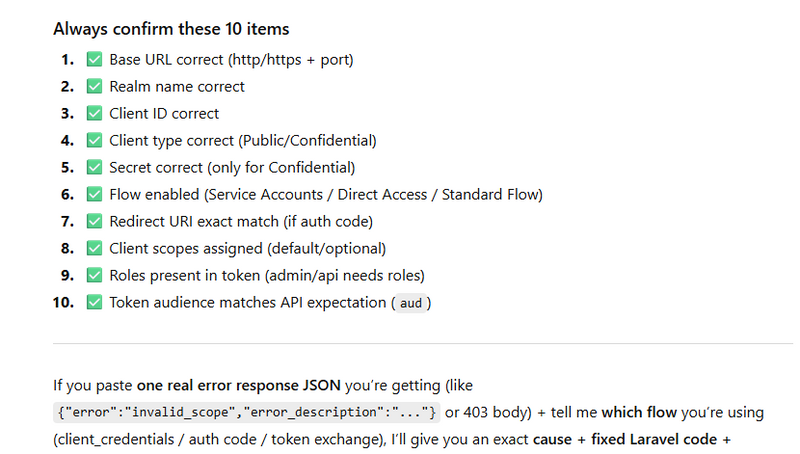
Practical Debugging Pattern (use this in your blog)
Step A: Always log the exact Keycloak response
HTTP status

response JSON

token endpoint URL

client_id + realm (never log secrets)
Step B: Confirm these 5 items first
Realm URL

Client type (Public/Confidential)

Enabled flow (auth code, password, service account, token exchange)

Redirect URI / Web Origins

Roles/permissions (for admin API or token exchange)
Userinfo (standard OIDC profile endpoint)
Step 1:add user and credential
select realm from manage realm(left-side-bar)

set paasword or credential
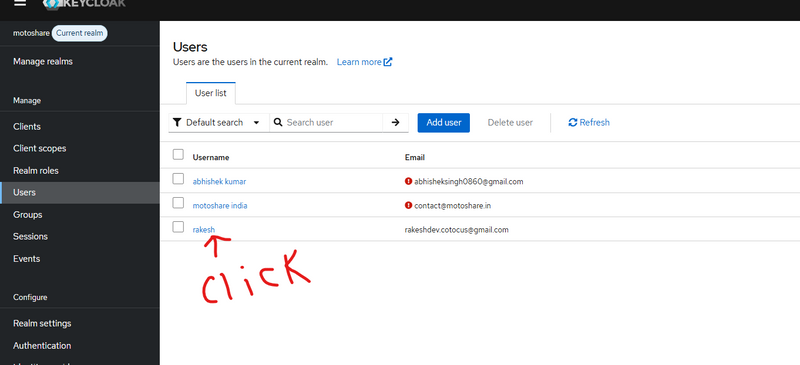
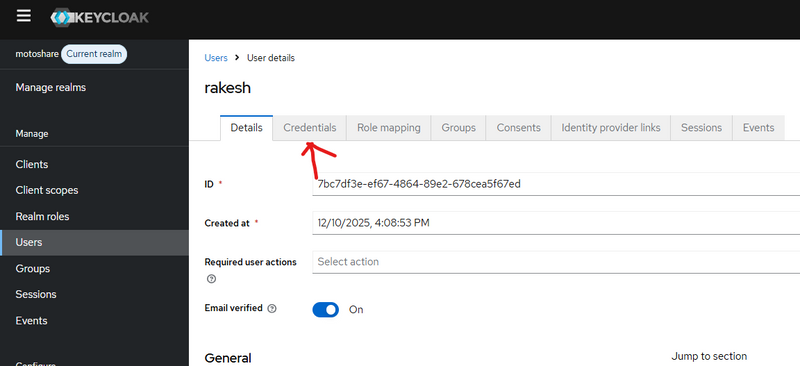
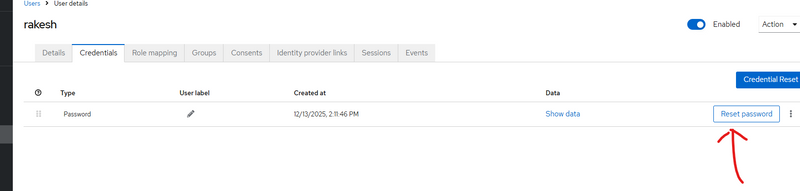
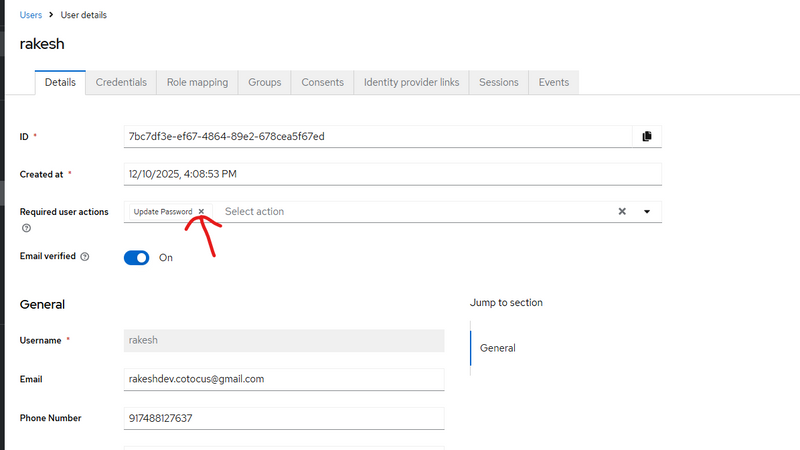
remove required user action if present
other wise error
invalid grant
account not fully setup
follow this part of blog
Steps to Enable Custom User Attributes
how-to-enable-use-custom-user-attributes-in-keycloak
After adding custom user attribute get access token using curl
apply curl to get access token
curl -X POST "https://auth.motoshare.in/realms/motoshare/protocol/openid-connect/token" \
  -H "Content-Type: application/x-www-form-urlencoded" \
  -d "grant_type=password" \
  -d "client_id=motoshare" \
  -d "client_secret=qOPC04bglJ9bsIWzGfqfpVIsjogYbDj4" \
  -d "username=rakeshdev.cotocus@gmail.com" \
  -d "password=rkgmkgskg@1234"
output
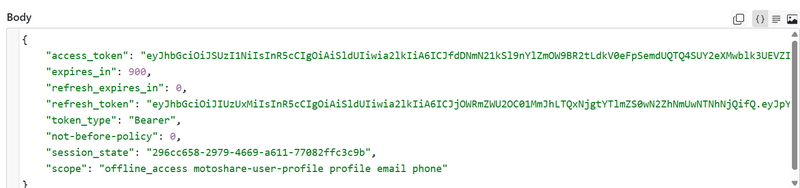
in output get access token use this accesstoken to get Userinfo (standard OIDC profile endpoint) using jwt
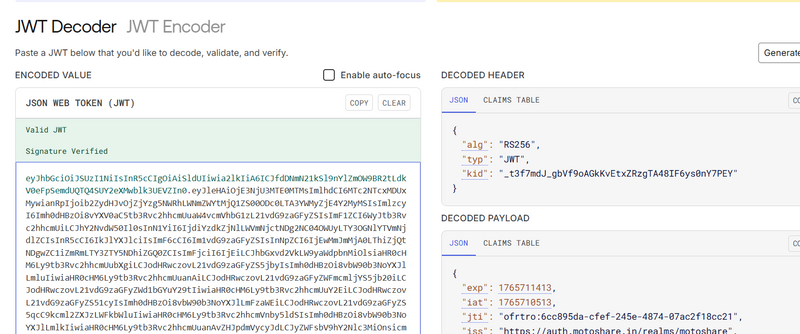
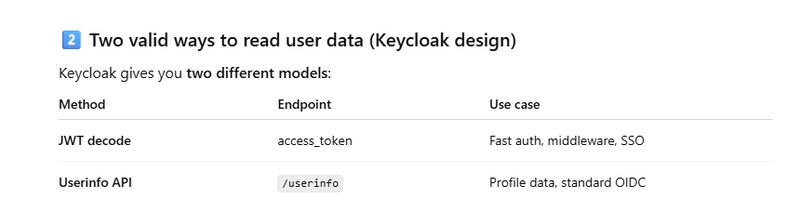
using jwt
 if ($accessToken) {
        Log::info("🔵[KC_AUTO] Validating access token via JWT decode…");

        $payload = $this->decodeJwtPayload($accessToken);

        if (!$payload) {
            Log::warning("⚠️ [KC_AUTO] Failed to decode JWT payload");
            Log::warning("⚠️ [KC_AUTO] Auto-login skipped (invalid token format)");
            return $next($request);
        }

        Log::info("🔵 [KC_AUTO] Decoded JWT payload", $payload);

        // ---- basic checks: exp / iss / aud --------------------------------
        $now = time();

        $exp = $payload['exp'] ?? null;
        if (!$exp || $exp < $now) {
            Log::warning("⚠️ [KC_AUTO] JWT token expired", [
                'exp' => $exp,
                'now' => $now,
            ]);
            return $next($request);
        }

        $realm  = env('KEYCLOAK_REALM');
        $base   = rtrim(env('KEYCLOAK_BASE_URL'), '/');        // e.g. https://auth.motoshare.in
        $issuerExpected = "{$base}/realms/{$realm}";
        $issuerActual   = $payload['iss'] ?? null;

        if ($issuerActual !== $issuerExpected) {
            Log::warning("⚠️ [KC_AUTO] JWT iss mismatch", [
                'expected' => $issuerExpected,
                'actual'   => $issuerActual,
            ]);
            return $next($request);
        }

        $expectedAud = env('KEYCLOAK_CLIENT_ID');              // motoshare
        $audClaim    = $payload['aud'] ?? [];

        if (is_string($audClaim)) {
            $audClaim = [$audClaim];
        }

        if ($expectedAud && !in_array($expectedAud, $audClaim, true)) {
            Log::warning("⚠️ [KC_AUTO] JWT aud mismatch", [
                'expected' => $expectedAud,
                'actual'   => $audClaim,
            ]);
            return $next($request);
        }

        // -----------------------------------------------------------------
        // 3️⃣ Extract useful claims and auto-login Laravel user
        // -----------------------------------------------------------------
      $email    = $payload['email'] ?? null;
$phone    = $payload['phone'] ?? ($payload['phone_number'] ?? null);
$username = $payload['preferred_username'] ?? null;
$kcUserId = $payload['sub'] ?? null;

$role     = $payload['role'] ?? null;
$status   = $payload['status'] ?? null;
$address  = $payload['address'] ?? null;

// ✅ handle possible key typo with space: " sms_notification"
$smsNotification      = $payload['sms_notification'] ?? ($payload[' sms_notification'] ?? null);
$emailNotification    = $payload['email_notification'] ?? null;
$whatsappNotification = $payload['whatsapp_notification'] ?? null;


        Log::info("📞 [KC_AUTO] Extracted user info from JWT", [
            'email'    => $email,
            'phone'    => $phone,
            'username' => $username,
            'kcUserId' => $kcUserId,
        ]);

        if ($email) {
            // 👇 Same flow as before, just driven by JWT instead of introspect
            return $this->autoLoginLaravelUser(
                $email,
                $phone,
                $kcUserId,
                $username,
                $role,
        $status,
        $address,
        $smsNotification,
        $emailNotification,
        $whatsappNotification,

                $request,
                $next
            );
        }

        Log::warning("⚠️ [KC_AUTO] JWT does not contain email, cannot auto-login");
    }
=========Another way Userinfo using jwt=====================
Step 1: Add custom user attributes in Keycloak (where you already did)
Example custom attributes on a Keycloak user:
phone

role

status

address

sms_notification

email_notification

whatsapp_notification
Important point (why sometimes you don’t see attributes)
Keycloak does NOT automatically put user attributes into access_token/userinfo unless you add a Protocol Mapper.
Step 2: Add Protocol Mappers so your custom attributes come in token/userinfo
Go to:
Keycloak Admin → Clients → motoshare → Client scopes / Mappers
Create mappers (repeat for each attribute):
Mapper settings (example: phone)
Mapper Type: User Attribute
User Attribute: phone (must match exactly your attribute key)
Token Claim Name: phone (or phone_number, your choice)
Claim JSON Type: String
Enable:
✅ Add to access token
✅ Add to ID token
✅ Add to userinfo
Do same for:
role, status, address
sms_notification, email_notification, whatsapp_notification
✅ Now your token + userinfo will include these.
Step 3: Get access token using cURL (your command)
Your cURL is correct for Direct Access Grant (password grant):
curl -X POST "https://auth.motoshare.in/realms/motoshare/protocol/openid-connect/token" \
  -H "Content-Type: application/x-www-form-urlencoded" \
  -d "grant_type=password" \
  -d "client_id=motoshare" \
  -d "client_secret=qOPC04bglJ9bsIWzGfqfpVIsjogYbDj4" \
  -d "username=rakeshdev.cotocus@gmail.com" \
  -d "password=rkgmkgskg@1234"
Keycloak response JSON contains:
access_token ✅ (use this next)

expires_in

refresh_token

token_type
Step 4: Call Userinfo endpoint using the access token
Userinfo endpoint:
GET https://auth.motoshare.in/realms/motoshare/protocol/openid-connect/userinfo
cURL example:
curl -X GET "https://auth.motoshare.in/realms/motoshare/protocol/openid-connect/userinfo" \
  -H "Authorization: Bearer YOUR_ACCESS_TOKEN"
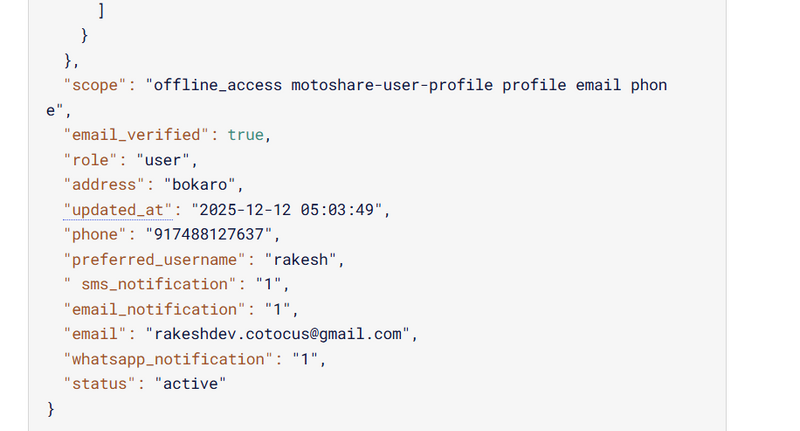
If your mappers are enabled (Step 2), you’ll see your custom attributes in output.
Step 5: Laravel config (.env)
Add:
KEYCLOAK_BASE_URL=https://auth.motoshare.in
KEYCLOAK_REALM=motoshare
KEYCLOAK_CLIENT_ID=motoshare
KEYCLOAK_CLIENT_SECRET=qOPC04bglJ9bsIWzGfqfpVIsjogYbDj4
Step 6: Laravel code to get access token (same as your cURL)
Create a service: app/Services/KeycloakService.php

<?php

namespace App\Services;

use Illuminate\Support\Facades\Http;
use Illuminate\Support\Facades\Log;

class KeycloakService
{
    public function tokenPasswordGrant(string $username, string $password): ?array
    {
        $base  = rtrim(env('KEYCLOAK_BASE_URL'), '/');
        $realm = env('KEYCLOAK_REALM');

        $url = "{$base}/realms/{$realm}/protocol/openid-connect/token";

        $res = Http::asForm()->post($url, [
            'grant_type'    => 'password',
            'client_id'     => env('KEYCLOAK_CLIENT_ID'),
            'client_secret' => env('KEYCLOAK_CLIENT_SECRET'),
            'username'      => $username,
            'password'      => $password,
        ]);

        if (!$res->ok()) {
            Log::error("[KC] Token request failed", [
                'status' => $res->status(),
                'body'   => $res->json(),
            ]);
            return null;
        }

        return $res->json();
    }
}
Usage:
$kc = app(\App\Services\KeycloakService::class);

$data = $kc->tokenPasswordGrant($username, $password);
$accessToken = $data['access_token'] ?? null;
Step 7: Laravel code to call Userinfo using access token
Add this method in the same service:
public function userInfo(string $accessToken): ?array
{
    $base  = rtrim(env('KEYCLOAK_BASE_URL'), '/');
    $realm = env('KEYCLOAK_REALM');

    $url = "{$base}/realms/{$realm}/protocol/openid-connect/userinfo";

    $res = Http::withToken($accessToken)->get($url);

    if (!$res->ok()) {
        Log::warning("[KC] Userinfo failed", [
            'status' => $res->status(),
            'body'   => $res->json(),
        ]);
        return null;
    }

    return $res->json();
}


Usage:

$userinfo = $kc->userInfo($accessToken);

Log::info("[KC] userinfo", $userinfo ?? []);
Step 8: JWT “decode” vs “verify” (your middleware code explanation)
Your current code:
✅ decodes payload
✅ checks exp, iss, aud
❌ does NOT verify signature (unless your decodeJwtPayload() actually validates signature using public keys)
Why signature verification matters
A token can be “decoded” even if it’s fake. Real validation needs:
Download realm JWKS
Validate token signature with the correct public key
Then trust claims
If you want production-grade JWT verification
Use a JWT library (commonly firebase/php-jwt) and validate using Keycloak JWKS.
If you want, I can paste the exact Laravel-ready verify function (JWKS fetch + cache + validate) that drops into your middleware.
Step 9: Mapping your custom attributes (JWT or Userinfo)
After you have either:
$payload from JWT
or $userinfo from userinfo endpoint
You extract like this (your pattern is fine):
$email    = $payload['email'] ?? null;
$phone    = $payload['phone'] ?? ($payload['phone_number'] ?? null);
$username = $payload['preferred_username'] ?? null;
$kcUserId = $payload['sub'] ?? null;

$role     = $payload['role'] ?? null;
$status   = $payload['status'] ?? null;
$address  = $payload['address'] ?? null;

$smsNotification      = $payload['sms_notification'] ?? ($payload[' sms_notification'] ?? null);
$emailNotification    = $payload['email_notification'] ?? null;
$whatsappNotification = $payload['whatsapp_notification'] ?? null;
Debugging in visual studio
./bin/kc.bat start-dev --http-port=8080 --log-level=DEBUG
401 error
In keyclock- select realm-->client--->user-> click particular user---> logout all session
in laravel also logout

How to check active SSO session
After calling success, you can check if Keycloak has already attached a UserSession like this:
   UserModel u = (context.getUser() != null) ? context.getUser() : s.getAuthenticatedUser();
UserSessionModel existingSession =
        context.getSession().sessions()
                .getUserSessions(context.getRealm(), u)
                .stream()
                .findFirst()
                .orElse(null);

System.out.println("[EmailOtpVerify] existingSession=" + (existingSession != null));

Top comments (0)