What Are Custom User Attributes?
Why Keycloak Removed the Old Attributes Section (Keycloak 22–26)
Understanding the Declarative User Profile
Steps to Enable Custom User Attributes
How Backend (Laravel / Node / Go) Sends Custom Attributes
How Custom Attributes Are Used in Real Applications
Common Errors and Why They Happen
Best Practices for Production
Different way to check custom user attribute added in keycloack
Before Keycloak 21, you could directly add attributes on the user page.
Now Keycloak enforces Declarative User Profile, which means:
You must define allowed attributes
You must declare their permissions
Keycloak GUI will show the field only if it exists in the JSON schema
This gives Keycloak:
Better validation
Security control
Cleaner identity model
Rule-based attribute editing
Modern applications need more than just usernames and emails. They need mobile numbers, user types, business IDs, foreign keys, domains, and more.
To support these capabilities, Keycloak provides a powerful mechanism called Custom User Attributes.
But from Keycloak version 22+, the system changed completely:
Old “Attributes” tab disappeared
A new Declarative User Profile was introduced
Custom attributes no longer appear until you manually define them
In this guide, you’ll learn exactly how to enable and use custom user attributes in Keycloak for real-world applications like Laravel, Flutter apps, and microservices.
What Are Custom User Attributes?
Custom user attributes are extra fields you add to a Keycloak user profile.
Examples:
phone

phone_verified

user_type

country_code

domain

ms_user_id (Laravel DB foreign key)

role_level

business_category
Why Keycloak Removed the Old Attributes Section (Keycloak 22–26)
Before Keycloak 21, you could directly add attributes on the user page.
Now Keycloak enforces Declarative User Profile, which means:
You must define allowed attributes
You must declare their permissions
Keycloak GUI will show the field only if it exists in the JSON schema
This gives Keycloak:
Better validation
Security control
Cleaner identity model
Rule-based attribute editing
Understanding the Declarative User Profile
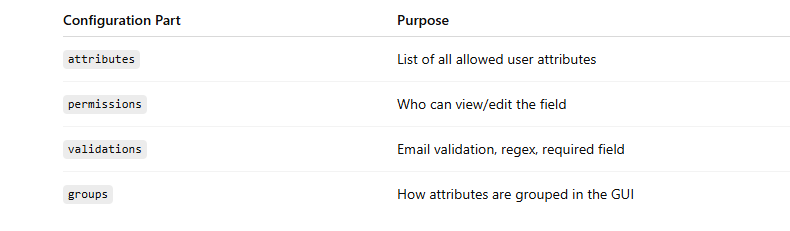
Keycloak now uses a JSON-based configuration to manage user attributes.
This JSON controls
{
  "attributes": [
    {
      "name": "phone",
      "displayName": "Phone Number",
      "permissions": {
        "view": ["admin", "user"],
        "edit": ["admin", "user"]
      }
    }
  ],
  "groups": []
}
Steps to Enable Custom User Attributes
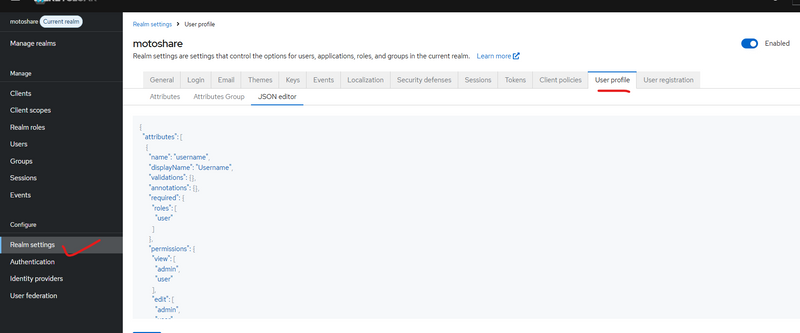
Step 1 — Enable Declarative User Profile
Located at:
Realm Settings → User Profile → Enabled
Once enabled, JSON editor becomes active.
Step 2 — Add the Custom Attribute to the JSON Schema
This JSON is mandatory for Keycloak to display the field.
Example:
{
  "attributes": [
    {
      "name": "phone",
      "displayName": "Phone Number",
      "permissions": {
        "view": ["admin", "user"],
        "edit": ["admin", "user"]
      }
    }
  ],
  "groups": []
}
==============or=====================
if u want to add user table field like status,role,sms_notification,whatsapp_notification,state,city
then paste in json editor
Realm Settings → User Profile → Enabled
{
  "attributes": [
    {
      "name": "username",
      "displayName": "Username",
      "validations": {},
      "annotations": {},
      "required": {
        "roles": [
          "user"
        ]
      },
      "permissions": {
        "view": [
          "admin",
          "user"
        ],
        "edit": [
          "admin",
          "user"
        ]
      },
      "multivalued": false
    },
    {
      "name": "email",
      "displayName": "Email",
      "validations": {
        "email": {}
      },
      "annotations": {},
      "required": {
        "roles": [
          "user"
        ]
      },
      "permissions": {
        "view": [
          "admin",
          "user"
        ],
        "edit": [
          "admin",
          "user"
        ]
      },
      "multivalued": false
    },
    {
      "name": "phone",
      "displayName": "Phone Number",
      "validations": {},
      "annotations": {},
      "permissions": {
        "view": [
          "admin",
          "user"
        ],
        "edit": [
          "admin",
          "user"
        ]
      },
      "multivalued": false
    },
    {
      "name": "status",
      "displayName": "Status",
      "validations": {},
      "annotations": {},
      "permissions": {
        "view": [
          "admin",
          "user"
        ],
        "edit": [
          "admin",
          "user"
        ]
      },
      "multivalued": false
    },
    {
      "name": "sms_notification",
      "displayName": "SMS Notification",
      "validations": {},
      "annotations": {},
      "permissions": {
        "view": [
          "admin",
          "user"
        ],
        "edit": [
          "admin",
          "user"
        ]
      },
      "multivalued": false
    },
    {
      "name": "email_notification",
      "displayName": "Email Notification",
      "validations": {},
      "annotations": {},
      "permissions": {
        "view": [
          "admin",
          "user"
        ],
        "edit": [
          "admin",
          "user"
        ]
      },
      "multivalued": false
    },
    {
      "name": "whatsapp_notification",
      "displayName": "WhatsApp Notification",
      "validations": {},
      "annotations": {},
      "permissions": {
        "view": [
          "admin",
          "user"
        ],
        "edit": [
          "admin",
          "user"
        ]
      },
      "multivalued": false
    },
    {
      "name": "role",
      "displayName": "Role",
      "validations": {},
      "annotations": {},
      "permissions": {
        "view": [
          "admin",
          "user"
        ],
        "edit": [
          "admin"
        ]
      },
      "multivalued": false
    },
    {
      "name": "address",
      "displayName": "Address",
      "validations": {},
      "annotations": {},
      "permissions": {
        "view": [
          "admin",
          "user"
        ],
        "edit": [
          "admin",
          "user"
        ]
      },
      "multivalued": false
    },
    {
      "name": "state",
      "displayName": "State",
      "validations": {},
      "annotations": {},
      "permissions": {
        "view": [
          "admin",
          "user"
        ],
        "edit": [
          "admin",
          "user"
        ]
      },
      "multivalued": false
    },
    {
      "name": "city",
      "displayName": "City",
      "validations": {},
      "annotations": {},
      "permissions": {
        "view": [
          "admin",
          "user"
        ],
        "edit": [
          "admin",
          "user"
        ]
      },
      "multivalued": false
    },
    {
      "name": "adhar",
      "displayName": "Aadhar Number",
      "validations": {},
      "annotations": {},
      "permissions": {
        "view": [
          "admin"
        ],
        "edit": [
          "admin"
        ]
      },
      "multivalued": false
    },
    {
      "name": "pinCode",
      "displayName": "PIN Code",
      "validations": {},
      "annotations": {},
      "permissions": {
        "view": [
          "admin",
          "user"
        ],
        "edit": [
          "admin",
          "user"
        ]
      },
      "multivalued": false
    },
    {
      "name": "profile_img",
      "displayName": "Profile Image URL",
      "validations": {},
      "annotations": {},
      "permissions": {
        "view": [
          "admin",
          "user"
        ],
        "edit": [
          "admin",
          "user"
        ]
      },
      "multivalued": false
    },
    {
      "name": "created_at",
      "displayName": "Created At",
      "validations": {},
      "annotations": {},
      "permissions": {
        "view": [
          "admin"
        ],
        "edit": [
          "admin"
        ]
      },
      "multivalued": false
    },
    {
      "name": "updated_at",
      "displayName": "Updated At",
      "validations": {},
      "annotations": {},
      "permissions": {
        "view": [
          "admin"
        ],
        "edit": [
          "admin"
        ]
      },
      "multivalued": false
    }
  ],
  "groups": []
}
in above json 3 attribute
username
 {
      "name": "username",
      "displayName": "Username",
      "validations": {},
      "annotations": {},
      "required": {
        "roles": [
          "user"
        ]
      },
      "permissions": {
        "view": [
          "admin",
          "user"
        ],
        "edit": [
          "admin",
          "user"
        ]
      },
      "multivalued": false
    },
email
{
      "name": "email",
      "displayName": "Email",
      "validations": {
        "email": {}
      },
      "annotations": {},
      "required": {
        "roles": [
          "user"
        ]
      },
      "permissions": {
        "view": [
          "admin",
          "user"
        ],
        "edit": [
          "admin",
          "user"
        ]
      },
      "multivalued": false
    },
phone
{
  "name": "phone",
  "displayName": "Phone Number",
  "validations": {},
  "annotations": {},
  "permissions": {
    "view": ["admin", "user"],
    "edit": ["admin", "user"]
  },
  "multivalued": false
}
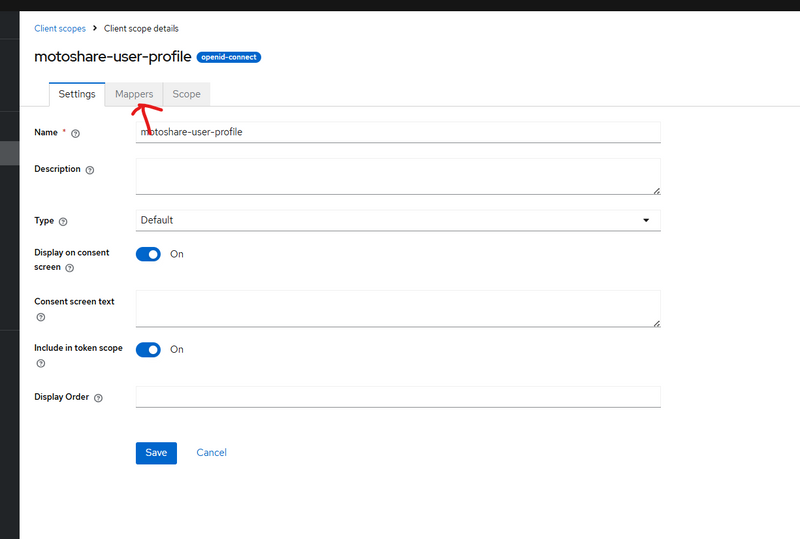
Step 3 — Expose Custom Attributes in Token using Client Scope + Mappers
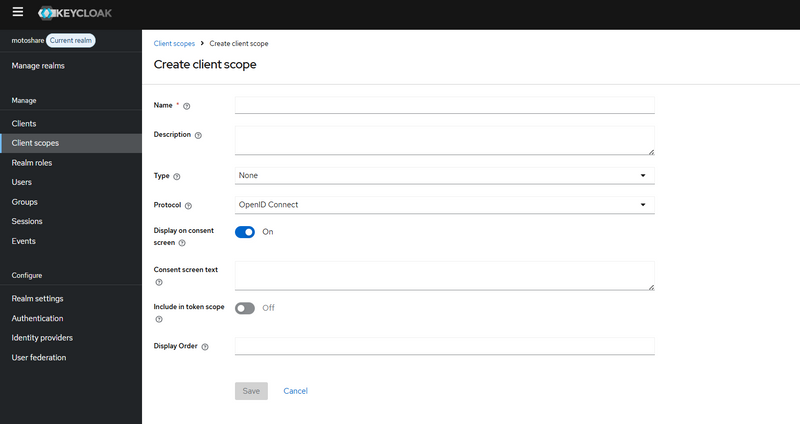
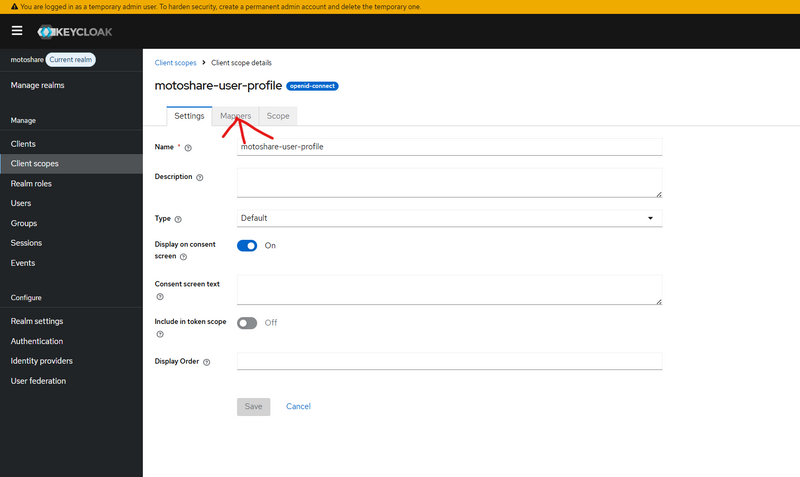
3.1 — Create a Custom Client Scope
Go to:
Realm → Client scopes → Create client scope
Fill details:
Name: motoshare-user-profile
(ya koi bhi naam, bas yaad rehne layak ho)
Protocol: openid-connect
Click Save
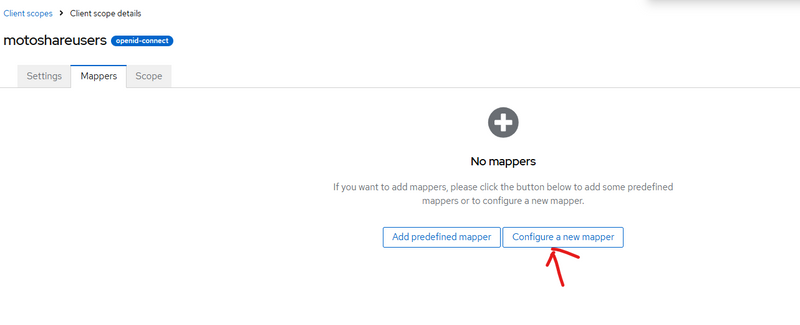
3.2 — Add Mappers for Each Custom Attribute
Ab har custom attribute jo tumne User Profile JSON mein banaya hai
(jaise status, email_notification, address, adhar, etc.)
uske liye ek User Attribute mapper banana zaroori hai.
Jaise jaise attributes tumne JSON mein define kiye:
status

sms_notification

email_notification

whatsapp_notification

role

address

state

city

adhar

pinCode

profile_img

created_at

updated_at
In sab ke liye:
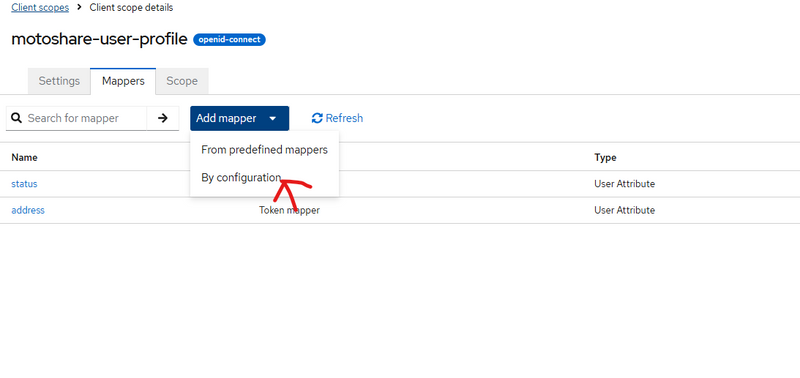
Client scopes → open motoshare-user-profile

Tab Mappers → Click Create-->configure new mapper or click addmapper then by configuration
===================or==============================
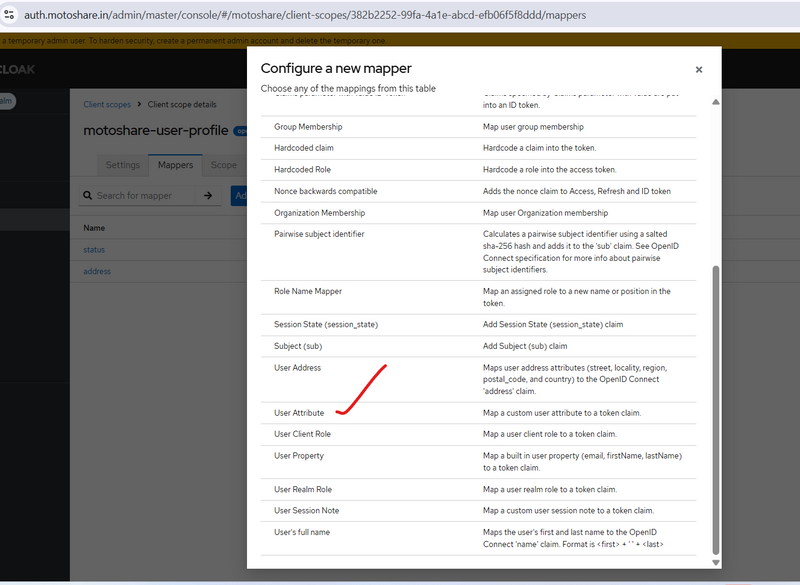
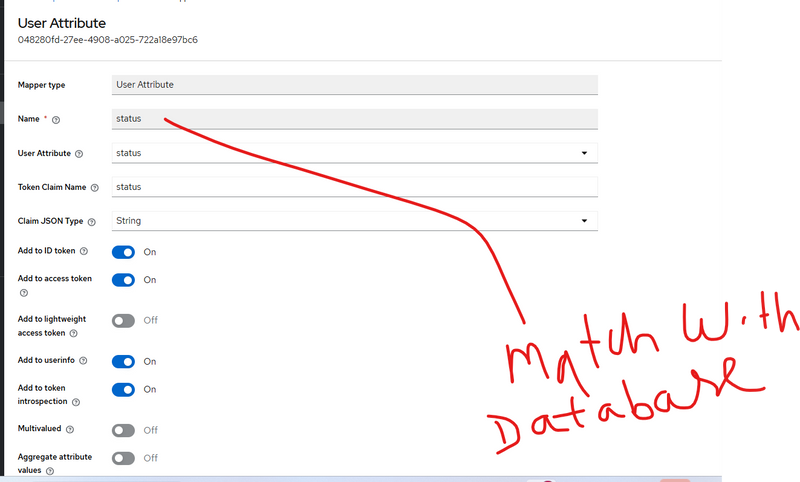
Set values:
Mapper Type: User Attribute
Name:
e.g. status
User Attribute:
same as attribute name → status
Token Claim Name:
same → status
Claim JSON Type: String
(agar multivalued kabhi use karein to JSON/String accordingly)
Toggle options:

Add to ID token: ON

Add to access token: ON

Add to userinfo: ON

Add to token introspection: ON

Multivalued: OFF
Click Save
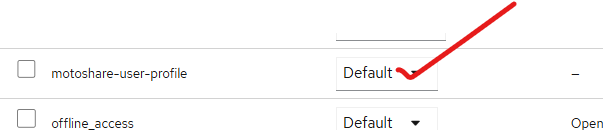
Ab tum is naye client scope ke detail page pe ho.
Map your custom client scope to yuyr realm
select checkbox and click add
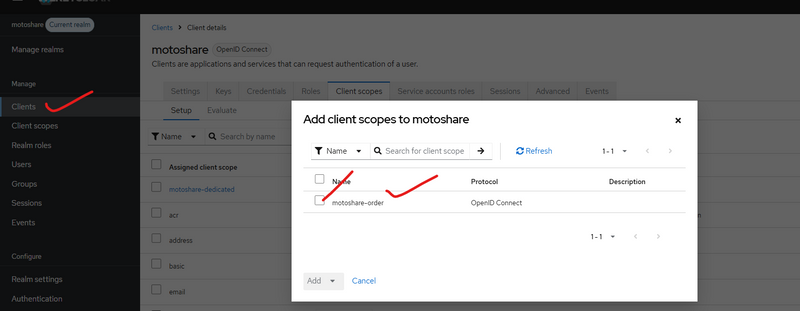
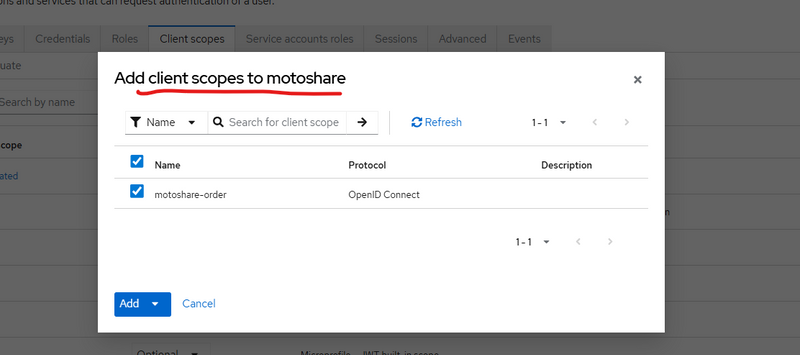
then make it default
How Backend (Laravel / Node / Go) Sends Custom Attributes
apply curl to get access token
curl -X POST "https://auth.motoshare.in/realms/motoshare/protocol/openid-connect/token" \
  -H "Content-Type: application/x-www-form-urlencoded" \
  -d "grant_type=password" \
  -d "client_id=motoshare" \
  -d "client_secret=qOPC04bglJ9bsIWzGfqfpVIsjogYbDj4" \
  -d "username=rakeshdev.cotocus@gmail.com" \
  -d "password=rkgmkgskg@1234"
output
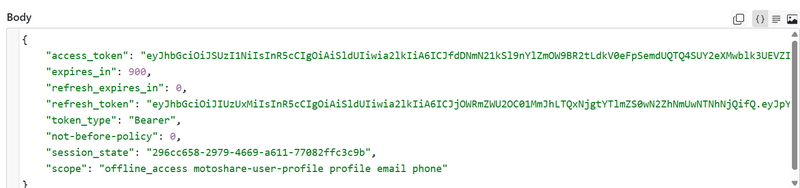
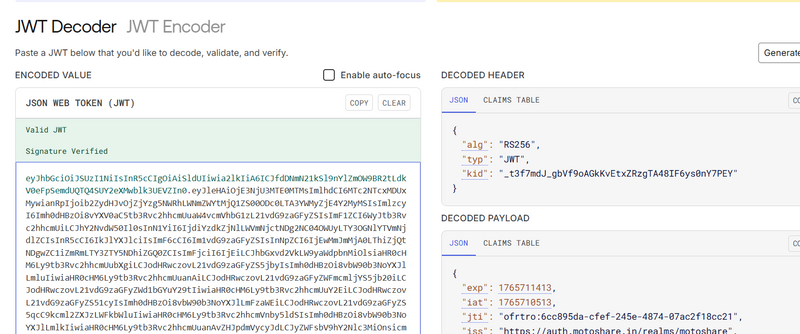
in output get access token use this accesstoken to get Userinfo (standard OIDC profile endpoint) using jwt
 if ($accessToken) {
        Log::info("🔵[KC_AUTO] Validating access token via JWT decode…");

        $payload = $this->decodeJwtPayload($accessToken);

        if (!$payload) {
            Log::warning("⚠️ [KC_AUTO] Failed to decode JWT payload");
            Log::warning("⚠️ [KC_AUTO] Auto-login skipped (invalid token format)");
            return $next($request);
        }

        Log::info("🔵 [KC_AUTO] Decoded JWT payload", $payload);

        // ---- basic checks: exp / iss / aud --------------------------------
        $now = time();

        $exp = $payload['exp'] ?? null;
        if (!$exp || $exp < $now) {
            Log::warning("⚠️ [KC_AUTO] JWT token expired", [
                'exp' => $exp,
                'now' => $now,
            ]);
            return $next($request);
        }

        $realm  = env('KEYCLOAK_REALM');
        $base   = rtrim(env('KEYCLOAK_BASE_URL'), '/');        // e.g. https://auth.motoshare.in
        $issuerExpected = "{$base}/realms/{$realm}";
        $issuerActual   = $payload['iss'] ?? null;

        if ($issuerActual !== $issuerExpected) {
            Log::warning("⚠️ [KC_AUTO] JWT iss mismatch", [
                'expected' => $issuerExpected,
                'actual'   => $issuerActual,
            ]);
            return $next($request);
        }

        $expectedAud = env('KEYCLOAK_CLIENT_ID');              // motoshare
        $audClaim    = $payload['aud'] ?? [];

        if (is_string($audClaim)) {
            $audClaim = [$audClaim];
        }

        if ($expectedAud && !in_array($expectedAud, $audClaim, true)) {
            Log::warning("⚠️ [KC_AUTO] JWT aud mismatch", [
                'expected' => $expectedAud,
                'actual'   => $audClaim,
            ]);
            return $next($request);
        }

        // -----------------------------------------------------------------
        // 3️⃣ Extract useful claims and auto-login Laravel user
        // -----------------------------------------------------------------
      $email    = $payload['email'] ?? null;
$phone    = $payload['phone'] ?? ($payload['phone_number'] ?? null);
$username = $payload['preferred_username'] ?? null;
$kcUserId = $payload['sub'] ?? null;

$role     = $payload['role'] ?? null;
$status   = $payload['status'] ?? null;
$address  = $payload['address'] ?? null;

// ✅ handle possible key typo with space: " sms_notification"
$smsNotification      = $payload['sms_notification'] ?? ($payload[' sms_notification'] ?? null);
$emailNotification    = $payload['email_notification'] ?? null;
$whatsappNotification = $payload['whatsapp_notification'] ?? null;


        Log::info("📞 [KC_AUTO] Extracted user info from JWT", [
            'email'    => $email,
            'phone'    => $phone,
            'username' => $username,
            'kcUserId' => $kcUserId,
        ]);

        if ($email) {
            // 👇 Same flow as before, just driven by JWT instead of introspect
            return $this->autoLoginLaravelUser(
                $email,
                $phone,
                $kcUserId,
                $username,
                $role,
        $status,
        $address,
        $smsNotification,
        $emailNotification,
        $whatsappNotification,

                $request,
                $next
            );
        }

        Log::warning("⚠️ [KC_AUTO] JWT does not contain email, cannot auto-login");
    }
Once you have created custom attributes in Realm Settings → User Profile (like phone, status, address, etc.), your backend has only one responsibility:
Send these attributes inside the attributes object when creating or updating a user in Keycloak.
What Keycloak Expects from Any Backend
Keycloak’s Admin REST API accepts a JSON payload like this when creating or updating a user:
{
  "username": "rakesh",
  "email": "rakesh@example.com",
  "enabled": true,
  "attributes": {
    "phone": ["9876543210"],
    "status": ["active"],
    "address": ["Bokaro"],
    "role": ["user"]
  }
}
Some important rules:
The keys inside attributes must be exactly equal to the “Attribute Name” in the Keycloak User Profile (phone, status, address, etc.).
Each attribute value is an array of strings, even if you store only one value:
✅ "phone": ["9876543210"]
❌ "phone": "9876543210"
The good news: this pattern is same for Laravel, Node, Go, Python, anything. Only the HTTP client syntax changes.
- Laravel Example – Full Flow to Send Custom Attributes
In Laravel, you already have a neat createUser() method. Let’s walk through it step by step and see where custom attributes go.
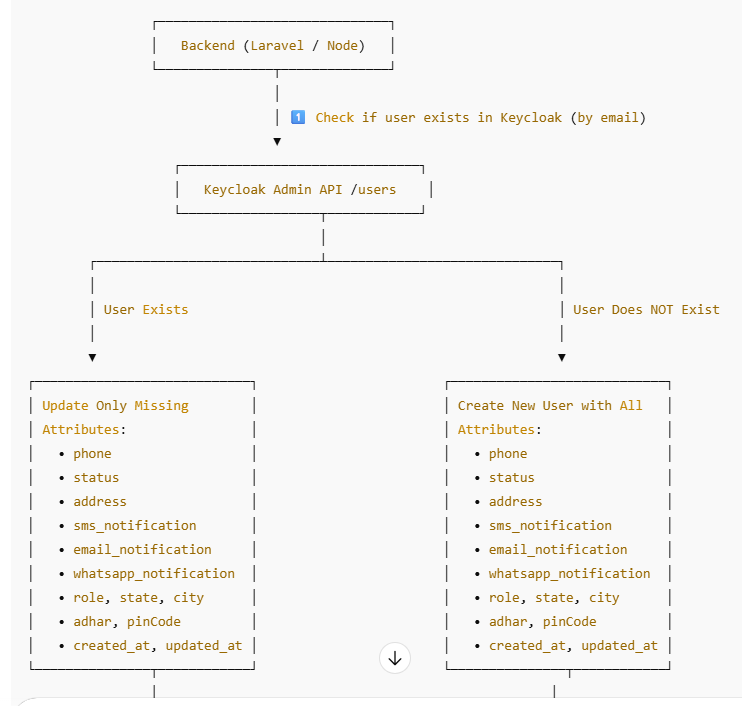
2.1. High-Level Flow
Get an admin token from Keycloak.
Check if user already exists in Keycloak by email.
If exists → build an update payload with only missing attributes.
If not exists → build a create payload with all attributes.
Call Keycloak Admin API with POST /users or PUT /users/{id}.
2.2. Main createUser() Method (Laravel)
public function createUser(
    string $username,
    string $email,
    string $fname,
    string $lname,
    string $password = null,
    string $phone = null,
    string $address = null,
    string $status = null,
    string $sms_notification = null,
    string $email_notification = null,
    string $whatsapp_notification = null,
    string $role = null,
    string $state = null,
    string $city = null,
    string $adhar = null,
    string $pinCode = null,
    string $profile_img = null,
    string $created_at = null,
    string $updated_at = null
): ?string {
    $token = $this->getmyAdminToken();
    if (!$token) {
        Log::error("❌ Cannot create user — admin token missing");
        return null;
    }

    if (!$password) {
        $password = Str::random(12);
    }

    $realmUrl = config('keycloak.base_url') . "/admin/realms/" . config('keycloak.realm');
    $usersUrl = $realmUrl . "/users";

    // 1️⃣ Check if user already exists
    $kcUser = $this->findKeycloakUserByEmail($token, $usersUrl, $email);

    if (!empty($kcUser)) {
        $kcUserId = $kcUser['id'];

        // 2️⃣ Build payload to update only missing attributes
        $updatePayload = $this->buildUpdatePayloadForExistingUser(
            $kcUser,
            $email,
            $phone,
            $address,
            $status,
            $sms_notification,
            $email_notification,
            $whatsapp_notification,
            $role,
            $state,
            $city,
            $adhar,
            $pinCode,
            $profile_img,
            $created_at,
            $updated_at
        );

        if (!empty($updatePayload)) {
            Log::info("📌 Updating existing KC user", [
                'kc_user_id' => $kcUserId,
                'payload'    => $updatePayload,
            ]);

            Http::withToken($token)->put("$usersUrl/$kcUserId", $updatePayload);

            Log::info("🟢 Existing KC user updated: $kcUserId");
        } else {
            Log::info("ℹ️ Existing KC user already has correct attributes", [
                'kc_user_id' => $kcUserId,
            ]);
        }

        return $kcUserId;
    }

    // 3️⃣ Create brand new user with all attributes
    $payload = $this->buildCreatePayload(
        $username,
        $email,
        $fname,
        $lname,
        $password,
        $phone,
        $address,
        $status,
        $sms_notification,
        $email_notification,
        $whatsapp_notification,
        $role,
        $state,
        $city,
        $adhar,
        $pinCode,
        $profile_img,
        $created_at,
        $updated_at
    );

    Log::info("📤 Creating new KC user", $payload);

    $response = Http::withToken($token)->post($usersUrl, $payload);

    if ($response->failed()) {
        Log::error("❌ KC create user failed: " . $response->body());
        return null;
    }

    // Location header contains the new user id
    $kcUserId = basename($response->header('Location'));

    Log::info("🟢 KC user created with ID: $kcUserId");

    // Optional: fetch full user to verify attributes
    $kcUser = Http::withToken($token)->get("$usersUrl/$kcUserId")->json();
    Log::info("🔍 KC User After Creation:", $kcUser);

    return $kcUserId;
}
2.3. Building the Update Payload (Only Missing Attributes)
When user already exists, you don’t want to overwrite values blindly.
This helper compares each attribute and only sends the ones that are empty in Keycloak:
private function buildUpdatePayloadForExistingUser(
    array $kcUser,
    string $email,
    ?string $phone,
    ?string $address,
    ?string $status,
    ?string $sms_notification,
    ?string $email_notification,
    ?string $whatsapp_notification,
    ?string $role,
    ?string $state,
    ?string $city,
    ?string $adhar,
    ?string $pinCode,
    ?string $profile_img,
    ?string $created_at,
    ?string $updated_at
): array {
    $updatePayload = [];
    $updatePayload['email'] = $email;

    $currentAttributes = $kcUser['attributes'] ?? [];

    // Input attributes (keys must match Keycloak attribute names)
    $attributesInput = [
        'phone'                 => $phone,
        'address'               => $address,
        'status'                => $status,
        'sms_notification'      => $sms_notification,
        'email_notification'    => $email_notification,
        'whatsapp_notification' => $whatsapp_notification,
        'role'                  => $role,
        'state'                 => $state,
        'city'                  => $city,
        'adhar'                 => $adhar,
        'pinCode'               => $pinCode,
        'profile_img'           => $profile_img,
        'created_at'            => $created_at,
        'updated_at'            => $updated_at,
    ];

    foreach ($attributesInput as $key => $value) {
        if ($value === null || $value === '') {
            continue;
        }

        $currentValue = $currentAttributes[$key][0] ?? null;

        if (empty($currentValue)) {
            $updatePayload['attributes'][$key] = [$value];
        }
    }

    return $updatePayload;
}
This keeps Keycloak as the source of truth and fills only missing data.
2.4. Building the Create Payload (Full Attribute Set)
For a new user, you usually want to send everything at once:
private function buildCreatePayload(
    string $username,
    string $email,
    string $fname,
    string $lname,
    string $password,
    ?string $phone,
    ?string $address,
    ?string $status,
    ?string $sms_notification,
    ?string $email_notification,
    ?string $whatsapp_notification,
    ?string $role,
    ?string $state,
    ?string $city,
    ?string $adhar,
    ?string $pinCode,
    ?string $profile_img,
    ?string $created_at,
    ?string $updated_at
): array {
    return [
        'username'  => $username,
        'email'     => $email,
        'enabled'   => true,
        'firstName' => $fname,
        'lastName'  => $lname,

        // 👇 All custom attributes here (array of strings)
        'attributes' => [
            'phone'                 => [$phone ?? ''],
            'address'               => [$address ?? ''],
            'status'                => [$status ?? ''],
            'sms_notification'      => [$sms_notification ?? ''],
            'email_notification'    => [$email_notification ?? ''],
            'whatsapp_notification' => [$whatsapp_notification ?? ''],
            'role'                  => [$role ?? ''],
            'state'                 => [$state ?? ''],
            'city'                  => [$city ?? ''],
            'adhar'                 => [$adhar ?? ''],
            'pinCode'               => [$pinCode ?? ''],
            'profile_img'           => [$profile_img ?? ''],
            'created_at'            => [$created_at ?? ''],
            'updated_at'            => [$updated_at ?? ''],
        ],

        'credentials' => [
            [
                'type'      => 'password',
                'value'     => $password,
                'temporary' => false,
            ],
        ],
    ];
}
This is the exact place where your Laravel backend sends custom attributes to Keycloak.
- Reading Custom Attributes Back in Other Domains
Once you configure mappers in the client (or client scope) to include attributes like phone in the access token, your other apps / domains can read them directly from the token or from token/introspect.
Your middleware already does that:
$cookieHeader = $request->header('Cookie');
preg_match('/keycloak_access_token=([^;]+)/', $cookieHeader, $matches);
$accessToken = $matches[1] ?? null;

if ($accessToken) {
    $introspectUrl = env('KEYCLOAK_BASE_URL') . "/realms/" . env('KEYCLOAK_REALM') . "/protocol/openid-connect/token/introspect";

    $introspect = Http::asForm()->post($introspectUrl, [
        'token'         => $accessToken,
        'client_id'     => env('KEYCLOAK_CLIENT_ID'),
        'client_secret' => env('KEYCLOAK_CLIENT_SECRET'),
    ]);

    $data  = $introspect->json();
    $email = $data['email'] ?? null;

    // 👇 Claim name must match your mapper config
    $phone    = $data['phone'] ?? ($data['phone_number'] ?? null);
    $username = $data['preferred_username'] ?? null;

    Log::info("📞 [KC_AUTO] Extracted user info from token", [
        'email' => $email,
        'phone' => $phone,
    ]);

    $kcUserId = $data['sub'] ?? null;

    if ($email) {
        return $this->autoLoginLaravelUser($email, $phone, $kcUserId, $username, $request, $next);
    }
}
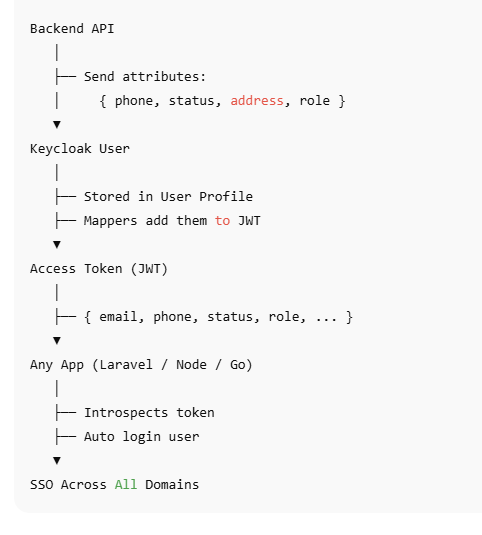
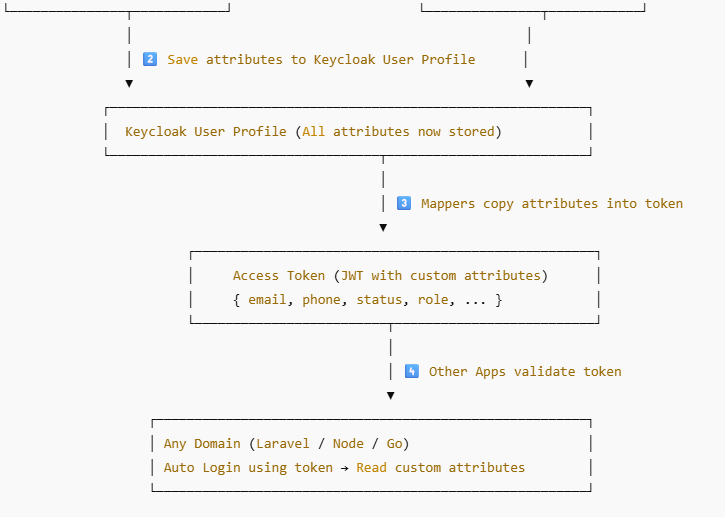
So the full circle is:
Laravel API → sends custom attributes to Keycloak.
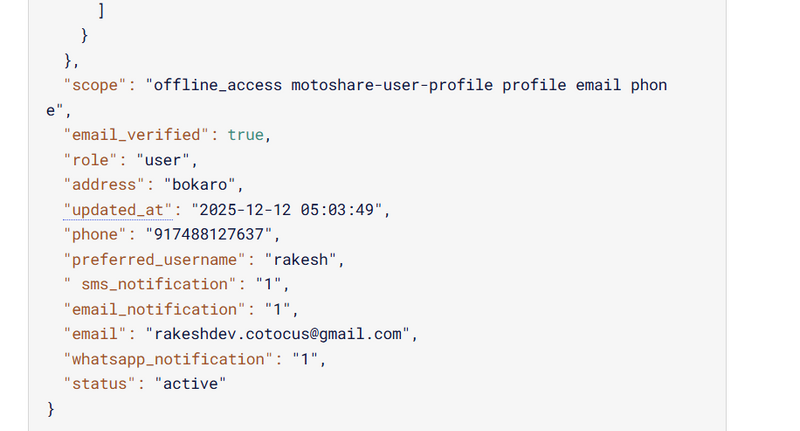
Keycloak → stores them and, via mappers, pushes them into tokens.
Other microservices (Laravel, Node, Go) → read those claims and automatically log users in with the same identity.
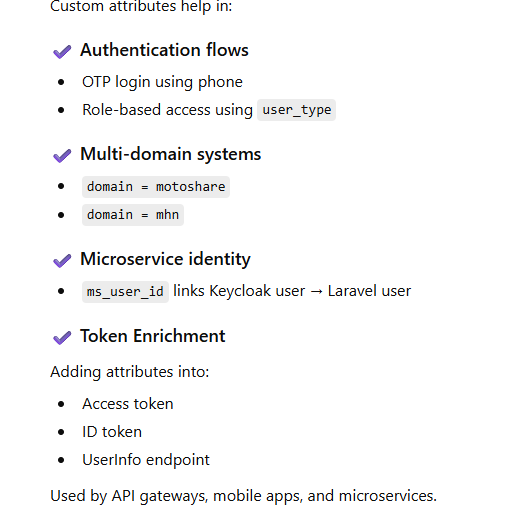
How Custom Attributes Are Used in Real Applications
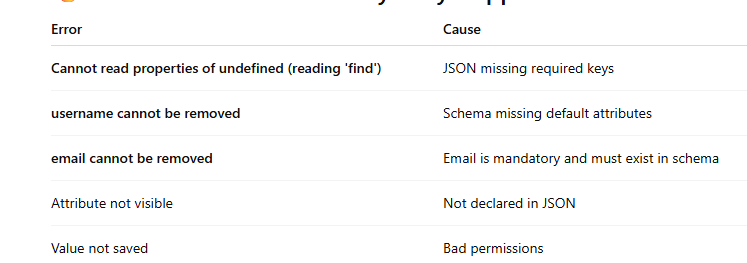
Common Errors and Why They Happen
Best Practices for Production
Never remove username or email attributes
Keep declarative profile clean and minimal
Use custom attributes for identity — NOT token mappers only
Log all Keycloak payloads for debugging
Sync Keycloak ID (kc_user_id) into your local DB
Use Token Exchange for multi-service login
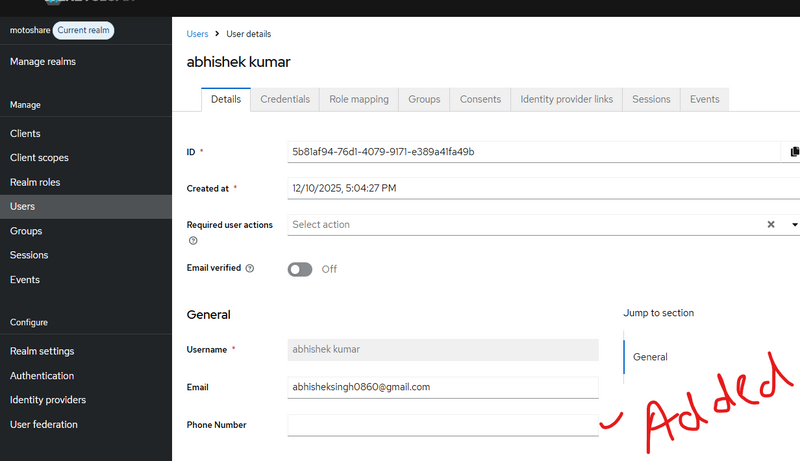
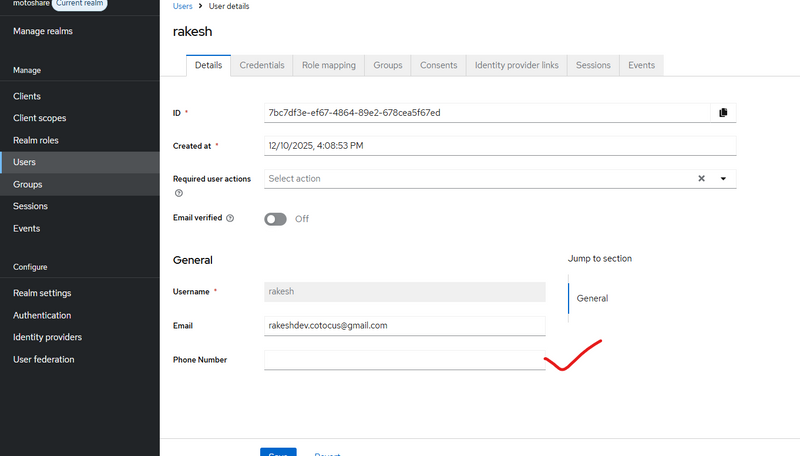
Different way to check custom user attribute added in keycloack
first way
. Check in Keycloak Database (Advanced)
If you want to check in DB:
Run SQL:
SELECT
    u.id AS kc_user_id,
    ua.name AS attribute_name,
    ua.value AS attribute_value
FROM user_entity u
LEFT JOIN user_attribute ua ON ua.user_id = u.id
WHERE u.email = 'theuser@example.com';
Using laravel log
Use Keycloak API to fetch user after creation:
$checkUrl = $url . "/" . $kcUserId;
$kcUser = Http::withToken($token)->get($checkUrl)->json();

Log::info("🟢 KC User After Creation", $kcUser);

Top comments (0)