Displaying Unescaped Data
Rendering JSON
If Statements
Authentication Directives
Environment Directives
Section Directives
Switch Statements
Loops
The Loop Variable
Validation Errors
Laravel's templating engine, Blade, provides an easy and expressive way to define and render templates in a web application. Here are some common concepts and questions related to Laravel Blade template programming:
What are the views?
Views contain the html code required by your application, and it is a method in Laravel that separates the controller logic and domain logic from the presentation logic. Views are located in the resources folder, and its path is resources/views.
Let's see the simple example of views.
Suppose we want to create the view of the contact.
Step 1: First, we create the view file named Contact.php in resources/views directory.
Contact.php

<html>
    <body>
        <h1>Name of the Contact is :  <?php echo $name; ?></h1>
    </body>
</html>
Step 2: Add the following code in web.php.
Route::get('/contact', function(){
  return view('Contact',['name'=>'John']);
});
In the above code, view() method contains two arguments. The first argument is the name of the file that contains the view, and the second argument is the array passed to the given file. In array, we are passing the name variable to the Contact.php file.
Step 3: Enter the URL http://localhost/laravelproject/public/contact to the web browser, then the output would be:
Laravel Views
Let's see another example of views.
In this example, we use the view() method in the Controller class.
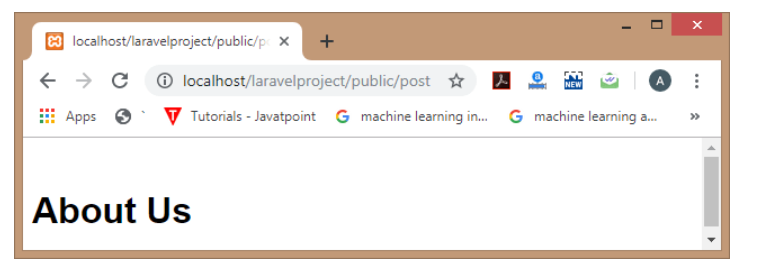
Step 1: First, I need to create a controller. Suppose I have created the controller named 'PostController', and then add the code given below in a PostController.php file.
public function display(){
  return view('about');
}
Step 2: Now, we create the about.php file in which we add the html code.
<html>
    <body>
        <h1>About Us</h1>
    </body>
</html>
Step 3: Last step is to add the route in web.php file.

Route::get('/post','PostController@display');
Step 4: Enter the URL http://localhost/laravelproject/public/post to the web browser.
Laravel Views
Nesting the Views
Views can also be nested within the sub-directory resources/views directory.
Let's understand the nested views through an example.
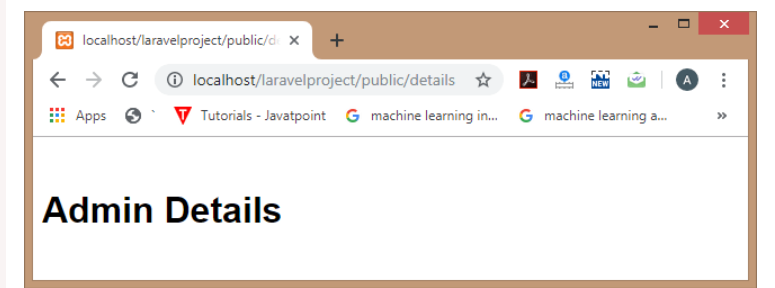
Suppose we want to know the admin details. The view of the admin details is available at the resources/views/admin/details.blade.php directory.
Step 1: First, we create details.blade.php file in the admin folder, and the code of the details.blade.php file is given below:
<html>
    <body>
        <h1>Admin Details</h1>
    </body>
</html>
Step 2: Now, we need to add the display() function in PostController.php file which is returning the view of the 'admin.details'.
public function display(){
  return view('admin.details');
}
Step 3: Lastly, we will add the route in a web.php file.
Route::get('/details', 'PostController@display');
Step 4: To see the output, enter the url 'http://localhost/laravelproject/public/details' to the web browser.
Laravel Views
Determining the existence of view
Laravel also allows you to determine whether the view exists or not by using the View façade. We can use the exists() method that returns true if the view exists.
Suppose we want to check whether the view of the admin.details exists or not, then we can use the following code in
PostController.php file:

use Illuminate\Support\Facades\View;
public function display()
{
  if (View::exists('admin.details')) {
echo "the view of the admin.details exists";

}
else
echo "view does not exist";
}
In the above code, View::exists('admin.details') method determines whether the admin.details exist or not. If it exists, then the 'if' statement is executed; otherwise, the 'else' statement is executed.
Output
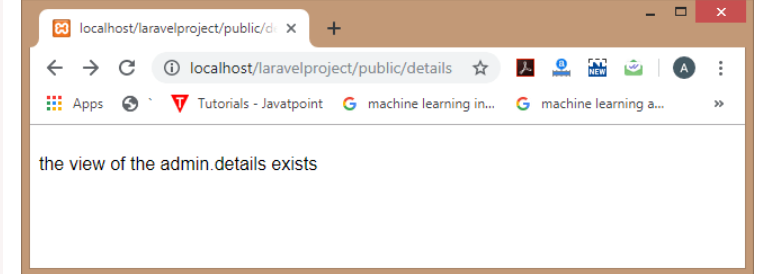
Enter the url 'http://localhost/laravelproject/public/details' to the web browser, and then the output would be:
Laravel Views
Passing data to views
In this topic, we will learn that how we can pass the data to views.
There are various ways of passing data to views:
By using the name array
By using with() function
By using compact() function
Name array
The name array is the array of data that is passed as the second parameter to the view() method.
Let's understand through an example.
Step 1: First, we create the student.blade.php, which contains the view of the page.
student.blade.php
<html>
 <body>
 <h1>Name of the Students are : <br>
 <?php
echo $name1;
echo "<br>";
echo $name2;
echo "<br>";
echo $name3; ?></h1>
</body>
</html>
In the above code, we are displaying the values of three variables, i.e., name1, name2, and name3. The values of these three are retrieved from the StudentController.php file.
Step 2: Now, we create the StudentController.php file.
StudentController.php.
<?php
namespace App\Http\Controllers;
use Illuminate\Http\Request;
class StudentController extends Controller
{
   public function display()
  {
     return view('student',['name1'=> 'Anisha','name2'=>'Nishka','name3'=>'Sumit']);
  }
  }
In the above code, we have defined the display() function in which we are returning the view of the student.blade.php file.
Step 3: Now, we define the route in web.php file.
web.php
Route::get('/details', 'StudentController@display');
Output
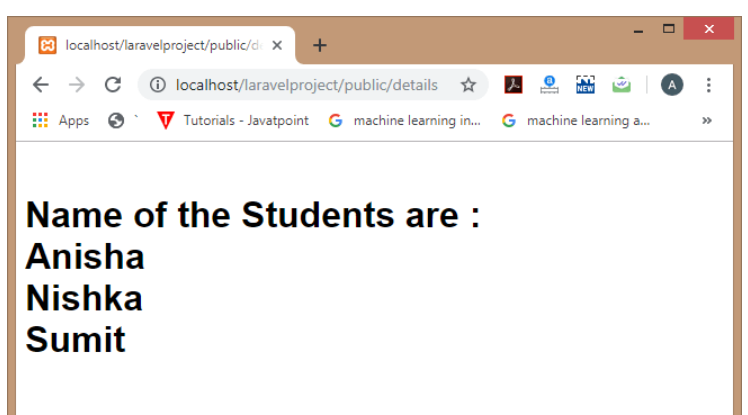
Laravel Passing data to views
with() function
We can also use the with() function to pass the data to views.
First, we create the student.blade.php file which contains the view of the page.
<html>
<body>
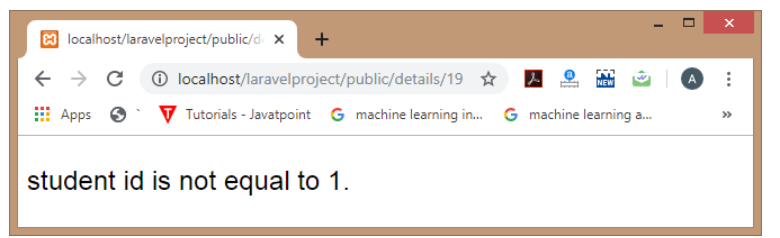
<h1>Student id is :
<?php
echo $id;
?>
</body>
</html>
The above code displays the value of the 'id'.
Now, we create the StudentController.php file.
<?php
namespace App\Http\Controllers;
use Illuminate\Http\Request;
class StudentController extends Controller
{
  public function display($id)
  {
    return view('student')->with('id',$id);
  }
}
In the above code, we create the display() function that returns the view of the student.blade.php file, and we are passing the value of 'id' by using the with() function. The 'with()' function contains two parameters, i.e., variable name(id) and the value of the 'id'.
Now, we define the route.
Route::get('/details/{id}', 'StudentController@display');
Output
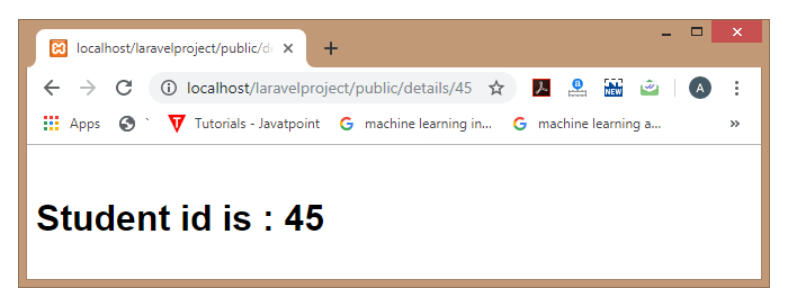
Laravel Passing data to views
compact() function
The compact() function is also used to pass the data to views. It contains a single parameter, i.e., the name of the variable.
Let's understand through an example.
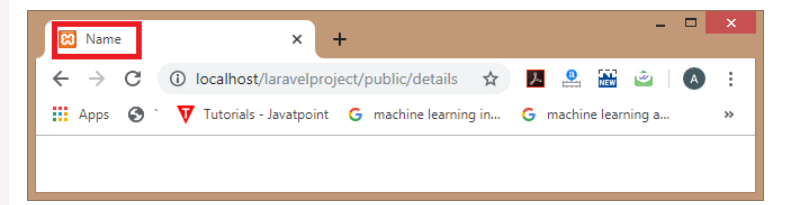
First, we create the student.blade.php file which contains the view of the page.
<html>
 <body>
 <h1>Name is :
 <?php
echo $name;?>
</body>
</html>
Now, we create the StudentController.php file.
<?php
namespace App\Http\Controllers;
use Illuminate\Http\Request;
class StudentController extends Controller
{
    public function display($name)
  {
    return view('student?, compact('name'));
  } }
Now, we define the route in the web.php file.
Route::get('/details/{name}', 'StudentController@display');
Output
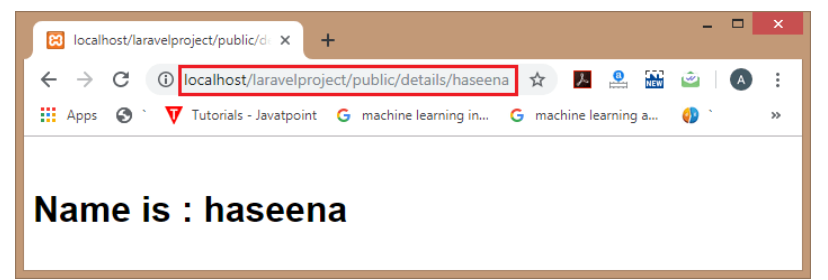
Laravel Passing data to views
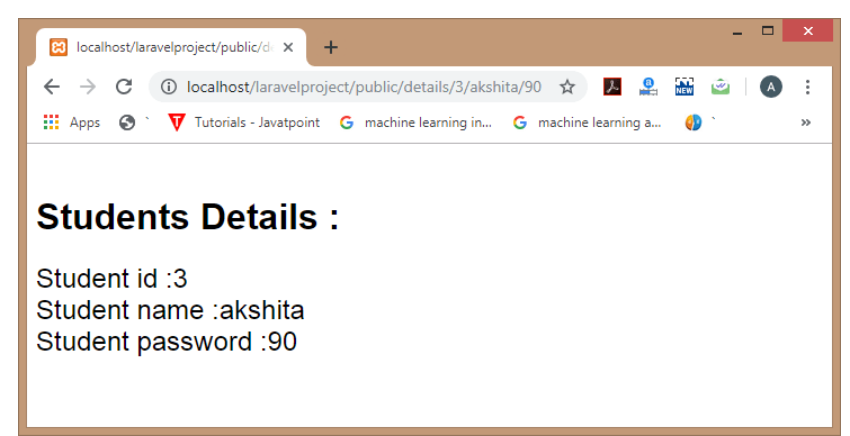
We can pass multiple parameters to the compact() function.
Let's understand through an example.
Student.blade.php

<html>
 <body>
<h1>Students Details : <br>
<font size='5' face='Arial'>
<?php
echo "student id is :" .$id;
echo "<br>";
echo "Student name is :" .$name;
echo "<br>";
echo "Student password is :" .$password; ?></h1>
</font>
</body></html>
StudentController.php

<?php
namespace App\Http\Controllers;
use Illuminate\Http\Request;
class StudentController extends Controller
{
   public function display($id,$name,$password)
  {
     return view('student',compact('id','name','password'));
  }
}
web.php
Route::get('/details/{id}/{name}/{password}', 'StudentController@display');
Output
Blade Template
The Blade is a powerful templating engine in a Laravel framework. The blade allows to use the templating engine easily, and it makes the syntax writing very simple. The blade templating engine provides its own structure such as conditional statements and loops. To create a blade template, you just need to create a view file and save it with a .blade.php extension instead of .php extension. The blade templates are stored in the /resources/view directory. The main advantage of using the blade template is that we can create the master template, which can be extended by other files.
Why Blade template?
Blade template is used because of the following reasons:
Displaying data
If you want to print the value of a variable, then you can do so by simply enclosing the variable within the curly brackets.
Syntax
{{$variable}};
In blade template, we do not need to write the code between <?php echo $variable; ?>. The above syntax is equivalent to <?= $variable ?>.
Ternary operator
In blade template, the syntax of ternary operator can be written as:
{{ $variable or 'default value'}}
The above syntax is equivalent to <?= isset($variable) ? $variable : ?default value? ?>
Blade Template Control Statements
Blade templating engine also provides the control statements in laravel as well as shortcuts for the control statements.
<html>
<body>
 <font size='5' face='Arial'>
@if(($id)==1)
student id is equal to 1.
@else
student id is not equal to 1
@endif
</font>
</body>
</html>
Output

Laravel Blade Template
Laravel Blade Template
Blade template provides @unless directive as a conditional statement. The above code is equivalent to the following code:
<html>
 <body>
 <font size='5' face='Arial'>
@unless($id==1)
student id is not equal to 1.
@endunless
</font>
</body>
</html>
Laravel Blade Template
@hasSection directive
The blade templating engine also provides the @hasSection directive that determines whether the specified section has any content or not.
Let's understand through an example.
<html>
 <body>
<title>
 @hasSection('title')
 @yield('title') - App Name
 @else
 Name
@endif
</title>
</font>
</body>
</html>
Output
Laravel Blade Template
Blade Loops
The blade templating engine provides loops such as @for, @endfor, @foreach, @endforeach, @while, and @endwhile directives. These directives are used to create the php loop equivalent statements.
@for loop
First, we create the student.blade.php file in resources/views directory.
Student.blade.php
value of i :
@for($i=1;$i<11;$i++)
{{$i}}
@endfor
Now, add the following code in PostController.php file.
public function display()
{
return view('student');
}
Add the route in the web.php file.
Route::get('/details', 'PostController@display');
Output
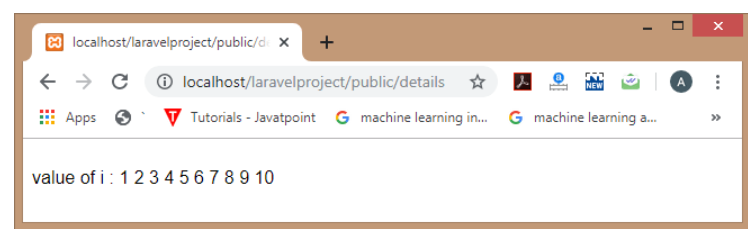
Laravel Blade Template
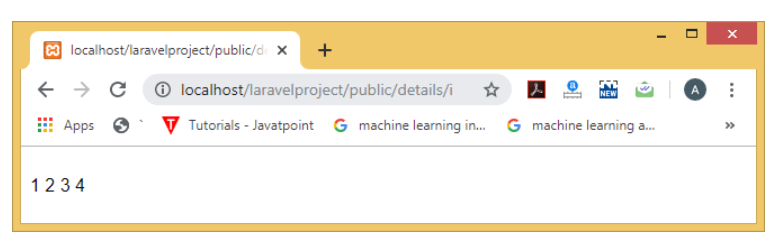
@foreach loop
First, we create the student.blade.php file in resources/views directory.
@foreach($students as $students)
{{$students}}<br>
@endforeach
Now, add the following code in the PostController.php file.
public function display()
{
   return view('student', ['students'=>['anisha','haseena','akshita','jyotika']]);
}
In the above code, we are passing the students array to the student.blade.php file.
Add the route in the web.php file.
Route::get('/details', 'PostController@display');
Output
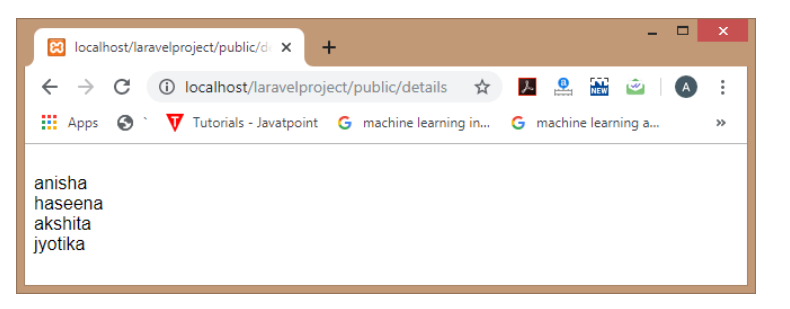
Laravel Blade Template
@while loop
First, we create the student.blade.php file in resources/views directory.
@while(($i)<5)
javatpoint
{{$i++}}
@endwhile
Now, add the following code in PostController.php file.
public function display($i)
{
   return view('student');
}
Add the route in web.php file.
Route::get('/details/{i}', 'PostController@display');
Output
Template Inheritance
Master Page Layout
Master page layout defines the common layout across all the web pages. All the web applications have the master page layout to define the common layout across all the web pages. The blade templating engine defines the master layout that can be extended by all the web pages. The master page layout is available in the /resources/views/layouts/ directory.
Let's understand through an example.
First, create the folder named as 'layout' in resources/views/ directory.
Now, create a new file in layout folder 'master.blade.php'.
We add the following code in the master.blade.php file.
master.blade.php
<html>
<head>
<title> Master Page Layout </title>
</head>
<body>
<div class="container">
@yield('content')
</div>
@yield('footer')
</body>
</html>
In the above code, we have used the @yield directive. The @yield is used to display the content. The @yield('content') displays the content of the 'content' while @yield('footer') displays the content of the footer.
Extending Master Layout
Now, we are going to extend the above master layout in contact.blade.php file as shown below:
Contact.blade.php

@extends('layout.master')
@section('content')
<h1>Contact Page </h1>
@stop
In the above code, we use the @extends directive. The '@extends' directive is used to inherit the blade layout in contact.blade.php file. The '@section('content')' defines the section of the content.
Now, Add the following route in web.php file.
Route::get('/contact', function () {
    return view('contact');
});
Output

Laravel Template Inheritance
We can also add the javascript code in contact.blade.php file. Suppose I added the following code in contact.blade.php file.
@section('footer')
<script> alert("Hello JavaTpoint") </script>
@stop
In the above code, I created the alert box, which is displaying the message "Hello JavaTpoint".
Output
Laravel Template Inheritance
Let's see another example of blade template.
We create a new file named as "post.blade.php" file.
post.blade.php

@extends('layout.master')
@section('content')
<h1>Post Page:</h1>
<h2>id is :{{$id}}<br> Password is :{{$password}}<br>Name is : {{$name}}</h2>
@stop
The above code defines the section of the content in which we are displaying the values of id, password and name respectively.
Now, we create a controller named as 'PostController.php'.
PostController.php
<?php

namespace App\Http\Controllers;

use Illuminate\Http\Request;

class PostController extends Controller
{
    //
 public function show_post($id,$password,$name)
{
  return view('post',compact('id','password','name'));
}}
In PostController.php file, we defined a new function named as show_post() which passes the data to the post.blade.php file.
Lastly, we define a route in web.php file.
web.php
Route::get('/post/{id}/{password}/{name}','PostController@show_post');
Output
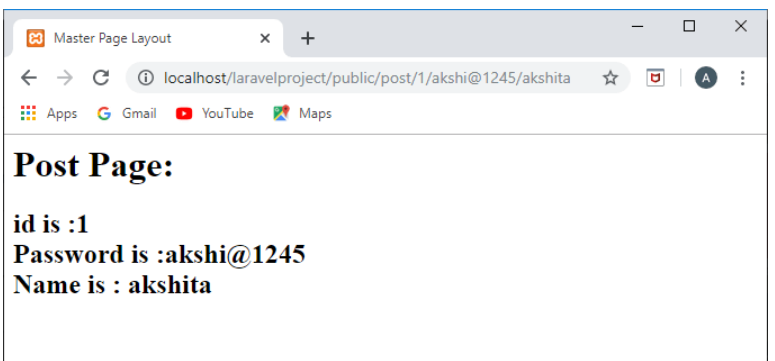
Laravel Template Inheritance
Till now, we have seen that both the post.blade.php and contact.blade.php files are extending the master layout file. This is the main advantage of a master layout that every file can extend the layout of the master file and add their own functionalities.
Use of @parent directive
The use of @parent directive is to display the content of the section defined in the master layout.
Let's understand through an example.
First, we create a master file.
master.blade.php
<html>
<head>
<title> Master Page Layout </title>
</head>
<body>
<div class="container">
@yield('content')
</div>
@section('footer')
This is footer
@show
</body>
</html>
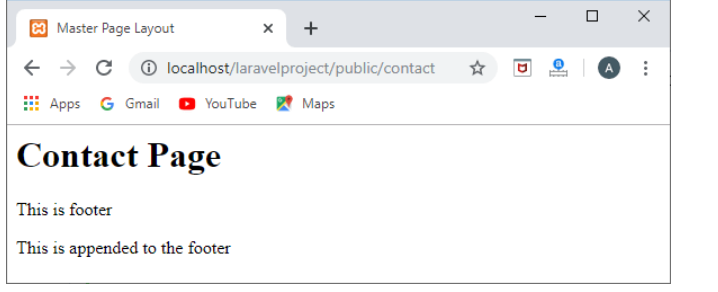
Now, we create the contact.blade.php in which we extend the above master.blade.php file.
@extends('layout.master')
@section('content')
<h1>Contact Page</h1>
@stop
@section('footer')
@parent
<p>this is appended</p>
@stop
In the above code, @parent directive adds the paragraph content to the footer section.
Output
Laravel Forms
Laravel handles the html forms by providing various in-built tags. Laravel generates the major elements required for an HTML. In order to generate the html elements, we need to add the html package in Laravel by using the composer.
Installation
We first install the package by using the composer. Enter the following command in Git bash window to install the package.
$composer require "laravelcollective/html":"^5.4.0"
When we enter the above command in the Git bash window, then the output would be:
Laravel Forms
In the above window, we observe that the command "$composer require "laravelcollective/html":"^5.4.0" updates the composer.json file required for laravelcollective/html.
Next, open the config/app directory in your project and add the html provider in the providers array of the config/app.php file.
Laravel Forms
The above-highlighted area represents the HtmlServiceProvider added in the providers array of the config/app.php file.
Lastly, we add the two class aliases to the aliases array of the
config/app.php file.
'aliases' => [
         Form' => Illuminate\Html\FormFacade::class,
        'Html' => Illuminate\Html\HtmlFacade::class,
        ],
Opening a Form
We can open a form by using the code given below:
{Form::open(['url' => 'post/create'])}
//
{Form::close()}
In laravel forms, the default method is assumed to be 'post' method if not mentioned, but we are free to specify any other method. Since forms support Post, Put, Delete, and Get methods, so these methods can be added in a form by using the hidden method field.
If we want to use the put method in a form, then the code is given below:
Form::open(['url'=>'Post/create , 'method'=>'Put''])
We can also open forms that point to the named routes or controller actions.

Form.open(['route' => 'route.name'])
Form.open(['action' => 'Controller@method'])
Generating HTML Elements
Label
Label is a normal text which appeared in the Html form. The syntax for writing a label element in Laravel is given below:
Form::label('phone_no', 'Phone Number');
We can also specify the additional attributes in a label element.
Form::label('phone_no', 'Phone Number',['class'=>'phone_no']);
In this case, we have added the 'class' as an attribute in a Label element.
Text
Text is an area where the user can input their data. The syntax for generating a text area in Laravel is given below:
Form::text('email');
We can also specify the default value to the text box.
Form::text('email','akshita123@gmail.com');
Password
Password is an html element in a form that captures the user input, and each character is represented in the form of (*) instead of displaying the entered digits. The syntax for the password field is given below:
Form::password('password',['class'=>'pass']);
Checkboxes
We can create the checkbox as given below:
Form::checkbox('name','value');
By default, the checkbox is unchecked. We can also check the box by providing true value to the checkbox element.
Form::checkbox('name','value',true);
Radio buttons
We can create the radio button as given below:
Form::radio('name','value');
By default, the radio button is not selected. We can also select the radio button by providing true value to the radio button element.
Form::radio(''name','value',true);
Number
We can also add the number input field in a form. Syntax for the number input field is given below:
Form::number('name','value');
The file input field is an html element used in a form for file uploading. Syntax for file input field is given below:
Form::file('image');
Where, image is the name of the file input field.
Drop-down list
The drop-down element is used to display the list of all the pre-defined options. The syntax for creating a drop-down menu is given below:
Form::select('digits', [1,2,3,4,5,6])
We can also set the drop-down list with a default value:
Form::select('digits',[1,2,3,4,5,6],'2')
The above code sets the value of the drop-down list with a second element of the array, i.e., 3 as indexing starts with 0.
Generating Grouped list
We can generate the grouped list through the drop-down element. Let's see this through an example:
Form::select('animal',[
        'fruits' => ['Apple','Mango','Orange'],
        'Vegetables' => ['Potato','Tomato','Cabbage'],
])
Generating drop-down list with a range.
Form::selectRange('number',1,30)
Generating drop-down list with a month names.
Form.selectMonth('month')
Date
year, month, and day. The syntax for generating a date input field is given below:
Form::date('name',\Carbon\Carbon::now())
Buttons
We can also create the button in a web form by using the button field in a form. Let's see its syntax:
Form::submit('Click me!!')
The above line creates the submit button with the name "Click me!!".
Let's understand the forms through an example.
The following are the steps required to create a form.
Step 1: First, we create the Master layout file named as master.blade.php file.
<html>
<head>
<title> Master Page Layout </title>
</head>
<body>
<div class="container">
@yield('content')
</div>
</body>
</html>
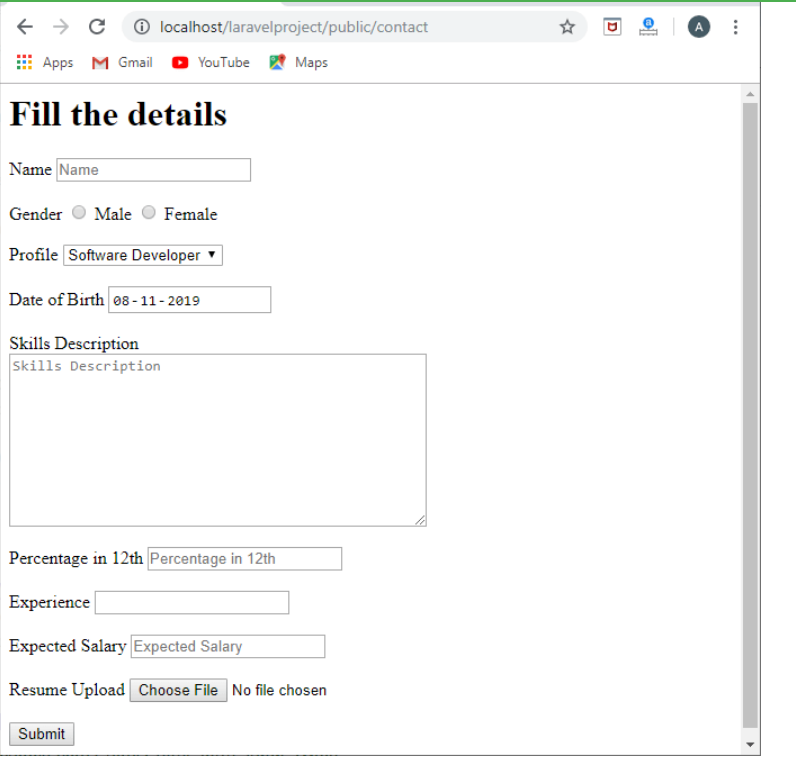
Step 2: Secondly, we create the contact.blade.php file in which we add the code of Form.
@extends('layout.master')
@section('content')
<h1>Contact Page</h1>

{!! Form::open(['route'=>'posts.store']) !!}


<div class="form-group">
{{ form::label('name','Name')}}
{{form::text('name','',['class'=>'form-control','placeholder'=>'Name'])}}
</div>
<br>
<div class="form-group">
{{ form::label('gender','Gender')}}
{{ form::radio('male','Male')}} Male
{{ form::radio('Female','Female')}} Female
</div>
<br>
<div class="form-group">
{{ form::label('profile','Profile')}}
{{form::select('list',['Software Developer','QA Analyst','Manager','HR'])}}
</div>
<br>
<div class="form-group">
{{ form::label('dob','Date of Birth')}}
{{Form::date('dob', \Carbon\Carbon::now())}}
</div>
<br>
{{form::label('skills','Skills Description')}}
<div class="form-group">

{{form::textarea('body','',['placeholder'=>'Skills Description'])}}
</div>
<br>
<div class="form-group">
{{ form::label('percentage','Percentage in 12th')}}
{{form::text('percent','',['class'=>'form-control','placeholder'=>'Percentage in 12th'])}}
</div>
<br>
<div class="form-group">
{{ form::label('experience','Experience')}}
{{form::number('exp','number')}}
</div>
<br>
<div class="form-group">
{{ form::label('expected_salary','Expected Salary')}}
{{form::text('salary','',['placeholder'=>'Expected Salary'])}}
</div>
<br>

<div class="form-group">
{{ form::label('resume','Resume Upload')}}
{{Form::file('resume')}}
</div>
<br>

{{Form::submit('Submit', ['class'=>'btn btn-primary'])}}


{!!Form::close()!!}
@stop
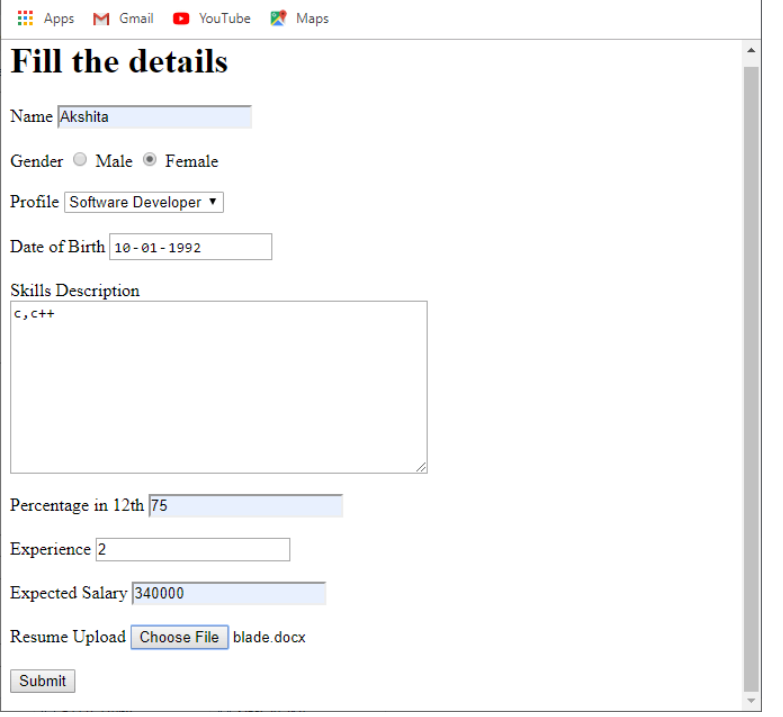
The above code is used to create the form which is containing different fields.
Step 3: Now, we create the resource controller named as PostsController, and we only added the functionality in a store() function given as below:
PostController.php
<?php
namespace App\Http\Controllers;
use Illuminate\Http\Request;
class PostsController extends Controller
{
/**
* Display a listing of the resource.
*
* @return \Illuminate\Http\Response
*/
public function index()
{
//
}
/**
* Show the form for creating a new resource.
*
* @return \Illuminate\Http\Response
*/
public function create()
{
//
}
/**
* Store a newly created resource in storage.
*
* @param \Illuminate\Http\Request $request
* @return \Illuminate\Http\Response
*/
public function store(Request $request)
{
$this->validate($request,[
'name'=>'required',
'list'=> 'required',
'dob'=>'required',
'body'=>'required',
'percent'=>'required',
'exp'=>'required',
'salary'=>'required',
'resume'=>'required']);
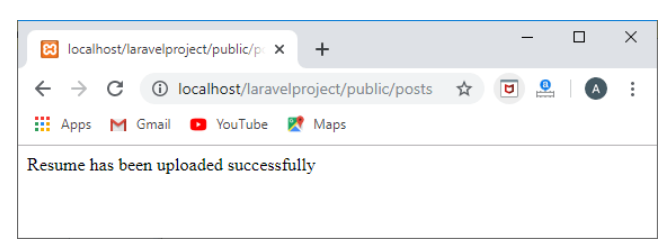
return "Resume has been updated successfully";
}
/**
* Display the specified resource.
*
* @param int $id
* @return \Illuminate\Http\Response
*/
public function show($id)
{
//
}
/**
* Show the form for editing the specified resource.
*
* @param int $id
* @return \Illuminate\Http\Response
*/
public function edit($id)
{
//
}
/**
* Update the specified resource in storage.
*
* @param \Illuminate\Http\Request $request
* @param int $id
* @return \Illuminate\Http\Response
*/
public function update(Request $request, $id)
{
//
}
/**
* Remove the specified resource from storage.
*
* @param int $id
* @return \Illuminate\Http\Response
*/
public function destroy($id)
{
//
}
}
In the above code, we add the code in a store() function, which validates all the fields in a form.
Step 4: Lastly, add the route in the web.php file.
Route::get('/contact',function()
{
  return view('contact');
});
Output
If Statements
You may construct if statements using the @if, @elseif, @else, and @endif directives. These directives function identically to their PHP counterparts:
@if (count($records) === 1)
    I have one record!
@elseif (count($records) > 1)
    I have multiple records!
@else
    I don't have any records!
@endif
For convenience, Blade also provides an @unless directive:
@unless (Auth::check())
    You are not signed in.
@endunless
In addition to the conditional directives already discussed, the @isset and @empty directives may be used as convenient shortcuts for their respective PHP functions:
@isset($records)
    // $records is defined and is not null...
@endisset

@empty($records)
    // $records is "empty"...
@endempty
Authentication Directives
The @auth and @guest directives may be used to quickly determine if the current user is authenticated or is a guest:
@auth
    // The user is authenticated...
@endauth

@guest
    // The user is not authenticated...
@endguest
If needed, you may specify the authentication guard that should be checked when using the @auth and @guest directives:
@auth('admin')
    // The user is authenticated...
@endauth

@guest('admin')
    // The user is not authenticated...
@endguest
Environment Directives
You may check if the application is running in the production environment using the @production directive:
@production
// Production specific content...
@endproduction
Section Directives
You may determine if a template inheritance section has content using the @hasSection directive:
@hasSection('navigation')
    <div class="pull-right">
        @yield('navigation')
    </div>

    <div class="clearfix"></div>
@endif
You may use the sectionMissing directive to determine if a section does not have content:
@sectionMissing('navigation')
    <div class="pull-right">
        @include('default-navigation')
    </div>
@endif
Switch Statements
Switch statements can be constructed using the @switch, @case, @break, @default and @endswitch directives:
@switch($i)
    @case(1)
        First case...
        @break

    @case(2)
        Second case...
        @break

    @default
        Default case...
@endswitch
Loops
In addition to conditional statements, Blade provides simple directives for working with PHP's loop structures. Again, each of these directives functions identically to their PHP counterparts:
@for ($i = 0; $i < 10; $i++)
    The current value is {{ $i }}
@endfor

@foreach ($users as $user)
    <p>This is user {{ $user->id }}</p>
@endforeach

@forelse ($users as $user)
    <li>{{ $user->name }}</li>
@empty
    <p>No users</p>
@endforelse

@while (true)
    <p>I'm looping forever.</p>
@endwhile
While iterating through a foreach loop, you may use the loop variable to gain valuable information about the loop, such as whether you are in the first or last iteration through the loop.
When using loops you may also skip the current iteration or end the loop using the @continue and @break directives:
@foreach ($users as $user)
    @if ($user->type == 1)
        @continue
    @endif

    <li>{{ $user->name }}</li>

    @if ($user->number == 5)
        @break
    @endif
@endforeach
You may also include the continuation or break condition within the directive declaration:
@foreach ($users as $user)
    @continue($user->type == 1)

    <li>{{ $user->name }}</li>

    @break($user->number == 5)
@endforeach
The Loop Variable
While iterating through a foreach loop, a $loop variable will be available inside of your loop. This variable provides access to some useful bits of information such as the current loop index and whether this is the first or last iteration through the loop:
@foreach ($users as $user)
    @if ($loop->first)
        This is the first iteration.
    @endif

    @if ($loop->last)
        This is the last iteration.
    @endif

    <p>This is user {{ $user->id }}</p>
@endforeach
If you are in a nested loop, you may access the parent loop's $loop variable via the parent property:
@foreach ($users as $user)
    @foreach ($user->posts as $post)
        @if ($loop->parent->first)
            This is the first iteration of the parent loop.
        @endif
    @endforeach
@endforeach
The $loop variable also contains a variety of other useful properties:
Property Description
$loop->index    The index of the current loop iteration (starts at 0).
$loop->iteration    The current loop iteration (starts at 1).
$loop->remaining    The iterations remaining in the loop.
$loop->count    The total number of items in the array being iterated.
$loop->first    Whether this is the first iteration through the loop.
$loop->last Whether this is the last iteration through the loop.
$loop->even Whether this is an even iteration through the loop.
$loop->odd  Whether this is an odd iteration through the loop.
$loop->depth    The nesting level of the current loop.
$loop->parent   When in a nested loop, the parent's loop variable.
Validation Errors
The @error directive may be used to quickly check if validation error messages exist for a given attribute. Within an @error directive, you may echo the $message variable to display the error message:
<label for="title">Post Title</label>

<input id="title"
    type="text"
    class="@error('title') is-invalid @enderror">

@error('title')
    <div class="alert alert-danger">{{ $message }}</div>
@enderror
Since the @error directive compiles to an "if" statement, you may use the @else directive to render content when there is not an error for an attribute:
<label for="email">Email address</label>

<input id="email"
    type="email"
    class="@error('email') is-invalid @else is-valid @enderror">
You may pass the name of a specific error bag as the second parameter to the @error directive to retrieve validation error messages on pages containing multiple forms:
<label for="email">Email address</label>

<input id="email"
    type="email"
    class="@error('email', 'login') is-invalid @enderror">

@error('email', 'login')
    <div class="alert alert-danger">{{ $message }}</div>
@enderror

Top comments (0)