What is EPEL and Write a instructions to install and use it
The EPEL repository is an additional package repository that provides easy access to install packages for commonly used software.
This repo was created because Fedora contributors wanted to use Fedora packages they maintain on RHEL and other compatible distributions.
To put it simply the goal of this repo was to provide greater ease of access to software on Enterprise Linux compatible distributions.
What’s an ‘EPEL repository’?
The EPEL repository is managed by the EPEL group, which is a Special Interest Group within the Fedora Project.
The ‘EPEL’ part is an abbreviation that stands for Extra Packages for Enterprise Linux.
The EPEL group creates, maintains and manages a high-quality set of additional packages.
These packages may be software not included in the core repository, or sometimes updates which haven’t been provided yet.
The EPEL repository can be used with the following Linux Distributions:
Red Hat Enterprise Linux (RHEL)
CentOS
Scientific Linux
Oracle Linux
Pre-Prequesties:
1. Machine should be connected to internet.
2. You should have root (Sudo/Admin) access to configure it.
Installing EPEL on CentOS:
By far CentOS is the easiest distro to install EPEL on. The CentOS distribution includes a repo called ‘CentOS Extras’ by default. Within this repo users can find a EPEL package, so in this case enabling EPEL is as easy as installing any other package.
1. Connect to the server via SSH as the root user; or open a terminal if you’re working locally.
2. Install the EPEL repository with the following command: sudo yum install epel-release
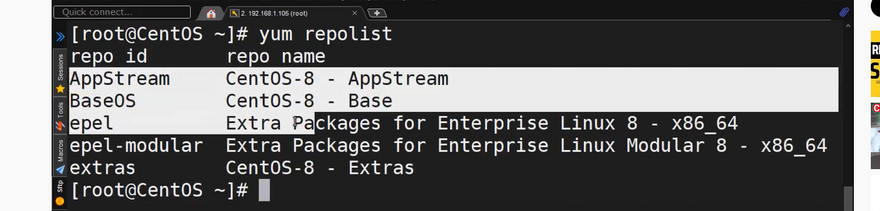
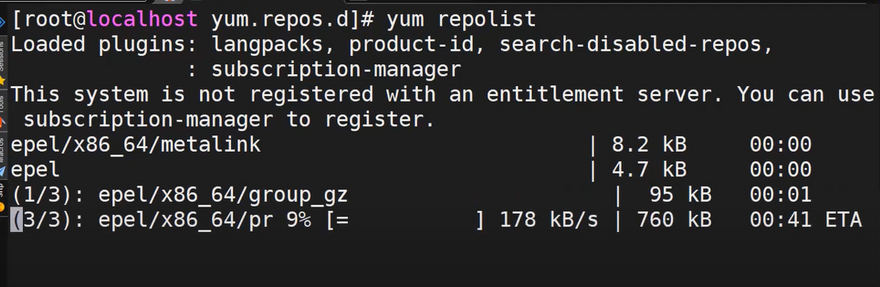
3. Confirm your work and refresh the repo list by running: sudo yum repolist
Essentially once you’re logged in as the root user, just run the following commands:
sudo yum install epel-release

sudo yum repolist

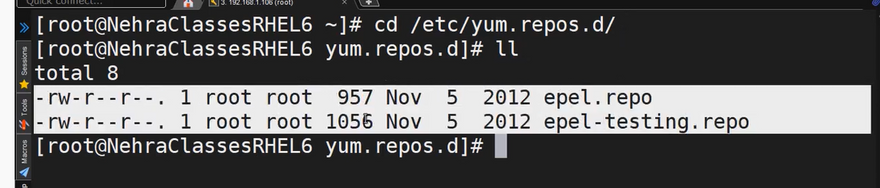
Installing EPEL on RHEL6/RHEL7/RHEL8:
If you are running a different supported distribution you can install the EPEL rep with the following method. This method should also work on CentOS if you’d like to do a manual install. First start by running the following command:
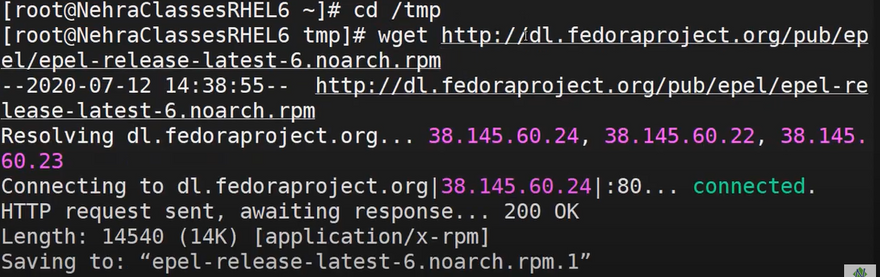
cd /tmpThen download the rpm file for installation. The file download depends on what OS version you are using, select from the list bellow:
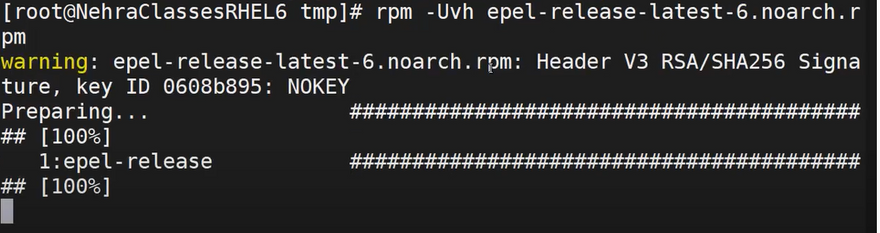
RHEL 6/CentOS 6/etc:
wget http://dl.fedoraproject.org/pub/epel/...
rpm -Uvh epel-release-6*.rpm
RHEL 7/CentOS 7/etc:
wget https://dl.fedoraproject.org/pub/epel...
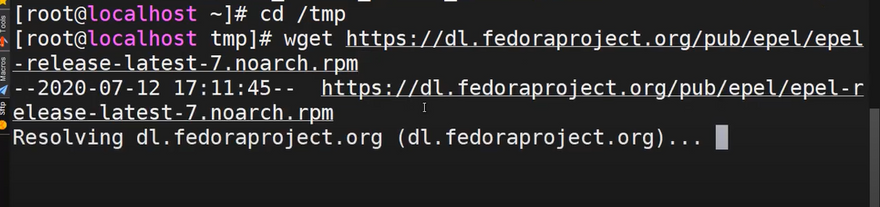
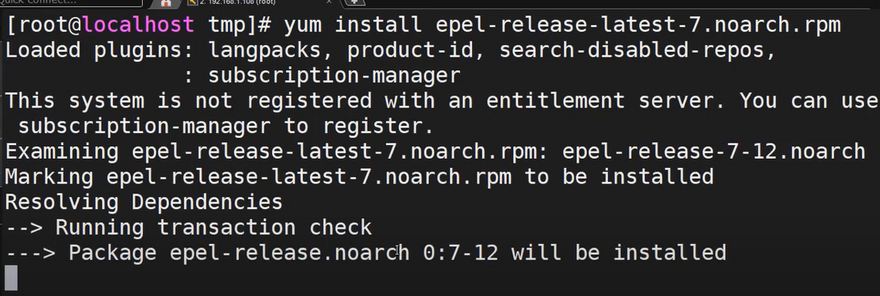
- Once you’ve downloaded the EPEL rpm file for your OS version, you can now install the EPEL repository. To install the EPEL rpm run:
yum install ./epel-release-latest-*.noarch.rpm
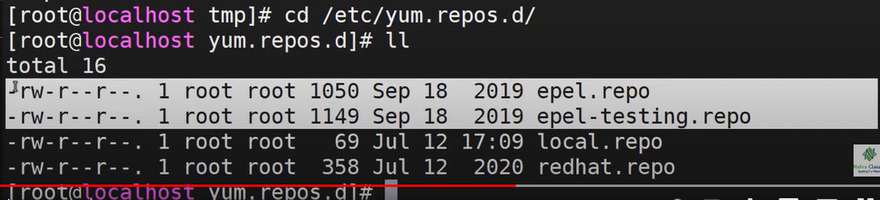
- Confirm your work and refresh the repo list by running.
yum repolist

--
To Configure EPEL repository in RHEL 8:
- SSH and run the commands below.
dnf install https://dl.fedoraproject.org/pub/epel...

dnf update
- Once the update is complete, you can verify the installation of the EPEL repository by executing the command.
sudo rpm -qa | grep epel

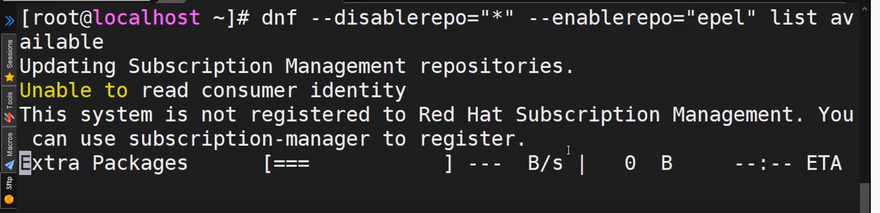
- To list the packages that constitute the EPEL repository, run the command.
sudo dnf --disablerepo="*" --enablerepo="epel" list available
- For instance, to search for the htop package, run the command.
sudo dnf --disablerepo="*" --enablerepo="epel" list available | grep htop

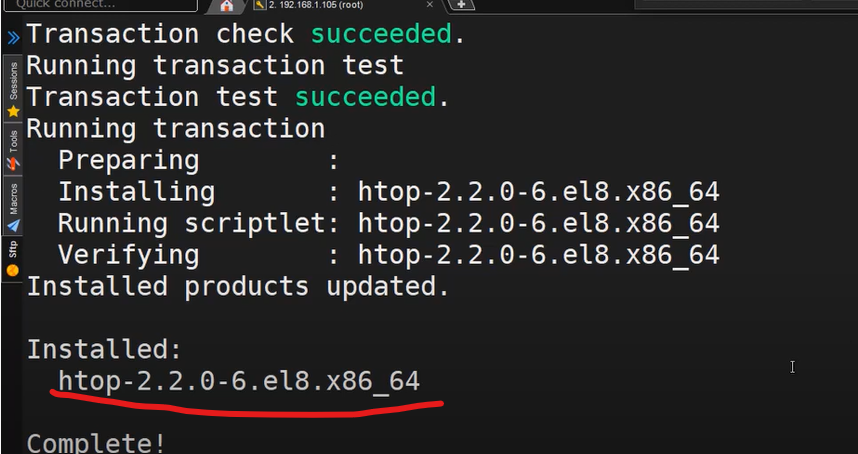
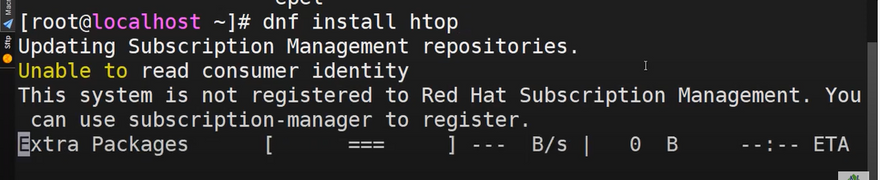
- To install htop package, the command will be.
sudo dnf install htop
What is diffrence between hypervisor and cloud?
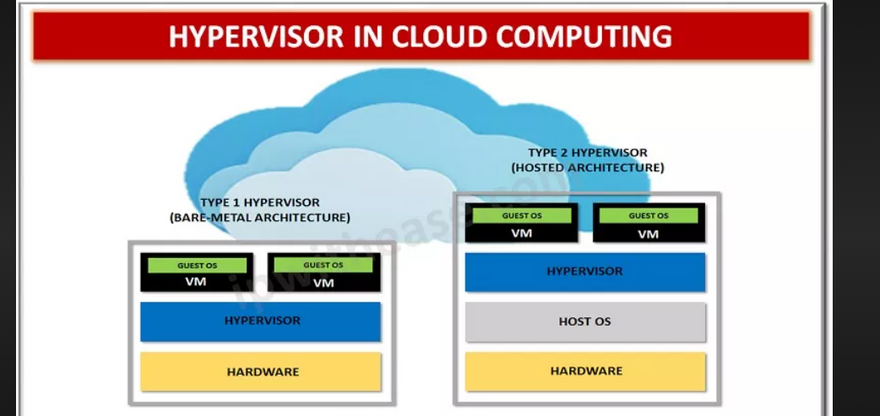
Hypervisor
hypervisor allows a single host computer to support multiple virtual machine by sharing resources inluding processing and memory. guest VM are independent of host hardware.
allowing several virtual machine to operate on single physical server reduce.
space efficiency
Energy uses
maintenance requirements of server

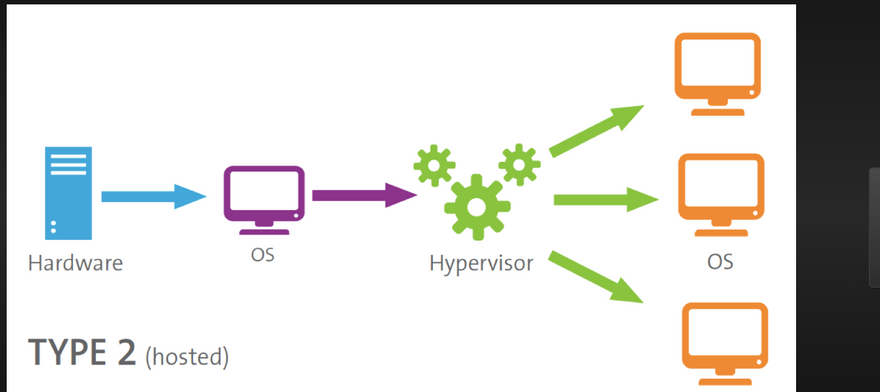
- Hypervisor is a technology which used for create virtualization or Hypervisor-It is a software to run and manage no of virtual machines in the system.
- Create multiple simulated environments from 1 physical hardware system.
- Deliver packaged resources to specific users for a specific purpose.
- It is based on Image based.
- It is low scalable and support scale up.
- It relies on single peripheral device.
- the workload is stateful.
- Cost is very low as compared to cloud.
Cloud
- Cloud is a methodology which ussed to access resources over internet.
- Pool and automate virtual resources for on-demand use.
- Deliver variable resources to groups of users for a variety of purposes.
- It is on Template Based.
- Cloud computing is high scalable and support sale out.
- Cloud relies on multiple machines so its helpful in disaster recovery.
- the workload is stateless.
- Cost is higher.
What are the Network Adaptor(Driver) you have in VirtualBox and write a usecase of it?
in modern business world, networking is a crucial component of interactive computer operations. It is difficult to imagine how to exchange data between computers without networks in a world where everything is changing at ever-growing speed. One of the central focal ideas behind hardware virtualization is the possibility to use virtual machines in nearly all cases where physical computers can also be used. Thus, virtual machines must be able to connect to physical and virtual networks with their virtual network adapters. Virtual machines running on VirtualBox can be connected to different networks. VirtualBox provides multiple network modes for virtual machines. Today’s blog post covers VirtualBox network settings to help you configure VirtualBox in the best way possible to suit your needs.
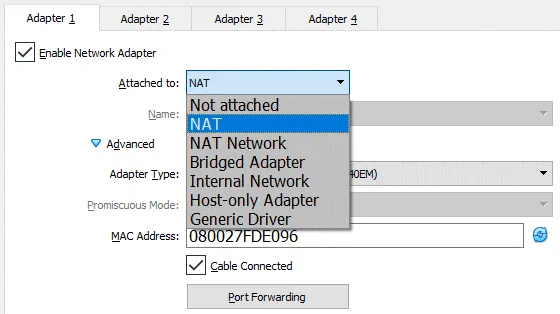
Below, the following VirtualBox network modes will be discussed and compared:
Not Attached
NAT
NAT Network
Bridged Adapter
Internal Network
Host-Only Adapter
Generic Driver
VirtualBox Network Modes
VirtualBox provides a long list of network modes, which is one of the most interesting features of VirtualBox network settings. Each virtual network adapter can be separately configured to operate in a different network mode. For example, you can set the NAT mode for the adapter 1 and the Host-only mode for the adapter 2. You can select the network mode in the Attached to drop-down menu.
Not attached. In this mode, VirtualBox reports to the guest that a network card is present, but that there is no connection. This is as if no Ethernet cable was plugged into the card. Using this mode, it is possible to pull the virtual Ethernet cable and disrupt the connection, which can be useful to inform a guest operating system that no network connection is available and enforce a reconfiguration.
A virtual network adapter is installed in a VM, but the network connection is missing, much like when you unplug the Ethernet network cable when using a physical network adapter. This mode can be useful for testing. For example, you can enable this network mode for a short time to emulate unplugging the cable. When you disable the Not Attached mode by switching to another network mode, the network connection becomes available again. You can also check whether a DHCP client obtains the IP address correctly, whether the appropriate application can resume downloading after link interruption or packet loss, and so on.
Instead of using the Not Attached network mode, you can use any other network mode without ticking the Cable Connected checkbox. You can tick/untick the checkbox when a VM is in the running state (see the screenshot above). Don’t forget to hit OK to apply changes in the VM network configuration.
Network Address Translation (NAT). Network Address Translation (NAT) is the simplest way of accessing an external network from a virtual machine. Usually, it does not require any configuration on the host network and guest system.If all you want is to browse the Web, download files, and view email inside the guest, then this default mode should be sufficient for you, and you can skip the rest of this section. Please note that there are certain limitations when using Windows file sharing.
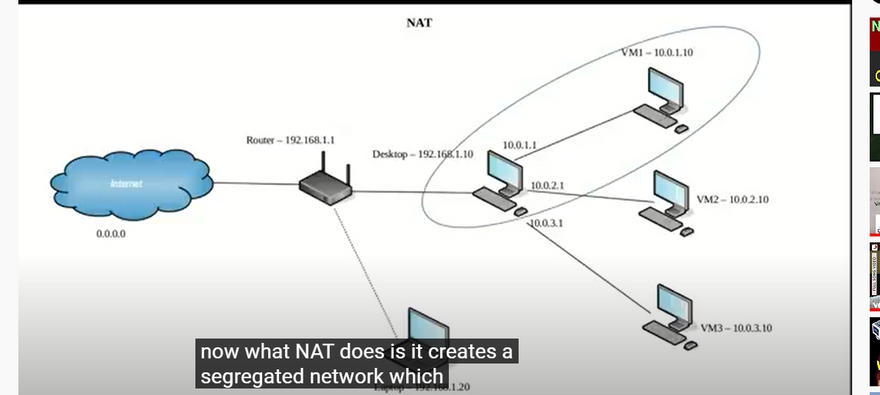
This network mode is enabled for a virtual network adapter by default. A guest operating system on a VM can access hosts in a physical local area network (LAN) by using a virtual NAT (Network Address Translation) device. External networks, including the internet, are accessible from a guest OS. A guest machine is not accessible from a host machine, or from other machines in the network when the NAT mode is used for VirtualBox networking. This default network mode is sufficient for users who wish to use a VM just for internet access, for example.
The IP address of the VM network adapter is obtained via DHCP and the IP addresses of the network used in this network mode cannot be changed in the GUI. VirtualBox has a built-in DHCP server and NAT engine. A virtual NAT device uses the physical network adapter of the VirtualBox host as an external network interface. The default address of the virtual DHCP server used in the NAT mode is 10.0.2.2 (this is also the IP address of the default gateway for a VM). The network mask is 255.255.255.0.
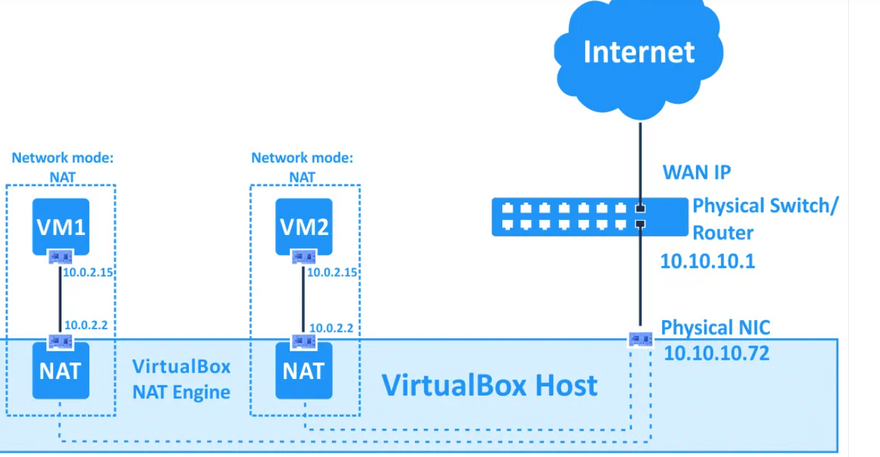
If you configure the network adapters of two or more VMs to use the NAT mode, each VM will obtain the 10.0.2.15 IP address in its own isolated network behind a private virtual NAT device. The default gateway for each VM is 10.0.2.2. In VirtualBox IP addresses are not changed when the NAT mode is used, as you can see below:
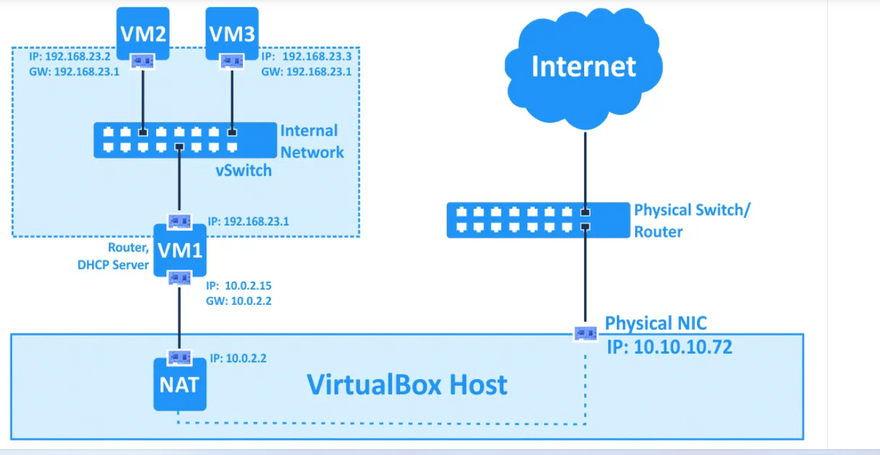
NAT Network. A NAT network is a type of internal network that allows outbound connections.
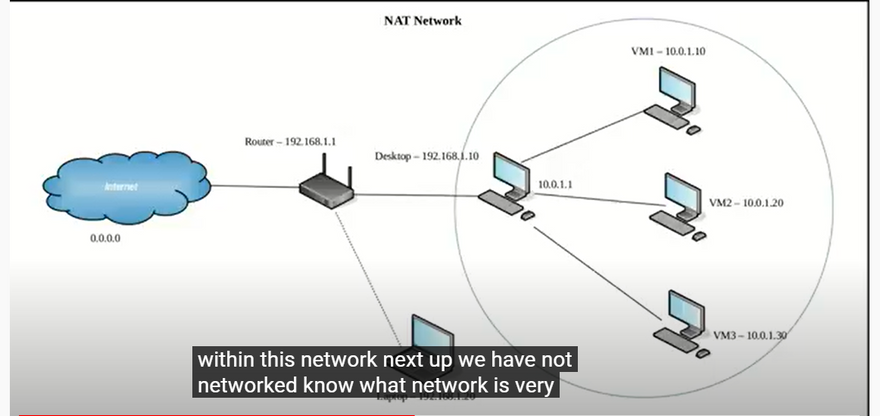
This mode is similar to the NAT mode that you use for configuring a router. If you use the NAT Network mode for multiple virtual machines, they can communicate with each other via the network. The VMs can access other hosts in the physical network and can access external networks including the internet. Any machine from external networks as well as those from a physical network to which the host machine is connected cannot access the VMs configured to use the NAT Network mode (similarly to when you configure a router for internet access from your home network). You cannot access the guest machine from the host machine when using the NAT Network mode (unless you are configuring port forwarding in global VirtualBox network settings). A built-in VirtualBox NAT router uses a physical network interface controller of the VirtualBox host as an external network interface (as is the case for the NAT mode).
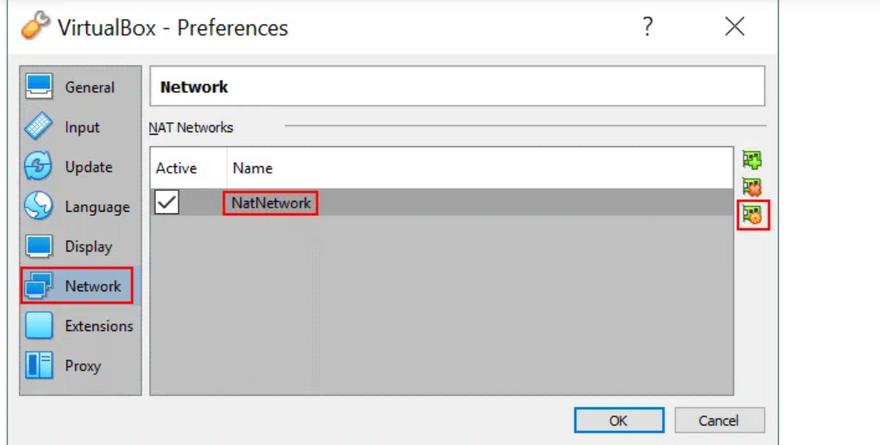
The network address and name can be changed in the global VirtualBox preferences (File > Preferences). In the left pane of the Preferences window, select Network to access global VirtualBox network settings, then double click your existing NAT network to edit the settings (you can also add a new network or delete an existing network by clicking the + or x icons).
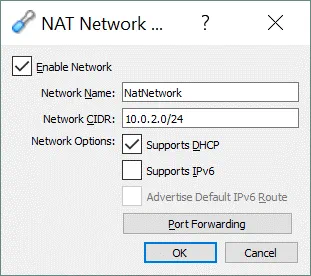
In the small pop-up window that will appear, it is also possible to enable/disable DHCP, IPv6 and configure port forwarding.
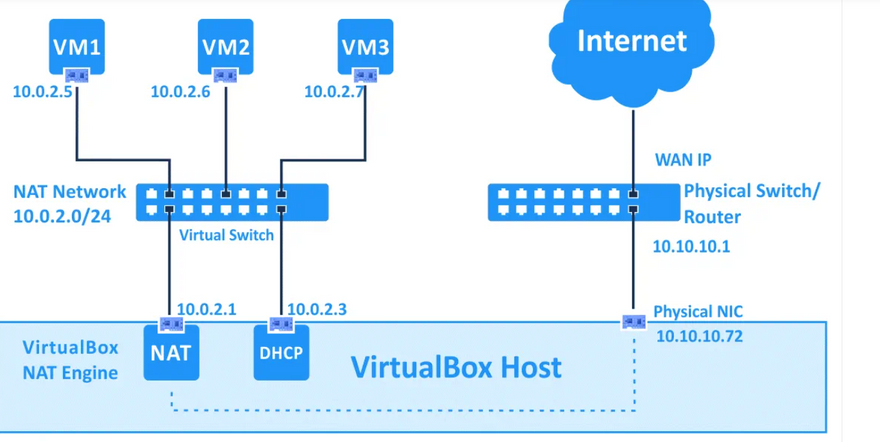
The default address of the NatNetwork is 10.0.2.0/24.
The default gateway IP is 10.0.2.1 (the x.x.x.1 template is used to assign the default gateway IP). For example, if you create a new virtual network for the NAT Network mode in VirtualBox and set the 192.168.22.0/24 network address, the IP address of the gateway in this network will be 192.168.22.1. You cannot change the IP address of the gateway for the network used in the NAT Network mode and change the range of IP addresses issued by the DHCP server. Similarly, the IP address of the DHCP server is 10.0.2.3 by default (the x.x.x.3 template is used).
The IP configuration of the Windows 7 VM running on VirtualBox with a virtual network adapter configured in the NAT Network mode is displayed on the screenshot.
u don’t want to edit VirtualBox network settings in the GUI, you can add a new NAT network with VBoxManage by using the command:

VBoxManage natnetwork add --netname natnet1 --network "192.168.22.0/24" --enable
Where:
natnet1 is the name of the NAT network;
192.168.22.0/24 is the address of that NAT network.
If you want to configure a VM network adapter in order to use the NAT Network mode with VBoxManage, run the following command:
VBoxManage modifyvm VM_name --nic1 natnetwork
Where:
nic1 is the first virtual network adapter (network interface controller);
natnetwork is the name of the VirtualBox network mode.
You may need to shut down the VM before applying these settings.
In order to avoid repeating the same command with VBoxManage when selecting a network mode for the virtual network adapter of a VM in each section of the article, consider the names of all possible VirtualBox network modes: none, null, nat, natnetwork, bridged, intnet, hostonly, generic.
Port forwarding is one more option that can be accessed and configured from this window. Port forwarding can be used to configure access from the host machine and other hosts of the same physical network to the services running on the guest OS inside the VM (see details below). As you can see, the location of the port forwarding settings for the NAT mode and NAT Network modes are different in the VirtualBox GUI. Port forwarding settings for the NAT mode are available in VM > Settings > Network while port forwarding settings for the NAT Network mode can be configured in File > Preferences > Network. This is because port forwarding rules for the NAT mode are individual for each VM while port forwarding rules for the NAT Network mode are common for multiple VMs whose adapters are connected to the appropriate NAT network. See details about configuring port forwarding below in the Port Forwarding section.
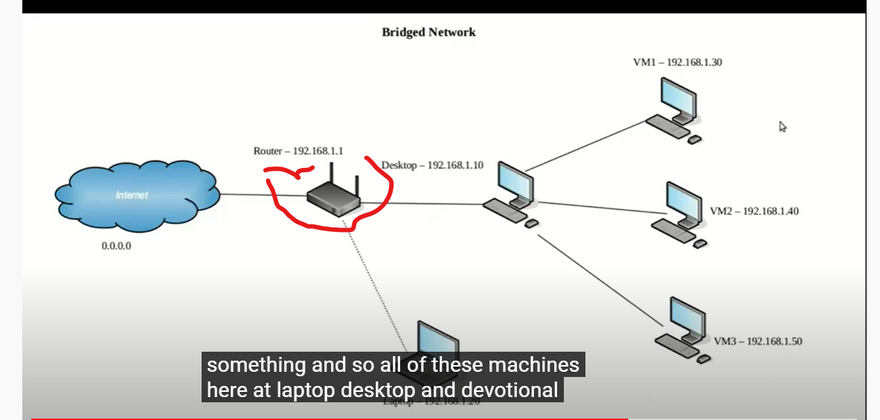
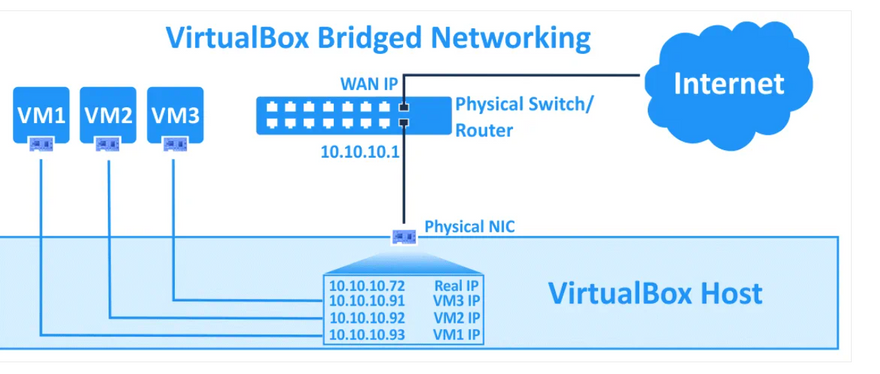
Bridged networking. This is for more advanced networking needs, such as network simulations and running servers in a guest. When enabled, VirtualBox connects to one of your installed network cards and exchanges network packets directly, circumventing your host operating system’s network stack.
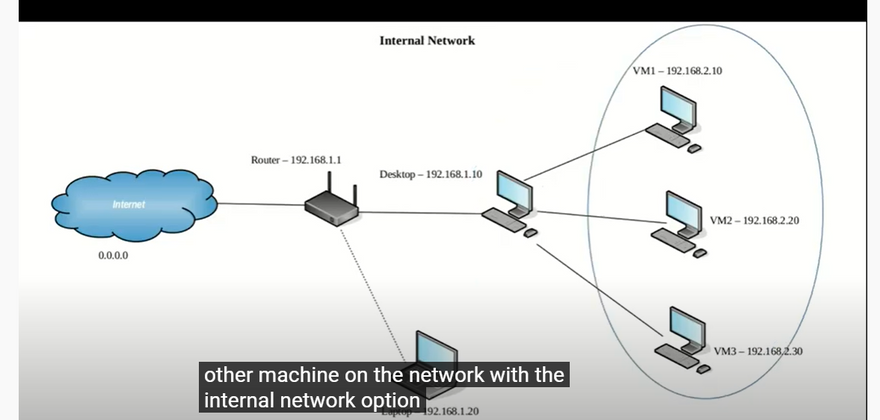
Internal networking. This can be used to create a different kind of software-based network which is visible to selected virtual machines, but not to applications running on the host or to the outside world.
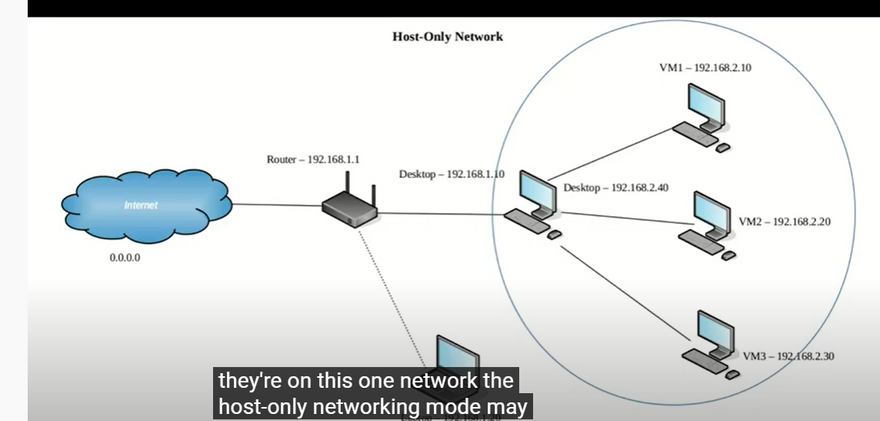
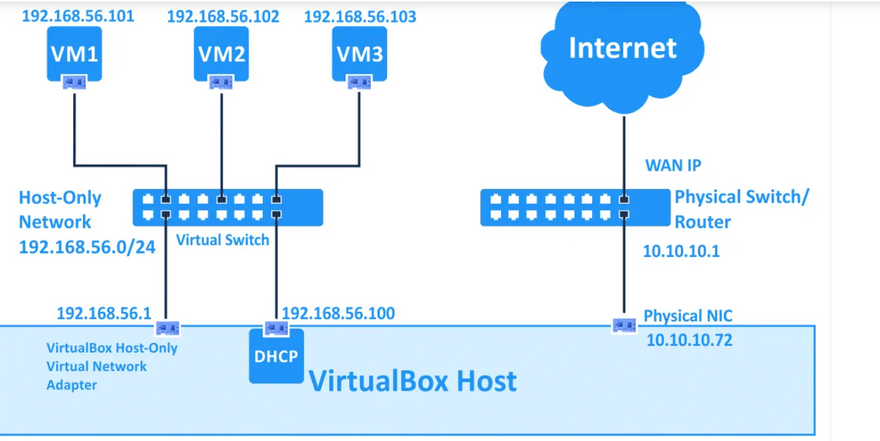
Host-only networking. This can be used to create a network containing the host and a set of virtual machines, without the need for the host’s physical network interface. Instead, a virtual network interface, similar to a loopback interface, is created on the host, providing connectivity among virtual machines and the host.
Generic networking. Rarely used modes which share the same generic network interface, by allowing the user to select a driver which can be included with Oracle VM VirtualBox or be distributed in an extension pack.
network mode allows you to share the generic network interface. A user can select the appropriate driver to be distributed in an extension pack or be included with VirtualBox.
Two sub-modes are available for VirtualBox Generic Driver mode – UDP Tunnel and VDE (Virtual Distributed Ethernet) Networking.
UDP Tunnel. Virtual machines that run on different hosts can communicate transparently by using an existing network infrastructure.
VDE Networking. Virtual machines can connect to a virtual distributed switch on Linux or FreeBSD hosts. You need to compile VirtualBox from sources to use VDE networking since standard VirtualBox packages don’t include this feature.
Explain following commands
- grep
- find
- xargs
- sed
- chmod
- netstat
- route
- record
- vmstat
- visudo
- awk
grep
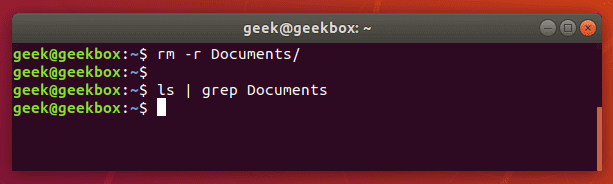
$ ls | grep Documents
$ ls | grep 'My Documents'
$ grep 'Class 1' Students.txt
$ grep -e 'Class 1' -e Todd Students.txt

$ egrep p\{2} fruits.txt
or

$ grep -E p\{2} fruits.txt
$ pgrep sshd

$ zgrep apple fruits.txt.gz
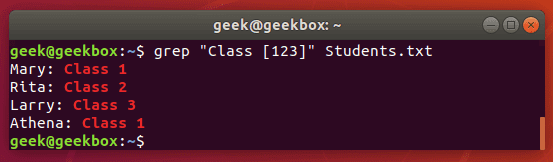
$ grep "Class [123]" Students.txt
$ grep "^Class" Students.txt
$ grep "Class [^1-2]" Students.txt

$ grep "1$" Students.txt
$ grep "A….a" Students.txt

$ zgrep word-to-search /path/to/file.gz
$ zcat file.gz | grep word-to-search
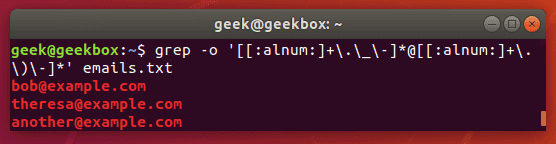
$ grep -o '[[:alnum:]+._-]@[[:alnum:]+._-]' emails.txt
$ grep -E -o "(25[0-5]|2[0-4][0-9]|[01]?[0-9][0-9]?)\.(25[0-5]|2[0-4][0-9]|[01]?[0-9][0-9]?)\.(25[0-5]|2[0-4][0-9]|[01]?[0-9][0-9]?)\.(25[0-5]|2[0-4][0-9]|[01]?[0-9][0-9]?)" /var/log/auth.log
$ grep -E 'string1|string2' filename
or, technically using egrep is even fewer keystrokes:
$ egrep 'string1|string2' filename
$ grep -i string filename

$ grep [Ss]tring filename
$ grep "\<apple\>" fruits.txt
$ grep -v string-to-exclude filename
$ grep -rl 'string1' ./ | xargs sed -i 's/string1/string2/g'
$ grep -n string filename
$ grep -c 1 string filename
Specify the number of lines you wish to show – we did only 1 line in this example.
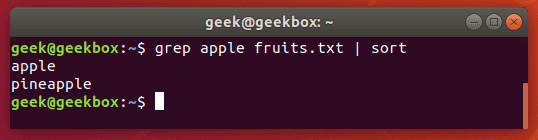
$ grep string filename | sort
line before and after
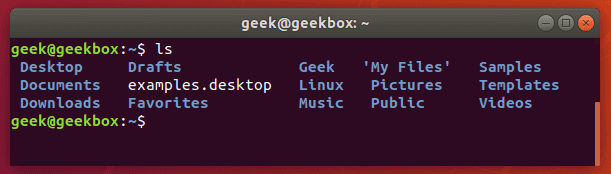
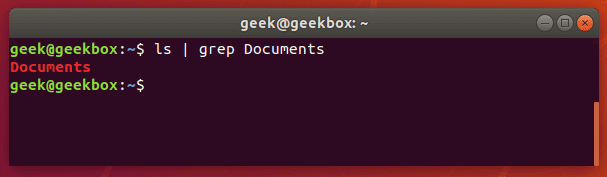
Grep is a command-line tool that Linux users use to search for strings of text. You can use it to search a file for a certain word or combination of words, or you can pipe the output of other Linux commands to grep, so grep can show you only the output that you need to see.
$ ls | grep Documents
If the Documents folder didn’t exist, grep wouldn’t return any output. So if grep returns nothing, that means that it couldn’t find the word you are searching for.
Find a string
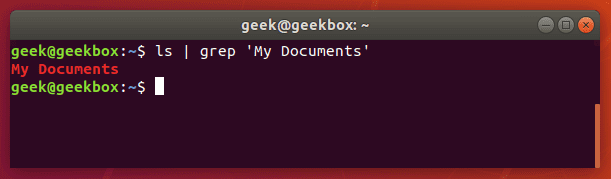
If you need to search for a string of text, rather than just a single word, you will need to wrap the string in quotes. For example, what if we needed to search for the “My Documents” directory instead of the single-worded “Documents” directory?
$ ls | grep 'My Documents'
Grep will accept both single quotes and double quotes, so wrap your string of text with either.
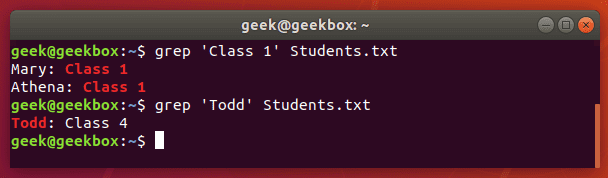
While you can use grep to search the output piped from other command-line tools, you can also use it to search documents directly. Here’s an example where we search a text document for a string.
$ grep 'Class 1' Students.txt
Find multiple strings
You can also use grep to find multiple words or strings. You can specify multiple patterns by using the -e switch. Let’s try searching a text document for two different strings:
$ grep -e 'Class 1' -e Todd Students.txt
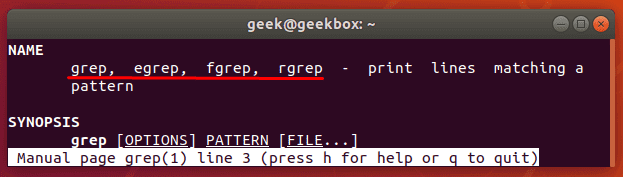
Difference between grep, egrep fgrep, pgrep, zgrep
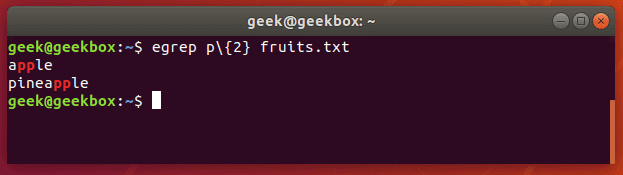
Let’s search a text document for strings that contain two consecutive ‘p’ letters:
$ egrep p\{2} fruits.txt
or

$ grep -E p\{2} fruits.txt
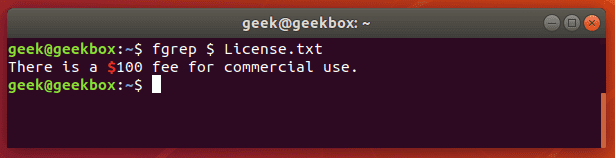
fgrep is the equivalent of grep -F
This switch will interpret a pattern as a list of fixed strings, and try to match any of them. It’s useful when you need to search for regular expression characters. This means you don’t have to escape special characters like you would with regular grep.
pgrep is a command to search for the name of a running process on your system and return its respective process IDs. For example, you could use it to find the process ID of the SSH daemon:
$ pgrep sshd
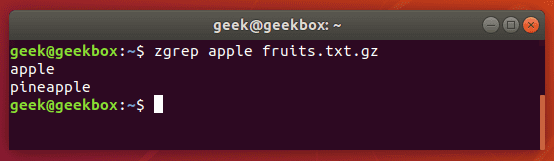
You can use zgrep to search compressed files for a pattern. It allows you to search the files inside of a compressed archive without having to first decompress that archive, basically saving you an extra step or two.
$ zgrep apple fruits.txt.gz
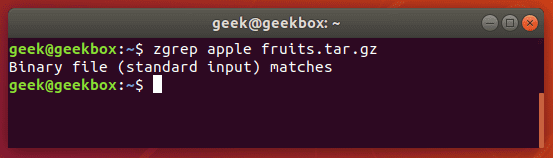
zgrep also works on tar files, but only seems to go as far as telling you whether or not it was able to find a match.
*Using regular expressions *
$ grep "Class [123]" Students.txt
This command will return any lines that say ‘Class 1’, ‘Class2’, or ‘Class 3’.
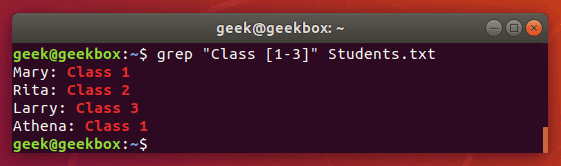
[-] brackets with a hyphen can be used to specify a range of characters, either numerical or alphabetical.
We get the same output as before, but the command is much easier to type, especially if we had a bigger range of numbers or letters.
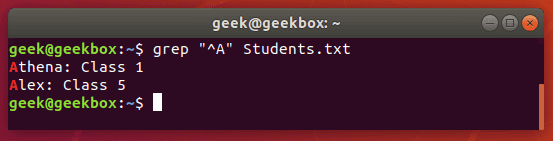
^ caret is used to search for a pattern that only occurs at the beginning of a line.
$ grep "^Class" Students.txt
[^] brackets with caret are used to exclude characters from a search pattern.
$ grep "Class [^1-2]" Students.txt
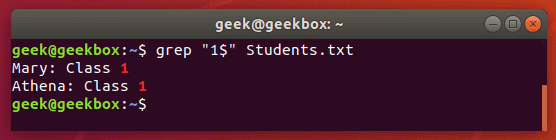
$ dollar sign is used to search for a pattern that only occurs at the end of a line.
$ grep "1$" Students.txt
. dot is used to match any one character, so it’s a wildcard but only for a single character.
$ grep "A….a" Students.txt
Grep gz files without unzipping
As we showed earlier, you can use the zgrep command to search through compressed files without having to unzip them first.
$ zgrep word-to-search /path/to/file.gz
You can also use the zcat command to display the contents of a gz file and then pipe that output to grep to isolate the lines containing your search string.
$ zcat file.gz | grep word-to-search
zcat
Grep email addresses from a zip file
We can use a fancy regular expression to extract all the email addresses from a zip file.
$ grep -o '[[:alnum:]+._-]@[[:alnum:]+._-]' emails.txt
The -o flag will extract the email address only, rather than showing the entire line that contains the email address. This results in a cleaner output.
grep emails
As with most things in Linux, there is more than one way to do this. You could also use egrep and a different set of expressions. But the example above works just fine and is a pretty simple way to extract the email addresses and ignore everything else.
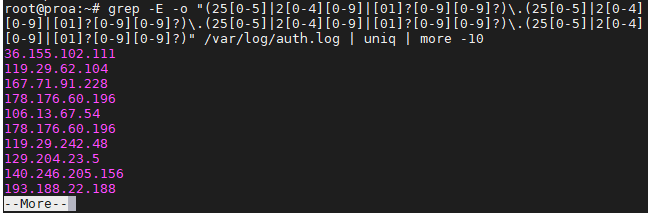
Grep IP addresses
Greping for IP addresses can get a little complex because we can’t just tell grep to look for four numbers separated by dots – well, we could, but that command has the potential to return invalid IP addresses as well.
The following command will find and isolate only valid IPv4 addresses:
$ grep -E -o "(25[0-5]|2[0-4][0-9]|[01]?[0-9][0-9]?)\.(25[0-5]|2[0-4][0-9]|[01]?[0-9][0-9]?)\.(25[0-5]|2[0-4][0-9]|[01]?[0-9][0-9]?)\.(25[0-5]|2[0-4][0-9]|[01]?[0-9][0-9]?)" /var/log/auth.log
We used this on our Ubuntu server just to see where the latest SSH attempts have been made from.
grep IP addresses
To avoid repeat information and prevent it from flooding your screen, you may want to pipe your grep commands to “uniq” and “more” as we did in the screenshot above.
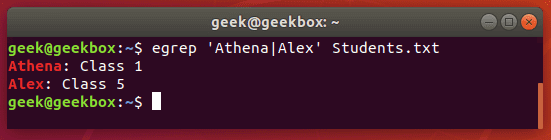
Grep or condition
There are a few different ways you can use an or condition with grep, but we will show you the one that requires the least amount of keystrokes and is easiest to remember:
$ grep -E 'string1|string2' filename
or, technically using egrep is even fewer keystrokes:
$ egrep 'string1|string2' filename
Ignore case sensitivity
By default, grep is case sensitive, which means you have to be precise in the capitalization of your search string. You can avoid this by telling grep to ignore the case with the -i switch.
$ grep -i string filename
grep ignore case
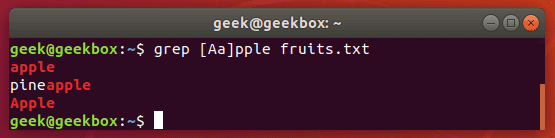
Search with case sensitive
What if we want to search for a string where the first can be uppercase or lowercase, but the rest of the string should be lowercase? Ignoring case with the -i switch won’t work in this case, so a simple way to do it would be with brackets.
$ grep [Ss]tring filename
This command tells grep to be case sensitive except for the first letter.
grep case sensitive
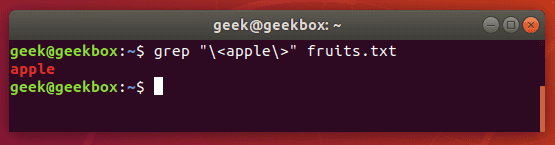
Grep exact match
In our examples above, whenever we search our document for the string “apple”, grep also returns “pineapple” as part of the output. To avoid this, and search for strictly “apple”, you can use this command:
$ grep "\<apple\>" fruits.txt
exact match
You can also use the -w switch, which will tell grep that the string must match the whole line. Obviously, this will only work in situations where you’re not expecting the rest of the line to have any text at all.
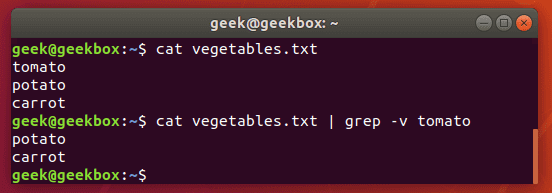
Exclude pattern
To see the contents of a file but exclude patterns from the output, you can use the -v switch.
$ grep -v string-to-exclude filename
exclude pattern
As you can see in the screenshot, the string we excluded is no longer shown when we run the same command with the -v switch.
Grep and replace
A grep command piped to sed can be used to replace all instances of a string in a file. This command will replace “string1” with “string2” in all files relative to the present working directory:
$ grep -rl 'string1' ./ | xargs sed -i 's/string1/string2/g'
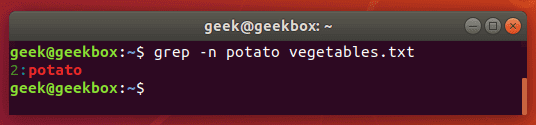
Grep with line number
To show the line number that contains your string, use the -n switch:
$ grep -n string filename
show line numbers
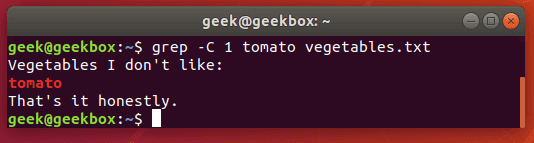
Show lines before and after
If you need a little more context to the grep output, you can show one line before and after your specified search string with the -c switch:
$ grep -c 1 string filename
Specify the number of lines you wish to show – we did only 1 line in this example.
line before and after
Sort the result
Pipe greps output to the sort command to sort your results in some kind of order. The default is alphabetical.
$ grep string filename | sort
line before and after
find
Reference1
Reference2
Reference3
When it comes to locating files or directories on your system, the find command on Linux is unparalleled. It’s simple to use, yet has a lot of different options that allow you to fine-tune your search for files.
Read on to see examples of how you can wield this command to find anything on your system. Every file is only a few keystrokes away once you know how to use the find command in Linux.
Find a directory
You can tell the find command to look specifically for directories with the -type d option. This will make find command only search for matching directory names and not file names.
$ find /path/to/search -type d -name "name-of-dir"
Find directory
Find hidden files
Since hidden files and directories in Linux begin with a period, we can specify this search pattern in our search string in order to recursively list hidden files and directories.
$ find /path/to/search -name ".*"
Find files of a certain size or greater than X
The -size option on find allows us to search for files of a specific size. It can be used to find files of an exact size, files that are larger or smaller than a certain size, or files that fit into a specified size range. Here are some examples:
Search for files bigger than 10MB in size:
$ find /path/to/search -size +10M
Search for files smaller than 10MB in size:
$ find /path/to/search -size -10M
Search for files that are exactly 10MB in size:
$ find /path/to/search -size 10M
Search for files that are between 100MB and 1GB in size:
$ find /path/to/search -size +100M -size -1G
Find from a list of files
If you have a list of files (in a .txt file, for example) that you need to search for, you can search for your list of files with a combination of the find and grep commands. For this command to work, just make sure that each pattern you want to search for is separated by a new line.
$ find /path/to/search | grep -f filelist.txt
The -f option on grep means “file” and allows us to specify a file of strings to be matched with. This results in the find command returning any file or directory names that match those in the list.
Find not in a list
Using that same list of files we mentioned in the previous example, you can also use the find command to search for any files that do not fit the patterns inside the text file. Once again, we’ll use a combination of the find and grep command; we just need an additional option specified with grep:
$ find /path/to/search | grep -vf filelist.txt
The -v option on grep means “inverse match” and will return a list of files that don’t match any of the patterns specified in our list of files.
Set the maxdepth
The find command will search recursively by default. This means that it will search the specified directory for the pattern you specified, as well as any and all subdirectories within the directory you told it to search.
For example, if you tell find to search the root directory of Linux (/), it will search the entire hard drive, no matter how many subdirectories of subdirectories exist. You can circumvent this behavior with the -maxdepth option.
Specify a number after -maxdepth to instruct find on how many subdirectories it should recursively search.
Search for files only in the current directory and don’t search recursively:
$ find . -maxdepth 0 -name "myfile.txt"
Search for files only in the current directory and one subdirectory deeper:
$ find . -maxdepth 1 -name "myfile.txt"
Find empty files (zero-length)
To search for empty files with find, you can use the -empty flag. Search for all empty files:
$ find /path/to/search -type f -empty
Search for all empty directories:
$ find /path/to/search -type d -empty
It is also very handy to couple this command with the -delete option if you’d like to automatically delete the empty files or directories that are returned by find.
Delete all empty files in a directory (and subdirectories):
$ find /path/to/search -type f -empty -delete
Find largest directory or file
If you would like to quickly determine what files or directories on your system are taking up the most room, you can use find to search recursively and output a sorted list of files and/or directories by their size.
How to show the biggest file in a directory:
$ find /path/to/search -type f -printf "%s\t%p\n" | sort -n | tail -1
Notice that the find command was sorted to two other handy Linux utilities: sort and tail. Sort command will put the list of files in order by their size, and the tail command will output only the last file in the list, which is also the largest.
You can adjust the tail command if you’d like to output, for example, the top 5 largest files:
$ find /path/to/search -type f -printf "%s\t%p\n" | sort -n | tail -5
Alternatively, you could use the head command to determine the smallest file(s):
$ find /path/to/search -type f -printf "%s\t%p\n" | sort -n | head -5
If you’d like to search for directories instead of files, just specify “d” in the type option. How to show the biggest directory:
$ find /path/to/search -type d -printf "%s\t%p\n" | sort -n | tail -1
Find setuid set files
Setuid is an abbreviation for “set user ID on execution,” which is a file permission that allows a normal user to run a program with escalated privileges (such as root).
This can be a security concern for obvious reasons, but these files can be easy to isolate with the find command and a few options.
The find command has two options to help us search for files with certain permissions: -user and -perm. To find files that are able to be executed with root privileges by a normal user, you can use this command:
$ find /path/to/search -user root -perm /4000
Find suid files
In the screenshot above, we included the -exec option in order to show a little more output about the files that find returns with. The whole command looks like this:
$ find /path/to/search -user root -perm /4000 -exec ls -l {} \;
You could also substitute “root” in this command for any other user that you want to search for as the owner. Or, you could search for all files with SUID permissions and not specify a user at all:
$ find /path/to/search -perm /4000
Find sgid set files
Finding files with SGID set is almost the same as finding files with SUID, except the permissions for 4000 need to be changed to 2000:
$ find /path/to/search -perm /2000
You can also search for files that have both SUID and SGID set by specifying 6000 in the perms option:
$ find /path/to/search -perm /6000
List files without permission denied
When searching for files with the find command, you must have read permissions on the directories and subdirectories that you’re searching through. If you don’t, find will output an error message but continue to look throughout the directories that you do have permission on.
Permission denied
Although this could happen in a lot of different directories, it will definitely happen when searching your root directory.
That means that when you’re trying to search your whole hard drive for a file, the find command is going to produce a ton of error messages.
To avoid seeing these errors, you can redirect the stderr output of find to stdout and pipe that to grep.
$ find / -name "myfile.txt" 2>%1 | grep -v "Permission denied"
This command uses the -v (inverse) option of grep to show all output except for the lines that say “Permission denied.”
Find modified files within the last X days
Use the -mtime option on the find command to search for files or directories that were modified within the last X days. It can also be used to search for files older than X days, or files that were modified exactly X days ago.
Here are some examples of how to use the -mtime option on the find command:
Search for all files that were modified within the last 30 days:
$ find /path/to/search -type f -mtime -30
Search for all files that were modified more than 30 days ago:
$ find /path/to/search -type f -mtime +30
Search for all files that were modified exactly 30 days ago:
$ find /path/to/search -type f -mtime 30
If you want the find command to output more information about the files it finds, such as the modified date, you can use the -exec option and include an ls command:
$ find /path/to/search -type f -mtime -30 -exec ls -l {} \;
Sort by time
To sort through the results of find by the modified time of the files, you can use the -printf option to list the times in a sortable way, and pipe that output to the sort utility.
$ find /path/to/search -printf "%T+\t%p\n" | sort
This command will sort the files older to newer. If you’d like the newer files to appear first, just pass the -r (reverse) option to sort.
$ find /path/to/search -printf "%T+\t%p\n" | sort -r
Difference between locate and find
The locate command on Linux is another good way to search for files on your system. It’s not packed with a plethora of search options like the find command is, so it’s a bit less flexible, but it still comes in handy.
$ locate myfile.txt
The locate command works by searching a database that contains all the names of the files on the system. The updatedb command updates this database.
Since the locate command doesn’t have to perform a live search of all the files on the system, it’s much more efficient than the find command. But in addition to the lack of options, there’s another drawback: the database of files only updates once per day.
You can update this database of files manually by running the updatedb command:
$ updatedb
The locate command is particularly useful when you need to search the entire hard drive for a file since the find command will naturally take a lot longer, as it has to traverse every single directory in real-time.
If searching a specific directory, known to not contain a large number of subdirectories, it’s better to stick with the find command.
CPU load of find command
When searching through loads of directories, the find command can be resource-intensive. It should inherently allow more important system processes to have priority, but if you need to ensure that the find command takes up fewer resources on a production server, you can use the ionice or nice command.
Monitor CPU usage of the find command:
$ top
Reduce the Input/Output priority of find command:
$ ionice -c3 -n7 find /path/to/search -name "myfile.txt"
Reduce the CPU priority of find command:
$ nice -n 19 find /path/to/search -name "myfile.txt"
Or combine both utilities to really ensure low I/O and low CPU priority:
$ nice -n 19 ionice -c2 -n7 find /path/to/search -name "myfile.txt"
xargs
click here for solution
click here for solution
click here for solution
What is the xargs Command?
The xargs command builds and executes commands provided through the standard input. It takes the input and converts it into a command argument for another command. This feature is particularly useful in file management, where xargs is used in combination with rm, cp, mkdir, and other similar commands.
How to Use the xargs Command With Examples
When used on its own, xargs prompts the user to enter a text string that it then passes to the echo command.
The basic function of the xargs command
The example shows an example input, followed by the output of the echo command.
Note: The echo command is a built-in Linux feature that prints out arguments as the standard output. echo is commonly used to display text strings or command results as messages. Learn about all the different ways you can use the echo command in Linux.
Combine xargs with find
The find command often precedes xargs in a pipeline. Use it to provide a list of files for further processing by xargs. The syntax looks like this:
find [location] -name "[search-term]" -type f | xargs [command]
Using the xargs command with the find command in a pipeline
The example above demonstrates using the find command to find all files with the .sh extension. The list of files is then piped to xargs, which uses the rm command to delete them.
However, xargs does not automatically include files which contain blank spaces in their names. To include those files too, use the -print0 option for find, and the -0 option for xargs:
find [location] -name "[search-term]" -type f -print0 | xargs -0 [command]
Using the xargs command with the find command in a pipeline, using the -print0 and -0 arguments
rm now deletes all the files with the .sh extension.
Combine xargs with grep
Use xargs with the grep command to search for a string in the list of files provided by the find command.
find . -name '[search-term]' | xargs grep '[string-to-find-in-files]'
Using the grep command with xargs to search files for stings
The example above searched for all the files with the .txt extension and piped them to xargs, which then executed the grep command on them.
Xargs Multiple Commands
To run more than one command with xargs, use the -I option. The syntax is:
[command-providing-input] | xargs -I % sh -c '[command-1] %; [command-2] %'
Running multiple commands with the xargs command
In the example, the contents of file4.txt were displayed first. Then mkdir created a folder for each word in the file.
Read Items From File
As mentioned before, xargs reads the standard input. Use the -a option to read the contents of a file instead.
xargs -a [filename]
Using the -a option to tell xargs to read from a file instead of standard input
Find and Archive Images Using tar
When used with the tar command, xargs creates a tar.gz archive and populates it with files provided by the find command.
find [location] -name "[search-term]" -type f -print0 | xargs -0 tar -cvzf [tar-gz-archive-name]
Using the xargs command to compress files into a tar.gz archive
Print Command
To see the commands executed by xargs in standard output, use the -t option.
[command-providing-input] | xargs -t [command]
Using the -t option with xargs to see the commands executed by xargs
In the example above, notice that xargs executed the mkdir command on the entire string provided by echo.
Approve xargs Command Execution
Some xargs operations, like removing files and folders, are irreversible. To control the execution of those commands, use the -p option.
[command-providing-input] | xargs -p [command]
Using the -p option with xargs to approve execution of commands
When you execute the command with the -p option, xargs displays a confirmation line before executing it. Type y to proceed, or n to cancel the operation.
Limit Output per Line
Sometimes it is necessary to control the number of arguments xargs takes at the same time. Perform this action using the -n option followed by the number of arguments you are limiting xargs to:
[command-providing-input] | xargs -n [number] [command]
In the example below, xargs takes the string from the echo command and splits it into three. Then it executes another echo for each of the parts:
Using the -n option to limit the number of arguments xargs passes at the same time
Specify the Delimiter
The default xargs delimiter is a blank space. To change the default delimiter, use the -d command followed by a single character or an escape character such as n (a new line).
[command-providing-input] | xargs -d [new-delimiter] | xargs [command]
In the example below, the xargs command instructs the system to use * as a delimiter and apply mkdir to each of the obtained arguments.
Using a custom delimiter with the xargs command
List All Linux User Accounts on the System
Use xargs to organize the output of the commands, such as cut. Consider the following example:
cut -d: -f1 < /etc/passwd | sort | xargs
The cut command accesses the /etc/passwd file and uses the : delimiter to cut the beginning of each line in the file. The output is then piped to sort, which sorts the received strings, and finally to xargs that displays them:
Using xargs to list all Linux user accounts on the system
Note: For alternative ways to list users, read How to List Users in Linux.
Remove Blank Spaces in String
Since xargs ignores blank spaces when looking for arguments, the command is useful for removing unnecessary blank spaces from strings.
echo "[string-with-unnecessary-spaces]" | xargs
Removing unnecessary blank spaces with xargs
List Number of Lines/Words/Characters in Each File
Use xargs with the wc command to display a list of files with the line, word, and character count.
ls | xargs wc
The example below instructed the ls command to pipe to xargs only the files containing the word “example”. xargs then applied wc to that list:
Using the wc command with xargs
Copy File to Multiple Directories
Copy files to multiple directories using the xargs command. The syntax is simple:
echo [directory-1] [directory-2] | xargs -n 1 cp -v [filename]
Using xargs to copy a file to multiple directories
The echo command provides directory names, and xargs uses the cp command to copy the given file into each of the directories.
sed
click here for solution
click here for solution
click here for solution

Top comments (0)