Why Use Volumes for Persistence?
purpose of data volumes
Docker volume Example
Differences Between Volumes and Bind Mounts
Why is /data given in docker while running container
how to see to see the /data directory inside a Docker container
how to Mounting a Docker Volume to an Existing Directory Inside the Container
How Docker Volumes Enable Data Sharing Between Multiple Containers
how to copy file Copy the File Into the Volume
List out docker volume command
Best Practices for Using Docker Volumes
Common Errors and Solutions
Docker volume Example
Docker volumes are a crucial feature in Docker that addresses the need for persistent and shared data storage when working with containers. Here are several reasons why Docker volumes are essential:
Defination
docker volume is a Docker command used to manage volumes, which are Docker’s preferred method for persisting data generated or used by containers. Volumes provide a way to store data that is independent of the container’s lifecycle, ensuring data is not lost when containers are stopped or removed.
Data Persistence:
Docker containers are ephemeral by nature, meaning that any data stored within the container is lost when the container is removed. Docker volumes allow you to persist data beyond the lifecycle of a container, ensuring that important data is retained even if containers are stopped or removed.
Shared Data Between Containers:
Volumes enable the sharing of data between multiple containers. Containers that need access to the same data, configuration files, or resources can mount a shared volume, allowing them to read and write data to a common storage location.
Database Storage:
For database containers, it's crucial to persist data outside the container to ensure that the data survives container restarts or updates. Docker volumes provide a reliable way to store and manage database data separately from the container itself.
Configuration Files:
Volumes are commonly used to store configuration files that are read by various containers. This allows you to update configurations without modifying the container, making it easier to manage application settings.
External Storage Integration:
Docker volumes can be backed by external storage systems, such as network-attached storage (NAS) or cloud storage. This allows you to decouple your data from the local filesystem, providing flexibility and scalability.
Backup and Restore:
With data stored in volumes, it becomes easier to perform backups and restores. You can back up the data by copying the contents of the volume to a backup location, and in case of a failure, you can restore the data by recreating the volume and copying the data back.
Efficient Data Sharing with Host:
Volumes enable efficient sharing of data between the host and containers. Changes made to files in a volume are immediately reflected both in the container and on the host, making it a convenient mechanism for development workflows.
Containerized Development Environments:
Docker volumes are valuable in containerized development environments, where source code and project files are mounted into containers. This allows developers to use their preferred tools and IDEs while keeping the application code in sync with the containerized environment.
Reduction of Image Size:
By storing data in volumes, you can keep the size of your Docker images smaller. Important and frequently changing data can be stored in volumes, while the container image remains focused on the application code and dependencies.
Isolation of Data:
Docker volumes provide a level of isolation for data, allowing different containers to access the same data without interfering with each other. This isolation is crucial for maintaining the integrity of the data.
In summary, Docker volumes are essential for managing persistent data in Docker containers. They provide a flexible and efficient way to handle data storage, sharing, and persistence, making them a fundamental component in many Dockerized applications.
List Volumes:
docker volume ls
Expected Output:
DRIVER    VOLUME NAME
local     myvolume1
local     myvolume2
This command lists all Docker volumes on the host.
2. Inspect a Volume:
docker volume inspect myvolume1
Expected Output:
[ { "CreatedAt": "2023-11-26T10:00:00Z", "Driver": "local", "Labels": {}, "Mountpoint": "/var/lib/docker/volumes/myvolume1/_data", "Name": "myvolume1", "Options": {}, "Scope": "local" }]
This command provides detailed information about a specific Docker volume (myvolume1).
3. Create a Volume:
docker volume create myvolume3
Expected Output:
myvolume3
This command creates a Docker volume named myvolume3.
4. Remove a Volume:
docker volume rm myvolume2
Expected Output:
myvolume2
This command removes a Docker volume named myvolume2.
5. Prune Unused Volumes:
docker volume prune
Expected Output:
WARNING! This will remove all local volumes not used by at least one container.
Are you sure you want to continue? [y/N]
This command removes all unused local volumes.
6. Mount a Volume in a Container:
docker run -d --name mycontainer -v myvolume1:/app myimage:1.0
Expected Output:
1234567890abcdef1234567890abcdef1234567890abcdef1234567890abcdef
This command runs a container (mycontainer) and mounts the volume (myvolume1) to the /app directory in the container.
7. Mount Multiple Volumes in a Container:
docker run -d --name mycontainer -v myvolume1:/app -v myvolume3:/data myimage:1.0
Expected Output:
1234567890abcdef1234567890abcdef1234567890abcdef1234567890abcdef
This command runs a container (mycontainer) and mounts multiple volumes (myvolume1 and myvolume3) to different directories in the container.
8. View Mounted Volumes in a Container:
docker exec mycontainer ls /app
Expected Output:
file1.txt
file2.txt
This command executes a command in a running container (mycontainer) to list the contents of the /app directory, which is mounted with the volume.
9. Backup Volume Data:
docker run --rm -v myvolume1:/source -v $(pwd):/backup ubuntu tar cvf /backup/myvolume1_backup.tar /source
Expected Output:
file1.txt
file2.txt
This command creates a backup (myvolume1_backup.tar) of the data in the myvolume1 volume.
10. Restore Volume Data:
docker run --rm -v myvolume1:/target -v $(pwd):/backup ubuntu tar xvf /backup/myvolume1_backup.tar -C /target
Expected Output:
This command restores the data from the backup (myvolume1_backup.tar) to the myvolume1 volume.
These Docker volume commands cover a range of volume-related tasks, from listing and inspecting volumes to creating, removing, and managing data within volumes. Adjust the examples based on your specific use case and volume requirements.
Docker volume Example
Creating and Attaching Volumes to Containers
Step 1: Create a Docker Volume
docker volume create mydata
This creates a named volume mydata managed by Docker.
Step 2: Attach the Volume When Running a Container
docker run -d --name mycontainer -v mydata:/app/data nginx
The -v flag syntax is volume_name:container_path.
Data written to /app/data inside the container is stored in the mydata volume and persists even if the container is removed.
Step 3: Inspect and List Volumes
docker volume ls
docker volume inspect mydata
Lists all volumes and shows details for mydata.
Step 4: Using Volumes in Docker Compose
docker-compose.yml:
version: '3'
services:
  web:
    image: nginx
    volumes:
      - mydata:/app/data
volumes:
  mydata:
This ensures persistent storage for the service, and Docker manages the volume lifecycle.
- Managing Persistent Data in Docker Why Persistence Matters By default, data inside a container is lost when the container is removed.
Persistent data is crucial for databases, user uploads, logs, etc.
How to Persist Data
Using Docker Volumes (Recommended)
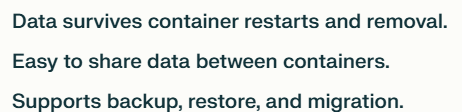
Data in a volume survives container restarts and removal.
Multiple containers can share a volume for collaborative data access.
Example:
docker volume create dbdata
docker run -d --name postgres-db -v dbdata:/var/lib/postgresql/data postgres
The database files are stored in dbdata, not inside the container.
Using Bind Mounts
Mount a host directory for real-time file access or development.
Example:
docker run -d -v /home/user/webdata:/usr/share/nginx/html nginx
Changes on the host path /home/user/webdata are reflected inside the container and vice versa.
Backing Up and Restoring Volumes
Backup:
docker run --rm -v mydata:/volume -v $(pwd):/backup busybox tar czf /backup/mydata.tar.gz -C /volume .
Restore:
docker run --rm -v mydata:/volume -v $(pwd):/backup busybox tar xzf /backup/mydata.tar.gz -C /volume
This ensures your persistent data can be saved and restored.
Cleaning Up Volumes
List unused volumes:
docker volume ls -f dangling=true
Remove a volume:
docker volume rm mydata
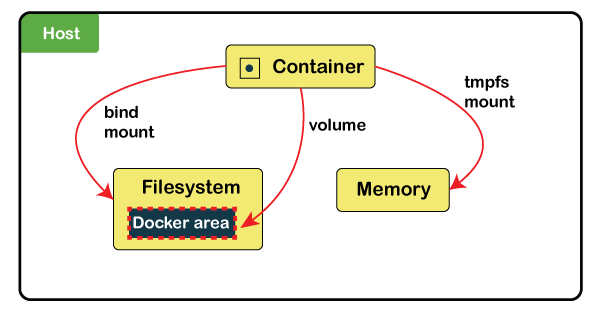
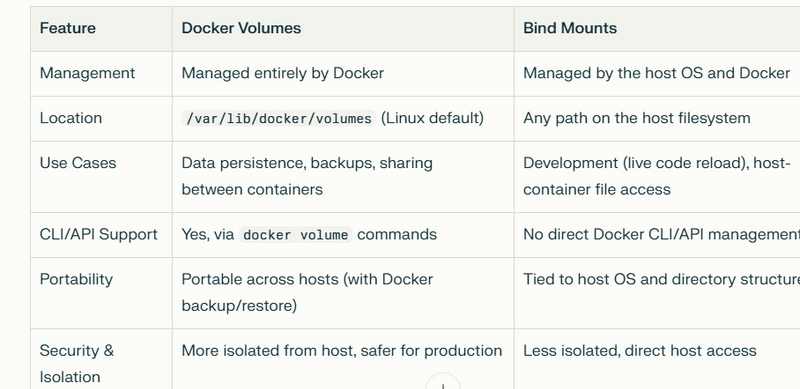
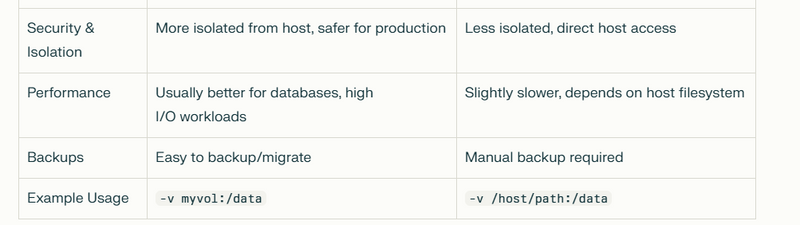
Differences Between Volumes and Bind Mounts
Docker Volume vs. Bind Mount: Key Differences, Examples, and Outputs
What Are They?
Docker Volume:
A volume is a persistent storage mechanism managed entirely by Docker. Volumes are stored in Docker’s internal storage area (usually under /var/lib/docker/volumes/) and are independent of the host’s directory structure. They are ideal for persisting data, sharing data between containers, and for cases where you want Docker to manage storage.
Bind Mount:
A bind mount links a specific file or directory from the host machine directly into a container at a specified path. It uses the host’s absolute path and is not managed by Docker. Any changes made in the mounted directory are immediately reflected both on the host and in the container. Bind mounts are often used for development, debugging, or sharing configuration files
===========Example to create Docker volume==========
Step 1: Create a Volume
docker volume create myvolume
Output:
myvolume
Step 2: Run a Container with the Volume
docker run -d -v myvolume:/data busybox sleep 3600
Output:
<container_id>
Step 3: Inspect the Volume
docker volume inspect myvolume
Output:
[
    {
        "CreatedAt": "...",
        "Driver": "local",
        "Mountpoint": "/var/lib/docker/volumes/myvolume/_data",
        "Name": "myvolume",
        ...
    }
]
The /data directory inside the container is mapped to Docker-managed storage on the host.
==========Example: to create Bind Mount===============
Step 1: Create a Host Directory
mkdir /tmp/bindtest
echo "hello from host" > /tmp/bindtest/file.txt
Step 2: Run a Container with a Bind Mount
docker run -it -v /tmp/bindtest:/data busybox
Inside the Container:
ls /data
Output:
file.txt
cat /data/file.txt
Output:
hello from host
===========Example to create Docker volume==========
=======Another example======================
Step 1: Create a Docker Volume
docker volume create mydata
Step 1: Create and Run the Container with a Volume
docker run -d --name mycontainer -v mydata:/app/data nginx
-v mydata:/app/data
tells Docker to mount the named volume mydata at the path /app/data inside the container.
Any files created or modified in /app/data will be stored in the mydata volume.
Step 2: Add Data to the Volume
Let’s copy a file into /app/data inside the running container:
docker exec mycontainer sh -c "echo Hello, Docker Volume! > /app/data/hello.txt"
This creates a file called hello.txt in the /app/data directory of the container.
The file is actually stored in the mydata volume.
Step 3: Verify Data Persistence
Stop and Remove the Container:
docker stop mycontainer
docker rm mycontainer
Start a New Container with the Same Volume:
docker run -d --name mycontainer2 -v mydata:/app/data nginx
Check the Data:
docker exec mycontainer2 cat /app/data/hello.txt
Output:
Hello, Docker Volume!
Result: The file hello.txt is still present, even though the original container was deleted. The data persisted because it was stored in the Docker volume, not in the container's ephemeral filesystem.
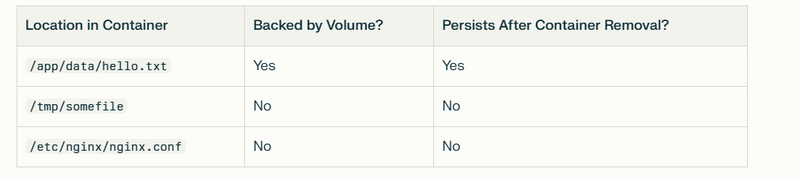
What Data Persists?
All files and subdirectories created inside the mount point (/app/data in this example) are persisted in the volume.
Data outside the volume mount point (e.g., /tmp, /etc/nginx) is not persisted and will be lost if the container is removed.
Why Use Volumes for Persistence
Purpose of data volumes
Why Use Docker Volumes?
Docker volumes are the preferred mechanism for persisting and managing data generated by and used in Docker containers. They are designed to solve the challenge of data persistence in containerized environments, where containers are typically ephemeral and stateless.
Purpose of Docker Volumes
- Data Persistence
Volumes store data outside the container’s writable layer, ensuring that data is not lost when a container is stopped, removed, or recreated.
This is essential for databases, user uploads, logs, and any data that must survive container restarts or upgrades.
- Data Sharing Between Containers
Multiple containers can mount the same volume, enabling them to share data easily and efficiently.
This is useful for scenarios like web servers and application containers sharing static files or logs.
- Backup and Restore
Volumes can be easily backed up and restored using Docker CLI commands, making data management and disaster recovery straightforward.
- Improved Performance
Volumes are managed by Docker and optimized for performance, especially on Linux systems.
They often provide better I/O performance compared to bind mounts, particularly for database workloads.
- Security and Isolation
Volumes are isolated from the host filesystem, reducing the risk of accidental data leaks or unauthorized access.
Docker manages the lifecycle and permissions of volumes, adding an extra layer of security.
- Portability and Environment Consistency
Volumes are portable and can be easily moved or replicated across different environments, ensuring consistency between development, testing, and production setups.
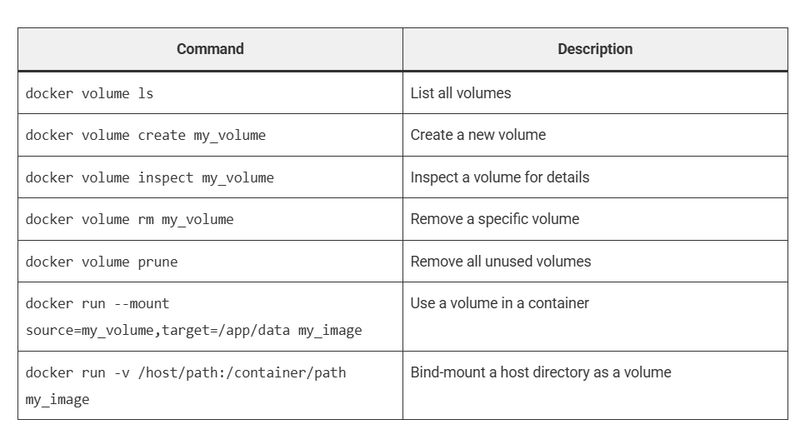
List out docker volume command
Basic Syntax
docker volume [COMMAND]
Code language: CSS (css)
Common docker volume Commands:
create: Create a new volume.
ls: List all volumes.
inspect: Display detailed information about a volume.
rm: Remove a volume.
prune: Remove all unused volumes.
docker volume create myvolume
docker volume ls
docker volume inspect myvolume
docker volume rm myvolume
docker volume prune
docker volume prune:This removes all dangling volumes (volumes not associated with any container).
Use a Volume When Running a Container
docker run -d --name my_app --mount source=my_volume,target=/app/data my_image
Code language: JavaScript (javascript)
This runs my_app with my_volume mounted at /app/data.
Bind-Mount a Local Directory as a Volume
docker run -d --name my_app -v /path/on/host:/app/data my_image
Code language: JavaScript (javascript)
This mounts the host directory /path/on/host into the container at /app/data.
Share a Volume Between Multiple Containers
docker run -d --name app1 --mount source=my_shared_volume,target=/shared my_image
docker run -d --name app2 --mount source=my_shared_volume,target=/shared my_image
Both app1 and app2 can read and write to my_shared_volume.
Backup a Volume
docker run --rm -v my_volume:/data -v $(pwd):/backup alpine tar cvf /backup/my_volume_backup.tar /data
Code language: JavaScript (javascript)
This creates a backup of my_volume as my_volume_backup.tar.
Restore a Volume from Backup
docker run --rm -v my_volume:/data -v $(pwd):/backup alpine tar xvf /backup/my_volume_backup.tar -C /data
Code language: JavaScript (javascript)
This restores my_volume from the backup file.
Use Named Volumes in Docker Compose
docker-compose.yml example:
version: "3"
services:
  web:
    image: nginx
    volumes:
      - my_volume:/usr/share/nginx/html

volumes:
  my_volume:
Code language: JavaScript (javascript)
This sets up a persistent volume my_volume for the web service.
Best Practices for Using Docker Volumes
- Use named volumes for persistent storage instead of bind mounts for portability and easier management.
- Regularly prune unused volumes to avoid consuming disk space.
- Backup important volumes before upgrading Docker or containers.
- Use labels to organize and identify volumes.
- Inspect volumes to monitor storage usage and location (Mountpoint) .
Common Errors and Solutions
“Volume not found”
→ Ensure the volume exists by running docker volume ls.
“Cannot remove volume in use”
→ Stop and remove the container using the volume before deleting it: docker rm -f my_container docker volume rm my_volume
“Permission denied”
→ Ensure the correct file permissions on the host directory for bind mounts.
“Volume takes too much disk space”
→ Use docker system df to analyze disk usage and remove unused volumes with docker volume prune.
Why is /data given in docker while running container
docker run -v myvolume:/data <image>
the /data part specifies the path inside the container where the volume will be mounted.
Explanation
myvolume: This is the name of the Docker-managed volume (created with docker volume create myvolume).
/data: This is the directory inside the container where the contents of myvolume will be accessible.
So, any files written to /data inside the container will actually be stored in the myvolume volume on the host. This allows you to persist data, share it between containers, or back it up easily.
Example
docker run -v myvolume:/data busybox
If you create a file at /data/hello.txt inside the container, it will be stored in the myvolume volume on the host.
If you run another container with -v myvolume:/data, it will see the same file at /data/hello.txt.
Why is /data given?
It tells Docker where inside the container to mount the volume.
You can change /data to any path you want inside the container, such as /app, /var/lib/mysql, etc.
The left side (myvolume) is the source (the volume), and the right side (/data) is the destination (the path inside the container
how to see to see the /data directory inside a Docker container
List Files/Directories Inside a Running Container
Example:
docker exec <container_id_or_name> ls /
Sample Output:
bin data dev etc home proc root sys tmp usr var
To view contents of a specific directory (e.g., /data):
docker exec <container_id_or_name> ls /data
Sample Output:
file1.txt
- Start a New Container and List Files You can use an interactive shell to explore the filesystem:
docker run -it --rm -v myvolume:/data busybox sh
Inside the container, run:
ls /data
Sample Output:
hello.txt
Show Tree Structure (if tree is installed)
If the tree command is available in your container, you can use:
docker exec <container_id_or_name> tree /data
Sample Output:
/data
├── hello.txt
└── myfolder
    └── notes.txt
Example: Full Folder Structure Output
Suppose you mounted a volume at /data and created some files:
docker run -it --rm -v myvolume:/data busybox sh
# Inside container:
cd /data
touch file1.txt
mkdir docs
touch docs/readme.md
ls -R /data
Sample Output:
/data:
docs  file1.txt

/data/docs:
readme.md
how to Mounting a Docker Volume to an Existing Directory Inside the Container
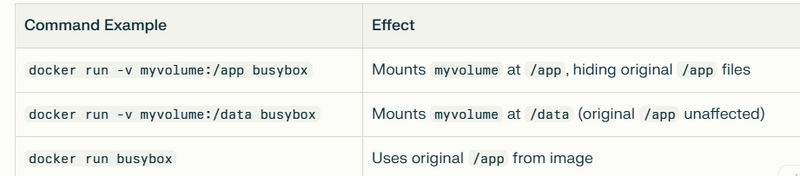
You can absolutely mount a Docker volume to any directory inside your container, including a directory like /app that already exists within the container image.
How It Works
When you use:
docker run -v myvolume:/app busybox
The contents of the myvolume Docker volume will be mounted to the /app directory inside the container.
If /app already exists in the container image:
The mount will "hide" (overlay) the original contents of /app while the container is running. You will only see the contents of the volume (myvolume) inside /app for that container session.
Example
Suppose your container image has a directory /app with some files (e.g., main.py).
Run the container with the volume mounted at /app:
docker run -it -v myvolume:/app busybox sh
Inside the container:
ls /app
If myvolume is empty, /app will appear empty.
If myvolume has files, those files will be shown in /app.
If you want to see the original /app contents:
You must run the container without the -v myvolume:/app mount, or use a different mount point.
How Docker Volumes Enable Data Sharing Between Multiple Containers
docker run -d --name app1 --mount source=my_shared_volume,target=/shared my_image
docker run -d --name app2 --mount source=my_shared_volume,target=/shared my_image
How Docker Volumes Enable Data Sharing Between Multiple Containers
Docker volumes are a powerful feature that allow containers to share and persist data. Here’s a step-by-step guide to understanding and using Docker volumes for sharing data between containers.
What Is a Docker Volume?
A volume is a storage area managed by Docker, separate from the container’s own filesystem.
Volumes persist data even if the container is stopped or removed.
Multiple containers can mount the same volume, enabling them to read and write shared data.
Step-by-Step Example: Sharing Data Between Two Containers
Step 1: Create a Docker Volume
docker volume create shared-data
This creates a volume named shared-data managed by Docker.
Step 2: Start the First Container and Mount the Volume
docker run -it --name container1 -v shared-data:/data ubuntu
This starts a container named container1 with the shared-data volume mounted at /data inside the container.
Step 3: Write Data in the Volume
Inside container1, create a file in /data:
echo "Hello from container1" > /data/hello.txt
This file is now stored in the shared-data volume.
Exit the container:
Step 4: Start the Second Container and Mount the Same Volume
docker run -it --name container2 -v shared-data:/data ubuntu
This starts another container named container2, mounting the same shared-data volume at /data.
Step 5: Read the Shared Data in the Second Container
Inside container2, check the contents of /data:
cat /data/hello.txt
Output:
Hello from container1
The file created by container1 is visible and accessible to container2 because both containers share the same Docker volume.
Step 6: (Optional) Write New Data from the Second Container
You can also add more data from container2:
echo "Hello from container2" >> /data/hello.txt
=================Another Example of Docker Volumes Enable Data Sharing Between Multiple Containers============
Create a Docker Volume
First, create a named Docker volume (if you haven’t already):
docker volume create shared-data
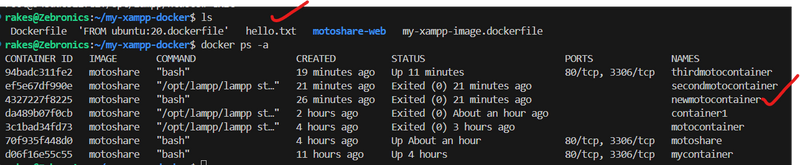
- Start the First Container With the Volume Run your container, mounting the volume to a suitable path. For your requirement, you want the file to end up at /opt/lampp/htdocs/hello.txt. So, mount the volume at /opt/lampp/htdocs:
docker run -it --name newmotocontainer -v shared-data:/opt/lampp/htdocs motoshare bash
This command creates and starts a container named newmotocontainer from the motoshare image.
The shared-data volume is mounted at /opt/lampp/htdocs inside the container.
- Create the File Inside the Container Once inside the running container shell, create your file:
echo "Hello from motoshare" > /opt/lampp/htdocs/hello.txt
4 .Start Another Container With the Same Volume
docker run -it --name thirdmotocontainer -v shared-data:/opt/lampp/htdocs motoshare bash
output


Copy the File Into the Volume
docker run -it --name newcontainer -v shared-data:/opt/lampp/htdocs motoshare bash
docker cp ./hello.txt newcontainer:/opt/lampp/htdocs/hello.txt
output
=======another example============
docker run -d --name app1 --mount source=my_shared_volume,target=/shared my_image
docker run -d --name app2 --mount source=my_shared_volume,target=/shared my_image
Both app1 and app2 can read and write to my_shared_volume.
docker run -d --name sevenmotocontainer --mount source=new_shared_volume,target=/opt/lampp/htdocs motoshare

docker run -d --name eightmotocontainer --mount source=new_shared_volume,target=/opt/lampp/htdocs motoshare
docker exec sevenmotocontainer bash -c 'echo "Hello from sevenmotocontainer!" > /opt/lampp/htdocs/news.txt'
Verify the File Is Shared
To confirm the file is visible in both containers, run:
docker exec sevenmotocontainer cat /opt/lampp/htdocs/hello.txt
docker exec eightmotocontainer cat /opt/lampp/htdocs/hello.txt
docker-volume
understand-docker-volume-from-beginner-to-deep-dive-level
docker-volume

Top comments (0)