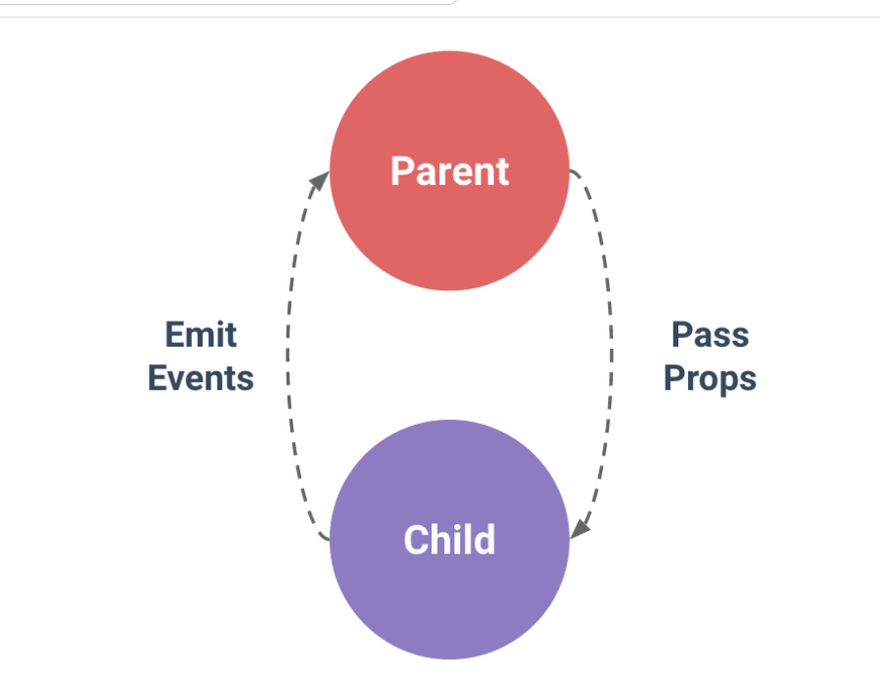
Update parent data from the child component
how-to-pass-data-from-child-to-parent-in-vue-js
props
emitting
pass-data-from-child-to-parent-in-vuejs-is-it-so-complicated
https://stackoverflow.com/questions/63623285/vue-js-pass-data-from-one-child-component-to-another-with-the-same-parent
passing-data-from-a-child-component-to-the-parents-pop-in-vuejs
how-to-use-props-in-vuejs
vue-props
VIDEO
Parent to Child Communication using this Props
Prop Validation with Type Checks and Prop Casing (Camel Case) in Vue js
Child - Parent Communication using the $emit to send the Custom Events
QUESTION
when data pass from one component to another component then we use
Solution:props
IS props are unidirectional or bidirectional?
Solution:unidirectional
it is unidirectional because it passes only data pass data parent to child not child to parent.
how to pass data child to parent ?
Solution:props
how to pass data parent to child ?
Solution:emit
What is Difference between data and props in VueJS
displaying-a-simple-list-using-data-and-props-in-vuejs
data-and-props-in-vuejs
Passing Props to Vue Components Instantiated by Vue Router
solving-common-vue-problems-props-and-routes-and-more
Props
how-to-use-props-in-vuejs
vue-props
What are Props in Vue.js?
In simple terms, props are the acronym of properties. Props are very essential when we want to pass data from the parent components to other child components. Props always take the top to bottom approach.
That is props can only take the flow from parent to child components and not vice versa. Props can also be of various types such as strings, arrays, objects, numbers, Boolean, and even Functions.
Data in props can only flow one way – from the top, or parent component, to the bottom, or child components. This simply means you cannot pass data from a child to a parent.
Another thing to keep in mind is that Props are read-only and cannot be modified by the child component because the parent component "owns" that value.
Why should you use props?
Why should you use props, you ask? If you have a data object (say, of the Billboard top 10 artists list) you want to display in two different components but in very different ways, the first instinct will be to create these two separate components, add the array inside the data object and then display them in the template.
Define a prop inside the component
Props are the way components can accept data from components that include them (parent components).
When a component expects one or more props, it must define them in its props property:
Vue.component('user-card', {
  props: ['name'],
  template: '<p>Hi {{ name }}</p>'
})
or, in a Vue Single File Component:
<template>
  <p>Hi {{ name }}</p>
</template>

<script>
export default {
  props: ['name']
}
</script>
Accept multiple props
You can have multiple props by appending them to the array:
Vue.component('user-card', {
  props: ['firstName', 'lastName'],
  template: '<p>Hi {{ firstName }} {{ lastName }}</p>'
})
or, in a Vue Single File Component:

<template>
  <p>Hi {{ firstName }} {{ lastName }}</p>
</template>

<script>
export default {
  props: ['firstName', 'lastName']
}
</script>
Vue.js Prop Types
To specify the type of prop you want to use in Vue, you will use an object instead of an array. You'll use the name of the property as the key of each property, and the type as the value.
If the type of the data passed does not match the prop type, Vue sends an alert (in development mode) in the console with a warning. The valid types you can use are:
- String
- Number
- Boolean
- Array
- Object
- Date
- Function
- Symbol
Vue.component('user-card', {
  props: {
    firstName: String,
    lastName: String
  },
  template: '<p>Hi {{ firstName }} {{ lastName }}</p>'
})
or, in a Vue Single File Component:
<template>
  <p>Hi {{ firstName }} {{ lastName }}</p>
</template>

<script>
export default {
  props: {
    firstName: String,
    lastName: String
  },
}
</script>
You can allow multiple different value types:
props: {
  firstName: [String, Number]
}
Set a prop to be mandatory
You can require a prop to be mandatory:
props: {
  firstName: {
    type: String,
    required: true
  },
  lastName: {
    type: String,
    required: true
  }
}
Set the default value of a prop
You can specify a default value:
props: {
  firstName: {
    type: String,
    required: true,
    default: 'Alex'
  },
  lastName: {
    type: String,
    required: true,
    default: 'Mark'
  }
}
For objects:
props: {
  user: {
    type: Object,
    default: {
      firstName: 'Unknown',
      lastName: ''
    }
  }
}
default can also be a function that returns an appropriate value, rather than being the actual value.
Passing props to the component
You pass a prop to a component using the syntax
if what you pass is a static value.
If it’s a data property, you use
<template>
  <ComponentName :name="name" />
</template>

<script>
export default {
  data: function() {
    return {
      name: 'Alex'
    }
  },
}
</script>
You can use a ternary operator inside the prop value to check a truthy condition and pass a value that depends on it:
<template>
  <ComponentName :name="name == '' ? 'Alex' : name" />
</template>

<script>
export default {
  data: function() {
    return {
      name: ''
    }
  },
}
</script>
Validating your Vue Props like a Pro
validating-your-vue-props-like-a-pro
Validating your Vue Props
it provides a powerful built-in mechanism to validate this data. This acts as a contract between the component and the consumer and ensures that the component is used as intended.
Let's explore this powerful tool which can help us reduce bugs and increase our confidence during development and debugging.
The basics
Primitive types
Validating primitive types is as easy as setting the type option to the primitive type constructor.
export default {
  props: {
    // Basic type check
    //  (`null` and `undefined` values will allow any type)
    propA: Number,
    // Multiple possible types
    propB: [String, Number],
    // Required string
    propC: {
      type: String,
      required: true
    },
    // Number with a default value
    propD: {
      type: Number,
      default: 100
    },
    // Object with a default value
    propE: {
      type: Object,
      // Object or array defaults must be returned from
      // a factory function. The function receives the raw
      // props received by the component as the argument.
      default(rawProps) {
        return { message: 'hello' }
      }
    },
    // Custom validator function
    propF: {
      validator(value) {
        // The value must match one of these strings
        return ['success', 'warning', 'danger'].includes(value)
      }
    },
    // Function with a default value
    propG: {
      type: Function,
      // Unlike object or array default, this is not a factory function - this is a function to serve as a default value
      default() {
        return 'Default function'
      }
    }
  }
}
Additional details:
All props are optional by default, unless required: true is specified.
An absent optional prop other than Boolean will have undefined value.
The Boolean absent props will be cast to false. You can change this by setting a default for it — i.e.: default: undefined to behave as a non-Boolean prop.
If a default value is specified, it will be used if the resolved prop value is undefined - this includes both when the prop is absent, or an explicit undefined value is passed.
When prop validation fails, Vue will produce a console warning (if using the development build).
Note
Note that props are validated before a component instance is created, so instance properties (e.g. data, computed, etc.) will not be available inside default or validator functions.
Runtime Type Checks#
The type can be one of the following native constructors:
- String
- Number
- Boolean
- Array
- Object
- Date
- Function
- Symbol In addition, type can also be a custom class or constructor function and the assertion will be made with an instanceof check. For example, given the following class:
js
class Person {
  constructor(firstName, lastName) {
    this.firstName = firstName
    this.lastName = lastName
  }
}
You could use it as a prop's type:
js
export default {
  props: {
    author: Person
  }
}
Vue will use instanceof Person to validate whether the value of the author prop is indeed an instance of the Person class.
Boolean Casting#
Props with Boolean type has special casting rules to mimic the behavior of native boolean attributes. Given a with the following declaration:
js
export default {
  props: {
    disabled: Boolean
  }
}
The component can be used like this:
template
When a prop is declared to allow multiple types, e.g.
js
export default {
  props: {
    disabled: [Boolean, Number]
  }
}
Props Declaration
Vue components require explicit props declaration so that Vue knows what external props passed to the component should be treated as fallthrough attributes (which will be discussed in its dedicated section).
Props are declared using the props option:
export default {
  props: ['foo'],
  created() {
    // props are exposed on `this`
    console.log(this.foo)
  }
}
In addition to declaring props using an array of strings, we can also use the object syntax:
export default {
  props: {
    title: String,
    likes: Number
  }
}
For each property in the object declaration syntax, the key is the name of the prop, while the value should be the constructor function of the expected type.
This not only documents your component, but will also warn other developers using your component in the browser console if they pass the wrong type.
Prop Passing Details#
Prop Name Casing#
We declare long prop names using camelCase because this avoids having to use quotes when using them as property keys, and allows us to reference them directly in template expressions because they are valid JavaScript identifiers:
js
export default {
  props: {
    greetingMessage: String
  }
}
template
<span>{{ greetingMessage }}</span>
Technically, you can also use camelCase when passing props to a child component (except in DOM templates). However, the convention is using kebab-case in all cases to align with HTML attributes:
template
<MyComponent greeting-message="hello" />
We use PascalCase for component tags when possible because it improves template readability by differentiating Vue components from native elements. However, there isn't as much practical benefit in using camelCase when passing props, so we choose to follow each language's conventions.
Static vs. Dynamic Props#
So far, you've seen props passed as static values, like in:
template
<BlogPost title="My journey with Vue" />
You've also seen props assigned dynamically with v-bind or its : shortcut, such as in:
template
<BlogPost :title="post.title" />
<BlogPost :title="post.title + ' by ' + post.author.name" />
Passing Different Value Types
In the two examples above, we happen to pass string values, but any type of value can be passed to a prop.
- Number
- template
<!-- Even though
42is static, we need v-bind to tell Vue that --> <!-- this is a JavaScript expression rather than a string. -->
<BlogPost :likes="42" />
<BlogPost :likes="post.likes" />
Boolean
template
<BlogPost is-published />
<BlogPost :is-published="false" />
<BlogPost :is-published="post.isPublished" />
Array
template
<BlogPost :comment-ids="[234, 266, 273]" />
<BlogPost :comment-ids="post.commentIds" />
Object
template
<BlogPost
  :author="{
    name: 'Veronica',
    company: 'Veridian Dynamics'
  }"
 />
<BlogPost :author="post.author" />
Binding Multiple Properties Using an Object
If you want to pass all the properties of an object as props, you can use v-bind without an argument (v-bind instead of :prop-name). For example, given a post object:
js
export default {
  data() {
    return {
      post: {
        id: 1,
        title: 'My Journey with Vue'
      }
    }
  }
}
The following template:
template
<BlogPost v-bind="post" />
Will be equivalent to:

template
<BlogPost :id="post.id" :title="post.title" />
One-Way Data Flow
All props form a one-way-down binding between the child property and the parent one: when the parent property updates, it will flow down to the child, but not the other way around. This prevents child components from accidentally mutating the parent's state, which can make your app's data flow harder to understand.
In addition, every time the parent component is updated, all props in the child component will be refreshed with the latest value. This means you should not attempt to mutate a prop inside a child component. If you do, Vue will warn you in the console:
js
export default {
  props: ['foo'],
  created() {
    // ❌ warning, props are readonly!
    this.foo = 'bar'
  }
}
There are usually two cases where it's tempting to mutate a prop:
The prop is used to pass in an initial value; the child component wants to use it as a local data property afterwards. In this case, it's best to define a local data property that uses the prop as its initial value:
js
export default {
  props: ['initialCounter'],
  data() {
    return {
      // counter only uses this.initialCounter as the initial value;
      // it is disconnected from future prop updates.
      counter: this.initialCounter
    }
  }
}
The prop is passed in as a raw value that needs to be transformed. In this case, it's best to define a computed property using the prop's value:
js
export default {
  props: ['size'],
  computed: {
    // computed property that auto-updates when the prop changes
    normalizedSize() {
      return this.size.trim().toLowerCase()
    }
  }
}
Mutating Object / Array Props
When objects and arrays are passed as props, while the child component cannot mutate the prop binding, it will be able to mutate the object or array's nested properties. This is because in JavaScript objects and arrays are passed by reference, and it is unreasonably expensive for Vue to prevent such mutations.
The main drawback of such mutations is that it allows the child component to affect parent state in a way that isn't obvious to the parent component, potentially making it more difficult to reason about the data flow in the future. As a best practice, you should avoid such mutations unless the parent and child are tightly coupled by design. In most cases, the child should emit an event to let the parent perform the mutation.
Emits
how-to-pass-data-from-child-to-parent
Child - Parent Communication using the $emit to send the Custom Events
In this article I will show you how to pass data from child to parent in vue.
We know that if we want to send data from parent to child we can use props but for the reverse case we have to use a different approach to achieve this.
<template>

  <h1>{{ title }}</h1>

  <Child @changeTitle="ChangeT($event)" />

</template>
<script>
import Child from "./components/Child"
export default{
name:'App',
components: {
    Child,
},
data()
{
   return{
     title:'Rick Grimes'
         }
},
methods:{
    ChangeT(title)
    {
      this.title=title;
    },
}
</script>
<style></style>
Child.vue
<template lang="html">
  <button type="button" @click='passEvent'> Update me</button>
</template>

<script>
export default {
  name:'Child',
  methods:{
    passEvent()
    {
      this.$emit('changeTitle','Awesome ')
    }
  }
}
</script>

<style lang="css" scoped>
</style>
In child.vue we are using a method named $emit this method takes 2 arguments first the custom event and the second is the data we are passing
**changeTitle **is the custom event
'Awesome' is the data we are passing to parent
in App.vue we are calling a method named 'ChangeT($event)' on the event 'changeTitle' (it is custom event you can name as your preferences)
when the ChangeT function called it takes the parameter which we are passing from child in this case $event='Awesome'
then we are simply changes the data value with this $event value
Now we have successfully passed data from child to parent in vue
What is Difference between data and props in VueJS
displaying-a-simple-list-using-data-and-props-in-vuejs
data-and-props-in-vuejs
**Data **is used to define properties in a particular component. In an SFC, data is a function that returns a set of properties that has been defined in the function.
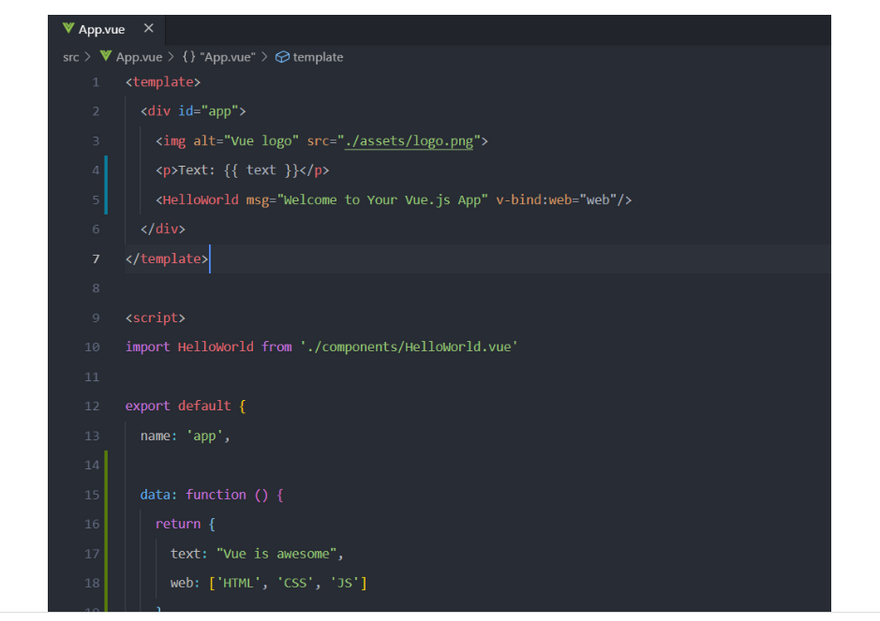
If we wanted to add a text property to our App.vue component, we would do it using data as shown in the script:
export default {
name: 'app',
data: function () {
return {
text: "Vue is awesome"
}
},
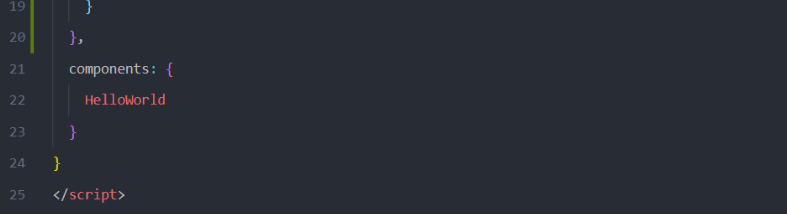
components: {
HelloWorld
}
}
Accessing this text property, that we have just defined in the template, would require us to use a data binding technique known as Interpolation.
To display the content of text in a template, add a paragraph tag to the template in App.vue:
<p>Text: {{ text }} </p>
Now, run the application using the npm run serve command in the command line interface. The text gets displayed just under the Vue logo.
- Passing data to another component. This is where props come in; with props, we can define a property in one component and then pass it to another component. Let’s try passing an array of basic web technologies from the main component (App.vue) to the child component (HelloWorld.vue).
Now, let’s define another property (web) in the data
export default {
  name: 'app',
  data: function () {
    return {
      ...
      web: ['HTML', 'CSS', 'JS']
    }
  },
  components: {
    HelloWorld
  }
}
This new property web, is an array of strings that we’re going to pass to the HelloWorld component, which we already have registered in the App component.
In the template, notice that we have already nested the HelloWorld component in the parent div, and that data is being passed to it from the app component. This is part of the default Vue landing page setup:
But, we are going to pass another data as a prop and receive it in the HelloWorld component using the v-bind directive. The v-bind directive is a built-in Vue directive that allows us to bind to any data we are passing, as long as the data can be dynamic.
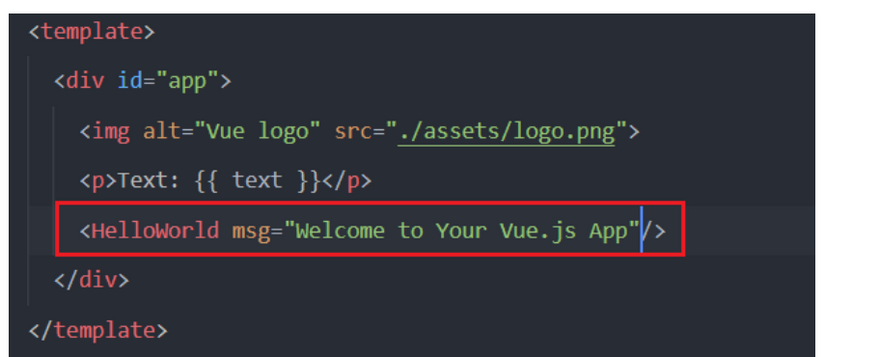
Still, in the template section of the App component, modify the tag to look like this:
<HelloWorld msg="Welcome to Your Vue.js App" v-bind:web="web"/>
Notice that the content of msg is specified when passing it as a prop to the HelloWorld component, in a case as such the v-bind is not needed.
The App component’s template and script should now look like this:
Now, to receive the newly passed prop in the HelloWorld component, open up the component and, in the script section, specify the name of the prop you are receiving (the name after the v-bind:). In this case, the name of the prop is web. Also, Vue requires us to specify the data type which is Array. The script section should look like this:
<script>
export default {
  name: 'HelloWorld',
  props: {
    msg: String,
    web: Array
  }
}
</script>
Now, we can access the web prop in the HelloWorld component. To display it as a list in the template, we will use another directive called v-for. The v-for directive is used to iterate through and render a list of items based on an array. The v-for directive requires a special syntax in the form of item in items, where “items” is the source data array and “item” is an alias for the array element being iterated on. We can then use the interpolation technique to display each item.
Add the line below anywhere in the template of your HelloWorld component.
<li v-for="item in web">{{item}}</li>
Now, you may get a warning in your editor saying elements in iterations expect to have a v-bind:key directive. What this means is that each item in the list requires a unique identifier in order to track them; so, we are going to add an index and bind the key to the index. Modify the line to look like the following:
<li v-for="(item, index) in web" v-bind:key="index">{{item}}</li>
Refresh your app in the browser and you should see both the text and the web list.
Passing Props to Vue Components Instantiated by Vue Router
solving-common-vue-problems-props-and-routes-and-more
Passing Props to Vue Components Instantiated by Vue Router
We can pass props to the component that are instantiated by Vue Router by passing our props straight into router-view .
For example, we can write:
<router-view :prop="value"></router-view>
Then in our components, we write:
props: {
  prop: String
},
Then our component can access the prop prop.
The type of prop is a string, so we can pass a string to router-view and access them in the route components with this.prop .

Top comments (0)