Explain following commands
- grep
- find
- xargs
- sed
- chmod
- netstat
- route
- record
- vmstat
- visudo
- awk
df –k
du –sh
top
uptime
ps –eaf | grep
ping
tail –f
iostat
free
kill -9
mount
sar
ifconfig eth0 | enable | disable
traceroute
netstat -r
nslookup
mpstat
-losf
- route
check log file
search word in vi editor

Some Usefull Questions on LINUX
netstat-command
Refrence
what do you mean by port are listening or established.
Find a Process That Is Using a Particular Port*(IMP).
what do you mean by local and foreighn address.
syntax to list All Ports and Connections,List All TCP Ports,List All UDP Ports,List Only TCP or UDP Listening Ports,Display statistics for all ports regardless of the protocol,Statistics for UDP/TCP Ports.
Display Numerical Addresses, Host Addresses, Port Numbers.
Display PID to specific port connection .
how to print netstat information every second.
how to List All netstat Commands
**netstat-command-2618098*
Show Specific Connections Only
Show Active TCP Connections and Process Identifiers
referene
To display both the Ethernet statistics and the statistics for all protocols, type:
To display the statistics for only the TCP and UDP protocols, type:
To display active TCP connections and the process IDs every 5 seconds, type:
To display active TCP connections and the process IDs using numerical form, type:
referene
Show Specific Connections Only
Show Protocol-Specific Stats
Show Updated Network Stats
Route
referene
referene
referene
referene
1.explain subnetmask,gateway,interface,metric,genmask
2.what are the ways to display routing table
- what do you mean by default routing
- how to add static routing
Vmstat
referene
referene
referene
referene
referene
referene
solution for question
1.Explain the topic active memory,inactive memory,Free memory.
Buffer memory,Cache memory,Swap.
2.why vmstat command used .
3.Explain different section of vmstat output .
4.Explain vmstat [options] [delay [count]]
visudo
referene
referene
referene
referene
.
1.What is sudo command in linux?
2.What is /etc/sudoers file?
3.What is purpose of visudo.
4.Explain four types of aliases.
5.How to give root user all of the superuser privileges.
6.How to user can run all commands on all hosts, as all users and groups.
7.you want is enable another user with the same powers as root
8.you want is enable another user with the only run certain commands
9.how to give superuser permissions to groups.
10.you want is enable another user with the only run certain commands using Cmnd_Alias
11.how to enable some user_alias to use some privileges to some Cmnd_Alias
- how to Search custom commands using pipe grep .
- allow user to run any commands without password
referene
referene
referene
referene
referene
referene
referene
.
.
1.What is awk command in linux and why we use it?
2.What are the Variables In Awk.
3.Explain follwing terms from referene
- Awk option
- Awk Preprocessing and Postprocessing
- Built-in Variables
- User Defined Variables
- Structured Commands
- loop
- Formatted Printing
- Built-In Functions
- String Functions
- User Defined Functions 4.How to prints every line of data from the specified file. ? 5.How to prints Name and Salary fields from the specified file(two methods)’. . 6.How to prints every line of data from the specified file. 7.What are the Built-In Variables In Awk. 8.How to prints all the lines along with the line number. 9.How to prints the line number 3 to 6.
10.How To print the first item along with the row number(NR) separated with ” – “ from each line in geeksforgeeks.txt
11.How To return the second column/item from geeksforgeeks.txt.
12.How To print any non empty line if present
13.How To count the lines in a file
- How to To find the length of the longest line present in the file .
- How to Printing lines with more than 10 characters
16.How To find/check for any string in any specific column.
17.How To print the squares of first numbers from 1 to n say 6
18.How To To separate the output by a '-' of given file.
- How Calculate the sum of a particular column .
- How to Printing lines with more than 10 characters
grep
$ ls | grep Documents
$ ls | grep 'My Documents'
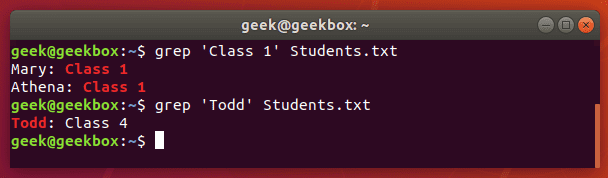
$ grep 'Class 1' Students.txt
$ grep -e 'Class 1' -e Todd Students.txt
$ egrep p\{2} fruits.txt
or

$ grep -E p\{2} fruits.txt
$ pgrep sshd
$ zgrep apple fruits.txt.gz
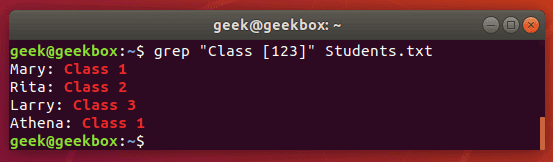
$ grep "Class [123]" Students.txt
$ grep "^Class" Students.txt
$ grep "Class [^1-2]" Students.txt

$ grep "1$" Students.txt
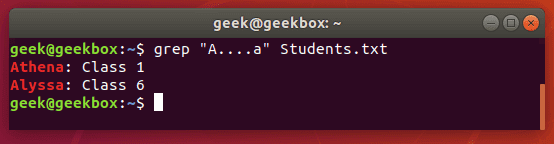
$ grep "A….a" Students.txt
$ zgrep word-to-search /path/to/file.gz
$ zcat file.gz | grep word-to-search
$ grep -o '[[:alnum:]+._-]@[[:alnum:]+._-]' emails.txt
$ grep -E -o "(25[0-5]|2[0-4][0-9]|[01]?[0-9][0-9]?)\.(25[0-5]|2[0-4][0-9]|[01]?[0-9][0-9]?)\.(25[0-5]|2[0-4][0-9]|[01]?[0-9][0-9]?)\.(25[0-5]|2[0-4][0-9]|[01]?[0-9][0-9]?)" /var/log/auth.log
$ grep -E 'string1|string2' filename
or, technically using egrep is even fewer keystrokes:
$ egrep 'string1|string2' filename
$ grep -i string filename
$ grep [Ss]tring filename
$ grep "\<apple\>" fruits.txt
$ grep -v string-to-exclude filename
$ grep -rl 'string1' ./ | xargs sed -i 's/string1/string2/g'
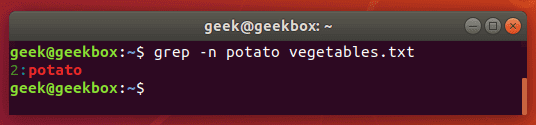
$ grep -n string filename
$ grep -c 1 string filename
Specify the number of lines you wish to show – we did only 1 line in this example.
$ grep string filename | sort
line before and after
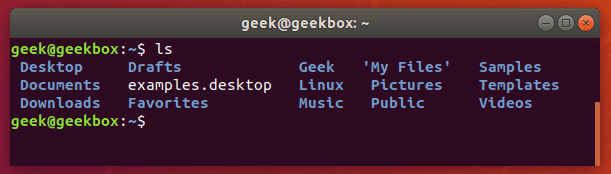
Grep is a command-line tool that Linux users use to search for strings of text. You can use it to search a file for a certain word or combination of words, or you can pipe the output of other Linux commands to grep, so grep can show you only the output that you need to see.
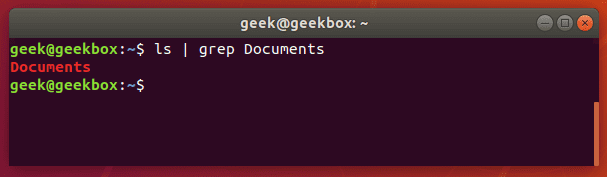
$ ls | grep Documents
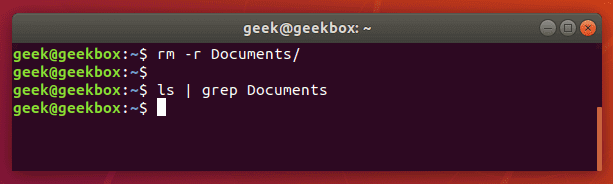
If the Documents folder didn’t exist, grep wouldn’t return any output. So if grep returns nothing, that means that it couldn’t find the word you are searching for.
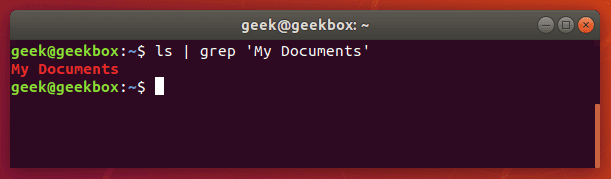
Find a string
If you need to search for a string of text, rather than just a single word, you will need to wrap the string in quotes. For example, what if we needed to search for the “My Documents” directory instead of the single-worded “Documents” directory?
$ ls | grep 'My Documents'
Grep will accept both single quotes and double quotes, so wrap your string of text with either.
While you can use grep to search the output piped from other command-line tools, you can also use it to search documents directly. Here’s an example where we search a text document for a string.
$ grep 'Class 1' Students.txt
Find multiple strings
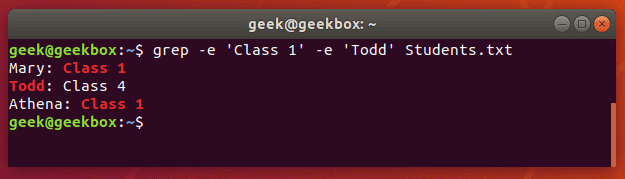
You can also use grep to find multiple words or strings. You can specify multiple patterns by using the -e switch. Let’s try searching a text document for two different strings:
$ grep -e 'Class 1' -e Todd Students.txt
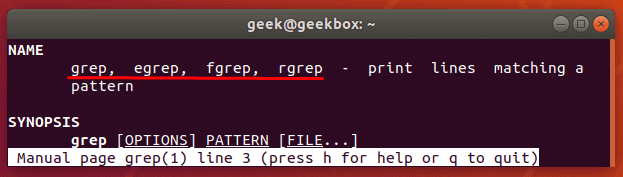
Difference between grep, egrep fgrep, pgrep, zgrep
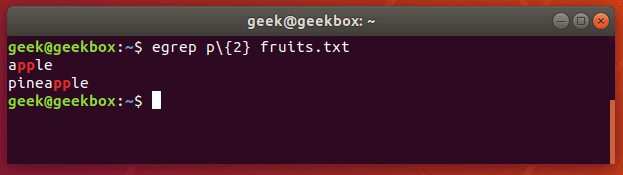
Let’s search a text document for strings that contain two consecutive ‘p’ letters:
$ egrep p\{2} fruits.txt
or

$ grep -E p\{2} fruits.txt
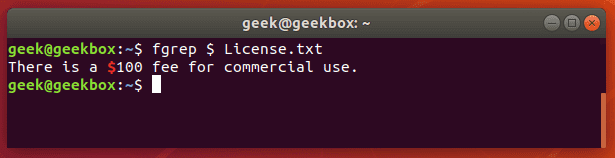
fgrep is the equivalent of grep -F
This switch will interpret a pattern as a list of fixed strings, and try to match any of them. It’s useful when you need to search for regular expression characters. This means you don’t have to escape special characters like you would with regular grep.
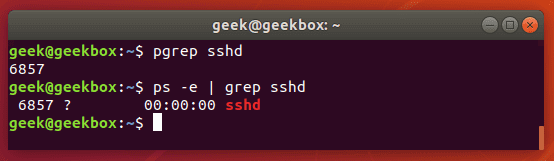
pgrep is a command to search for the name of a running process on your system and return its respective process IDs. For example, you could use it to find the process ID of the SSH daemon:
$ pgrep sshd
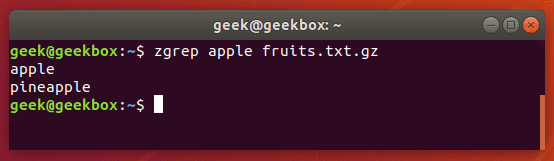
You can use zgrep to search compressed files for a pattern. It allows you to search the files inside of a compressed archive without having to first decompress that archive, basically saving you an extra step or two.
$ zgrep apple fruits.txt.gz
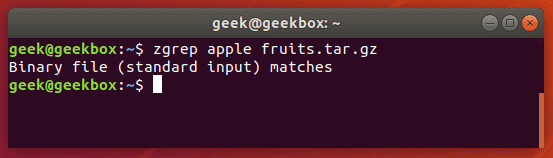
zgrep also works on tar files, but only seems to go as far as telling you whether or not it was able to find a match.
*Using regular expressions *
$ grep "Class [123]" Students.txt
This command will return any lines that say ‘Class 1’, ‘Class2’, or ‘Class 3’.
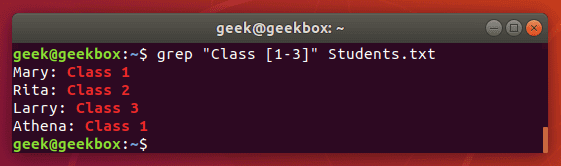
[-] brackets with a hyphen can be used to specify a range of characters, either numerical or alphabetical.
We get the same output as before, but the command is much easier to type, especially if we had a bigger range of numbers or letters.
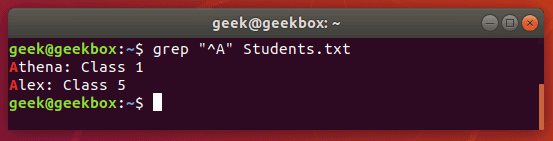
^ caret is used to search for a pattern that only occurs at the beginning of a line.
$ grep "^Class" Students.txt
[^] brackets with caret are used to exclude characters from a search pattern.
$ grep "Class [^1-2]" Students.txt
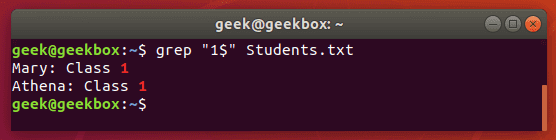
$ dollar sign is used to search for a pattern that only occurs at the end of a line.
$ grep "1$" Students.txt
. dot is used to match any one character, so it’s a wildcard but only for a single character.
$ grep "A….a" Students.txt
Grep gz files without unzipping
As we showed earlier, you can use the zgrep command to search through compressed files without having to unzip them first.
$ zgrep word-to-search /path/to/file.gz
You can also use the zcat command to display the contents of a gz file and then pipe that output to grep to isolate the lines containing your search string.
$ zcat file.gz | grep word-to-search
zcat
Grep email addresses from a zip file
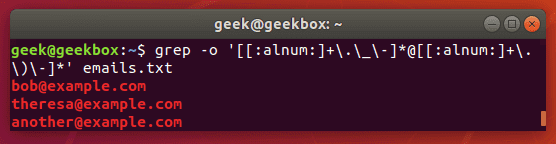
We can use a fancy regular expression to extract all the email addresses from a zip file.
$ grep -o '[[:alnum:]+._-]@[[:alnum:]+._-]' emails.txt
The -o flag will extract the email address only, rather than showing the entire line that contains the email address. This results in a cleaner output.
grep emails
As with most things in Linux, there is more than one way to do this. You could also use egrep and a different set of expressions. But the example above works just fine and is a pretty simple way to extract the email addresses and ignore everything else.
Grep IP addresses
Greping for IP addresses can get a little complex because we can’t just tell grep to look for four numbers separated by dots – well, we could, but that command has the potential to return invalid IP addresses as well.
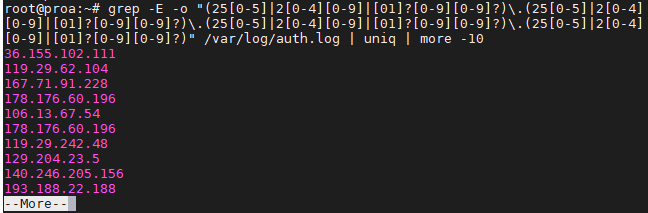
The following command will find and isolate only valid IPv4 addresses:
$ grep -E -o "(25[0-5]|2[0-4][0-9]|[01]?[0-9][0-9]?)\.(25[0-5]|2[0-4][0-9]|[01]?[0-9][0-9]?)\.(25[0-5]|2[0-4][0-9]|[01]?[0-9][0-9]?)\.(25[0-5]|2[0-4][0-9]|[01]?[0-9][0-9]?)" /var/log/auth.log
We used this on our Ubuntu server just to see where the latest SSH attempts have been made from.
grep IP addresses
To avoid repeat information and prevent it from flooding your screen, you may want to pipe your grep commands to “uniq” and “more” as we did in the screenshot above.
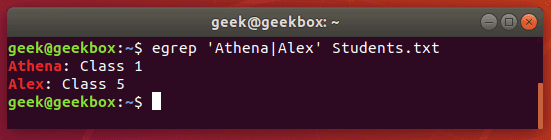
Grep or condition
There are a few different ways you can use an or condition with grep, but we will show you the one that requires the least amount of keystrokes and is easiest to remember:
$ grep -E 'string1|string2' filename
or, technically using egrep is even fewer keystrokes:
$ egrep 'string1|string2' filename
Ignore case sensitivity
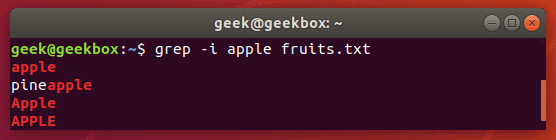
By default, grep is case sensitive, which means you have to be precise in the capitalization of your search string. You can avoid this by telling grep to ignore the case with the -i switch.
$ grep -i string filename
grep ignore case
Search with case sensitive
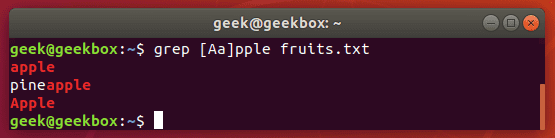
What if we want to search for a string where the first can be uppercase or lowercase, but the rest of the string should be lowercase? Ignoring case with the -i switch won’t work in this case, so a simple way to do it would be with brackets.
$ grep [Ss]tring filename
This command tells grep to be case sensitive except for the first letter.
grep case sensitive
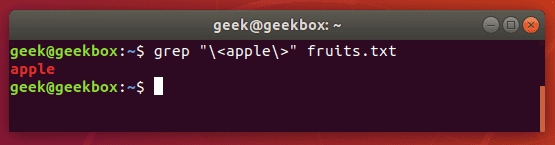
Grep exact match
In our examples above, whenever we search our document for the string “apple”, grep also returns “pineapple” as part of the output. To avoid this, and search for strictly “apple”, you can use this command:
$ grep "\<apple\>" fruits.txt
exact match
You can also use the -w switch, which will tell grep that the string must match the whole line. Obviously, this will only work in situations where you’re not expecting the rest of the line to have any text at all.
Exclude pattern
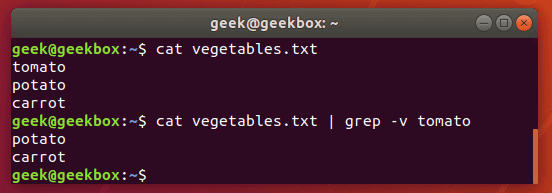
To see the contents of a file but exclude patterns from the output, you can use the -v switch.
$ grep -v string-to-exclude filename
exclude pattern
As you can see in the screenshot, the string we excluded is no longer shown when we run the same command with the -v switch.
Grep and replace
A grep command piped to sed can be used to replace all instances of a string in a file. This command will replace “string1” with “string2” in all files relative to the present working directory:
$ grep -rl 'string1' ./ | xargs sed -i 's/string1/string2/g'
Grep with line number
To show the line number that contains your string, use the -n switch:
$ grep -n string filename
show line numbers
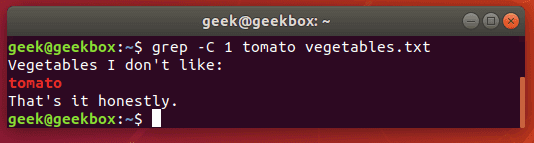
Show lines before and after
If you need a little more context to the grep output, you can show one line before and after your specified search string with the -c switch:
$ grep -c 1 string filename
Specify the number of lines you wish to show – we did only 1 line in this example.
line before and after
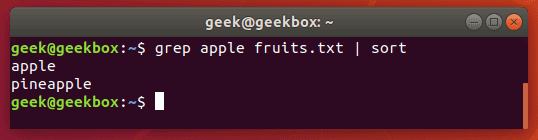
Sort the result
Pipe greps output to the sort command to sort your results in some kind of order. The default is alphabetical.
$ grep string filename | sort
line before and after
find
Reference1
Reference2
Reference3
1. Find Files Using Name in Current Directory
Find all the files whose name is tecmint.txt in a current working directory.
# find . -name tecmint.txt

./tecmint.txt
2. Find Files Under Home Directory
Find all the files under /home directory with the name tecmint.txt.
# find /home -name tecmint.txt

/home/tecmint.txt
3. Find Files Using Name and Ignoring Case
Find all the files whose name is tecmint.txt and contains both capital and small letters in /home directory.
# find /home -iname tecmint.txt

./tecmint.txt
./Tecmint.txt
4. Find Directories Using Name
Find all directories whose name is Tecmint in / directory.
# find / -type d -name Tecmint

/Tecmint
5. Find PHP Files Using Name
Find all php files whose name is tecmint.php in a current working directory.
# find . -type f -name tecmint.php

./tecmint.php
6. Find all PHP Files in the Directory
Find all php files in a directory.
# find . -type f -name "*.php"

./tecmint.php
./login.php
./index.php
7. Find Files With 777 Permissions
Find all the files whose permissions are 777.
# find . -type f -perm 0777 -print
8. Find Files Without 777 Permissions
Find all the files without permission 777.
# find / -type f ! -perm 777
9. Find SGID Files with 644 Permissions
Find all the SGID bit files whose permissions are set to 644.
# find / -perm 2644
10. Find Sticky Bit Files with 551 Permissions
Find all the Sticky Bit set files whose permission is 551.
# find / -perm 1551
11. Find SUID Files
Find all SUID set files.
# find / -perm /u=s
12. Find SGID Files
Find all SGID set files.
# find / -perm /g=s
[ You might also like: How to Find Files With SUID and SGID Permissions in Linux ]
13. Find Read-Only Files
Find all Read-Only files.
# find / -perm /u=r
14. Find Executable Files
Find all Executable files.
# find / -perm /a=x
15. Find Files with 777 Permissions and Chmod to 644
Find all 777 permission files and use the chmod command to set permissions to 644.
# find / -type f -perm 0777 -print -exec chmod 644 {} \;
16. Find Directories with 777 Permissions and Chmod to 755
Find all 777 permission directories and use the chmod command to set permissions to 755.
# find / -type d -perm 777 -print -exec chmod 755 {} \;
17. Find and remove single File
To find a single file called tecmint.txt and remove it.
# find . -type f -name "tecmint.txt" -exec rm -f {} \;
18. Find and remove Multiple File
To find and remove multiple files such as .mp3 or .txt, then use.
# find . -type f -name "*.txt" -exec rm -f {} \;

OR

# find . -type f -name "*.mp3" -exec rm -f {} \;
19. Find all Empty Files
To find all empty files under a certain path.
# find /tmp -type f -empty
20. Find all Empty Directories
To file all empty directories under a certain path.
# find /tmp -type d -empty
21. File all Hidden Files
To find all hidden files, use the below command.
# find /tmp -type f -name ".*"
22. Find Single File Based on User
To find all or single files called tecmint.txt under / root directory of owner root.
# find / -user root -name tecmint.txt
23. Find all Files Based on User
To find all files that belong to user Tecmint under /home directory.
# find /home -user tecmint
24. Find all Files Based on Group
To find all files that belong to the group Developer under /home directory.
# find /home -group developer
25. Find Particular Files of User
To find all .txt files of user Tecmint under /home directory.
# find /home -user tecmint -iname "*.txt"
26. Find Last 50 Days Modified Files
To find all the files which are modified 50 days back.
# find / -mtime 50
27. Find Last 50 Days Accessed Files
To find all the files which are accessed 50 days back.
# find / -atime 50
28. Find Last 50-100 Days Modified Files
To find all the files which are modified more than 50 days back and less than 100 days.
# find / -mtime +50 –mtime -100
29. Find Changed Files in Last 1 Hour
To find all the files which are changed in the last 1 hour.
# find / -cmin -60
30. Find Modified Files in Last 1 Hour
To find all the files which are modified in the last 1 hour.
# find / -mmin -60
31. Find Accessed Files in Last 1 Hour
To find all the files which are accessed in the last 1 hour.
# find / -amin -60
32. Find 50MB Files
To find all 50MB files, use.
# find / -size 50M
33. Find Size between 50MB – 100MB
To find all the files which are greater than 50MB and less than 100MB.
# find / -size +50M -size -100M
34. Find and Delete 100MB Files
To find all 100MB files and delete them using one single command.
# find / -type f -size +100M -exec rm -f {} \;
35. Find Specific Files and Delete
Find all .mp3 files with more than 10MB and delete them using one single command.
# find / -type f -name *.mp3 -size +10M -exec rm {} \;
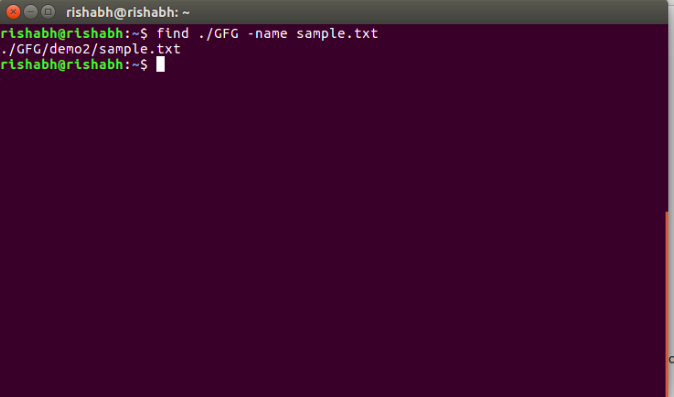
36.Search a file with specific name.
$ find ./GFG -name sample.txt
It will search for sample.txt in GFG directory.
Output :
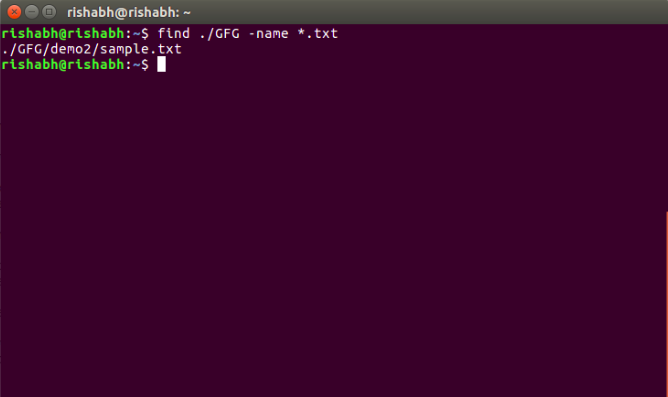
37. Search a file with pattern.
$ find ./GFG -name *.txt
It will give all files which have ‘.txt’ at the end.
Output :
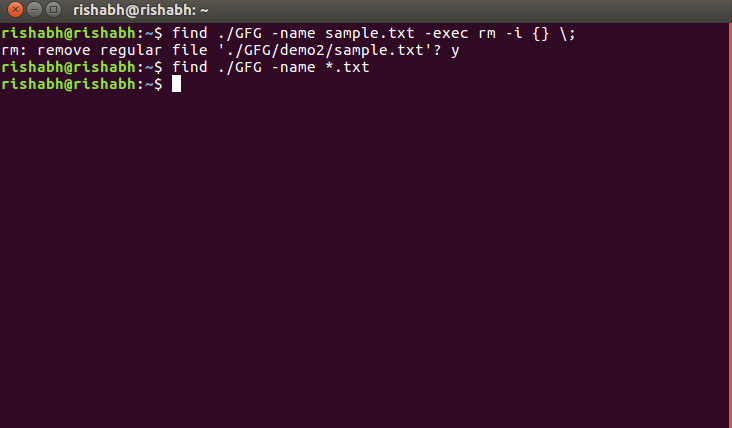
*38. How to find and delete a file with confirmation. *
$ find ./GFG -name sample.txt -exec rm -i {} \;
When this command is entered, a prompt will come for confirmation, if you want to delete sample.txt or not. if you enter ‘Y/y’ it will delete the file. Output :
When it comes to locating files or directories on your system, the find command on Linux is unparalleled. It’s simple to use, yet has a lot of different options that allow you to fine-tune your search for files.
Read on to see examples of how you can wield this command to find anything on your system. Every file is only a few keystrokes away once you know how to use the find command in Linux.
Find a directory
You can tell the find command to look specifically for directories with the -type d option. This will make find command only search for matching directory names and not file names.
$ find /path/to/search -type d -name "name-of-dir"
Find directory
Find hidden files
Since hidden files and directories in Linux begin with a period, we can specify this search pattern in our search string in order to recursively list hidden files and directories.
$ find /path/to/search -name ".*"
Find files of a certain size or greater than X
The -size option on find allows us to search for files of a specific size. It can be used to find files of an exact size, files that are larger or smaller than a certain size, or files that fit into a specified size range. Here are some examples:
Search for files bigger than 10MB in size:
$ find /path/to/search -size +10M
Search for files smaller than 10MB in size:

$ find /path/to/search -size -10M
Search for files that are exactly 10MB in size:
$ find /path/to/search -size 10M
Search for files that are between 100MB and 1GB in size:
$ find /path/to/search -size +100M -size -1G
Find from a list of files
If you have a list of files (in a .txt file, for example) that you need to search for, you can search for your list of files with a combination of the find and grep commands. For this command to work, just make sure that each pattern you want to search for is separated by a new line.
$ find /path/to/search | grep -f filelist.txt
The -f option on grep means “file” and allows us to specify a file of strings to be matched with. This results in the find command returning any file or directory names that match those in the list.
Find not in a list
Using that same list of files we mentioned in the previous example, you can also use the find command to search for any files that do not fit the patterns inside the text file. Once again, we’ll use a combination of the find and grep command; we just need an additional option specified with grep:
$ find /path/to/search | grep -vf filelist.txt
The -v option on grep means “inverse match” and will return a list of files that don’t match any of the patterns specified in our list of files.
Set the maxdepth
The find command will search recursively by default. This means that it will search the specified directory for the pattern you specified, as well as any and all subdirectories within the directory you told it to search.
For example, if you tell find to search the root directory of Linux (/), it will search the entire hard drive, no matter how many subdirectories of subdirectories exist. You can circumvent this behavior with the -maxdepth option.
Specify a number after -maxdepth to instruct find on how many subdirectories it should recursively search.
Search for files only in the current directory and don’t search recursively:
$ find . -maxdepth 0 -name "myfile.txt"
Search for files only in the current directory and one subdirectory deeper:
$ find . -maxdepth 1 -name "myfile.txt"
Find empty files (zero-length)
To search for empty files with find, you can use the -empty flag. Search for all empty files:
$ find /path/to/search -type f -empty
Search for all empty directories:
$ find /path/to/search -type d -empty
It is also very handy to couple this command with the -delete option if you’d like to automatically delete the empty files or directories that are returned by find.
Delete all empty files in a directory (and subdirectories):
$ find /path/to/search -type f -empty -delete
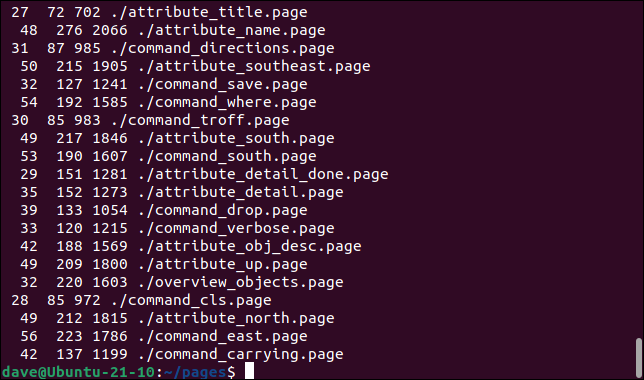
Find largest directory or file
If you would like to quickly determine what files or directories on your system are taking up the most room, you can use find to search recursively and output a sorted list of files and/or directories by their size.
How to show the biggest file in a directory:
$ find /path/to/search -type f -printf "%s\t%p\n" | sort -n | tail -1
Notice that the find command was sorted to two other handy Linux utilities: sort and tail. Sort command will put the list of files in order by their size, and the tail command will output only the last file in the list, which is also the largest.
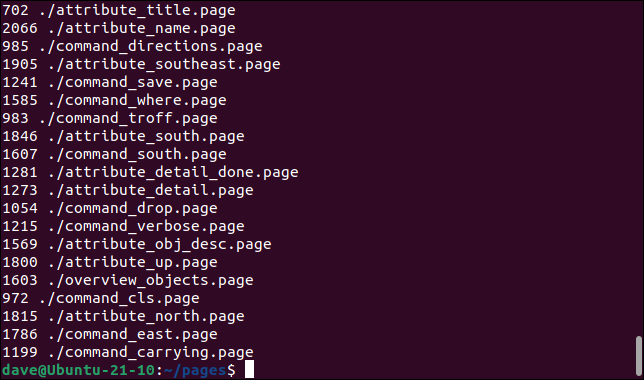
You can adjust the tail command if you’d like to output, for example, the top 5 largest files:
$ find /path/to/search -type f -printf "%s\t%p\n" | sort -n | tail -5
Alternatively, you could use the head command to determine the smallest file(s):
$ find /path/to/search -type f -printf "%s\t%p\n" | sort -n | head -5
If you’d like to search for directories instead of files, just specify “d” in the type option. How to show the biggest directory:
$ find /path/to/search -type d -printf "%s\t%p\n" | sort -n | tail -1
Find setuid set files
Setuid is an abbreviation for “set user ID on execution,” which is a file permission that allows a normal user to run a program with escalated privileges (such as root).
This can be a security concern for obvious reasons, but these files can be easy to isolate with the find command and a few options.
The find command has two options to help us search for files with certain permissions: -user and -perm. To find files that are able to be executed with root privileges by a normal user, you can use this command:
$ find /path/to/search -user root -perm /4000
Find suid files
In the screenshot above, we included the -exec option in order to show a little more output about the files that find returns with. The whole command looks like this:
$ find /path/to/search -user root -perm /4000 -exec ls -l {} \;
You could also substitute “root” in this command for any other user that you want to search for as the owner. Or, you could search for all files with SUID permissions and not specify a user at all:
$ find /path/to/search -perm /4000
Find sgid set files
Finding files with SGID set is almost the same as finding files with SUID, except the permissions for 4000 need to be changed to 2000:
$ find /path/to/search -perm /2000
You can also search for files that have both SUID and SGID set by specifying 6000 in the perms option:
$ find /path/to/search -perm /6000
List files without permission denied
When searching for files with the find command, you must have read permissions on the directories and subdirectories that you’re searching through. If you don’t, find will output an error message but continue to look throughout the directories that you do have permission on.
Permission denied
Although this could happen in a lot of different directories, it will definitely happen when searching your root directory.
That means that when you’re trying to search your whole hard drive for a file, the find command is going to produce a ton of error messages.
To avoid seeing these errors, you can redirect the stderr output of find to stdout and pipe that to grep.
$ find / -name "myfile.txt" 2>%1 | grep -v "Permission denied"
This command uses the -v (inverse) option of grep to show all output except for the lines that say “Permission denied.”
Find modified files within the last X days
Use the -mtime option on the find command to search for files or directories that were modified within the last X days. It can also be used to search for files older than X days, or files that were modified exactly X days ago.
Here are some examples of how to use the -mtime option on the find command:
Search for all files that were modified within the last 30 days:
$ find /path/to/search -type f -mtime -30
Search for all files that were modified more than 30 days ago:
$ find /path/to/search -type f -mtime +30
Search for all files that were modified exactly 30 days ago:
$ find /path/to/search -type f -mtime 30
If you want the find command to output more information about the files it finds, such as the modified date, you can use the -exec option and include an ls command:
$ find /path/to/search -type f -mtime -30 -exec ls -l {} \;
Sort by time
To sort through the results of find by the modified time of the files, you can use the -printf option to list the times in a sortable way, and pipe that output to the sort utility.
$ find /path/to/search -printf "%T+\t%p\n" | sort
This command will sort the files older to newer. If you’d like the newer files to appear first, just pass the -r (reverse) option to sort.
$ find /path/to/search -printf "%T+\t%p\n" | sort -r
How to Use the find Command in Linux
Using find With xargs
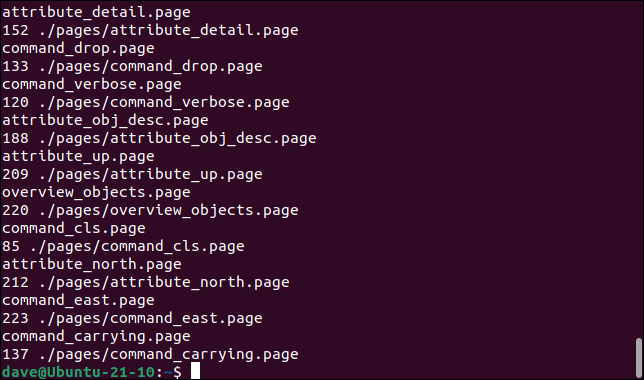
We can use find with xargs to some action performed on the files that are found. This is a long-winded way to go about it, but we could feed the files found by find into xargs , which then pipes them into tar to create an archive file of those files. We’ll run this command in a directory that has many help system PAGE files in it.
find ./ -name "*.page" -type f -print0 | xargs -0 tar -cvzf page_files.tar.gz

Piping the output from find through xargs and into tar
The command is made up of different elements.
find ./ -name “*.page” -type f -print0: The find action will start in the current directory, searching by name for files that match the “.page” search string. Directories will not be listed because we’re specifically telling it to look for files only, with *-type f.** The print0 argument tells find to not treat whitespace as the end of a filename. This means that that filenames with spaces in them will be processed correctly.
xargs -o: The -0 arguments xargs to not treat whitespace as the end of a filename.
tar -cvzf page_files.tar.gz: This is the command xargs is going to feed the file list from find to. The tar utility will create an archive file called “page_files.tar.gz.”
We can use ls to see the archive file that is created for us.
ls *.gz

This command pipes all the filenames into wc at once. Effectively, xargs constructs a long command line for wc with each of the filenames in it.
find . -name "*.page" -type f -print0 | xargs -0 wc
The lines, words, and characters for each file are printed, together with a total for all files.
If we use xarg‘s -I (replace string) option and define a replacement string token—in this case ” {}“—the token is replaced in the final command by each filename in turn. This means wc is called repeatedly, once for each file.


find . -name "*.page" -type f -print0 | xargs -0 -I "{}" wc "{}"
The output isn’t nicely lined up. Each invocation of wc operates on a single file so wc has nothing to line the output up with. Each line of output is an independent line of text.

The find -exec Option
The find command has a built-in method of calling external programs to perform further processing on the filenames that it returns. The -exec (execute) option has a syntax similar to but different from the xargs command.
find . -name "*.page" -type f -exec wc -c "{}" \;

This will count the words in the matching files. The command is made up of these elements.
find .: Start the search in the current directory. The find command is recursive by default, so subdirectories will be searched too.
-name “.page”: **We’re looking for files with names that match the “.page” search string.
**-type f: We’re only looking for files, not directories.
-exec wc: We’re going to execute the wc command on the filenames that are matched with the search string.
-w: Any options that you want to pass to the command must be placed immediately following the command.
“{}”: The “{}” placeholder represents each filename and must be the last item in the parameter list.
**\;: **A semicolon “;” is used to indicate the end of the parameter list. It must be escaped with a backslash “\” so that the shell doesn’t interpret it.
When we run that command we see the output of wc. The -c (byte count) limits its output to the number of bytes in each file.
As you can see there is no total. The wc command is executed once per filename. By substituting a plus sign “+” for the terminating semicolon “;” we can change -exec‘s behaviour to operate on all files at once.
find . -name "*.page" -type f -exec wc -c "{}" \+
We get the summary total and neatly tabulated results that tell us all files were passed to wc as one long command line.

*Using the Filename More Than Once *

If you want to chain several commands together you can do so, and you can use the “{}” replace string in each command.
find . -name "*.page" -type f -exec bash -c "basename "{}" && words-only "{}"" \;
If we cd up a level out of the “pages” directory and run that command, find will still discover the PAGE files because it searches recursively. The filename and path are passed to our words-only function just as before. Purely for reasons of demonstrating using -exec with two commands, we’re also calling the basename command to see the name of the file without its path.
Both the basename command and the words-only shell function have the filenames passed to them using a “{}” replace string.
Difference between locate and find
The locate command on Linux is another good way to search for files on your system. It’s not packed with a plethora of search options like the find command is, so it’s a bit less flexible, but it still comes in handy.
$ locate myfile.txt
The locate command works by searching a database that contains all the names of the files on the system. The updatedb command updates this database.
Since the locate command doesn’t have to perform a live search of all the files on the system, it’s much more efficient than the find command. But in addition to the lack of options, there’s another drawback: the database of files only updates once per day.
You can update this database of files manually by running the updatedb command:
$ updatedb
The locate command is particularly useful when you need to search the entire hard drive for a file since the find command will naturally take a lot longer, as it has to traverse every single directory in real-time.
If searching a specific directory, known to not contain a large number of subdirectories, it’s better to stick with the find command.
CPU load of find command
When searching through loads of directories, the find command can be resource-intensive. It should inherently allow more important system processes to have priority, but if you need to ensure that the find command takes up fewer resources on a production server, you can use the ionice or nice command.
Monitor CPU usage of the find command:
$ top
Reduce the Input/Output priority of find command:
$ ionice -c3 -n7 find /path/to/search -name "myfile.txt"
Reduce the CPU priority of find command:
$ nice -n 19 find /path/to/search -name "myfile.txt"
Or combine both utilities to really ensure low I/O and low CPU priority:
$ nice -n 19 ionice -c2 -n7 find /path/to/search -name "myfile.txt"
xargs
click here for solution
click here for solution
click here for solution
What is the xargs Command?
The xargs command builds and executes commands provided through the standard input. It takes the input and converts it into a command argument for another command. This feature is particularly useful in file management, where xargs is used in combination with rm, cp, mkdir, and other similar commands.
How to Use the xargs Command With Examples
When used on its own, xargs prompts the user to enter a text string that it then passes to the echo command.

The basic function of the xargs command
The example shows an example input, followed by the output of the echo command.
Note: The echo command is a built-in Linux feature that prints out arguments as the standard output. echo is commonly used to display text strings or command results as messages. Learn about all the different ways you can use the echo command in Linux.
Combine xargs with find
The find command often precedes xargs in a pipeline. Use it to provide a list of files for further processing by xargs. The syntax looks like this:
find [location] -name "[search-term]" -type f | xargs [command]

Using the xargs command with the find command in a pipeline
The example above demonstrates using the find command to find all files with the .sh extension. The list of files is then piped to xargs, which uses the rm command to delete them.
However, xargs does not automatically include files which contain blank spaces in their names. To include those files too, use the -print0 option for find, and the -0 option for xargs:
find [location] -name "[search-term]" -type f -print0 | xargs -0 [command]
Using the xargs command with the find command in a pipeline, using the -print0 and -0 arguments
rm now deletes all the files with the .sh extension.
Combine xargs with grep
Use xargs with the grep command to search for a string in the list of files provided by the find command.
find . -name '[search-term]' | xargs grep '[string-to-find-in-files]'

Using the grep command with xargs to search files for stings
The example above searched for all the files with the .txt extension and piped them to xargs, which then executed the grep command on them.
Xargs Multiple Commands
To run more than one command with xargs, use the -I option. Thesyntax is:
[command-providing-input] | xargs -I % sh -c '[command-1] %; [command-2] %'

Running multiple commands with the xargs command
In the example, the contents of file4.txt were displayed first. Then mkdir created a folder for each word in the file.
Read Items From File
As mentioned before, xargs reads the standard input. Use the -a option to read the contents of a file instead.
xargs -a [filename]

Using the -a option to tell xargs to read from a file instead of standard input
Find and Archive Images Using tar
When used with the tar command, xargs creates a tar.gz archive and populates it with files provided by the find command.
find [location] -name "[search-term]" -type f -print0 | xargs -0 tar -cvzf [tar-gz-archive-name]
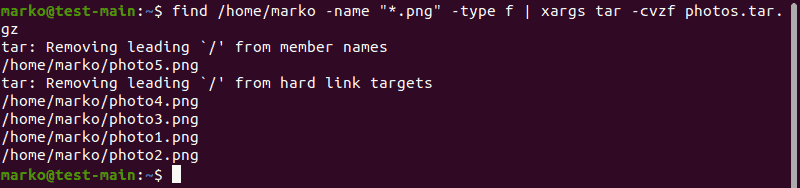
Using the xargs command to compress files into a tar.gz archive
Print Command
To see the commands executed by xargs in standard output, use the -t option.
[command-providing-input] | xargs -t [command]

Using the -t option with xargs to see the commands executed by xargs
In the example above, notice that xargs executed the mkdir command on the entire string provided by echo.
Approve xargs Command Execution
Some xargs operations, like removing files and folders, are irreversible. To control the execution of those commands, use the -p option.
[command-providing-input] | xargs -p [command]

Using the -p option with xargs to approve execution of commands
When you execute the command with the -p option, xargs displays a confirmation line before executing it. Type y to proceed, or n to cancel the operation.
Limit Output per Line
Sometimes it is necessary to control the number of arguments xargs takes at the same time. Perform this action using the -n option followed by the number of arguments you are limiting xargs to:
[command-providing-input] | xargs -n [number] [command]

In the example below, xargs takes the string from the echo command and splits it into three. Then it executes another echo for each of the parts:
Using the -n option to limit the number of arguments xargs passes at the same time
Specify the Delimiter
The default xargs delimiter is a blank space. To change the default delimiter, use the -d command followed by a single character or an escape character such as n (a new line).
[command-providing-input] | xargs -d [new-delimiter] | xargs [command]

In the example below, the xargs command instructs the system to use * as a delimiter and apply mkdir to each of the obtained arguments.
Using a custom delimiter with the xargs command
List All Linux User Accounts on the System
Use xargs to organize the output of the commands, such as cut. Consider the following example:
cut -d: -f1 < /etc/passwd | sort | xargs

The cut command accesses the /etc/passwd file and uses the : delimiter to cut the beginning of each line in the file. The output is then piped to sort, which sorts the received strings, and finally to xargs that displays them:
Using xargs to list all Linux user accounts on the system
Note: For alternative ways to list users, read How to List Users in Linux.
Remove Blank Spaces in String
Since xargs ignores blank spaces when looking for arguments, the command is useful for removing unnecessary blank spaces from strings.
echo "[string-with-unnecessary-spaces]" | xargs

Removing unnecessary blank spaces with xargs
List Number of Lines/Words/Characters in Each File
Use xargs with the wc command to display a list of files with the line, word, and character count.
ls | xargs wc

The example below instructed the ls command to pipe to xargs only the files containing the word “example”. xargs then applied wc to that list:
Using the wc command with xargs
Copy File to Multiple Directories
Copy files to multiple directories using the xargs command. The syntax is simple:
echo [directory-1] [directory-2] | xargs -n 1 cp -v [filename]

Using xargs to copy a file to multiple directories
The echo command provides directory names, and xargs uses the cp command to copy the given file into each of the directories.
What is xargs command?
The xargs command reads lines of text from the standard input or from the output of another command and turns them into commands and execute them.
You’ll often find xargs command being used with the find command. The find command gives you a list of filenames and the xargs command lets you use those filenames, one by one, as if it was input to the other command.
How to use xargs command?
xargs [options] [command [initial-arguments]]
But you are probably not going to use it like that. It’s power lies in combining the output of one command to another. Let’s see it with a simple example.
In my current directory, I have some text files and the flowers.txt has the name of all these files:
abhishek@linuxhandbook:~/tutorial$ ls
flowers.txt  lily.txt  one_lotus.txt  rose.txt  three_lotus.txt  two_lotus.txt
abhishek@linuxhandbook:~/tutorial$ cat flowers.txt
lily.txt
one_lotus.txt
rose.txt
three_lotus.txt
two_lotus.txt
Now my aim is that I want to see the file size of all the files mentioned in the flowers.txt. Common sense says that I could combine cat command to display all the filenames and then pipe it to the du command to check the file size.
But if I pipe it directly, it won’t give the size of each of the files mentioned in the flowers.txt file.
abhishek@linuxhandbook:~/tutorial$ du -h
52K .
abhishek@linuxhandbook:~/tutorial$ cat flowers.txt | du -h
52K
Why? First, the du command doesn’t take standard input. Second, the output of the cat command is not individual file names. It’s a like a words separate by new line character.
The magic of xargs command is that it will take this and the text separated by blanks or new lines and convert them into individual inputs to the next command.
abhishek@linuxhandbook:~/tutorial$ cat flowers.txt | xargs du -h
4.0K    lily.txt
4.0K    one_lotus.txt
16K rose.txt
4.0K    three_lotus.txt
16K two_lotus.txt
Think of it as equivalent to feeding those filenames to the du command:
abhishek@linuxhandbook:~/tutorial$ du -h lily.txt one_lotus.txt rose.txt three_lotus.txt two_lotus.txt
4.0K    lily.txt
4.0K    one_lotus.txt
16K rose.txt
4.0K    three_lotus.txt
16K two_lotus.txt
You realize the power of xargs command now, don’t you?
xargs and find: made for each other
You’ll often find it being used in combination of the “find command”.
The find command searches for files and directories and returns their names. Thanks to xargs, you can use the result of the find command for specific purposes like renaming them, moving them, deleting them and whatnot.
Let’s say, you want to get all the files ending in .txt and containing the word red. You can combine find and grep commands with the help of xargs:
abhishek@linuxhandbook:~/tutorial$ find . -type f -name "*.txt" | xargs grep -l red

./three_lotus.txt
./two_lotus.txt
./rose.txt
The find exec command combination works similarly. But let's focus on the xargs command here.
Dealing with file names with spaces
If you have file with space in its name, it will cause issues. Let’s say I renamed three_lotus.txt to “three lotus.txt”. Now when it is processed via xargs, it is seen as two separate files as three and lotus.txt.
abhishek@linuxhandbook:~/tutorial$ find . -type f -name "*.txt" | xargs grep -l red

./two_lotus.txt
grep: ./three: No such file or directory
grep: lotus.txt: No such file or directory
./rose.txt
In such cases, you should use the -print0 option of the find command. It separates lines with ASCII null characters instead of newline characters. Similarly, you should also use xargs with -0 to accept the ASCII nulls.
abhishek@linuxhandbook:~/tutorial$ find . -type f -print0 -name "*.txt" | xargs -0 grep -l red

./two_lotus.txt
./three lotus.txt
./rose.txt
See what command is being executed
If you want to see what command is being executed with the help of xargs, you can use the -t option. It will print the actual command being executed.
abhishek@linuxhandbook:~/tutorial$ find . -type f -name "*.txt" | xargs -t touch
touch ./three_lotus.txt ./two_lotus.txt ./lily.txt ./rose.txt
Force xargs to prompt for confirmation before running the command
Some situations demand to be extra careful like deleting files. It will be a good idea to see what command is going to be executed and have the option to deny the execution.
You can use the -p option of xargs to get the prompt.

abhishek@linuxhandbook:~/tutorial$ find . -type f -name "*.txt" | xargs -p rm
rm ./three_lotus.txt ./two_lotus.txt ./lily.txt ./rose.txt ?...n
Using placeholder with xargs to get more control over it
By default, the xargs command adds the standard input as argument at the end of the command. This creates a problem when you need to use that before the last argument.
For example, if you use the move command, you need the source first and then the target. If you want to move the found files to a target directory, this command won’t work:
abhishek@linuxhandbook:~/tutorial$ find . -type f -name "*.txt" | xargs -p mv new_dir

mv new_dir ./three_lotus.txt ./two_lotus.txt ./lily.txt ./rose.txt ?...y
mv: target './rose.txt' is not a directory
This is where you can use placeholders in xargs with option -I like this:

abhishek@linuxhandbook:~/tutorial$ find . -type f -name "*.txt" | xargs -p -I {} mv {} new_dir

mv ./three_lotus.txt new_dir ?...n
mv ./two_lotus.txt new_dir ?...n
mv ./lily.txt new_dir ?...n
mv ./rose.txt new_dir ?...n
Think of it as if xargs gets all the file names from the find command and keep it in {}. Then it goes to the mv command and supplies the content of {}.
The major difference here is that instead of putting all the file names in the same command, it adds them one by one. This is why the mv command’s been called for each argument (as you can see in the above example).
Note: I used {} as placeholder. You could most other letters or characters as placeholder. {} is safe bet and easy to understand and distinguish.
Running multiple commands with xargs
You may use the placeholders to run multiple commands with xargs.
abhishek@linuxhandbook:~/tutorial$ find . -type f -name "*.txt" | xargs -I {} sh -c 'ls -l {}; du -h {}'

-rw-rw-r-- 1 abhishek abhishek 0 May 28 17:02 ./three_lotus.txt
0   ./three_lotus.txt
-rw-rw-r-- 1 abhishek abhishek 0 May 28 17:02 ./two_lotus.txt
0   ./two_lotus.txt
-rw-rw-r-- 1 abhishek abhishek 0 May 28 17:02 ./lily.txt
0   ./lily.txt
-rw-rw-r-- 1 abhishek abhishek 0 May 28 17:02 ./rose.txt
0   ./rose.txt
Keep in mind that placeholder won’t extend to the next pipe redirection or other command. This is why I used sh command here.
There’s always more…
I have mainly used find with xargs command in the examples here because that’s what you’ll see the most. But that doesn’t mean xargs is restricted to be used with find command only. One such practical example of xargs command is when you want to stop all running docker containers:
docker ps -q | xargs docker stop
.
sed
click here for solution
click here for solution
click here for solution
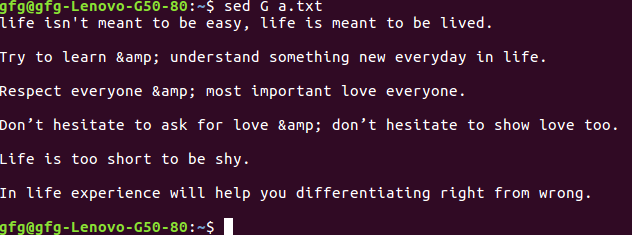
*1 – Insert one blank line after each line – *
[root@rhel7 ~]# sed G a.txt
sed-output
*2 – To insert two blank lines – *
[root@rhel7 ~]# sed 'G;G' a.txt
3 – Delete blank lines and insert one blank line after each line –
[root@rhel7 ~]# sed '/^$/d;G' a.txt
*4 – Insert a black line above every line which matches “love” – *
[root@rhel7 ~]# sed '/love/{x;p;x;}' a.txt
*5 – Insert a blank line below every line which matches “love” – *
[root@rhel7 ~]# sed '/love/G' a.txt
*6 – Insert 5 spaces to the left of every lines – *
[root@rhel7 ~]# sed 's/^/ /' a.txt
Numbering lines
1 – Number each line of a file (left alignment). **= is used to number the line. \t is used for tab between number and sentence – **
[root@rhel7 ~]# sed = a.txt | sed 'N;s/\n/\t/'
*2 – Number each line of a file (number on left, right-aligned). This command is similar to cat -n filename. *
[root@rhel7 ~]# sed = a.txt | sed 'N; s/^/ /; s/ *\(.\{4,\}\)\n/\1 /'
*3 – Number each line of file, only if line is not blank – *
[root@rhel7 ~]# sed '/./=' a.txt | sed '/./N; s/\n/ /'
*# Deleting lines
1 – Delete a particular line – *
Syntax: sed ‘nd’ filename
Example :
[root@rhel7 ~]# sed '5d' a.txt
*2 – Delete the last line *
Syntax: sed ‘$d’ filename
*3 – Delete line from range x to y *
Syntax: sed ‘x,yd’ filename
Example :
[root@rhel7 ~]# sed '3,5d' a.txt
*4 – Delete from nth to last line *
Syntax: sed ‘nth,$d’ filename
Example :
[root@rhel7 ~]# sed '2,$d' a.txt
*5 – Delete the pattern matching line – *
Syntax: sed ‘/pattern/d’ filename
Example :
[root@rhel7 ~]# sed '/life/d' a.txt
*6 – Delete lines starting from nth line and every 2nd line from there – *
Syntax: sed ‘n~2d’ filename
Example :
[root@rhel7 ~]# sed '3~2d' a.txt
*7 – Delete the lines which matches the pattern and 2 lines after to that – *
Syntax: sed ‘/pattern/,+2d’ filename
Example :
[root@rhel7 ~]# sed '/easy/,+2d' a.txt
*8 – Delete blank Lines *
[root@rhel7 ~]# sed '/^$/d' a.txt
*9 – Delete empty lines or those begins with “#” – *
[root@rhel7 ~]# sed -i '/^#/d;/^$/d' a.txt
View/Print the files
If we want to view content of file, then we use cat command and if we want to view the bottom and the top content of any file, we use tools such as head and tail. But what if we need to view a particular section in the middle of any file? Here we’ll discuss, how to use SED command to view a section of any file.
*1 – Viewing a file from x to y range – *
Syntax: sed -n ‘x,yp’ filename
Example :
[root@rhel7 ~]# sed -n '2,5p' a.txt
*2 – View the entire file except the given range – *
Syntax: sed ‘x,yd’ filename
Example :
[root@rhel7 ~]# sed '2,4d' a.txt
*3 – Print nth line of the file – *
Syntax: sed -n ‘address’p filename
Example :
[root@rhel7 ~]# sed -n '4'p a.txt
*4 – Print lines from xth line to yth line. *
Syntax: sed -n ‘x,y’p filename
Example :
[root@rhel7 ~]# sed -n '4,6'p a.txt
*5 – Print only the last line – *
Syntax: sed -n ‘$’p filename
*6 – Print from nth line to end of file – *
Syntax: sed -n ‘n,$p’ filename
Example :
[root@rhel7 ~]# sed -n '3,$'p a.txt
Pattern Printing
*7 – Print the line only which matches the pattern – *
Syntax: sed -n /pattern/p filename
Example :
[root@rhel7 ~]# sed -n /every/p a.txt
*8 – Print lines which matches the pattern i.e from input to xth line. *
Syntax: sed -n ‘/pattern/,xp’ filename
Example :
[root@rhel7 ~]# sed -n '/everyone/,5p' a.txt
Following prints lines which matches the pattern, 3rd line matches the pattern “everyone”, so it prints from 3rd line to 5th line. Use $ in place of 5, if want to print the file till end.
9 – Prints lines from the xth line of the input, up-to the line which matches the pattern. If the pattern doesn’t found then it prints up-to end of the file.
Syntax: sed -n ‘x,/pattern/p’ filename
Example :
sed -n '1,/everyone/p' a.txt
*10 – Print the lines which matches the pattern up-to the next xth lines – *
Syntax: sed -n ‘/pattern/,+xp’ filename
Example :
sed -n '/learn/,+2p' a.txt
Replacement with the sed command
*1 – Change the first occurrence of the pattern – *
[root@rhel7 ~]# sed 's/life/leaves/' a.txt
*2 – Replacing the nth occurrence of a pattern in a line – *
Syntax: sed ‘s/old_pattern/new_pattern/n’ filename
Example :
[root@rhel7 ~]# sed 's/to/two/2' a.txt
We wrote “2” because we replaces the second occurrence. Likewise you can use 3, 4 etc according to need.
*3 – Replacing all the occurrence of the pattern in a line. *
[root@rhel7 ~]# sed 's/life/learn/g' a.txt
*4 – Replace pattern from nth occurrence to all occurrences in a line. *
Syntax: sed ‘s/old_pattern/new_pattern/ng’ filename
Example :
[root@rhel7 ~]# sed 's/to/TWO/2g' a.txt
Note – This sed command replaces the second, third, etc occurrences of pattern “to” with “TWO” in a line.
If you wish to print only the replaced lines, then use “-n” option along with “/p” print flag to display only the replaced lines –
[root@rhel7 ~]# sed -n 's/to/TWO/p' a.txt
And if you wish to print the replaced lines twice, then only use “/p” print flag without “-n” option-
[root@rhel7 ~]# sed 's/to/TWO/p' a.txt
*5 – Replacing pattern on a specific line number. Here, “m” is the line number. *
Syntax: sed ‘m s/old_pattern/new_pattern/’ filename
Example :
[root@rhel7 ~]# sed '3 s/every/each/' a.txt
If you wish to print only the replaced lines –
[root@rhel7 ~]# sed -n '3 s/every/each/p' a.txt
*6 – Replace string on a defined range of lines – *
Syntax: sed ‘x,y s/old_pattern/new_pattern/’ filename
where,
x = starting line number
and y = ending line number
Example :
[root@rhel7 ~]# sed '2,5 s/to/TWO/' a.txt
Note – $ can be used in place of “y” if we wish to change the pattern up-to last line in the file.
Example :
[root@rhel7 ~]# sed '2,$ s/to/TWO/' a.txt
*7 – If you wish to replace pattern in order to ignore character case (beginning with uppercase or lowercase), then there are two ways to replace such patterns – *
First, By using “/i” print flag –
Syntax: sed ‘s/old_pattern/new_pattern/i’ filename
Example :
[root@rhel7 ~]# sed 's/life/Love/i' a.txt
Second, By using regular expressions –
[root@rhel7 ~]# sed 's/[Ll]ife/Love/g' a.txt
*8 – To replace multiple spaces with a single space – *
[root@rhel7 clang]# sed 's/ */ /g' filename
*9 – Replace one pattern followed by the another pattern – *
Syntax: sed ‘/followed_pattern/ s/old_pattern/new_pattern/’ filename
Example :
[root@rhel7 ~]# sed '/is/ s/live/love/' a.txt
*10Replace a pattern with other except in the nth line. *
Syntax: sed ‘n!s/old_pattern/new_pattern/’ filename
Example :
[root@rhel7 ~]# sed -i '5!s/life/love/' a.txt
SED command in UNIX stands for stream editor and it can perform lots of functions on file like searching, find and replace, insertion or deletion. Though most common use of SED command in UNIX is for substitution or for find and replace. By using SED you can edit files even without opening them, which is much quicker way to find and replace something in file, than first opening that file in VI Editor and then changing it.
- SED is a powerful text stream editor. Can do insertion, deletion, search and replace(substitution).
- SED command in unix supports regular expression which allows it perform complex pattern matching. Syntax:
sed OPTIONS... [SCRIPT] [INPUTFILE...]
Example:
Consider the below text file as an input.
$cat > geekfile.txt
unix is great os. unix is opensource. unix is free os.
learn operating system.
unix linux which one you choose.
unix is easy to learn.unix is a multiuser os.Learn unix .unix is a powerful.
Sample Commands
Replacing or substituting string : Sed command is mostly used to replace the text in a file. The below simple sed command replaces the word “unix” with “linux” in the file.
$sed 's/unix/linux/' geekfile.txt
Output :
linux is great os. unix is opensource. unix is free os.
learn operating system.
linux linux which one you choose.
linux is easy to learn.unix is a multiuser os.Learn unix .unix is a powerful.
Here the “s” specifies the substitution operation. The “/” are delimiters. The “unix” is the search pattern and the “linux” is the replacement string.
By default, the sed command replaces the first occurrence of the pattern in each line and it won’t replace the second, third…occurrence in the line.
Replacing the nth occurrence of a pattern in a line : Use the /1, /2 etc flags to replace the first, second occurrence of a pattern in a line. The below command replaces the second occurrence of the word “unix” with “linux” in a line.
$sed 's/unix/linux/2' geekfile.txt
Output:

unix is great os. linux is opensource. unix is free os.
learn operating system.
unix linux which one you choose.
unix is easy to learn.linux is a multiuser os.Learn unix .unix is a powerful.
Replacing all the occurrence of the pattern in a line : The substitute flag /g (global replacement) specifies the sed command to replace all the occurrences of the string in the line.
$sed 's/unix/linux/g' geekfile.txt
Output :

linux is great os. linux is opensource. linux is free os.
learn operating system.
linux linux which one you choose.
linux is easy to learn.linux is a multiuser os.Learn linux .linux is a powerful.
**Replacing from nth occurrence to all occurrences in a **line : Use the combination of /1, /2 etc and /g to replace all the patterns from the nth occurrence of a pattern in a line. The following sed command replaces the third, fourth, fifth… “unix” word with “linux” word in a line.
$sed 's/unix/linux/3g' geekfile.txt
Output:

unix is great os. unix is opensource. linux is free os.
learn operating system.
unix linux which one you choose.
unix is easy to learn.unix is a multiuser os.Learn linux .linux is a powerful.
Parenthesize first character of each word : This sed example prints the first character of every word in parenthesis.
$ echo "Welcome To The Geek Stuff" | sed 's/\(\b[A-Z]\)/\(\1\)/g'
Output:

(W)elcome (T)o (T)he (G)eek (S)tuff
Replacing string on a specific line number : You can restrict the sed command to replace the string on a specific line number. An example is
$sed '3 s/unix/linux/' geekfile.txt
Output:

unix is great os. unix is opensource. unix is free os.
learn operating system.
linux linux which one you choose.
unix is easy to learn.unix is a multiuser os.Learn unix .unix is a powerful.
The above sed command replaces the string only on the third line.
Duplicating the replaced line with /p flag : The /p print flag prints the replaced line twice on the terminal. If a line does not have the search pattern and is not replaced, then the /p prints that line only once.
$sed 's/unix/linux/p' geekfile.txt
Output:

linux is great os. unix is opensource. unix is free os.
linux is great os. unix is opensource. unix is free os.
learn operating system.
linux linux which one you choose.
linux linux which one you choose.
linux is easy to learn.unix is a multiuser os.Learn unix .unix is a powerful.
linux is easy to learn.unix is a multiuser os.Learn unix .unix is a powerful.
Printing only the replaced lines : Use the -n option along with the /p print flag to display only the replaced lines. Here the -n option suppresses the duplicate rows generated by the /p flag and prints the replaced lines only one time.
$sed -n 's/unix/linux/p' geekfile.txt
Output:

linux is great os. unix is opensource. unix is free os.
linux linux which one you choose.
linux is easy to learn.unix is a multiuser os.Learn unix .unix is a powerful.
If you use -n alone without /p, then the sed does not print anything.
Replacing string on a range of lines : You can specify a range of line numbers to the sed command for replacing a string.
$sed '1,3 s/unix/linux/' geekfile.txt
Output:

linux is great os. unix is opensource. unix is free os.
learn operating system.
linux linux which one you choose.
unix is easy to learn.unix is a multiuser os.Learn unix .unix is a powerful.
Here the sed command replaces the lines with range from 1 to 3. Another example is
$sed '2,$ s/unix/linux/' geekfile.t
xt
Output:
unix is great os. unix is opensource. unix is free os.
learn operating system.
linux linux which one you choose.
linux is easy to learn.unix is a multiuser os.Learn unix .unix is a powerful
Here $ indicates the last line in the file. So the sed command replaces the text from second line to last line in the file.
Deleting lines from a particular file : SED command can also be used for deleting lines from a particular file. SED command is used for performing deletion operation without even opening the file
Examples:
-
To Delete a particular line say n in this example
Syntax:
$ sed 'nd' filename.txtExample:
$ sed '5d' filename.txt
- To Delete a last line
Syntax:
$ sed '$d' filename.txt
- To Delete line from range x to y
Syntax:
$ sed 'x,yd' filename.txt
Example:
$ sed '3,6d' filename.txt
- To Delete from nth to last line
Syntax:
$ sed 'nth,$d' filename.txt
Example:
$ sed '12,$d' filename.txt
- To Delete pattern matching line
Syntax:
$ sed '/pattern/d' filename.txt
Example:
$ sed '/abc/d' filename.txt
Examples of sed Command
Let's see the following examples:
- Applying to the STDIN directory
- Global Replacement
- Removing a Line
- Using the Multiple sed Command
- Reading Commands From a File
- Replacing Characters
- Limiting the sed
- Inserting and Appending Text
- Modifying Lines
- Transformation of Characters
- Printing the Line Numbers
echo class7 | sed 's/class/jtp/'
echo class7 | sed 's/7/10/'
 cat msg.txt | sed 's/learn/study/'
The above commands will replace the first text with the second text pattern. Consider the below output:
Linux Sed Filter
From the above output, first, we have performed 'sed' command on a string 'class7' where 'class' is changed into 'jtp' and 7 into 10. Then we have performed 'sed' command on a stream 'msg.txt' where 'learn' is converted into 'study.'
Global Replacement
In the earlier example, all 'learn' words were not edited into 'study'. To edit every word, we have to use a global replacement 'g'. It will edit all the specified words in a file or string.
Syntax:
command | sed 's///g'
Consider the below examples:
echo class7 class9 | sed 's/class/jtp/g'
cat msg.txt | sed 's/learn/study/g'
The above commands will replace all the specified text pattern. Consider the below output:
Linux Sed Filter
From the above output, by executing the command "echo class7 class9 | sed 's/class/jtp/g'" all the 'class' is converted into 'jtp' and with command "cat msg.txt | sed 's/learn/study/g'" all the 'learn' was converted into 'study'.
Removing a Line
The 'd' option will let us remove a complete line from a file. We only need to specify a word from that line with 'd' option, and that line will be deleted. But, note that all the lines having that same word will be deleted. It will be executed as:
cat <fileName> | sed '/<Word>/d'
Consider the below command:
cat msg.txt | sed '/jtp/d'
The above command will delete the lines having the word 'jtp'. Consider the below output:
Linux Sed Filter
From the above output, by executing the command "cat msg.txt | sed '/jtp/d'" all lines containing the word 'jtp' are deleted.
Using the Multiple sed Command
The '-e' option allows us to execute the multiple sed commands at once. We can perform more than one sed operation by executing the command as:
sed -e '<script 1> ; <script 2>' <file name>
Consider the below command:
sed -e 's/red/blue/; s/yellow/black/' exm.txt
The above command will apply all the specified operations in file 'exm.txt'. Consider the below output:
Linux Sed Filter
As we can see from the above output, all the 'red' words are replaced with 'blue,' and all the 'yellow' words are replaced with 'black.' We can also separate commands like this:
sed -e '
>s/red/blue/;
>s/yellow/black/' exm.txt
The result will be the same as the above command.
Reading Commands From a File
We can save the sed commands in a file and apply them at once in any file. It can be done by specifying the '-f' option as follows:
sed -f <sed file> <file name>
From the above command, the '' is a file that has a sed command list. Consider the below command:
sed -f SedCommands exm.txt
The above command will apply all the specified commands in the 'SedCommand' file on 'exm.txt'. Consider the below output:
Linux Sed Filter
From the above output, we have used commands applied to the earlier example. So, the output is the same as the previous example.
Replacing Characters
We can use the exclamation mark (!) as a string delimiter. For example, we want to replace bash shell and replace it with csh shell in the "/etc/passwd". To do so, execute the below command:
sed 's/\/bin\/bash/\/bin\/csh/' /etc/passwd
We can achieve the same result by executing the below command:
sed 's!/bin/bash!/bin/csh!' /etc/passwd
Limiting the sed
The basic use of the sed command process the entire file. But, we can limit the sed command and specify any line. There are two ways to limit the sed command:
A range of lines.
A pattern that matches a specific line.
We can provide a number to specify a line as follows:
sed '3s/Red/Blue/' exm.txt
The above command will apply the specified operation on the third line. Consider the below output:
Linux Sed Filter
From the above output, only the line three is modified.
We can also specify a range of lines. To specify a range of lines, execute the command as follows:
sed '1,3s/Red/Blue/' exm.txt
The above command will update the specified text in lines 1 and 3. Consider the below output:
Linux Sed Filter
Inserting and Appending Text
The 'i' and 'a' flag is used to insert and append the text on a file. The 'i' flag will add the text before the string, and the 'a' flag is used to add text after the string. Consider the below command:
echo "Another Demo" | sed 'i\First Demo'
The above command will insert the text before the text "Another Demo". Consider the below output:
Linux Sed Filter
To append text, execute the command as follows:
echo "Another Demo" | sed 'a\First Demo'
The above command will append the text. Consider the below output:
Linux Sed Filter
Modifying Lines
The 'c' flag is used to modify a specific line. To modify a line, execute the command as follows:
sed '3c\This is a modified line.' exm.txt
The above command will update the line three. Consider the below output:
Linux Sed Filter
We can also use a regular expression to update more than one lines having the same pattern. Consider the below command:
sed '/Apple is /c Line updated.' exm.txt
The above command will update all the lines having string 'Apple is'. Consider the below output:
Linux Sed Filter
Transformation of Characters
The 'y' flag is used to transform the characters. The transformation of characters cannot be limited to specific occurrences. To transform characters, execute the command as follows:
sed 'y/abc/def/' exm.txt
The above command will transform the characters 'a', 'b', 'c' into 'd', 'e', 'f'. consider the below output:
Linux Sed Filter
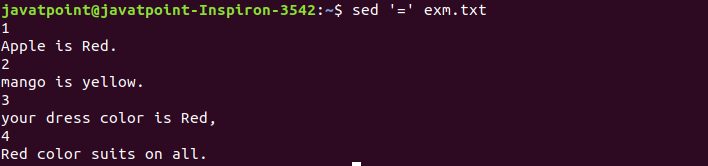
Printing the Line Numbers
The '=' sign is used to print the line number. To print the line number, execute the command as follows:
sed '=' exm.txt
The above command will display the line number of file content. Consider the below output:
Linux Sed Filter
The equal sign with the '-n' option specifies the line number that contains a matching script. Consider the below output:
sed -n '/mango/=' exm.txt
The above command will display the line number that contains the word 'mango'. Consider the below output:
Linux Sed Filter
From the above output, we can see the line number 2 has the 'mango' word
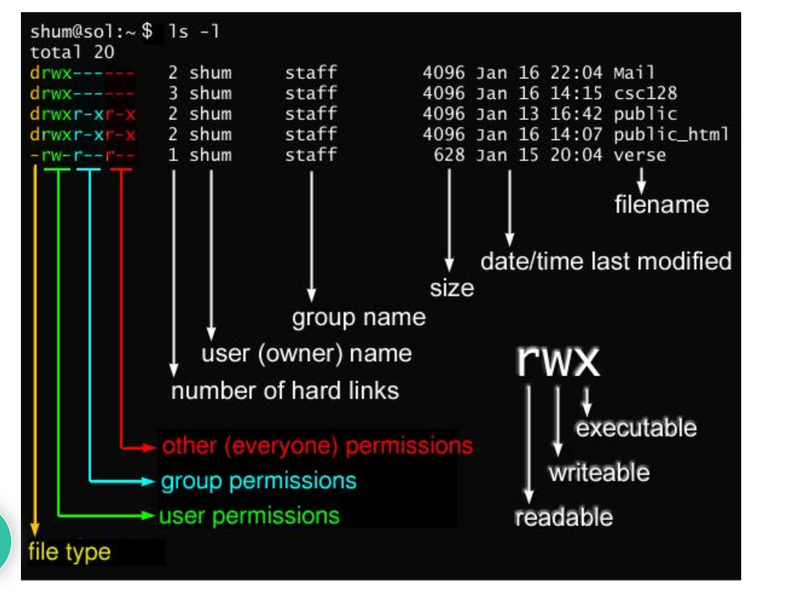
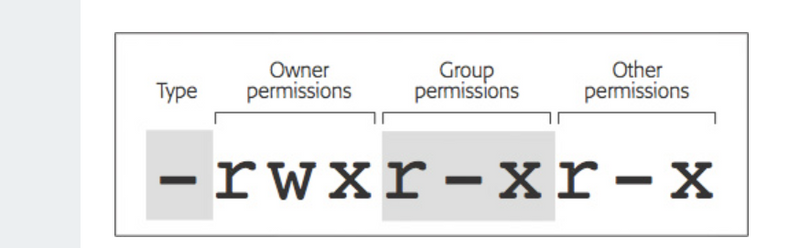
Chmod Commands
In Unix and Unix-like operating systems, chmod is the command and system call used to change the access permissions and the special mode flags of file system objects. Collectively these were originally called its modes, and the name chmod was chosen as an abbreviation of change mode

1. Add single permission to a file/directory
Changing permission to a single set. + symbol means adding permission. For example, do the following to give execute permission for the user irrespective of anything else:
$ chmod u+x filename
2. Add multiple permission to a file/directory
Use comma to separate the multiple permission sets as shown below.
$ chmod u+r,g+x filename
3. Remove permission from a file/directory
Following example removes read and write permission for the user.
$ chmod u-rx filename
4. Change permission for all roles on a file/directory
Following example assigns execute privilege to user, group and others (basically anybody can execute this file).
$ chmod a+x filename
5. Make permission for a file same as another file (using reference)
If you want to change a file permission same as another file, use the reference option as shown below. In this example, file2’s permission will be set exactly same as file1’s permission.
$ chmod --reference=file1 file2
6. Apply the permission to all the files under a directory recursively
Use option -R to change the permission recursively as shown below.
$ chmod -R 755 directory-name/
7. Change execute permission only on the directories (files are not affected)
On a particular directory if you have multiple sub-directories and files, the following command will assign execute permission only to all the sub-directories in the current directory (not the files in the current directory).
$ chmod u+X *
Using the method above we come up to the number 754, which represents the desired permissions.
To set up the setuid, setgid, and sticky bit flags use four digits number.
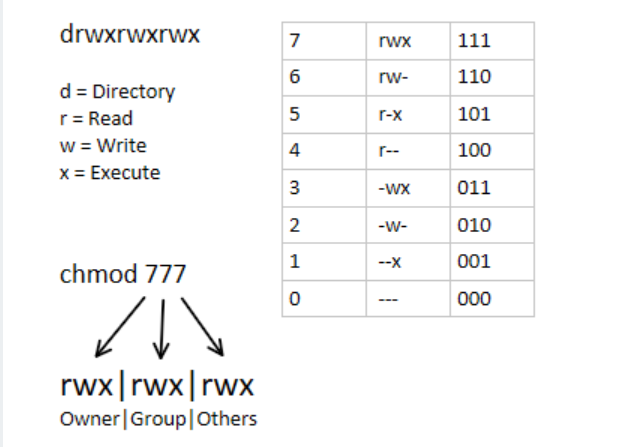
When the 4 digits number is used, the first digit has the following meaning:
setuid=4
setgid=2
sticky=1
no changes = 0
The next three digits have the same meaning as when using 3 digits number.
If the first digit is 0 it can be omitted, and the mode can be represented with 3 digits. The numeric mode 0755 is the same as 755.
To calculate the numeric mode you can also use another method (binary method), but it is a little more complicated. Knowing how to calculate the numeric mode using 4, 2, and 1 is sufficient for most users.
You can check the file’s permissions in the numeric notation using the stat command:
stat -c "%a" filename
Copy
644
Copy
Here are some examples of how to use the chmod command in numeric mode:
Give the file’s owner read and write permissions and only read permissions to group members and all other users:
chmod 644 dirname
Copy
Give the file’s owner read, write and execute permissions, read and execute permissions to group members and no permissions to all other users:
chmod 750 dirname
Copy
Give read, write, and execute permissions, and a sticky bit to a given directory:
chmod 1777 dirname
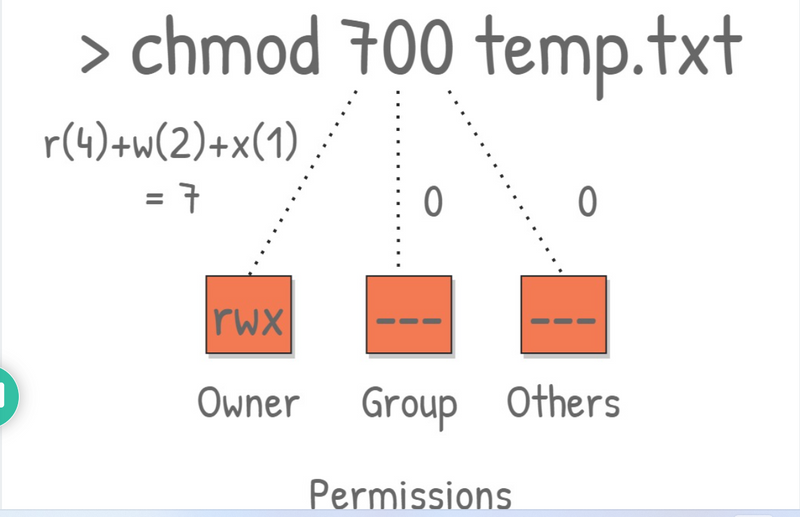
Recursively set read, write, and execute permissions to the file owner and no permissions for all other users on a given directory:
chmod -R 700 dirname
Using a Reference File
The --reference=ref_file option allows you to set the file’s permissions to be same as those of the specified reference file (ref_file).
chmod --reference=REF_FILE FILE
For example, the following command will assign the permissions of the file1 to file2
chmod --reference=file1 file2
Recursively Change the File’s Permissions
To recursively operate on all files and directories under the given directory, use the -R (--recursive) option:
chmod -R MODE DIRECTORY
For example, to change the permissions of all files and subdirectories under the /var/www directory to 755 you would use:
chmod -R 755 /var/www
Operating on Symbolic Links
Symbolic links always have 777 permissions.
By default, when changing symlink’s permissions, chmod will change the permissions on the file the link is pointing to.
chmod 755 symlink
Copy
Chances are that instead of changing the target ownership, you will get a “cannot access ‘symlink’: Permission denied” error.
The error occurs because by default on most Linux distributions symlinks are protected, and you cannot operate on target files. This option is specified in /proc/sys/fs/protected_symlinks. 1 means enabled and 0 disabled. It is recommended not to disable the symlink protection.
Changing File Permissions in Bulk
Sometimes there are situations where you would need to bulk change files and directories permissions.
The most common scenario is to recursively change the website file’s permissions to 644 and directory’s permissions to 755.
Using the numeric method:
find /var/www/my_website -type d -exec chmod 755 {} \;
find /var/www/my_website -type f -exec chmod 644 {} \;
Using the symbolic method:
find /var/www/my_website -type d -exec chmod u=rwx,go=rx {} \;
find /var/www/my_website -type f -exec chmod u=rw,go=r {} \;
The find command will search for files and directories under /var/www/my_website and pass each found file and directory to the chmod command to set the permissions.
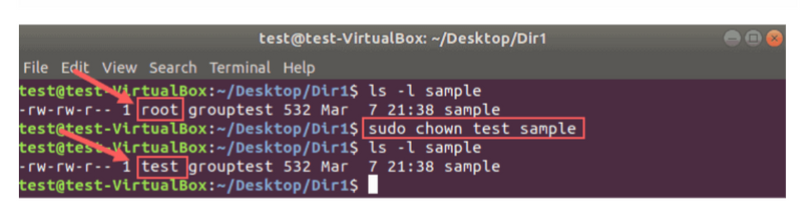
Differene between chmod and chown
The command chown, an abbreviation of change owner, is used on Unix and Unix-like operating systems to change the owner of file system files, directories. Unprivileged users who wish to change the group membership of a file that they own may use chgrp.

1. Change the owner of a file
# ls -lart tmpfile
-rw-r--r-- 1 himanshu family 0 2012-05-22 20:03 tmpfile

# chown root tmpfile

# ls -l tmpfile
-rw-r--r-- 1 root family 0 2012-05-22 20:03 tmpfile
So we see that the owner of the file was changed from ‘himanshu’ to ‘root’.
2. Change the group of a file
Through the chown command, the group (that a file belongs to) can also be changed.
# ls -l tmpfile
-rw-r--r-- 1 himanshu family 0 2012-05-22 20:03 tmpfile

# chown :friends tmpfile

# ls -l tmpfile
-rw-r--r-- 1 himanshu friends 0 2012-05-22 20:03 tmpfile
If you observe closely, the group of the file changed from ‘family’ to ‘friends’. So we see that by just adding a ‘:’ followed by the new group name, the group of the file can be changed.
3. Change both owner and the group
# ls -l tmpfile
-rw-r--r-- 1 root family 0 2012-05-22 20:03 tmpfile

# chown himanshu:friends tmpfile

# ls -l tmpfile
-rw-r--r-- 1 himanshu friends 0 2012-05-22 20:03 tmpfile
So we see that using the syntax ‘:’, the owner as well as group can be changed in one go.
4. Using chown command on symbolic link file
Here is a symbolic link :
ls -l tmpfile_symlnk
lrwxrwxrwx 1 himanshu family 7 2012-05-22 20:03 tmpfile_symlnk -> tmpfile
So we see that the symbolic link ‘tmpfile_symlink’ links to the file ‘tmpfile’.
Lets see what happens if chown command is issued on a symbolic link:
# chown root:friends tmpfile_symlnk

# ls -l tmpfile_symlnk
lrwxrwxrwx 1 himanshu family 7 2012-05-22 20:03 tmpfile_symlnk -> tmpfile

# ls -l tmpfile
-rw-r--r-- 1 root friends 0 2012-05-22 20:03 tmpfile
When the chown command was issued on symbolic link to change the owner as well as the group then its the referent of the symbolic link ie ‘tmpfile’ whose owner and group got changed. This is the default behavior of the chown command. Also, there exists a flag ‘–dereference’ for the same.
5. Using chown command to forcefully change the owner/group of symbolic file.
Using flag ‘-h’, you can forcefully change the owner or group of a symbolic link as shown below.
# ls -l tmpfile_symlnk
lrwxrwxrwx 1 himanshu family 7 2012-05-22 20:03 tmpfile_symlnk -> tmpfile

# chown -h root:friends tmpfile_symlnk

# ls -l tmpfile_symlnk
lrwxrwxrwx 1 root friends 7 2012-05-22 20:03 tmpfile_symlnk -> tmpfile
6. Change owner only if a file is owned by a particular user
Using chown “–from” flag, you can change the owner of a file, only if that file is already owned by a particular owner.
# ls -l tmpfile
-rw-r--r-- 1 root friends 0 2012-05-22 20:03 tmpfile
# chown --from=guest himanshu tmpfile
# ls -l tmpfile
-rw-r--r-- 1 root friends 0 2012-05-22 20:03 tmpfile
chown --from=root himanshu tmpfile
# ls -l tmpfile
-rw-r--r-- 1 himanshu friends 0 2012-05-22 20:03 tmpfile
In the example above, we verified that the original owner/group of the file ‘tmpfile’ was root/friends.
Next we used the ‘–from’ flag to change the owner to ‘himanshu’ but only if the existing owner is ‘guest’.
Now, as the existing owner was not ‘guest’. So, the command failed to change the owner of the file.
Next we tried to change the owner if the existing owner is ‘root’ (which was true) and this time command was successful and the owner was changed to ‘himanshu’.
On a related note, if you want to change the permission of a file, you should use chmod command.
If you are a beginner, you should start by reading the basics of file permissions.
**
- Change group only if a file already belongs to a certain group Here also the flag ‘–from’ is used but in the following way:**
# ls -l tmpfile
-rw-r--r-- 1 himanshu friends 0 2012-05-22 20:03 tmpfile

# chown --from=:friends :family tmpfile

# ls -l tmpfile
-rw-r--r-- 1 himanshu family 0 2012-05-22 20:03 tmpfile
Since the file ‘tmpfile’ actually belonged to group ‘friends’ so the condition was correct and the command was successful.
So we see that by using the flag ‘–from=:’ we can change the group under a particular condition.
NOTE: By following the template ‘–from=:’, condition on both the owner and group can be applied.
8. Copy the owner/group settings from one file to another
This is possible by using the ‘–reference’ flag.
# ls -l file
-rwxr-xr-x 1 himanshu family 8968 2012-04-09 07:10 file

# ls -l tmpfile
-rw-r--r-- 1 root friends 0 2012-05-22 20:03 tmpfile

# chown --reference=file tmpfile
# ls -l tmpfile
-rw-r--r-- 1 himanshu family 0 2012-05-22 20:03 tmpfile
In the above example, we first checked the owner/group of the reference-file ‘file’ and then checked the owner/group of the target-file ‘tmpfile’. Both were different. Then we used the chown command with the ‘–reference’ option to apply the owner/group settings from the reference file to the target file. The command was successful and the owner/group settings of ‘tmpfile’ were made similar to the ‘file’.
9. Change the owner/group of the files by traveling the directories recursively
This is made possible by the ‘-R’ option.
# ls -l linux/linuxKernel
-rw-r--r-- 1 root friends 0 2012-05-22 21:52 linux/linuxKernel

# ls -l linux/ubuntu/ub10
-rw-r--r-- 1 root friends 0 2012-05-22 21:52 linux/ubuntu/ub10

# ls -l linux/redhat/rh7
-rw-r--r-- 1 root friends 0 2012-05-22 21:52 linux/redhat/rh7
# chown -R himanshu:family linux/

# ls -l linux/redhat/rh7
-rw-r--r-- 1 himanshu family 0 2012-05-22 21:52 linux/redhat/rh7
# ls -l linux/ubuntu/ub10
-rw-r--r-- 1 himanshu family 0 2012-05-22 21:52 linux/ubuntu/ub10
# ls -l linux/linuxKernel
-rw-r--r-- 1 himanshu family 0 2012-05-22 21:52 linux/linuxKernel
So we see that after checking the owner/group of all the files in the directory ‘linux’ and its two sub-directories ‘ubuntu’ and ‘redhat’. We issued the chown command with the ‘-R’ option to change both the owner and group. The command was successful and owner/group of all the files was changed successfully.
10. Using chown command on a symbolic link directory
Lets see what happens if we issue the ‘chown’ command to recursively change the owner/group of files in a directory that is a symbolic link to some other directory.
Here is a symbolic link directory ‘linux_symlnk’ that links to the directory ‘linux’ (already used in example ‘9’ above) :
$ ls -l linux_symlnk
lrwxrwxrwx 1 himanshu family 6 2012-05-22 22:02 linux_symlnk -> linux/
Now, lets change the owner (from himanshu to root) of this symbolic link directory recursively :
# chown -R root:friends linux_symlnk

# ls -l linux_symlnk/
-rw-r--r-- 1 himanshu friends    0 2012-05-22 21:52 linuxKernel
drwxr-xr-x 2 himanshu friends 4096 2012-05-22 21:52 redhat
drwxr-xr-x 2 himanshu friends 4096 2012-05-22 21:52 ubuntu
In the ouput above we see that the owner of the files and directories was not changed. This is because by default the ‘chown’ command cannot traverse a symbolic link. This is the default behavior but there is also a flag ‘-P’ for this.
11. Using chown to forcefully change the owner/group of a symbolic link directory recursively
This can be achieved by using the flag -H
# chown -R -H guest:family linux_symlnk

# ls -l linux_symlnk/
total 8
-rw-r--r-- 1 guest family    0 2012-05-22 21:52 linuxKernel
drwxr-xr-x 2 guest family 4096 2012-05-22 21:52 redhat
drwxr-xr-x 2 guest family 4096 2012-05-22 21:52 ubuntu
So we see that by using the -H flag, the owner/group of all the files/folder were changed.
12. List all the changes made by the chown command
Use the verbose option -v, which will display whether the ownership of the file was changed or retained as shown below.
# chown -v -R guest:friends linux
changed ownership of `linux/redhat/rh7' to guest:friends
changed ownership of `linux/redhat' retained to guest:friends
ownership of `linux/redhat_sym' retained as guest:friends
ownership of `linux/ubuntu_sym' retained as guest:friends
changed ownership of `linux/linuxKernel' to guest:friends
changed ownership of `linux/ubuntu/ub10' to guest:friends
ownership of `linux/ubuntu' retained as guest:friends
ownership of `linux' retained as guest:friends
netstat
How to Use netstat Command in Linux
The primary usage of netstat is without any parameters:
netstat
The first list in the output displays active established internet connections on the computer. The following details are in the columns:
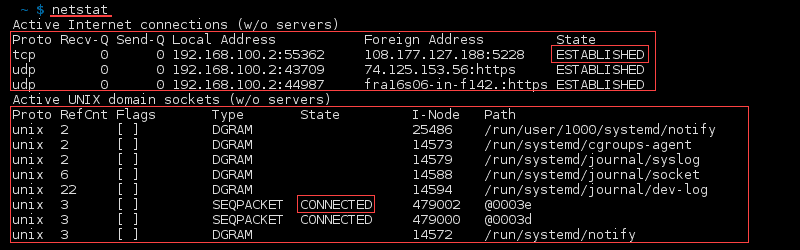
Proto – Protocol of the connection (TCP, UDP).
Recv-Q – Receive queue of bytes received or ready to be received.
Send-Q – Send queue of bytes ready to be sent.
Local address – Address details and port of the local connection. An asterisk () in the host indicates that the server is listening and if a port is not yet established.
Foreign address– Address details and port of the remote end of the connection. An asterisk () appears if a port is not yet established.
State – State of the local socket, most commonly ESTABLISHED, LISTENING, CLOSED or blank.
The second list shows all the active "Unix Domain" open sockets with the following details:
Proto – Protocol used by the socket (always unix).
RefCnt – Reference count of the number of attached processes to this socket.
Flags – Usually ACC or blank.
Type – The socket type.
State – State of the socket, most often CONNECTED, LISTENING or blank.
I-Node – File system inode (index node) associated with this socket.
Path – System path to the socket.
For advanced usage, expand the netstat command with options:
netstat [options]
Or list the options one by one:
netstat [option 1] [option 2] [option 3]
List All Ports and Connections
To list all ports and connections regardless of their state or protocol, use:
netstat -a

The output lists established connections along with servers which are open or listening.
List All TCP Ports
List all TCP ports by running:
netstat -at
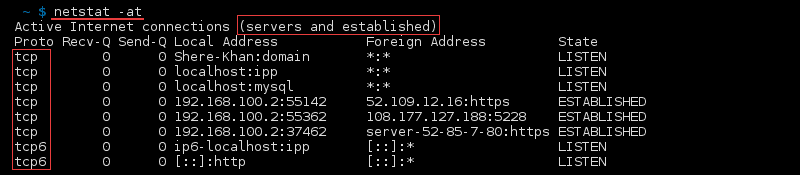
Terminal output of the command netstat -at
List All UDP Ports
List all UDP ports with:
netstat -au
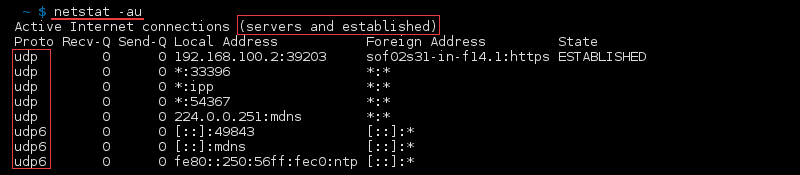
Terminal output of the command netstat -au
List Only Listening Ports
To return a list of only listening ports for all protocols, use:
netstat -l
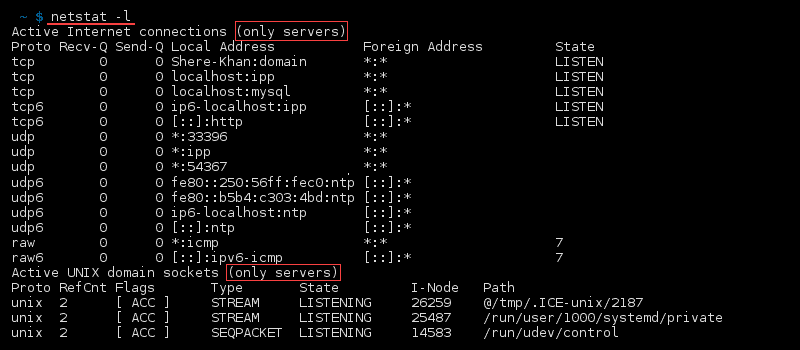
Terminal output of the command netstat -l
List TCP Listening Ports
List all listening TCP ports with:
netstat -lt

Terminal output of the command netstat -lt
List UDP Listening Ports
Return only listening UDP ports by running:
netstat -lu

Terminal output of the command netstat -lu
List UNIX Listening Ports
To list UNIX listening ports, use:
netstat -lx

Terminal output of the command netstat -lx
Display Statistics by Protocol
Display statistics for all ports regardless of the protocol with:
netstat -s
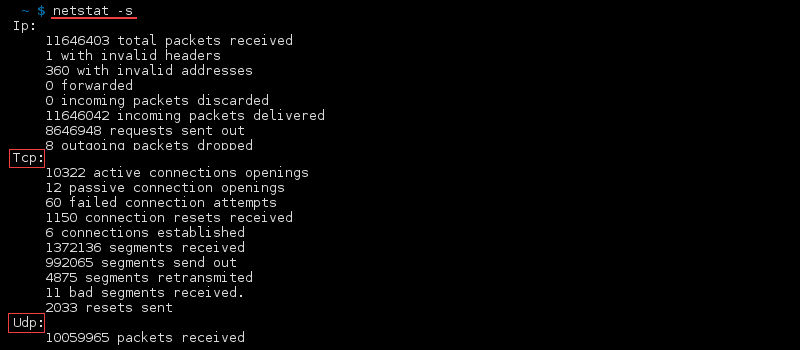
Terminal output of the command netstat -s
Statistics are also filterable by protocol.
List Statistics for TCP Ports
List statistics for TCP ports only with:
netstat -st
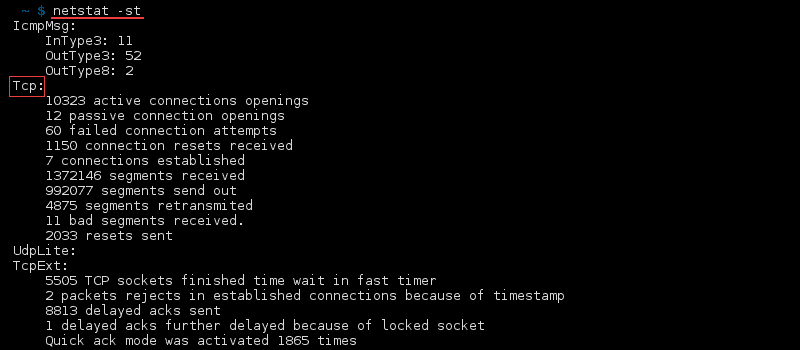
Terminal output of the command netstat -st
List Statistics for UDP Ports
To list statistics for UDP ports only, use:
netstat -su
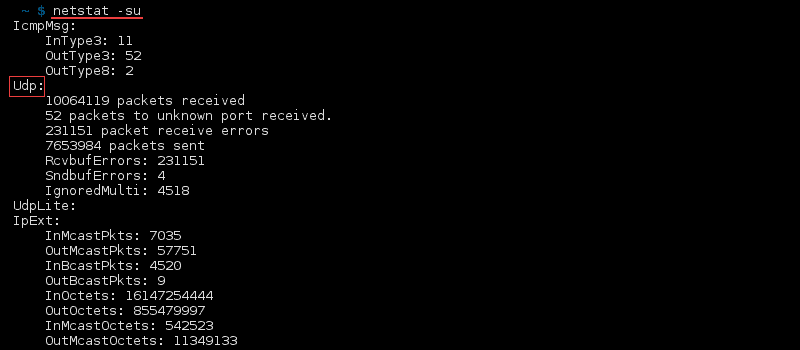
Terminal output of the command netstat -su
List Network Interface Transactions
To see transactions of MTU, receiving and transferring packets in the kernel interface table, use:
netstat -i

Terminal output of the command netstat -i
Display Extended Kernel Interface Table
Add the option -e to netstat -i to extend the details of the kernel interface table:
netstat -ie
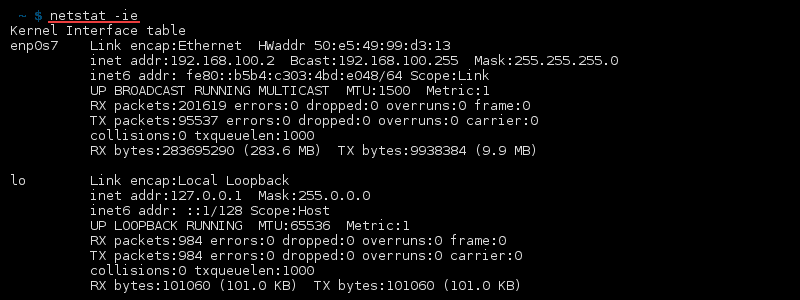
Terminal output of the command netstat -ie
Display Masqueraded Connections
For displaying masqueraded connections, use:
netstat -M
Display PID
Display the PID/Program name related to a specific connection by adding the -p option to netstat. For example, to view the TCP connections with the PID/Program name listed, use:
netstat -tp
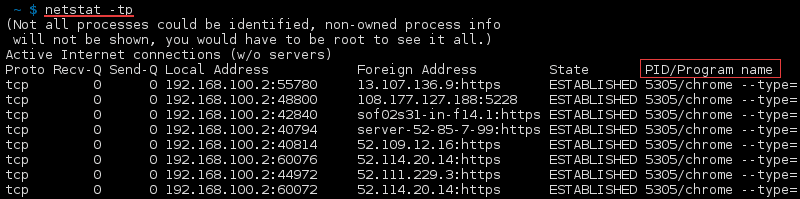
Terminal output of the command netstat -tp
Find Listening Programs
Find all listening programs with:
netstat -lp
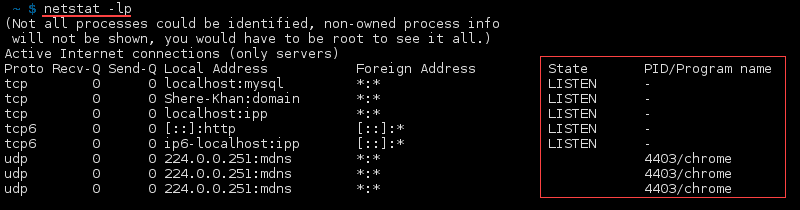
Terminal output of the command netstat -lp
Display Kernel IP Routing Table
Display the kernel IP routing table with:
netstat -r

Terminal output of the command netstat -r
Display IPv4 and IPv6 Group Membership
Display group membership for IPv6/IPv4 with:
netstat -g
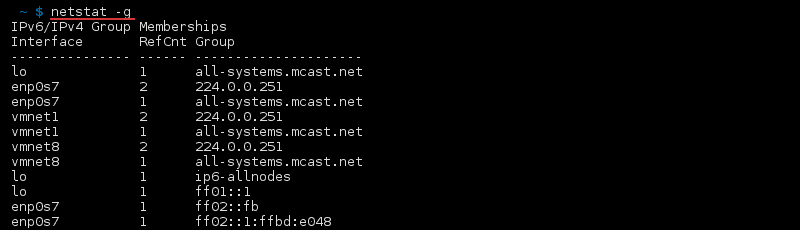
Terminal output of the command netstat -g
Print netstat Info Continuously
Add the -c option to the netstat command to print information every second:
netstat -c
For example, to print the kernel interface table continuously, run:
netstat -ic
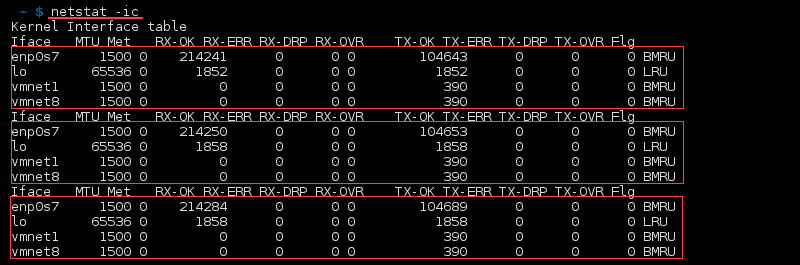
Terminal output of the command netstat -ic
Find Unconfigured Address Families
List addresses without support on the system with:
netstat --verbose

The information is found at the end of the output:
Terminal output of the command netstat --verbose
Display Numerical Addresses, Host Addresses, Port Numbers, and User IDs
By default, addresses, port numbers, and user IDs are resolved into human-readable names when possible. Knowing the unresolved port number is important for tasks such as SSH port forwarding.
Display Numerical Addresses
Show numerical addresses with:
netstat -n
Display Numerical Host Addresses
To show only host addresses as numerical, run:
netstat --numeric-hosts
Display Numerical Port Numbers
Show only ports as numerical with:
netstat --numeric-ports
Display Numerical User Ids
To display numerical user IDs, use:
netstat --numeric-users
Find a Process That Is Using a Particular Port
Make use of the grep command to filter the data from netstat. To find a process that is using a particular port number, run:
netstat -an | grep ':[port number]'
For example:
netstat -an | grep ':80'

Terminal output of the command netstat -an | grep
List All netstat Commands
There are many netstat options available. Access the list of all the available commands and a short description using:
netstat -h
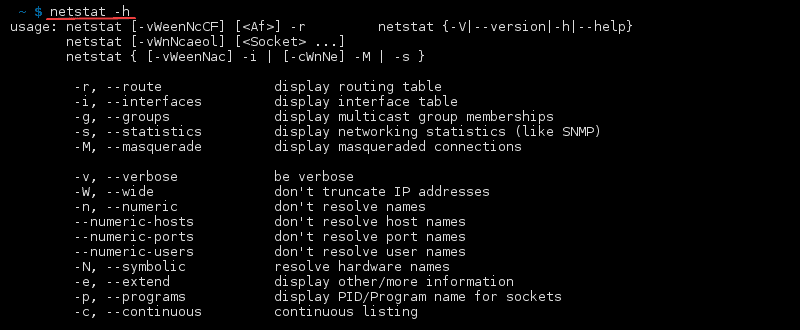
Terminal output of the command netstat -h
To display both the Ethernet statistics and the statistics for all protocols, type:
netstat -e -s
To display the statistics for only the TCP and UDP protocols, type:
netstat -s -p tcp udp
To display active TCP connections and the process IDs every 5 seconds, type:
netstat -o 5
To display active TCP connections and the process IDs using numerical form, type:
netstat -n -o
Show Specific Connections Only
netstat -0 | findstr 28604
Show Protocol-Specific Stats
netstat -s -p tcp -f
Show Updated Network Stats
netstat -e -t 5
route
Using the route command displays or modifies the computer's routing table. For a typical computer that has a single network interface and is connected to a local area network (LAN) that has a router, the routing table is pretty simple and isn't often the source of network problems. Still, if you're having trouble accessing other computers or other networks, you can use the route command to make sure that a bad entry in the computer's routing table isn't the culprit.
For a computer with more than one interface and that's configured to work as a router, the routing table is often a major source of trouble. Setting up the routing table properly is a key part of configuring a router to work.
Displaying the routing table
To display the routing table (both IPv4 and IPv6) in Windows, use the route print command. In Unix/Linux, you can just use route without any command line switches. The output displayed by the Windows and Unix/Linux commands are similar. Here's an example from a typical Windows client computer:
C:\>route print
==================================================================
Interface List
 8 ...00 12 3f a7 17 ba ...... Intel(R) PRO/100 VE Network Connection
 1 ........................... Software Loopback Interface 1
 9 ...02 00 54 55 4e 01 ...... Teredo Tunneling Pseudo-Interface
10 ...00 00 00 00 00 00 00 e0 isatap.{D0F85930-01E2-402F-B0FC-
31DFF887F06F}
==================================================================
IPv4 Route Table
==================================================================
Active Routes:
Network      Netmask    Gateway       Interface     Metric
Destination
0.0.0.0      0.0.0.0     192.168.1.1  192.168.1.110   276
127.0.0.0    255.0.0.0   On-link      127.0.0.1       306
127.0.0.1    255.255.255.255 On-link      127.0.0.1       306
127.255.255.255  255.255.255.255 On-link      127.0.0.1       306
192.168.1.0      255.255.255.0   On-link      192.168.1.110   276
192.168.1.110    255.255.255.255 On-link      192.168.1.110   276
192.168.1.255    255.255.255.255 On-link      192.168.1.110   276
224.0.0.0    240.0.0.0   On-link      127.0.0.1       306
224.0.0.0    240.0.0.0   On-link      192.168.1.110   276
255.255.255.255  255.255.255.255 On-link      127.0.0.1 306
255.255.255.255  255.255.255.255 On-link      192.168.1.110   276
=================================================================
Persistent Routes:
Network Address     Netmask     Gateway Address   Metric
    0.0.0.0     0.0.0.0     192.168.1.1       Default
=================================================================
IPv6 Route Table
=================================================================
Active Routes:
If Metric Network Destination   Gateway
9   18 ::/0         On-link
1   306 ::1/128         On-link
9   18 2001::/32        On-link
9   266 2001:0:4136:e38c:2c6c:670:3f57:fe91/128
                On-link
8   276 fe80::/64       On-link
9   266 fe80::/64       On-link
10  281 fe80::5efe:192.168.1.110/128
                On-link
8   276 fe80::cca:9067:9427:a911/128
                On-link
9   266 fe80::2c6c:670:3f57:fe91/128
                On-link
1   306 ff00::/8        On-link
9   266 ff00::/8        On-link
8   276 ff00::/8        On-link
=================================================================
Persistent Routes:
None
C:>
For each entry in the routing table, five items of information are listed:
The destination IP address Actually, this is the address of the destination subnet, and must be interpreted in the context of the subnet mask.
The subnet mask that must be applied to the destination address to determine the destination subnet
The IP address of the gateway to which traffic intended for the destination subnet will be sent
The IP address of the interface through which the traffic will be sent to the destination subnet
The metric, which indicates the number of hops required to reach destinations via the gateway
Each packet that's processed by the computer is evaluated against the rules in the routing table. If the packet's destination address matches the destination subnet for the rule, the packet is sent to the specified gateway via the specified network interface. If not, the next rule is applied.
The computer on which I ran the route command in this example is on a private 192.168.1.0 subnet. The computer's IP address is 192.168.1.100, and the default gateway is a router at 192.168.1.1.
How to View the Network Routing Table in Linux?

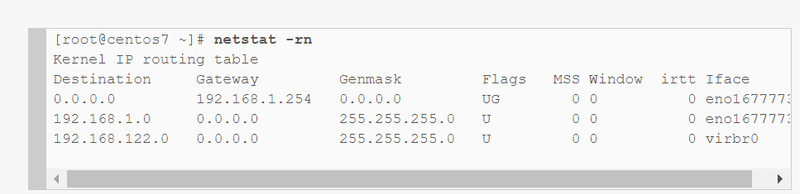
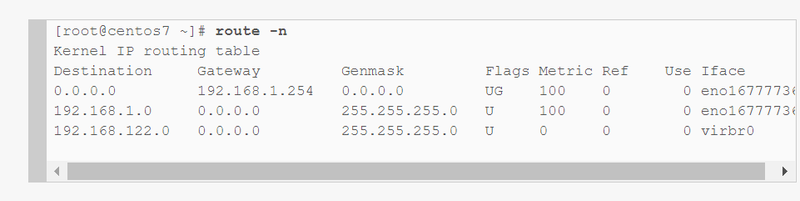
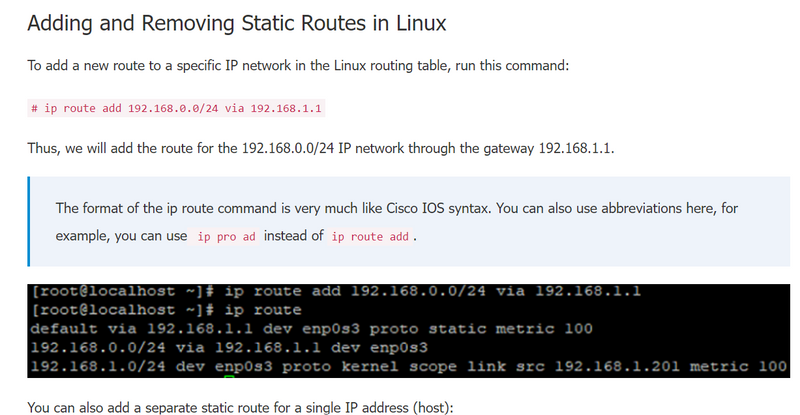
vmstat
Display Active and Inactive System Memory
Active memory is memory in use by a process. Inactive memory is memory that was allocated to a process which is no longer running.
Using the -a option replaces the buff and cache memory columns with inact and active columns. These columns display the amount of inactive and active memory in a system.
To view the information, run this command:
vmstat -a

Using vmstat to see active and inactive memory in Linux.
The output shows memory statistics in kilobytes by default. To generate a report using megabytes, use the -S option.
Memory and Scheduling Statistics
To generate more detailed information about memory, event counters, and CPU scheduling statistics, run the following command:
vmstat -s
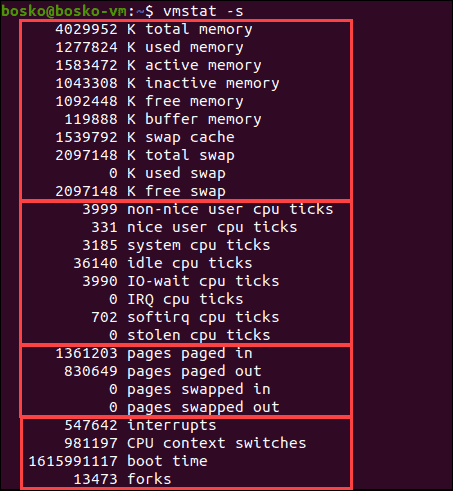
Using vmstat to see memory and scheduling statistics in Linux.
The output shows a report similar to the vmstat basic report, with more details in some sections. For example, the output splits the nice and non-nice CPU time, which are combined in the basic vmstat report.
There are four sections in the output:
1. The first section of the output deals with the amount of used memory:
- Total physical memory.
- Currently used memory.
- Active memory.
- Inactive memory.
- Free memory.
- Buffer memory.
- Cache memory.
Swap memory information.
2. The second section displays CPU statistics:Non-nice CPU ticks – the number of times the CPU was used for high priority processes.
Nice CPU ticks – the number of times the CPU was used for lower priority processes.
System CPU ticks – the number of times the CPU was used for kernel processes.
Idle CPU ticks – the number of times the CPU was idle.
IO-wait – the number of times the CPU was used for input/output management.
IRQ – the number of times the CPU received interrupt requests.
softirq – the number of times the CPU received software interrupts.
stolen CPU ticks – the number of times a virtual machine stole CPU time.
3. The third section shows values related to memory paging:Total pages paged in from virtual memory.
Total pages paged out to virtual memory.
Total pages read from swap memory.
Total pages written to swap memory.
4. The last section describes various event counters:The number of interrupts since boot.
The number of context switches performed.
The timestamp for the last boot time.
The total number of forks.
Display Number of Forks Since Boot
Forks are new processes created from existing running ones. To see the number of forks created since system startup, run the following command:
vmstat -f

Use vmstat to see the number of forks created since boot.
The output shows the number of forks created since system boot.
Display Quick Summary Disk Statistics
The -D option generates a quick summary statistic of all disk activity. Run the following command:
vmstat -D
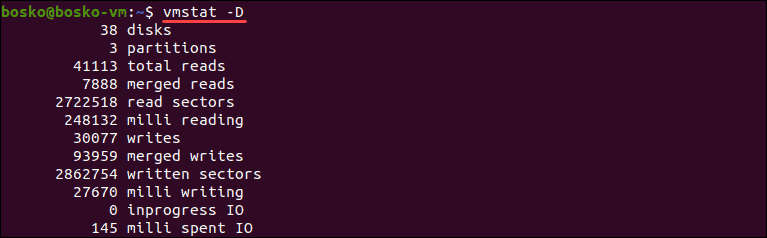
See disk statistics using vmstat in Linux.
The output shows the system details, such as the number of disks, partitions, the number of reads, writes, etc.
Note: If you are using Ubuntu, the disk count is usually higher than your actual number of disks. This is because installing Snap applications creates a SquashFS pseudo-filesystem, which is attached to a /dev/loop device, and vmstat counts it as a disk.
Display Disk Statistics (Read/Write Stats)
To get a detailed statistic on each disk usage, use the -d option:
vmstat -d
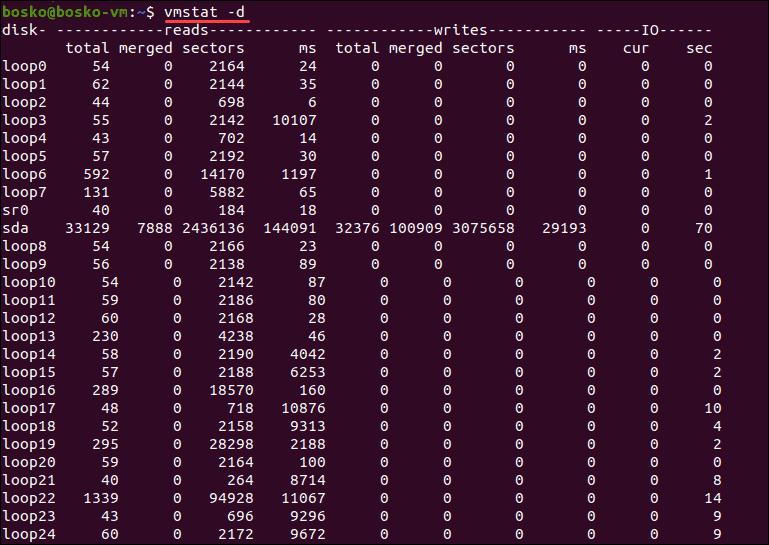
Use vmstat to see detailed disk statistics.
The output shows three columns for each disk – Reads, Writes, and IO. Read and Write are measured in milliseconds, while the IO column is measured in seconds.
Each column has several subsections:
1. Reads:
total: The total number of disk reads.
merged: The total number of grouped reads.
sectors: The total number of sectors that have been read in.
ms: The total number of time it took to read data from the disk, in milliseconds.
2. Writes:
total: The total number of disk writes.
merged: The total number of grouped writes.
sectors: The total number of sectors written to.
ms: The total number of time it took to write data to the disk, in milliseconds.
3. IO:
cur: Total current disk reads or writes.
sec: Time spent for any in-progress reads or writes, in seconds.
Display Partition Statistics
Generate a report related to a specific partition by using the -p option, followed by a partition name:
vmstat -p [partition_identifier]

Use vmstat to see partition statistics in Linux.
In this example, the output shows the summary for sda1, the first partition of the sda device. The summary includes the disk read and write count on that partition and the total number of sectors involved in disk read and write tasks.
Display Timestamp Information for Updates
To get a timestamp along with a requested output, use the -t option:
vmstat -t

Add a timestamp to vmstat basic output.
The output is the same as the basic vmstat output, with an added timestamp.
Use a Delay Value
The [delay] syntax specifies the time elapsed between each output update, expressed in seconds. Use the following syntax:
vmstat [delay]

Add a delay value to the vmstat command in Linux.
In this example, there is a three-second delay between each report update.
If no delay is specified, only one output is printed, giving average values since the last reboot.
Note: A low delay value burdens the system because it runs the command infinitely until you stop it manually with the Ctrl+C key combo. To avoid the extra load, use a count value along with a delay value. The syntax is vmstat [delay[count]], and it is explained in detail in the following section.
Use a Count Value
The count value lets vmstat know how many updates to carry out before the output stops refreshing. To run a command an infinite number of times, omit the [count] syntax.
The syntax for using the count value is:
vmstat [delay[count]]

Use a count value with the vmstat command in Linux.
In this example, we specified that we want a five-second delay and three output updates.
Change Units
The default unit for displaying memory and swap statistics is kilobytes. To change the output units, use the -S option and one of the following arguments:
k: 1000 bytes.
K: 1024 bytes.
m: 1000000 bytes.
M: 1048576 bytes.
To display the statistics in decimal kilobytes and megabytes, use k and m, respectively. Upper case K and M display statistics in hexadecimal kilobytes and megabytes.
For example, use the following command to update the statistics every 5 seconds and to change the display units to megabytes:
vmstat 5 -S M

Change output units when using the vmstat command in Linux.
The output now shows the memory and swap statistics in megabytes.
Display Statistics for Slabs
Slab allocation is a memory management system for efficiently allocating memory to various data objects that the kernel handles.
To see slab statistics, use the -m option. Note that this action requires superuser permissions. Run the following command:
sudo vmstat -m
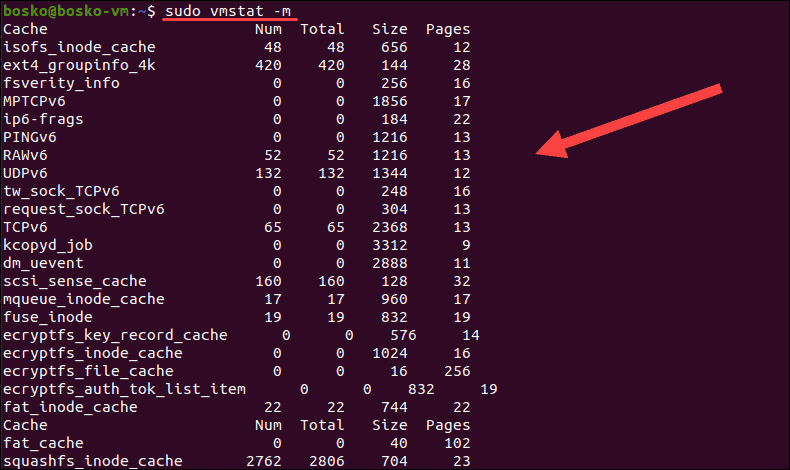
Use vmstat to see slab statistics in Linux.
The output consists of five columns:

1. Cache: Cached data name.

2. Num: Total active objects in the Num cache.

3. Total: The number of available objects in a specific cache.

4. Size: The size of each cached object.

5. Pages: The number of memory pages containing a cached object.
visudo
sudo= s for super, u for user, do
The visudo command is a safe and secure way of editing the /etc/sudoers file on UNIX and Linux systems. /etc/sudoers is instumental for gaining privileged access via sudo command.
Since the sudoers file determines which users can run administrative tasks, those requiring superuser privileges, it is a good idea to take some precautions when editing it, and that’s what visudo does.
It locks the sudoers file so it cannot be edited by anyone else simultaneously. It also checks the syntax of your edits and provides basic sanity checks. If someone else is editing the file you’ll get a message to try later, and if there are errors in your edits it wont save them.
Preventing simultaneous editing by someone else is helpful to ensure your edits aren’t lost, and saving a sudoers file without errors is important because you could otherwise end up locked out of your system. An unreadable sudoers file will prevent you from running administrative tasks by using the sudo command or becoming root, and editing the sudoers file itself requires those privileges. So you really don’t want to screw that one up.
Visudo is basically a wrapper for a text editor such as vi or nano. Vi is traditionally the default unless your distribution or OS has something else set up. For basics on how to use vi for editing check out the vi survival guide.
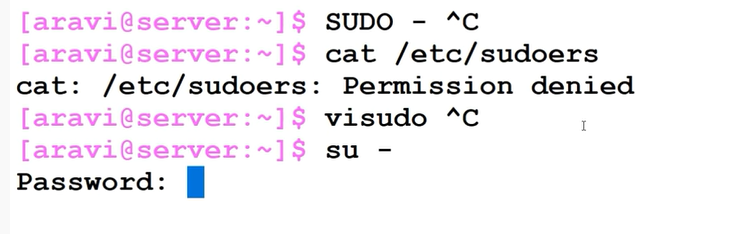
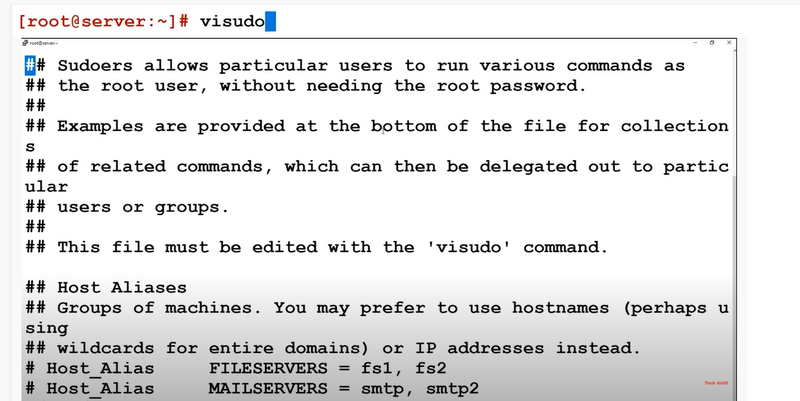

This gives the root user all of the superuser privileges, as can be expected. The format of the rule set such as this is as follows:
root ALL=(ALL:ALL) ALL
In case where all of them are set to ALL, like for root, it means that the user can run all commands on all hosts, as all users and groups.
user hosts=(users:groups) commands
If all you want is enable another user with the same powers as root
daniel ALL=(ALL:ALL) ALL
you can allow “daniel” to only run certain commands:
daniel ALL=(ALL:ALL) mytop,cat,tail
Besides users you can also give superuser permissions to groups using a % indicator
This would allow all users in the admin group to run all commands as root
%admin ALL=(ALL) ALL
Aliases in /etc/sudoers
you can set up aliases to group multiple entries into a single one for use in these statements
There are four types of aliases:
- User_Alias for listing users,
- Runas_Alias for listing users a given user can run as,
- Host_Alias for listing hosts,
- Cmnd_Alias for listing commands. To set up an alias just state the alias type, its name, and then the list of users, hosts or commands you want to associate it with. For example to set up a User_Alias you can do this:

All the other aliases follow the same format only with the different specified type, and listing different types of things, like users, hosts or commands. If we wanted to put the three commands from the above example with the “daniel” user under an alias we could do this:
And then instead of listing these two commands in our configuration for daniel we can just specify the READ alias:

It works the same way for other types of aliases. If we want to give the same privileges to users steve, bill, and james we can say:

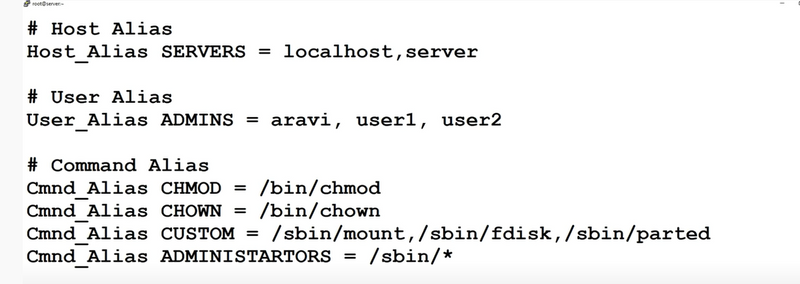
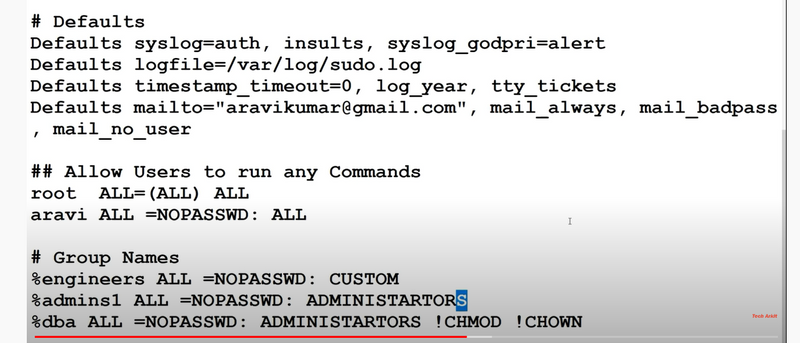
Practical Scenario
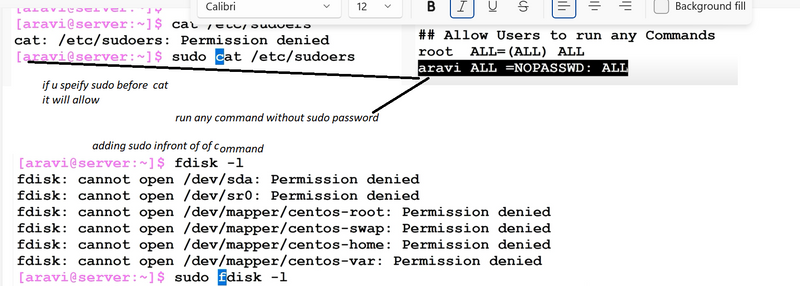
Search custom commands

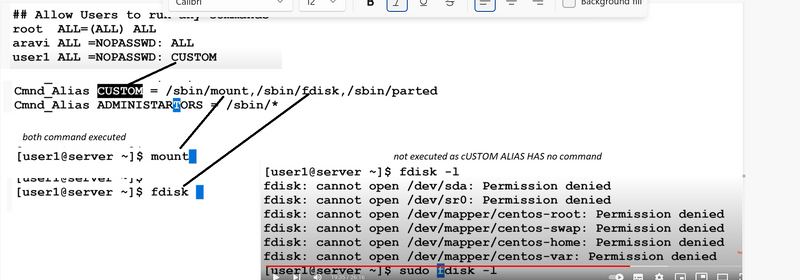
check log file
tail -f storage/logs/laravel.log
search word in vi editor
/tools
for permision errors
chown -R daemon:daemon .

Top comments (0)