django-database-connectitvity
django-database-connectitvity
django-database-connectitvity
django-database
django-mysql
Django Database Connectivity
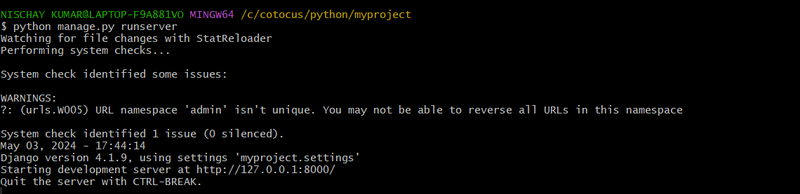
The settings.py file contains all the project settings along with database connection details. By default, Django works with SQLite, database and allows configuring for other databases as well.
Database connectivity requires all the connection details such as database name, user credentials, hostname drive name etc.
To connect with MySQL, django.db.backends.mysql driver is used to establishing a connection between application and database. Let's see an example.
We need to provide all connection details in the settings file. The settings.py file of our project contains the following code for the database.
DATABASES = {
    'default': {
        'ENGINE': 'django.db.backends.mysql',
        'NAME': 'djangoApp',
        'USER':'root',
        'PASSWORD':'mysql',
        'HOST':'localhost',
        'PORT':'3306'
    }
}
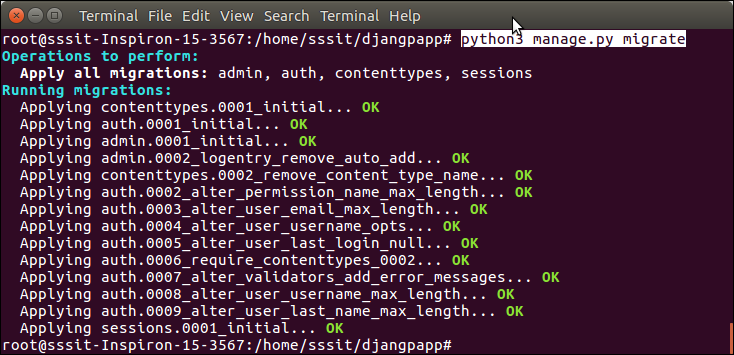
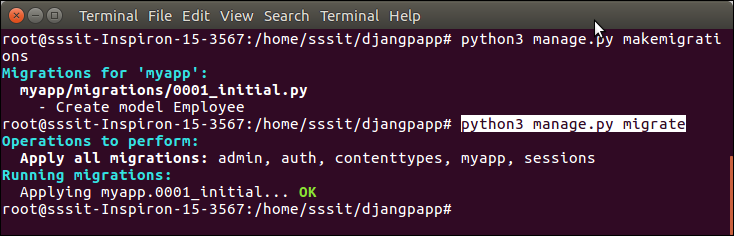
After providing details, check the connection using the migrate command.
$ python3 manage.py migrate
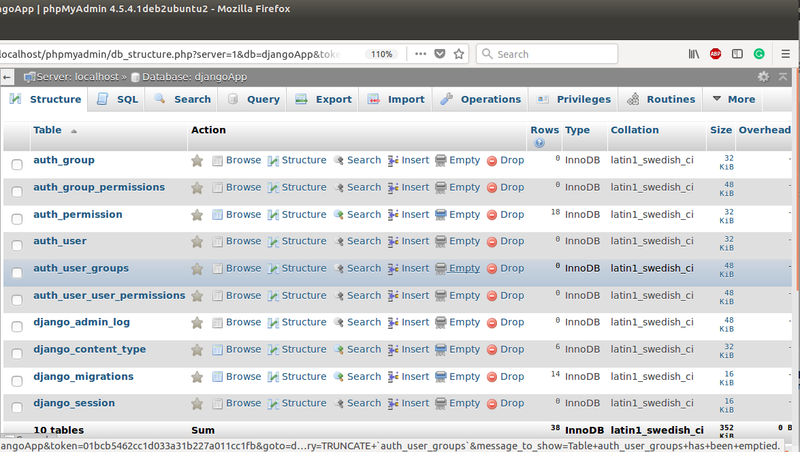
This command will create tables for admin, auth, contenttypes, and sessions. See the example.
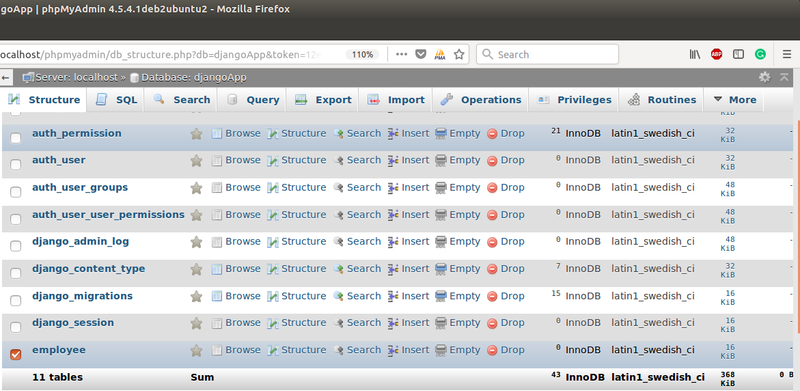
Now, access to the MySQL database and see the database from the list of databases. The created database contains the following tables.

Note: It throws an error if database connectivity fails: django.db.utils.OperationalError: (1045, "Access denied for user 'root'@'localhost' (using password: YES)")
Migrating Model
Well, till here, we have learned to connect Django application to the MySQL database. Next, we will see how to create a table using the model.
Each Django's model is mapped to a table in the database. So after creating a model, we need to migrate it. Let's see an example.
Suppose, we have a model class Employee in the models.py file that contains the following code.
// models.py

from django.db import models
class Employee(models.Model):
    eid      = models.CharField(max_length=20)
    ename    = models.CharField(max_length=100)
    econtact = models.CharField(max_length=15)
    class Meta:
        db_table = "employee"
Django first creates a migration file that contains the details of table structure. To create migration use the following command.
$ python3 manage.py makemigrations
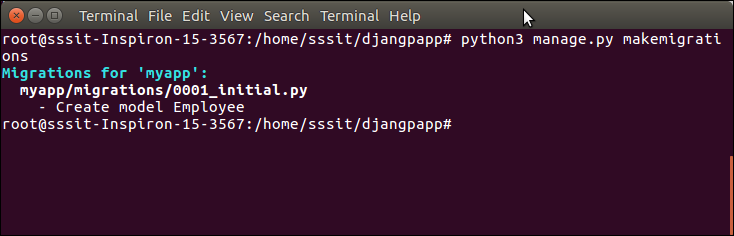
The created migration file is located into migrations folder and contains the following code.
from django.db import migrations, models
class Migration(migrations.Migration):
    initial = True
    dependencies = [
    ]
    operations = [
        migrations.CreateModel(
            name='Employee',
            fields=[
                ('id', models.AutoField(auto_created=True, primary_key=True, serialize=False, verbose_name='ID')),
                ('eid', models.CharField(max_length=20)),
                ('ename', models.CharField(max_length=100)),
                ('econtact', models.CharField(max_length=15)),
            ],
            options={
                'db_table': 'employee',
            },
        ),
    ]
Now, migrate to reflect the changes into the database.
$ python3 manage.py migrate
Check the database again, now it contains the employee table.
Django Database Migrations
Migration is a way of applying changes that we have made to a model, into the database schema. Django creates a migration file inside the migration folder for each model to create the table schema, and each table is mapped to the model of which migration is created.
Django provides the various commands that are used to perform migration related tasks. After creating a model, we can use these commands.
makemigrations : It is used to create a migration file that contains code for the tabled schema of a model.
migrate : It creates table according to the schema defined in the migration file.
sqlmigrate : It is used to show a raw SQL query of the applied migration.
n Django, sqlmigrate is a management command that displays the SQL statements for a given migration. This can be useful to inspect the SQL changes that will be applied when you run a migration. Here's how you can use sqlmigrate in Django:
First, navigate to your Django project directory in the terminal.
Run the following command to generate SQL for a specific migration:
python manage.py sqlmigrate <app_name> <migration_name>
Replace with the name of your Django app and with the migration name or number. You can find the migration name by looking at the files in the migrations directory of your app.
Here's a simple example:
Suppose you have a Django app named myapp with a migration named 0002_add_column.py. To get the SQL statements for this migration, run:
python manage.py sqlmigrate myapp 0002_add_column
This command will output the SQL statements that would be executed if you were to run the migration.
Example output:
BEGIN;
--
-- Add field new_field to mymodel
--
ALTER TABLE "myapp_mymodel" ADD COLUMN "new_field" varchar(255) NOT NULL;
COMMIT;
You can use the sqlmigrate command to review the SQL generated by Django before applying it to your database. Keep in mind that this doesn't actually execute the migration; it only shows you the SQL statements that would be executed.
Remember to replace myapp and 0002_add_column with your actual app name and migration name.
showmigrations : It lists out all the migrations and their status.
Suppose, we have a model as given below and contains the following attributes.
Model
//models.py

from django.db import models
class Employee(models.Model):
    eid = models.CharField(max_length=20)
    ename = models.CharField(max_length=100)
    econtact = models.CharField(max_length=15)
    class Meta:
        db_table = "employee"
To create a migration for this model, use the following command. It will create a migration file inside the migration folder.
$ python3 manage.py makemigrations
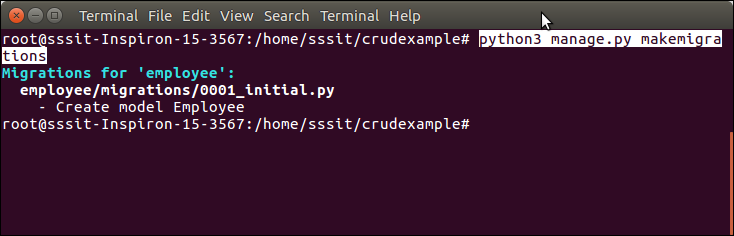
This migration file contains the code in which a Migration class is created that contains the name and fields of employee table.
Migrations
// 0001_initial.py

from django.db import migrations, models
class Migration(migrations.Migration):
    initial = True
    dependencies = [
    ]
    operations = [
        migrations.CreateModel(
            name='Employee',
            fields=[
                ('id', models.AutoField(auto_created=True, primary_key=True, serialize=False, verbose_name='ID')),
                ('eid', models.CharField(max_length=20)),
                ('ename', models.CharField(max_length=100)),
                ('econtact', models.CharField(max_length=15)),
            ],
            options={
                'db_table': 'employee',
            },
        ),
    ]
After creating a migration, migrate it so that it reflects the database permanently. The migrate command is given below.
$ python3 manage.py migrate

Apart from creating a migration, we can see raw SQL query executing behind the applied migration. The sqlmigrate app-name migration-name is used to get raw SQL query. See an example.
$ python3 manage.py migrate
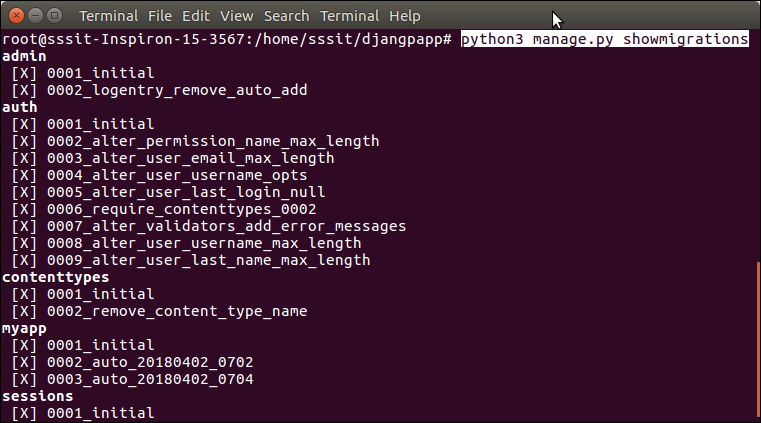
And showmigrations command is used to show applied migrations. See the example.
If no app-name is provided, it shows all migrations applied to the project.
$ python3 manage.py showmigrations
We can get app-specific migrations by specifying app-name, see the example.
$ python3 manage.py showmigrations myapp

Django Middleware
In Django, middleware is a lightweight plugin that processes during request and response execution. Middleware is used to perform a function in the application. The functions can be a security, session, csrf protection, authentication etc.
Django provides various built-in middleware and also allows us to write our own middleware. See, settings.py file of Django project that contains various middleware, that is used to provides functionalities to the application. For example, Security Middleware is used to maintain the security of the application.
// settings.py

MIDDLEWARE = [
    'django.middleware.security.SecurityMiddleware',
    'django.contrib.sessions.middleware.SessionMiddleware',
    'django.middleware.common.CommonMiddleware',
    'django.middleware.csrf.CsrfViewMiddleware',
    'django.contrib.auth.middleware.AuthenticationMiddleware',
    'django.contrib.messages.middleware.MessageMiddleware',
    'django.middleware.clickjacking.XFrameOptionsMiddleware',
]
Creating Own Middleware
middleware is a class that takes an argument get_response and returns a response.
class FirstMiddleware:
    def __init__(self, get_response):
        self.get_response = get_response

    def __call__(self, request):
        response = self.get_response(request)
        return response
__init__(get_response)
It must accept the get_response argument because Django initializes middleware with only it. It calls only once whereas call executes for each request.
Activating Middleware
To activate middleware, add it to the MIDDLEWARE list of the settings.py file.
MIDDLEWARE = [
    'django.middleware.security.SecurityMiddleware',
    'django.contrib.sessions.middleware.SessionMiddleware',
    'django.middleware.common.CommonMiddleware',
    'django.middleware.csrf.CsrfViewMiddleware',
    'django.contrib.auth.middleware.AuthenticationMiddleware',
    'django.contrib.messages.middleware.MessageMiddleware',
    'django.middleware.clickjacking.XframeOptionsMiddleware',
  'add new created middleware here'
]
A Django project does not require middleware, the MIDDLEWARE list can be empty but recommended that have at least a CommonMiddleware.
Middleware Order and Layering
Middleware applies in the order it is defined in MIDDLEWARE list and each middleware class is a layer. The MIDDLEWARE list is like an onion so each request passes through from top to bottom and response is in reverse order (bottom to up).
Other Middleware Methods
Apart from request and response, we can add three more methods to add more features to our middleware.
process_view(request, view_func, view_args, view_kwargs )
It takes HttpRequest object, function object, list of arguments passed to the view or a dictionary of arguments respectively.
This method executes just before the calling of view. It returns either None or HttpResponse, if it returns an HttpResponse, it stops processing and return the result.
process_template_response(request,response)
It takes two arguments first is a reference of HttpRequest and second is HttpResponse object. This method is called just after the view finished execution.
It returns a response object which implements the render method.
process_exception(request, exception)
This method takes two arguments, first is HttpRequest object and second is Exception class object that is raised by the view function.
This method returns either None or HttpResponse object. If it returns a response, the middleware will be applied and the result returns to the browser. Otherwise, the exception is handle by default handling system.

Top comments (0)