What Is AWS VPC?
Concept of VPC in AWS
How to launch VPN in AWS
Question
What does VPC (Virtual Private Cloud) resemble
How does Aws provides high-performance and low-latency network
what advantage does launching resources into a virtual network provide
How does assigning an IP address range to each VPC facilitate the deployment of resources like instances
How many subnet within single vpc
how vpc operate in dual stack mode
EC2 instance is resources or services where it is launched
How you can have multiple resources in EC2 instances using vpc
Is good having multiple subnet in each availibilty zones
practice all the images
- AWS VPC stands for Amazon Web Services Virtual Private Cloud.
- AWS VPC resembles a traditional network in a data centre.
- AWS provides a high-performance and low-latency network . how-does-aws-provides-high-performance-and-low-latency-network We can think of a VPC as an isolated container for an AWS account that is specified with an IP range.
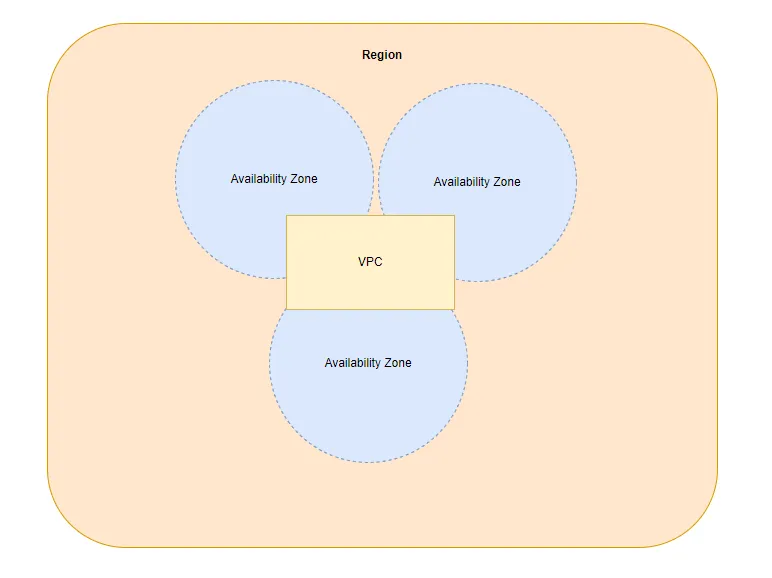
- A region in AWS has multiple availability zones. Think of an availability zone as a discrete data centre within an AWS region.
- A VPC spans all availability zones in a region .
We can use AWS VPC to launch AWS resources into a virtual network.
- A VPC is dedicated to an AWS account and it is isolated from other VPCs in the AWS cloud. Each VPC can be given an IP address range and we can then deploy our resources such as instances and use AWS resources within the isolated VPC. These IP addresses are in the form of a CIDR block. A VPC has a router that uses the route table. The route table controls where the traffic is directed.
- AWS VPC allows us to use AWS's scalable infrastructure and services that AWS offers.
- A VPC can operate in a dual-stack mode means Virtual Private Cloud (VPC) in dual-stack mode means that the VPC supports both IPv4 and IPv6 addressing.
- We can type in VPC in Amazon Console to view the VPCs, subnets and gateways if needed.
- An AWS resource such as an EC2 instance can be launched within a VPC. We can browse the Network settings to select the appropriate VPC.
- A VPC can have multiple subnets, each within a single availability zone .
Over the years, I have used cloud services on diffrent ocassions from most of the major vendors — Microsoft, Google and Amazon. I know what is public, private or hybrid cloud but never had a chance to setup one by myself in any of the cloud environments. Having the theoratical concept, it always intimidated to setup a VPC by myself. Recently, I had an opportunity to work on a project where I had to setup the infrastrucutre in AWS from the scratch including the VPC. So, today we are going to talk about the VPCs on AWS cloud.
As with all the cloud services, AWS manages with underlying infrastrucute and network components of the VPC. All the network hardware will be transparent from the end-users. Contrary to the traditional approach, where one had to initially genearate a request to purchase the hardware, get it installed and configure it, which took ages to have a VPC in place. Cloud VPC is can configured in few seconds and you can have your services ready to use in few mintues.
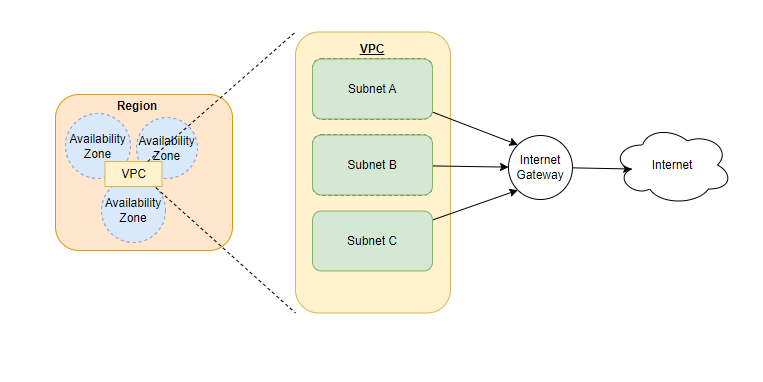
Most of the cloud providers have different availability zones to offer higher availability and reliability. So, a VPC has one or more subnets where each subnets exist in an availability zone. Then you can have multiple resources (ec2 instance) in a subnet. Having said that, if we have mutilple subnets in different availability zones, it will provide the redundacny for the infrastrucutre. Fig 1. shows that redundant architecture with instances in two different availability zones.
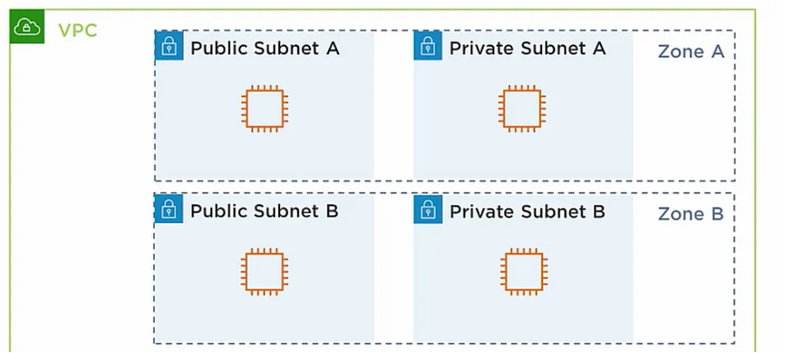
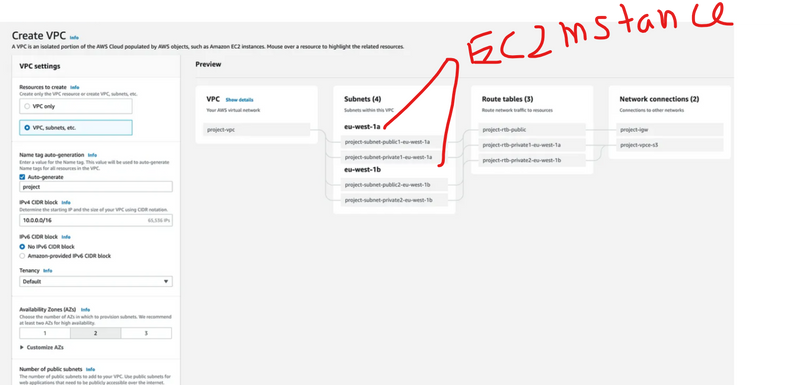
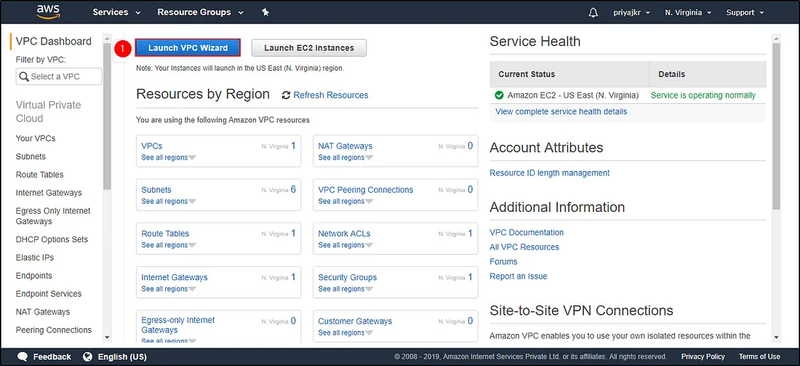
Let’s follow the wizard to create a new VPC as shown in the above diagram with a public and a private subnet. We will also need to configure the NAT gateway for our private subnet to have access to the internet. Public subnet will have both inbound and outbound access to the internet. On AWS console, go to VPC dasbhoard and select launch VPC.
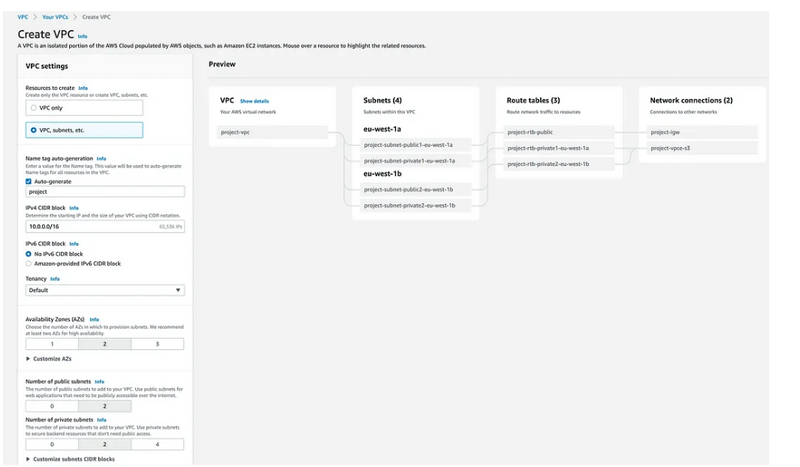
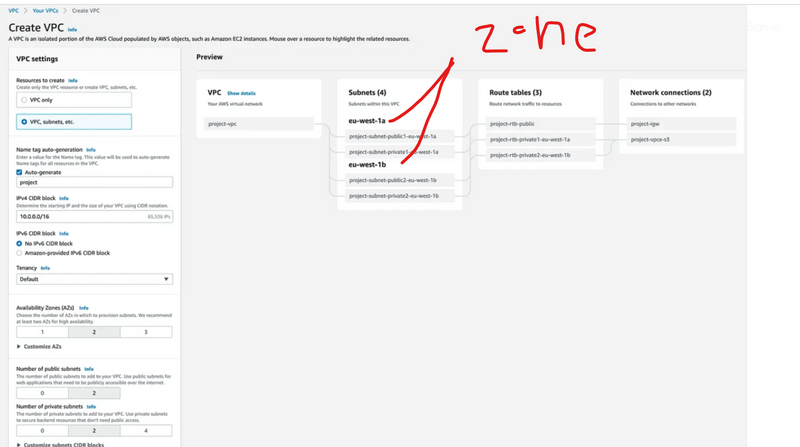
You will see the view as in Fig 2. You can select the IP settings, no of availability zones, number of public and private subnets based on the availability zones and other settings. Once you clicke the create, it should create a VPC, 4 subnets, 3 route tables and 2 network connections as shown in the figure 2.
Each subnet will have an associated route table which shows that how the internet traffic will flow for that specific subnet e.g. only private network or traffic can be both public network as well as private network. You see all of the created resources from the left hand side navigation and change their settings accrodingly.
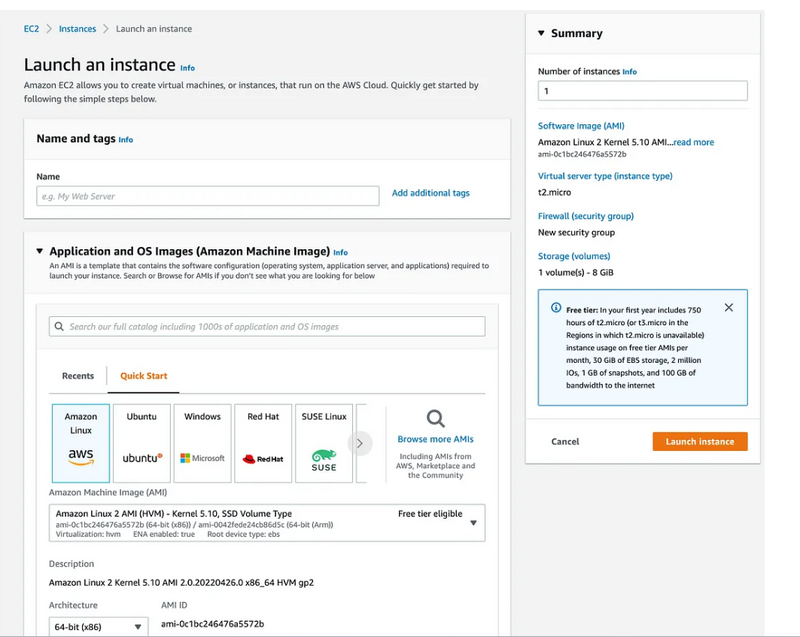
Next step is to launch the ec2 instances inside the already created subnets. There are twos ways to create the instance, either from the console or using the aws cli. Use the follow command to create an ec2 inside a specific subnet
aws ec2 run-instances --subnet-id subnet-xyz123dummyid --image-id ami-123randomid --instance-type t2.micro
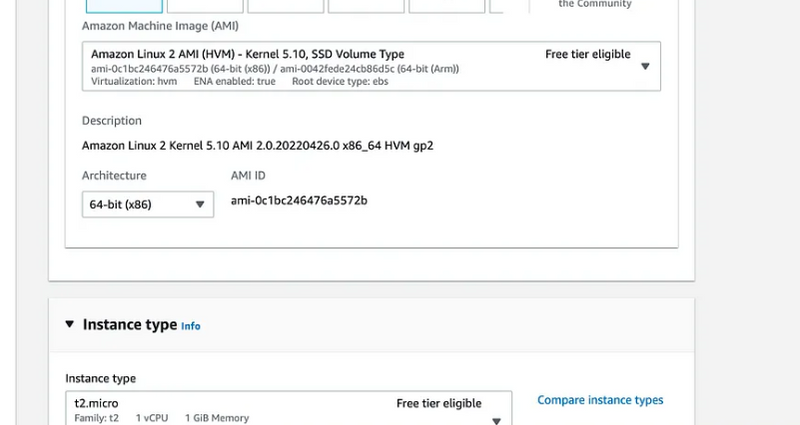
Similarly, once you go to the console and launch ec2 dashboard, select launch instance. You will be able to specify the name, application and OS image, specify the instance type and choose key pair as well.
Now, we can launch instances in the same way in the other subnets as well to complete our infrastrucutre settings as shown in Fig.1.
Once we have configuration complete, we need to make sure how our VPC is accessible and connected with other VPCs across the globe. AWS offers two ways, Direct connect — expensive but provides low latency, and VPN connection. VPN connection is encrypted connection over the internet and have two variations — virtual private gateway and transit gateway. Virtual private gateway enables you to establish a VPN tunnel with only one VPC. On the other hand, Transit gateway is much more robust and allows to connect multiple VPCs together. So, we will use the transit gateway to cofigure that connection.
So to summarize, VPCs enables you to build a virtual network in the cloud — no VPNs, hardware, or physical datacenters required. One can define their own network, and control how the network and the Amazon EC2 resources inside the network are exposed to the Internet. It is also easy to leverage the enhanced security options in Amazon VPC to provide more granular access to and from the Amazon EC2 instances in the virtual network.
Creating A VPC Using AWS Console
Creating a VPC using AWS Console is very easy. It is just a matter of a few clicks. Let me walk you through the process:
Step 1: Navigate to the VPC Dashboard. Here you will see a “Launch VPC Wizard” click on it.
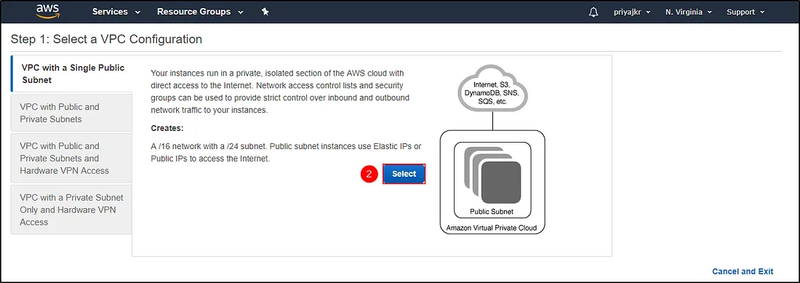
Step 2: This is the “VPC creation” wizard. Here you can find 4 different options:
- VPC with Single Public Subnet, the one we are going to choose.
- VPC with Public and Private Subnets.
- VPC with Public and Private Subnets and Hardware VPN Access.
- VPC with a Private Subnet only and Hardware VPN Access . So let’s start by creating a VPC with a single public subnet. Click on “Select“.
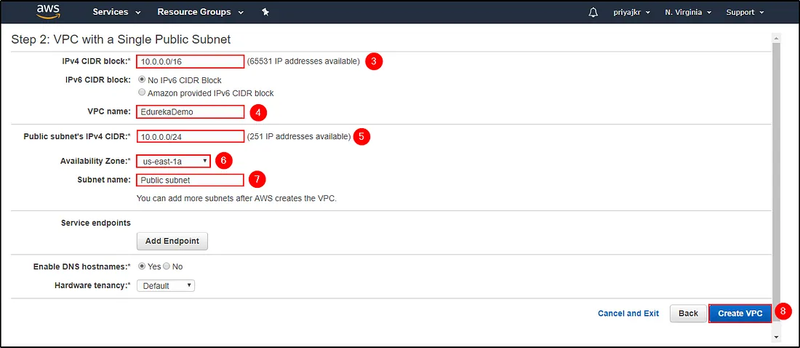
Step 3: Here you will have to mention a few details for creating your VPC.
- The IPv4 CIDR block
- VPC Name
- Public Subnet’s IPv4 CIDR
- Availability Zone where you want your VPC to be created
- Subnet name
- Hardware tenancy
- After mentioning all the details, click on “Create VPC“ .
Step 4: You will get a message saying “Your VPC has been successfully created“. Click on “OK“.

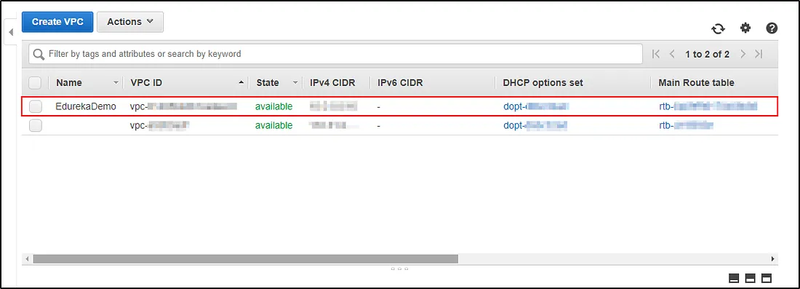
Step 5: In the “Your VPC” section, you can see that there is a new VPC named “EdurekaDemo” created.
Step 6: Now let’s verify the public subnet. You can see that a subnet named “Public Subnet” is created. This subnet has a routeing table attached which consists of local and public access with an Internet Gateway.
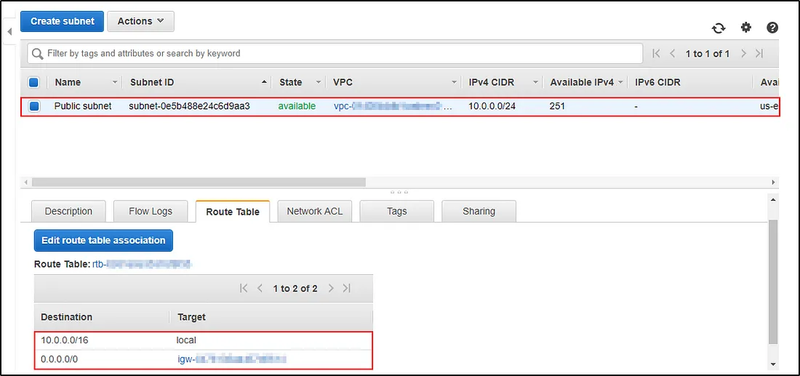
This way a VPC is created with a Public Subnet. Easy isn’t it?
Now, let’s move to another Demo for the Amazon VPC tutorial and find out another way of creating a VPC from scratch. Here, I will show you how to create everything manually.
Demo: Creating A Non-Default VPC And Creating A Private And Public Subnet Inside The VPC
Let’s take a long route for creating a non-default VPC with two subnets, one public and one private.
Step 1: Navigate to “Your VPC” and click on “Create VPC“.

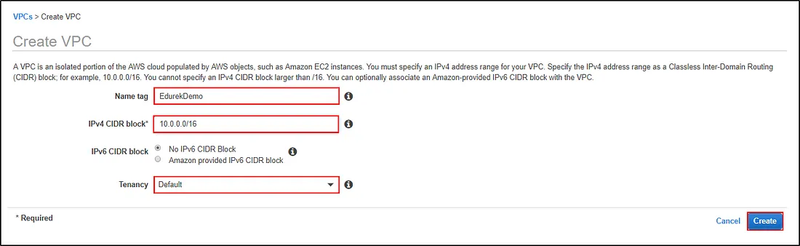
Step 2: Give a name for your VPC, mention the IPv4 CIDR block. Click on “Create”.
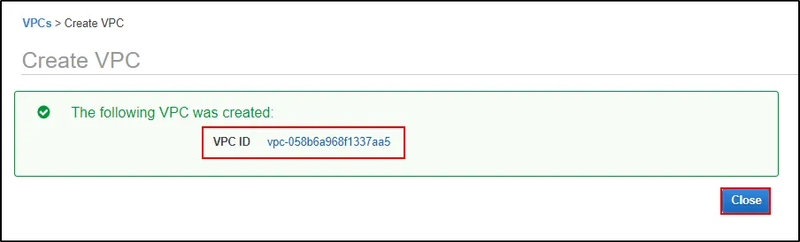
Step 3: You get a message “The following VPC was created” with your “VPC ID“. Click on “Close“.
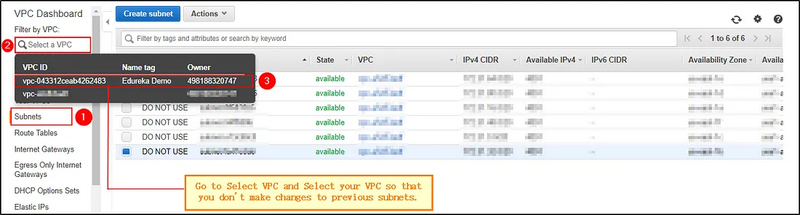
Step 4: Now, create subnets. To do this navigate to “Subnets“, in the “Filter by VPC“, select your VPC and then you will see there are no subnets.
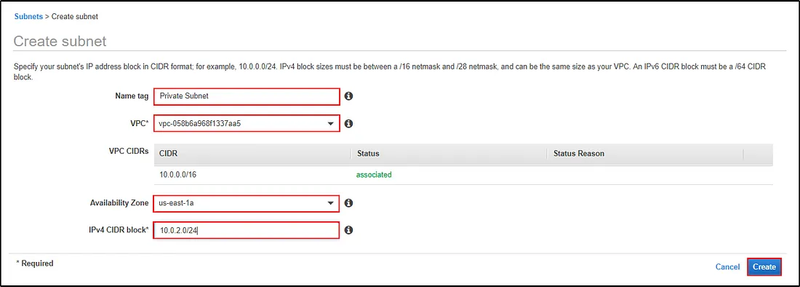
Step 5: Create a subnet named Private. Select your VPC, the Availability Zone, and the IPv4 CIDR block. Click on “Create“.
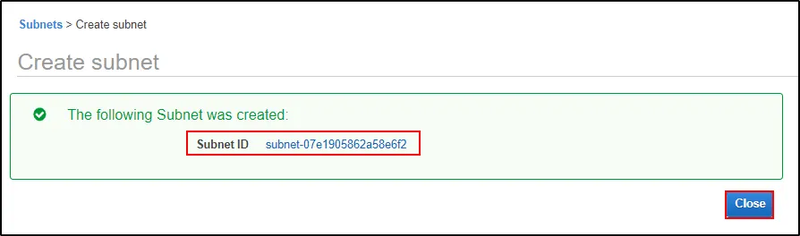
You will get a message saying “The following Subnet was created” along with the “Subnet ID“. Click on “Close“.
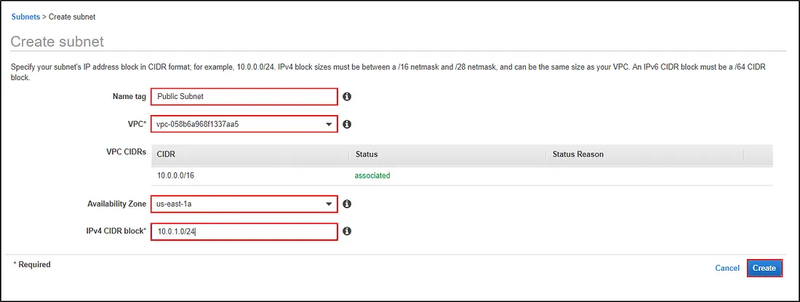
Step 6: Create a Public Subnet, fill it in with all the relevant details as I did for the creating a Private Subnet. Click on “Create“.
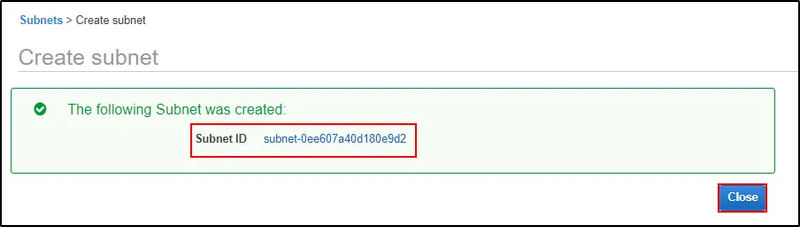
You will get a message saying “The following Subnet was created” with the “Subnet ID“. Click on “Close“.
Step 7: Now we have to create an Internet Gateway to make the subnet public.
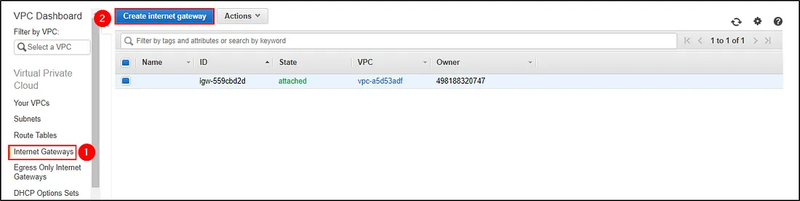
Navigate to Internet Gateways, click on Create “Internet gateway“.
Give a name to your Internet Gateway. Click on “Create“.
You will get a message saying “The following internet gateway was created” and the “Internet Gateway ID“. Click on “Close“.
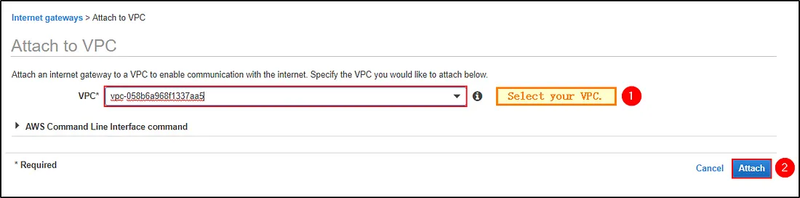
Step 8: Just by creating an Internet Gateway won’t suffice the purpose. You have to attach the Internet Gateway to the VPC.

Select the VPC for which you want to attach your Internet Gateway. Click on “Attach“.
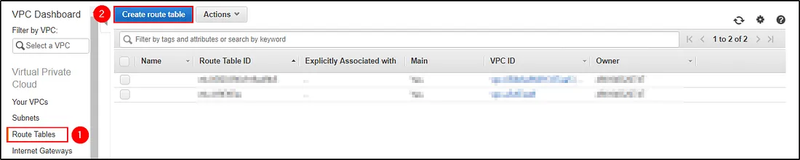
Step 9: Now as you have attached the Internet Gateway to your VPC, it’s time to make rules for managing traffic using Route Table. Navigate to Route Tables, and click on “Create route table“.
Give a name to your Route table and select the VPC for which the Route table will work. Click on “Create“.
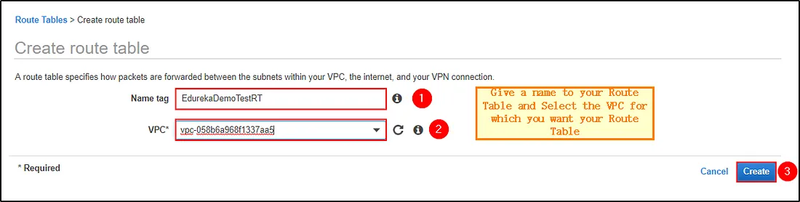
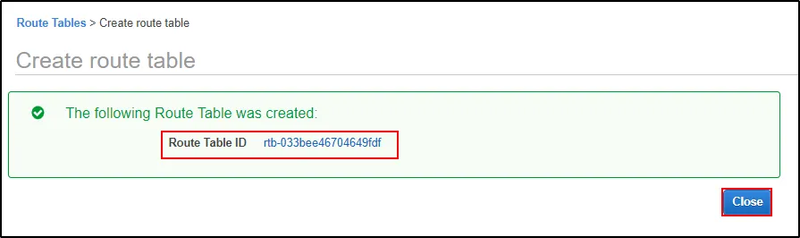
You will get a message “The following Route Table was created” and the “Route Table ID“. Click on “Close“.
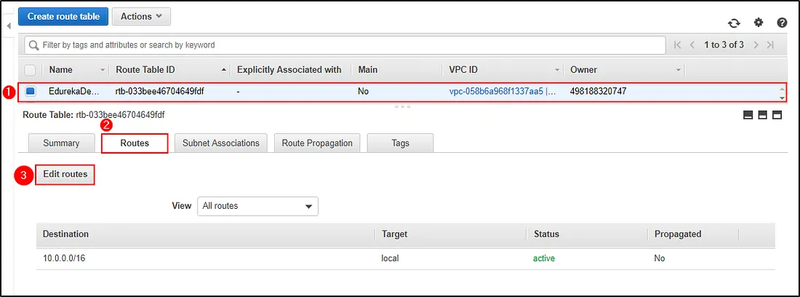
Step 10: Now you have a Route table created. Add the routes for managing the traffic. Navigate to “Routes” and click on “Edit routes“.
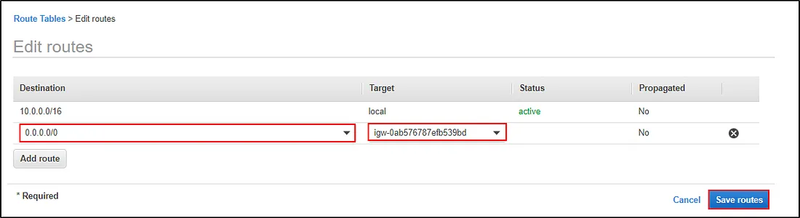
Click on “Add Routes” and mention the destination 0.0.0.0/0 as you want it to be accessible to Public and then select the target as the Internet Gateway that you created earlier. Click on “Save routes“.
Step 11: Now that the rules are added to the Route table, its time to attach it to the Public Subnet. Select the Public Subnet and navigate to Route Table and click on “Edit route table association“.
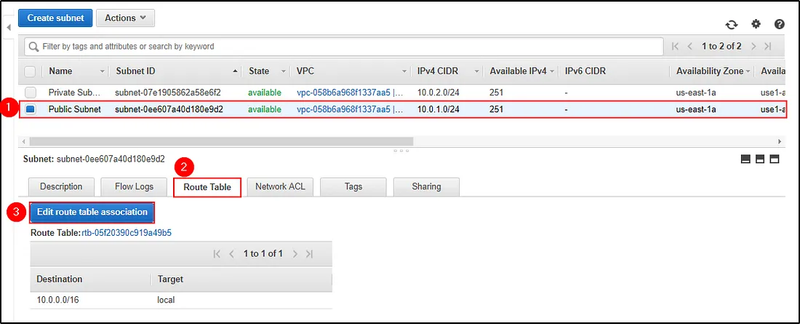
Select the Route table and click on “Save“.
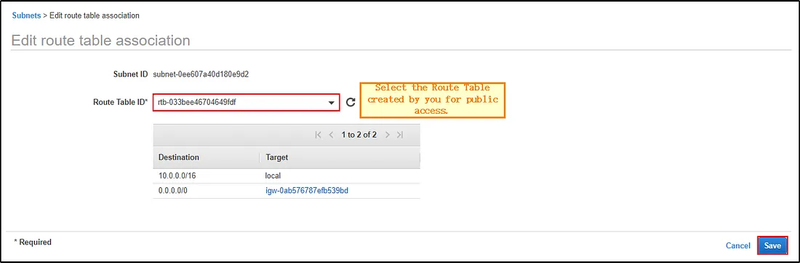
You have successfully made the subnet public.
This way you can take a long route to create an Amazon VPC with two subnets, a Public and a Private subnet.
vpc-virtual-private-cloud
vpc-virtual-private-cloud
vpc-virtual-private-cloud
latency-reduction-of-hybrid-architectures-with-amazon-elasticache

Top comments (0)