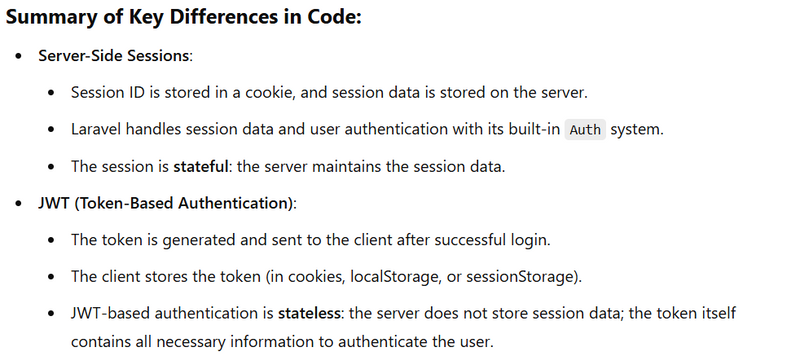
Laravel provides a robust authentication system that makes handling user login and session management easy. Laravel manages user login by storing a session ID on the client-side (in a cookie) and associates that session with the user on the server-side, where user-specific data (such as authentication details) is stored.
Here's an explanation of how Laravel manages user login and session ID storage, along with a code example.
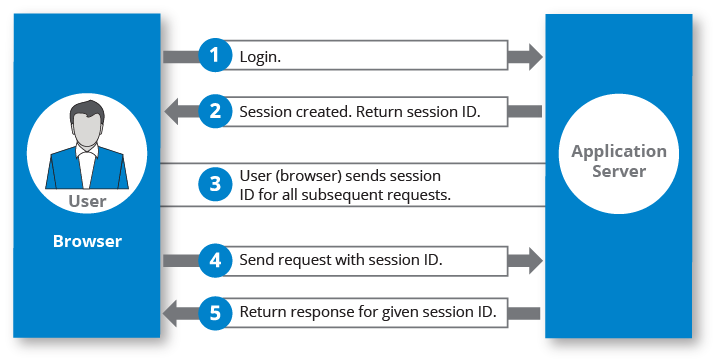
- User Login Flow in Laravel When a user logs in, Laravel creates a session ID and stores it in a cookie on the client's browser. This session ID is used to retrieve session data on subsequent requests, such as the authenticated user details.
Login Process Overview:
- The user submits their login credentials (email and password).
- Laravel's built-in authentication system checks the credentials using the Auth facade.
- If the credentials are valid, Laravel generates a session ID and stores it in a cookie on the client's browser.
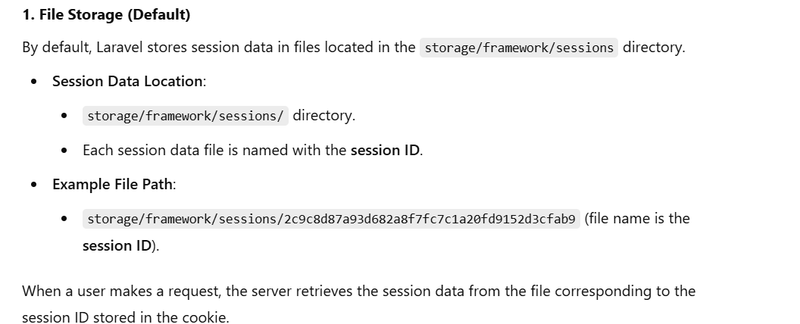
- Laravel stores the session data on the server (in storage/framework/sessions by default) and associates it with the session ID .
- Laravel's Session System By default, Laravel uses file-based session storage. The session ID is stored in a cookie named laravel_session and sent with each HTTP request.
Cookie Storage:
Session ID: laravel_session
Cookie Storage: Client-side (browser cookies)
Server-Side Session Data:
Location: storage/framework/sessions/ directory (or database/Redis if configured).
- Authentication in Laravel: Laravel makes the login process seamless by providing built-in authentication features. Here's how it works.
Step 1: Set Up Authentication (Laravel Breeze / Laravel UI)
To get started with user authentication, you can use Laravel's built-in authentication system.
Run the following command to set up authentication scaffolding (if not already set up):
composer require laravel/breeze --dev
php artisan breeze:install
npm install && npm run dev
php artisan migrate
This sets up the authentication routes, controllers, and views for login, registration, and logout.
Step 2: Example Code for User Login with Session Handling
Here's an example that shows the login flow and how session IDs are managed.
Login Controller (app/Http/Controllers/Auth/LoginController.php)

namespace App\Http\Controllers\Auth;

use App\Http\Controllers\Controller;
use Illuminate\Http\Request;
use Illuminate\Support\Facades\Auth;

class LoginController extends Controller
{
    // Show the login form
    public function showLoginForm()
    {
        return view('auth.login');
    }

    // Handle the login request
    public function login(Request $request)
    {
        // Validate the login form data
        $request->validate([
            'email' => 'required|email',
            'password' => 'required|min:6',
        ]);

        // Attempt to log the user in
        if (Auth::attempt(['email' => $request->email, 'password' => $request->password], $request->remember)) {
            // If successful, redirect to home or dashboard
            return redirect()->intended(route('dashboard'));
        }

        // If authentication fails, redirect back with an error
        return redirect()->back()->withErrors(['email' => 'Invalid credentials.']);
    }

    // Logout the user
    public function logout()
    {
        Auth::logout();  // Log out the user

        // Clear the session
        session()->invalidate();
        session()->regenerateToken();

        // Redirect to login page
        return redirect()->route('login');
    }
}
Login View (resources/views/auth/login.blade.php)
This is a basic login form.
@extends('layouts.app')

@section('content')
    <div class="container">
        <form action="{{ route('login') }}" method="POST">
            @csrf
            <div class="form-group">
                <label for="email">Email</label>
                <input type="email" name="email" id="email" class="form-control" required>
            </div>
            <div class="form-group">
                <label for="password">Password</label>
                <input type="password" name="password" id="password" class="form-control" required>
            </div>
            <div class="form-group form-check">
                <input type="checkbox" name="remember" id="remember" class="form-check-input">
                <label for="remember" class="form-check-label">Remember me</label>
            </div>
            <button type="submit" class="btn btn-primary">Login</button>
        </form>
    </div>
@endsection
Routes (routes/web.php)
Define the routes for login and logout:
use App\Http\Controllers\Auth\LoginController;

Route::get('login', [LoginController::class, 'showLoginForm'])->name('login');
Route::post('login', [LoginController::class, 'login']);
Route::post('logout', [LoginController::class, 'logout'])->name('logout');
-
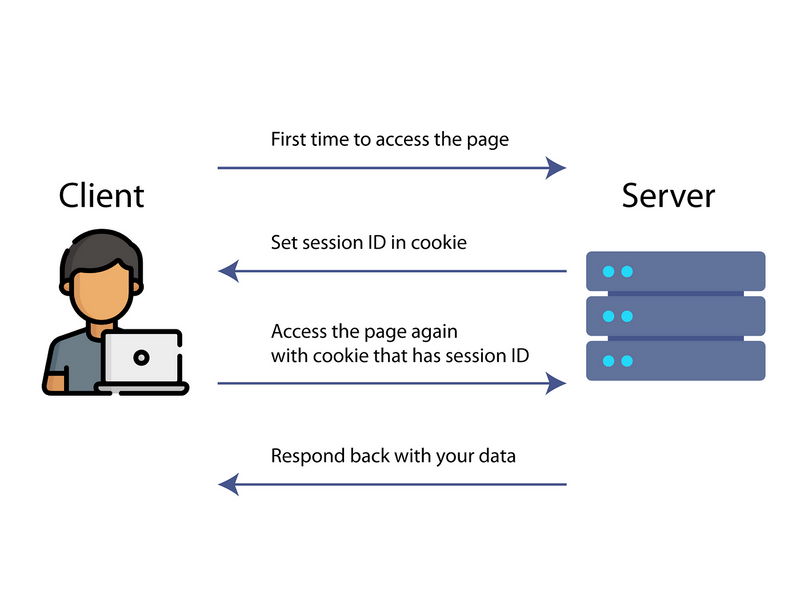
Session ID Storage and Retrieval
Session ID in Cookie: After the user successfully logs in, Laravel generates a session ID and stores it in the laravel_session cookie.Server-Side Session Data: Laravel uses the session ID from the cookie to find the associated session data stored in the session storage (e.g., files in storage/framework/sessions/). You can check the session data on the server using:
// Accessing the session data in a controller or anywhere in the app
$user = session('user');
- Logging Out and Clearing Session Data When the user logs out, Laravel will:
Invalidate the Session: This clears the session data on the server and regenerates the CSRF token to prevent any future attacks.
Clear the Cookie: The laravel_session cookie is automatically deleted by Laravel after the session is invalidated.
// Inside the logout method
Auth::logout();  // Logout the user

session()->invalidate();  // Invalidate the session
session()->regenerateToken();  // Regenerate CSRF token

return redirect()->route('login');  // Redirect to login page
- Session Configuration in Laravel You can configure session handling in the config/session.php file. Here are some important settings related to session IDs:
Configuration File (config/session.php)
You can configure how Laravel handles sessions in the config/session.php file. Here, you can specify:
Session Driver: Determines where session data will be stored.
Cookie Settings: Configures session cookie name, path, domain, etc.
Session Lifetime: Sets how long the session is valid.
return [
    'driver' => env('SESSION_DRIVER', 'file'), // 'file', 'database', 'redis', etc.
    'lifetime' => 120, // Session lifetime in minutes
    'expire_on_close' => false, // Whether the session should expire when the browser closes
    'encrypt' => false, // Whether to encrypt session data
    'files' => storage_path('framework/sessions'), // Directory where session files are stored
    'cookie' => 'laravel_session', // Cookie name where session ID is stored
    'secure' => env('SESSION_SECURE_COOKIE', false), // Whether the session cookie should only be sent over HTTPS
    'same_site' => 'lax', // Same-site cookie policy
];
IN FAQ
QUESTION1
In laravel when session id stored
if (Auth::attempt($request->only('email', 'password'))) {
use Illuminate\Http\Request;

class LoginController extends Controller
{
    public function login(Request $request)
    {
        // Validate login input
        $request->validate([
            'email' => 'required|email',
            'password' => 'required|min:6',
        ]);

        // Attempt to log the user in
        if (Auth::attempt($request->only('email', 'password'))) {
            // Store session data automatically (session id is stored in cookie)
            return redirect()->route('home');
        }

        return redirect()->back()->withErrors(['email' => 'Invalid credentials']);
    }
}
QUESTION2
how to Accessing Session Data
use Illuminate\Support\Facades\Session;

public function showDashboard()
{
    // Access the logged-in user from the session
    $user = Auth::user();  // Fetch authenticated user from session
    return view('dashboard', compact('user'));
}
QUESTION3
difference between localstorage and SessionStorage
LocalStorage vs. SessionStorage:
LocalStorage: Similar to SessionStorage, but data persists even after the browser is closed and reopened.
SessionStorage: Data is only available during the session (the browser tab is open), and it is cleared when the session ends.
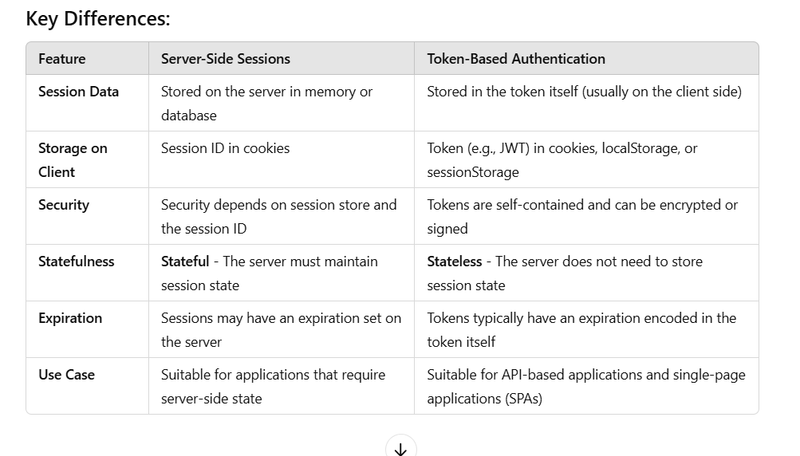
Token-Based Authentication (e.g., JWT - JSON Web Tokens)
:
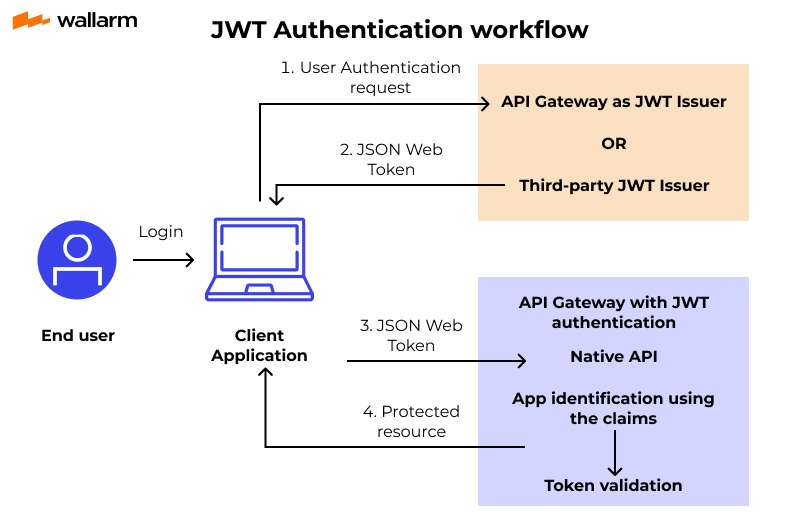
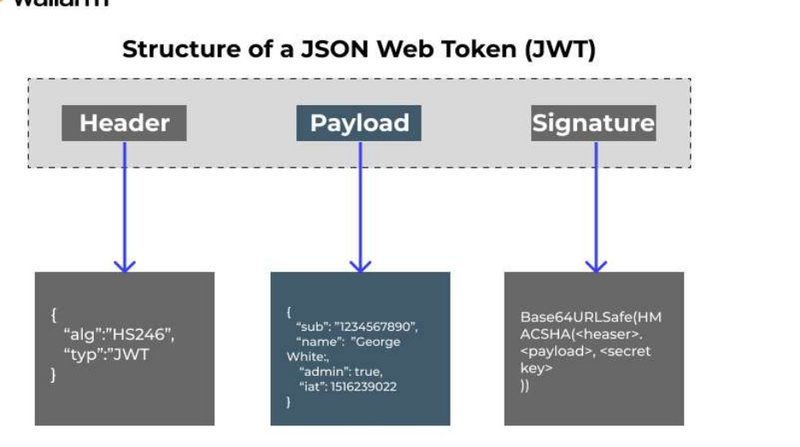
In token-based authentication, tokens (like JWTs) are used instead of session IDs. These tokens contain all the information needed to authenticate and authorize the user, and they are stored on the client-side (often in localStorage, sessionStorage, or cookies).
How it works:
Token generation: After the user logs in, the server generates a token (e.g., JWT) that contains user information and sometimes additional claims (e.g., user roles).
Token on the client: The token is sent to the client and stored in a client-side storage mechanism (e.g., localStorage, sessionStorage, or cookies).
Token on each request: The client includes the token in the Authorization header (often in the form of Bearer ) on each request to authenticate the user.
Server verification: The server verifies the token on each request to ensure the user is authorized to access the requested resources.
Example:
The client logs in, and the server generates a JWT.
The JWT is sent to the client and stored in localStorage or a cookie.
On subsequent requests, the client sends the token as part of the request header (usually in Authorization: Bearer ).
The server verifies the token and grants access if it's valid.
use Illuminate\Http\Request;
use Tymon\JWTAuth\Facades\JWTAuth;
use App\Models\User;
use Illuminate\Support\Facades\Auth;
use Validator;

class AuthController extends Controller
{
    // Login function to authenticate and generate JWT
    public function login(Request $request)
    {
        // Validate the request
        $validator = Validator::make($request->all(), [
            'email' => 'required|email',
            'password' => 'required',
        ]);

        if ($validator->fails()) {
            return response()->json(['errors' => $validator->errors()], 400);
        }

        // Attempt login with the provided credentials
        if ($token = JWTAuth::attempt($request->only('email', 'password'))) {
            return response()->json(['token' => $token], 200);
        }

        return response()->json(['error' => 'Unauthorized'], 401);
    }

    // A method to fetch the currently authenticated user
    public function user()
    {
        return response()->json(Auth::user());
    }
}
const token = localStorage.getItem('jwt_token'); // Get token from localStorage

fetch('/api/user', {
    method: 'GET',
    headers: {
        'Authorization': `Bearer ${token}`,
        'Content-Type': 'application/json',
    }
})
.then(response => response.json())
.then(data => console.log(data));  // User data returned by the server
how-to-implement-secure-login-with-token-based-authentication-in-laravel-and-flutter
how-authentication-is-managed-by-token-and-session

Top comments (0)