Prerequisites
Get Client ID and Client Secret and Issuer URL
Locate and Edit the Traccar Configuration (traccar.xml)
Add OpenID Connect Settings
One-Click Seamless SSO Login from Laravel (IdP) to Traccar (SP)
Architecture Flow
Here, i am going to configure Traccar to act as a Service Provider (SP) to enable Single Sign-On (SSO) with an external Identity Provider (IdP) using OpenID Connect
Prerequisites
Traccar Server: Installed and running (self-hosted or cloud VM).
Admin/root access to your Traccar host machine.
Identity Provider supporting OpenID Connect (e.g., Laravel with Passport, Auth0, Keycloak, etc.).
For SAML, IdP with SAML 2.0 support.
Get Client ID and Client Secret and Issuer URL
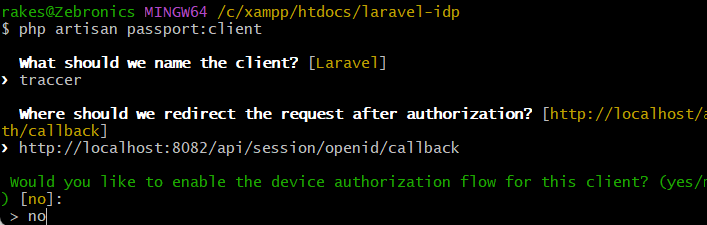
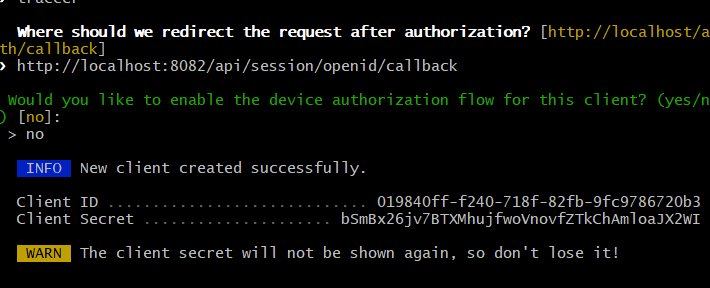
you will get Client ID and Client Secret while running below command in laravel project
php artisan passport:client
Choose "authorization code" grant option for web apps, and note Client ID and Secret.
after running above command u have to type
Would you like to create the "personal access" grant client? (yes/no) [yes] ==type no
then type
Name: Traccar (application name)
Redirect URI: https://YOUR_TRACCAR_SERVER/api/session/openid/callback (replace with your actual Traccar URL)
http://localhost:8082/api/session/openid/callback
Locate and Edit the Traccar Configuration (traccar.xml)
The config file is typically at:
Linux: /opt/traccar/conf/traccar.xml
Docker: mount ./traccar.xml:/opt/traccar/conf/traccar.xml
Stop the Traccar service:
sudo systemctl stop traccar
Add OpenID Connect Settings
Edit section in traccar.xml and add:
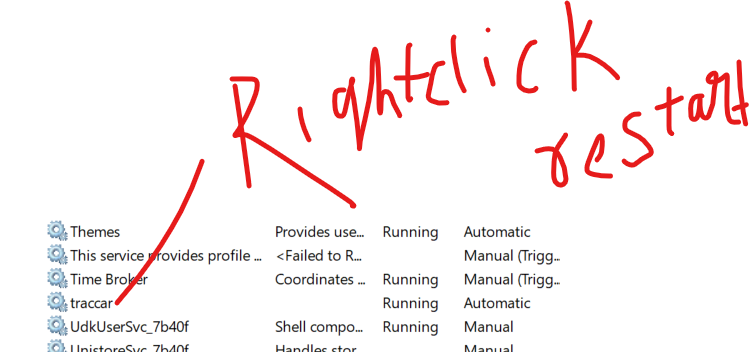
Note:whenever edit xml or any traccar file
must restart traccar
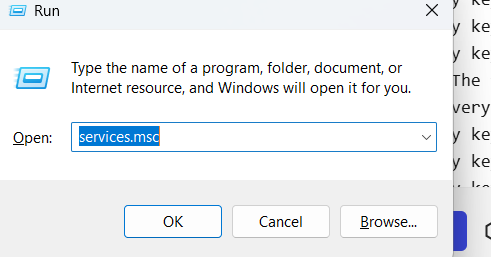
click win + R
<entry key='openid.clientId'>YOUR_CLIENT_ID</entry>
<entry key='openid.clientSecret'>YOUR_CLIENT_SECRET</entry>
<entry key='openid.issuerUrl'>https://your-idp.com/</entry>
<!-- The following entries are OPTIONAL if your IdP supports .well-known discovery; otherwise, set manually -->
<entry key='openid.authUrl'>https://your-idp.com/oauth/authorize</entry>
<entry key='openid.tokenUrl'>https://your-idp.com/oauth/token</entry>
<entry key='openid.userInfoUrl'>https://your-idp.com/oauth/userinfo</entry>
<!-- Optional: restrict Traccar access to specific IdP groups -->
<entry key='openid.allowGroup'>user</entry>        <!-- Only these users can log in -->
<entry key='openid.adminGroup'>admin</entry>      <!-- Users in this group become Traccar admins -->
<!-- Optional: force disable local accounts -->
<entry key='openid.force'>true</entry>
Replace YOUR_CLIENT_ID, YOUR_CLIENT_SECRET, and URLs with your IdP's actual values.
<properties>
    <entry key='web.url'>https://traccar.example.com</entry>
    <entry key='openid.clientId'>abc123xyz</entry>
    <entry key='openid.clientSecret'>s3cret!</entry>
    <entry key='openid.issuerUrl'>https://idp.example.com/</entry>
    <entry key='openid.allowGroup'>user</entry>
    <entry key='openid.adminGroup'>admin</entry>
    <entry key='openid.force'>true</entry>
</properties>
===========or======================
<properties>

    <!-- Documentation: https://www.traccar.org/configuration-file/ -->

    <entry key='database.driver'>org.h2.Driver</entry>
    <entry key='database.url'>jdbc:h2:./data/database</entry>
    <entry key='database.user'>sa</entry>
    <entry key='database.password'></entry>
    <entry key='openid.clientId'>1</entry>
    <entry key='web.url'>http://localhost:8082</entry>
    <entry key='openid.force'>true</entry>
    <entry key='openid.clientSecret'>O41c4w1g3QQ7moNvj4pqCQxir7uVK0DCvA9Xvy3h</entry>
<entry key='openid.issuerUrl'>http://127.0.0.1:8000/</entry>
<entry key='openid.authUrl'>http://127.0.0.1:8000/oauth/authorize</entry>
<entry key='openid.tokenUrl'>http://127.0.0.1:8000/oauth/token</entry>
<entry key='openid.userInfoUrl'>http://127.0.0.1:8000/api/user</entry>

</properties>
==========================OR============================
<?xml version="1.0" encoding="UTF-8"?>
<!DOCTYPE properties SYSTEM 'http://java.sun.com/dtd/properties.dtd'>
<properties>
<!-- Documentation: https://www.traccar.org/configuration-file/ -->
<entry key='database.driver'>com.mysql.cj.jdbc.Driver</entry>
<entry key='database.url'>jdbc:mysql://127.0.0.1:3306/traccar?serverTimezone=UTC&useSSL=false&allowPublicKeyRetrieval=true</entry>
<entry key='database.user'>traccar</entry>
<entry key='database.password'>cotocus@123</entry>
<entry key='openid.clientId'>3</entry>
<entry key='web.url'>https://gps.motoshare.in</entry>
<entry key='openid.force'>true</entry>
<entry key='openid.clientSecret'>fGyEBGcC1g78y79eWqrTEveu0pMC7QHrgZonZqL9</entry>
<entry key='openid.issuerUrl'>https://motoshare.in</entry>
<entry key='openid.authUrl'>https://motoshare.in/oauth/authorize</entry>
<entry key='openid.tokenUrl'>https://motoshare.in/oauth/token</entry>
<entry key='openid.userInfoUrl'>https://motoshare.in/api/user</entry>
<entry key='logger.level'>all</entry>
</properties>
Correctly Set Web URL
Set web.url so the IdP knows where to return the user after authentication:
<entry key='web.url'>https://your-traccar-domain.com</entry>
Restart Traccar and Test
Start Traccar:
bash
sudo systemctl start traccar
Go to https://your-traccar-domain.com:8082 and look for a "Login with OpenID" button.
Click it; you'll be redirected to your IdP’s login page.
Authenticate; if successful, you’ll be redirected back to Traccar and logged in with your IdP identity.
One-Click Seamless SSO Login from Laravel (IdP) to Traccar (SP)
When a user clicks the "Track My Vehicle" link in your Laravel application, which functions as an Identity Provider (IdP), you want them to be authenticated automatically in Traccar (the Service Provider/SP) without entering their credentials again. Here’s how you achieve this seamless SSO experience:
How the Process Works
User Logs In on Laravel
The user is authenticated in your Laravel system (IdP) using your normal login process.
User Clicks "Track My Vehicle"
The link in your Laravel app points to Traccar’s login or root page, e.g.:
<a href="https://your-traccar-domain.com/login">Track My Vehicle</a>
Since the user is already logged in with Laravel, you do not need to pass any tokens or credentials in this link.
SSO Flow Is Triggered Automatically
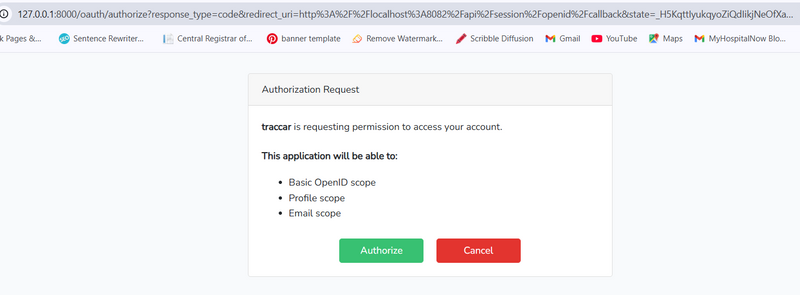
url
http://127.0.0.1:8000/oauth/authorize?response_type=code&redirect_uri=http%3A%2F%2Flocalhost%3A8082%2Fapi%2Fsession%2Fopenid%2Fcallback&state=_H5KqttIyukqyoZiQdIikjNeOfXamT2OqdvSa91Nuv4&client_id=1&scope=openid+profile+email
click authorize
store in database
in table: oauth_access_token

When the user lands on Traccar, Traccar’s SSO configuration (OIDC or SAML) causes it to redirect the user to Laravel’s authorization endpoint.
Since the user already has a valid Laravel session, Laravel instantly validates the session and issues an SSO token/assertion (behind the scenes).
The browser is then automatically redirected back to Traccar’s callback endpoint, carrying the token.
User Is Authenticated in Traccar Without Re-Login
Traccar verifies the token with Laravel and logs the user in, mapping details as needed.
The user seamlessly sees the Traccar dashboard or desired map view without another login form.
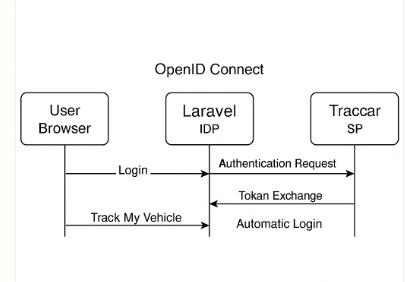
ARHITECTURE FLOW
Below is an architecture diagram (described step-by-step) for your SSO integration where Traccar (Service Provider – SP) uses Laravel as the Identity Provider (IDP). When a user logs in via Laravel and clicks “Track My Vehicle”, they’re automatically logged in to Traccar without re-entering credentials.
Architecture & SSO Flow
Components:
Laravel (IDP): Authenticates user, issues tokens.
Traccar (SP): Accepts authentication via OpenID Connect (OIDC).
User Browser: Initiates login and “Track My Vehicle” action.
User Login and SSO Initiation
User logs in to the Laravel dashboard (https://motoshare.jp).
On the dashboard, there is a button/link:
<a href="https://traccar.motoshare.in/login">Track My Vehicle</a>
Clicking it directs the browser to Traccar’s /login page (https://traccar.motoshare.in/login), which starts the OpenID Connect login process.
OIDC Authentication (Traccar as SP)
Traccar’s config tells it to use OpenID Connect SSO (see your XML):
openid.force=true: Always require OpenID login.
Traccar is registered with these properties:
clientId, clientSecret

issuerUrl, authUrl, tokenUrl, userInfoUrl
Traccar immediately redirects to Laravel’s authUrl (https://motoshare.jp/oauth/authorize) for authentication.
Laravel (IDP) Authenticates & Issues Token
Since user is already logged in to Laravel, the IDP issues an authorization code (or JWT access/ID tokens if Implicit/Hybrid flow).
The browser is redirected back to Traccar’s callback endpoint, with:
Authorization code (or token) in query
Traccar Exchanges Code for User Data
Traccar calls Laravel’s tokenUrl to exchange code for access/id tokens.
Next, Traccar calls userInfoUrl with the access token to get user profile details (name, email, etc.).
Traccar Automatically Logs User In
Traccar creates/updates a user session based on profile information received.
User is redirected and logged in to Traccar dashboard (https://traccar.motoshare.in), mapped to the same authenticated identity as in Laravel.

Top comments (0)