Access control Directive
Different way to to configure access control in Apache
Purpose of .htpasswd and .htaccess
How to Set Up .htpasswd and .htaccess for Basic Authentication
Example Scenario: Protecting a Folder with Basic Authentication
Application of htaccess
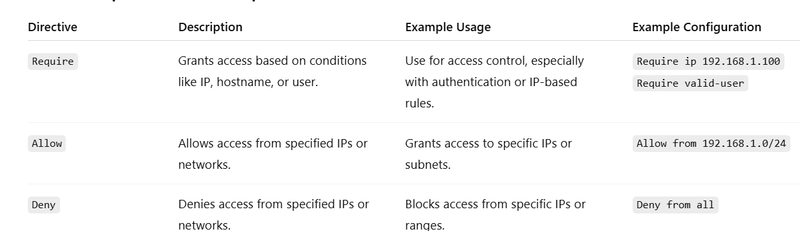
Access control is a mechanism that restricts access to resources based on certain conditions such as IP address, authentication credentials, or other factors. In Apache HTTP Server, access control can be enforced using directives like Require, Allow, Deny, and AuthType.
Access control Directive
Require:
Purpose: Specifies the conditions under which access to a resource is allowed. It is used with access control models like IP-based, user authentication, etc.
Common Usage: Restrict access based on user groups, IP address, or other conditions.
Allow:
Purpose: Grants access to resources based on certain conditions. When used in conjunction with Deny, it allows the server to apply whitelisting.
Common Usage: Allow access from specific IP addresses or networks.
Deny:
Purpose: Denies access to resources based on specific conditions, such as IP address or network. It is the opposite of Allow.
Common Usage: Deny access from specific IP addresses or networks.
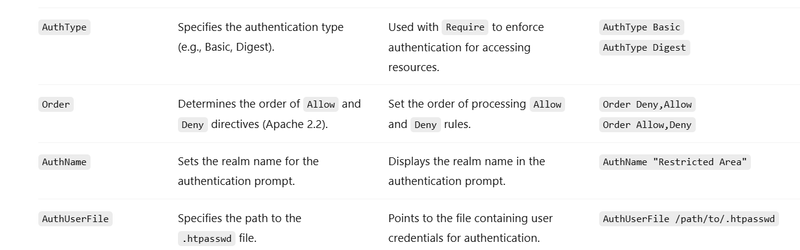
AuthType:
Purpose: Specifies the type of authentication that is required (e.g., Basic, Digest).
Common Usage: Used in conjunction with Require to enforce authentication for accessing protected resources.
Basic Authentication Example (Using AuthType and Require)
This configuration forces users to authenticate with basic authentication before they can access a directory.
<Directory "/var/www/html/secure">
    AuthType Basic
    AuthName "Restricted Area"
    AuthUserFile /path/to/.htpasswd
    Require valid-user
</Directory>
Explanation:
AuthType Basic: Specifies that basic authentication is used.
AuthName "Restricted Area": Sets the realm of the authentication (shown to users).
AuthUserFile /path/to/.htpasswd: Points to the .htpasswd file where the usernames and passwords are stored.
Require valid-user: Grants access to users who provide valid credentials from the .htpasswd file.
IP-Based Access Control (Using Allow, Deny, and Order)
This example restricts access to a directory based on the IP address of the client.
<Directory "/var/www/html/private">
    Order Deny,Allow
    Deny from all
    Allow from 192.168.1.100
</Directory>
Explanation:
Order Deny,Allow: Denies access first and then allows access from the specified IP.
Deny from all: Denies access from all IP addresses.
Allow from 192.168.1.100: Allows access from the IP 192.168.1.100.
IP Range-Based Access Control (Using Allow and Deny)
This example allows access from an IP range and denies access from others.
<Directory "/var/www/html/secure">
    Order Allow,Deny
    Allow from 192.168.0.0/16
    Deny from all
</Directory>
Explanation:
Allow from 192.168.0.0/16: Allows access from the entire 192.168.0.0 subnet.
Deny from all: Denies access from all other IP addresses.
Using Require with IP and Host Conditions
This example shows how to use Require to control access based on both IP and host conditions.
<Directory "/var/www/html/protected">
    Require ip 192.168.1.100
    Require host example.com
</Directory>
Explanation:
Require ip 192.168.1.100: Grants access only from IP 192.168.1.100.
Require host example.com: Grants access only if the hostname of the request is example.com.
Allow Access for All (Using Require all granted)
This example explicitly grants access to everyone.
<Directory "/var/www/html/open">
    Require all granted
</Directory>
Explanation:
Require all granted: Allows access to everyone without any restrictions
Different way to to configure access control in Apache
There are various ways to configure access control in Apache:
IP-based Access Control: Restrict access based on the IP address or range of addresses.
Authentication-based Access Control: Restrict access to resources based on user authentication (e.g., username and password).
Directory-based Access Control: Restrict access to specific directories or files.
Time-based Access Control: Restrict access based on the time of day (less commonly used).
IP-based Access Control
With IP-based access control, you can allow or deny access based on the client’s IP address.
Example: Restrict Access to a Directory Based on IP
In the following example, only clients from 192.168.1.0/24 subnet (IP addresses 192.168.1.1 to 192.168.1.255) are allowed to access a directory, while all other IP addresses are denied.
# /etc/apache2/sites-available/000-default.conf
<VirtualHost *:80>
    ServerName example.com
    DocumentRoot /var/www/html

    <Directory "/var/www/html/private">
        # Deny access by default
        Deny from all

        # Allow access only from IP range 192.168.1.0/24
        Allow from 192.168.1.0/24
    </Directory>
</VirtualHost>
Deny from all: Denies access to all clients by default.
Allow from 192.168.1.0/24: Allows access only to clients within the IP range 192.168.1.0/24.
Access Control Based on Specific IPs
If you want to allow access from specific IPs, you can use the Allow directive with multiple IP addresses.
<Directory "/var/www/html/private">
    # Deny all access
    Deny from all

    # Allow access only from specific IPs
    Allow from 192.168.1.10
    Allow from 192.168.1.20
</Directory>
This configuration allows only the IP addresses 192.168.1.10 and 192.168.1.20 to access the /private directory.
Authentication-based Access Control
To restrict access based on user authentication, Apache provides the AuthType, AuthName, AuthUserFile, and Require directives.
Example: Basic Authentication
Here is an example of setting up basic authentication for a directory. This will prompt the user for a username and password.
Create a Password File: First, you need to create a password file using the htpasswd command.
sudo htpasswd -c /etc/apache2/.htpasswd username
The -c flag creates a new file. You’ll be prompted to enter a password for the username.
Configure Authentication in Apache: Now, configure the authentication settings for a specific directory.
# /etc/apache2/sites-available/000-default.conf
<VirtualHost *:80>
    ServerName example.com
    DocumentRoot /var/www/html

    <Directory "/var/www/html/private">
        # Set authentication type to Basic
        AuthType Basic
        AuthName "Restricted Access"
        AuthUserFile /etc/apache2/.htpasswd

        # Require user to authenticate
        Require valid-user
    </Directory>
</VirtualHost>
AuthType Basic: This specifies that we are using basic authentication (username and password).
AuthName "Restricted Access": This is the message that will appear in the authentication dialog box.
AuthUserFile /etc/apache2/.htpasswd: Specifies the location of the .htpasswd file that contains the usernames and passwords.
Require valid-user: This specifies that any user with a valid username and password from the .htpasswd file can access the directory.
When users try to access /private, they will be prompted to enter a username and password. Only users listed in the .htpasswd file will be able to access the directory.
Directory-based Access Control
You can apply access control to specific directories using the directive.
Example: Restricting Access to a Specific Directory
Here’s an example where we restrict access to a directory to a certain group of users using a password file:
<Directory "/var/www/html/admin">
    # Only allow users with specific permissions
    Require user admin
</Directory>
This will allow access to the /admin directory only for the user admin. You must configure the user in the .htpasswd file.
Allow or Deny Access Based on HTTP Methods
You can also control access based on the HTTP methods (e.g., GET, POST, PUT, DELETE).
Example: Deny Access for PUT and DELETE Methods
<Directory "/var/www/html/private">
    # Allow GET and POST methods
    <Limit GET POST>
        Require all granted
    </Limit>

    # Deny PUT and DELETE methods
    <LimitExcept GET POST>
        Require all denied
    </LimitExcept>
</Directory>
<Limit GET POST>: Allows only the GET and POST methods.

<LimitExcept GET POST>: Denies all other methods like PUT and DELETE.
Time-based Access Control (Less Common)
While less common, you can restrict access to resources based on the time of day using Apache’s mod_setenvif.
Example: Restrict Access During Certain Hours
SetEnvIf Time "^22.*" deny_access


<Directory "/var/www/html/private">
    Order Allow,Deny
    Allow from all
    Deny from env=deny_access
</Directory>
In this example:
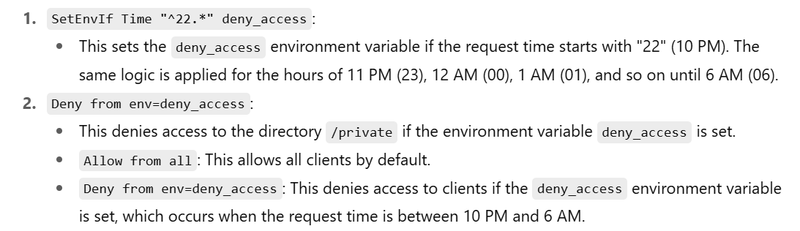
SetEnvIf Time "^22.*" deny_access: Sets an environment variable deny_access if the current time starts with 22 (i.e., restricts access from 10 PM onward).
Deny from env=deny_access: Denies access if the deny_access variable is set.
# /etc/apache2/sites-available/000-default.conf
<VirtualHost *:80>
    ServerName example.com
    DocumentRoot /var/www/html

    # Set the environment variable deny_access if the request time is between 10 PM and 6 AM
    SetEnvIf Time "^22.*" deny_access
    SetEnvIf Time "^23.*" deny_access
    SetEnvIf Time "^00.*" deny_access
    SetEnvIf Time "^01.*" deny_access
    SetEnvIf Time "^02.*" deny_access
    SetEnvIf Time "^03.*" deny_access
    SetEnvIf Time "^04.*" deny_access
    SetEnvIf Time "^05.*" deny_access
    SetEnvIf Time "^06.*" deny_access

    # Apply the access control based on the environment variable
    <Directory "/var/www/html/private">
        # Deny access if the environment variable "deny_access" is set
        Order Allow,Deny
        Allow from all
        Deny from env=deny_access
    </Directory>
</VirtualHost>
Purpose of .htpasswd and .htaccess
.htpasswd and .htaccess are configuration files used by Apache HTTP Server to manage user authentication and access control to directories and files.
.htpasswd: This file stores the usernames and encrypted passwords used for authentication.
.htaccess: This file is placed in specific directories to control access to resources. It can be used to enforce authentication and set up other access control rules.
Purpose of .htpasswd and .htaccess
.htpasswdis used for storing user credentials (username and password) in a secure, encrypted format.
.htaccess is used for enforcing authentication for a specific directory or location in the web server. It allows or denies access based on credentials stored in the .htpasswd file.
How to Set Up .htpasswd and .htaccess for Basic Authentication
Step 1: Creating the .htpasswd File
The .htpasswd file contains the username and password (encrypted). Here’s how to set it up:
Generate a Username and Password Pair:
To securely generate the password for your .htpasswd file, use htpasswd command-line tool, which comes with Apache.
htpasswd -c /path/to/.htpasswd username
-c creates the .htpasswd file.
username is the username you want to create.
You will be prompted to enter and confirm a password.
Example .htpasswd Entry:
The resulting .htpasswd file will look like this:
username:$apr1$hfL5R25v$KPzHq4JhH8d5x0vS4qYHT.$k.4swOBN20vvR0jIuWzDl/
This is the username (username) and the encrypted password ($apr1$hfL5R25v...).
Step 2: Placing the .htpasswd File
The .htpasswd file should be placed in a secure directory (i.e., not directly under the web root). Common practice is to store it outside the publicly accessible web directory for security.
For example, if your website's root is /var/www/html, you might store the .htpasswd file in /var/www/.htpasswd to keep it secure.
Step 3: Setting Up the .htaccess File
The .htaccess file is used to specify the authentication configuration for a directory. The .htaccess file should be placed in the directory you want to protect.
Create the .htaccess File:
For example, create a .htaccess file in /var/www/html/secure (the folder you want to protect) with the following content:
AuthType Basic
AuthName "Restricted Access"
AuthUserFile /var/www/.htpasswd
Require valid-user
AuthType Basic: Specifies that basic authentication is required.
AuthName "Restricted Access": This is the prompt that will appear to the user asking for authentication.
AuthUserFile /var/www/.htpasswd: Specifies the path to the .htpasswd file. Ensure this path is correct and secure.
Require valid-user: Only users with valid credentials (from the .htpasswd file) are allowed access.
Directory Structure Example:
/var/www/
├── html/
│   ├── index.html
│   └── secure/  <--- Directory to protect with authentication
│       └── .htaccess  <--- File to enforce authentication
└── .htpasswd  <--- Stores the encrypted user credentials
How It Works:
When a user accesses a protected resource (e.g., a file in /var/www/html/secure), Apache will prompt for a username and password.
Apache reads the .htaccess file in the /secure directory and knows it needs to authenticate the user.
Apache checks the .htpasswd file for a matching username and password (using the encrypted password).
If the credentials are correct, the user gains access to the protected content; otherwise, they are denied access.
Example Scenario: Protecting a Folder with Basic Authentication
Assume you have the following directory structure:
Example Scenario: Protecting a Folder with Basic Authentication
/var/www/html/
├── index.html        # Accessible to everyone
└── secure/            # Folder to be protected with authentication
    ├── confidential.html
    └── .htaccess      # Contains authentication configuration
To protect the /secure/ directory with authentication, you:
Place a .htpasswd file outside the html directory (e.g., /var/www/.htpasswd).
Create the .htaccess file inside /secure/ with the following content:
AuthType Basic
AuthName "Restricted Access"
AuthUserFile /var/www/.htpasswd
Require valid-user
Run the following command to create a .htpasswd file with a user:
htpasswd -c /var/www/.htpasswd myuser
Example Scenario: Protecting a Folder with Basic Authentication
In this example, we will protect a folder inside your Laravel project located in /opt/lampp/htdocs/ with basic authentication using .htpasswd and .htaccess.
Here’s the step-by-step guide:
Directory Structure of Your Laravel Project
Let’s assume you have the following directory structure in your Laravel project located inside /opt/lampp/htdocs:
/opt/lampp/
├── htdocs/
│   └── my-laravel-project/         # Your Laravel project folder
│       ├── public/
│       │   └── index.php           # Default Laravel index file
│       └── secure/                 # Folder to be protected with authentication
│           └── confidential.html   # The protected file
└── .htpasswd                      # The file storing username and encrypted password
Creating the .htpasswd File
The .htpasswd file will store the user credentials (username and password).
Generate the .htpasswd File:
In XAMPP (or Apache), the .htpasswd file should be stored outside the htdocs folder for security reasons. For example, we will store it at /opt/lampp/.htpasswd.
Run the following command to create the .htpasswd file and add a user:
sudo htpasswd -c /opt/lampp/.htpasswd username
Replace username with your desired username. You’ll be prompted to enter a password for this user.
Sample .htpasswd File Content:
After running the above command, your .htpasswd file will contain something like:
username:$apr1$hfL5R25v$KPzHq4JhH8d5x0vS4qYHT.$k.4swOBN20vvR0jIuWzDl/
This represents the username and the encrypted password.
Creating the .htaccess File in the Protected Folder
The .htaccess file is used to enforce authentication and control access to specific directories. For this example, we will place the .htaccess file inside the /secure folder (the folder you want to protect with authentication).
Create the .htaccess File in /opt/lampp/htdocs/my-laravel-project/secure/ with the following content:
AuthType Basic
AuthName "Restricted Access"
AuthUserFile /opt/lampp/.htpasswd
Require valid-user
Explanation:
AuthType Basic: Specifies basic authentication, which prompts users for a username and password.
AuthName "Restricted Access": The name of the authentication realm that will be displayed when the user is prompted to log in.
AuthUserFile /opt/lampp/.htpasswd: Specifies the full path to the .htpasswd file that stores the usernames and encrypted passwords.
Require valid-user: Only users with valid credentials (in .htpasswd) are allowed to access the folder.
Enable .htaccess and Authentication
For the .htaccess to work, you need to ensure that the Apache configuration allows overrides. This is typically done using the AllowOverride directive in the Apache configuration.
Open your Apache configuration file (/opt/lampp/etc/httpd.conf or /opt/lampp/etc/extra/httpd-vhosts.conf).
Make sure the following line is present and set to All:
<Directory "/opt/lampp/htdocs">
    AllowOverride All
</Directory>
Restart Apache to apply the changes:
sudo /opt/lampp/lampp restart
Testing the Configuration
Now, when you try to access any file inside the /secure directory, Apache will prompt you for the username and password defined in the .htpasswd file.
If you enter the correct username and password (as specified in .htpasswd), you'll be granted access.
If you fail to provide the correct credentials, you will receive a 403 Forbidden error.
For example, accessing:
http://localhost/my-laravel-project/secure/confidential.html
will prompt you for a username and password. Only users with valid credentials will be able to access the confidential.html file.
Summary of the Steps
Create the .htpasswd file:
Use the htpasswd command to create the .htpasswd file and store usernames and encrypted passwords securely outside the htdocs directory.
Create the .htaccess file:
Place the .htaccess file inside the directory you want to protect (e.g., /secure/).
Configure it to use basic authentication with the correct path to the .htpasswd file.
Enable .htaccess Overrides:
Ensure AllowOverride All is enabled in your Apache configuration for the directory.
Restart Apache:
Restart Apache to apply the configuration changes.
Application of htaccess
The .htaccess file is a configuration file used by Apache HTTP Server to control various server and directory settings for a website or web application. It allows webmasters to manage access control, redirect URLs, set up custom error pages, and configure many other server-related functionalities.
Here are some of the most common things you can do with the .htaccess file, along with coding examples and example scenarios:
Redirects (URL Redirection)
You can use the .htaccess file to redirect URLs from one location to another. This is useful for redirecting users to new pages or enforcing HTTPS.
Scenario: Redirect HTTP to HTTPS
If you want to ensure that all traffic to your site uses HTTPS, you can add the following rule in your .htaccess file.
Example Code:
# Force HTTPS for all traffic
RewriteEngine On
RewriteCond %{HTTPS} off
RewriteRule ^ https://%{HTTP_HOST}%{REQUEST_URI} [L,R=301]
Explanation:
RewriteEngine On: Enables the mod_rewrite module to perform URL rewriting.
RewriteCond %{HTTPS} off: Checks if the current request is not using HTTPS.
RewriteRule ^ https://%{HTTP_HOST}%{REQUEST_URI} [L,R=301]: Redirects the request to the same URL but with HTTPS. The [L,R=301] flags tell Apache to issue a permanent redirect (301).
Scenario: Redirect from old URL to a new URL
If you've changed the structure of your website and want to redirect an old page to a new one, use the following example.
# Redirect old URL to new URL
Redirect 301 /old-page.html http://www.yourdomain.com/new-page.html
Explanation:
Redirect 301: Issues a permanent (301) redirect.
/old-page.html: The old URL path.
http://www.yourdomain.com/new-page.html: The new URL.
------------full code-------
# Enable mod_rewrite for URL rewriting
RewriteEngine On

# Redirect HTTP to HTTPS
RewriteCond %{HTTPS} off
RewriteRule ^ https://%{HTTP_HOST}%{REQUEST_URI} [L,R=301]

# Redirect old page to new page
Redirect 301 /old-page.html http://www.yourdomain.com/new-page.html
Custom Error Pages
You can define custom error pages to display a more user-friendly message instead of default Apache error messages (e.g., 404 Page Not Found).
Scenario: Custom 404 Page
If a user requests a non-existent page, you can show a custom 404 error page.
Example Code:
# Custom 404 error page
ErrorDocument 404 /error-pages/404.html
Explanation:
ErrorDocument 404: Specifies that this rule applies to the 404 (Not Found) error.
/error-pages/404.html: Path to the custom error page.
You can do the same for other HTTP status codes (e.g., 500, 403, etc.).
Access Control Based on IP Address
You can restrict or allow access to certain parts of your site based on the user's IP address.
Scenario: Allow access from a specific IP address
If you only want a certain IP to access your admin section, use the following example.
<Directory "/var/www/html/admin">
    Order Deny,Allow
    Deny from all
    Allow from 192.168.1.100
</Directory>
Explanation:
Deny from all: Denies access to everyone by default.
Allow from 192.168.1.100: Only allows access from the IP 192.168.1.100.
Scenario: Block a specific IP address
If you want to block an IP from accessing your site, you can use this example.
# Block access from a specific IP
Deny from 203.0.113.45
Explanation: Denies access from the IP 203.0.113.45.
Password Protection Using .htaccess and .htpasswd
You can use .htaccess to enable basic HTTP authentication on specific directories, requiring users to log in with a username and password.
Scenario: Password protect a directory
To password protect a directory (e.g., /admin), you need to create a .htaccess file in that directory and link it to a .htpasswd file where usernames and passwords are stored.
Example Code for .htaccess:
<Directory "/var/www/html/admin">
    AuthType Basic
    AuthName "Restricted Area"
    AuthUserFile /path/to/.htpasswd
    Require valid-user
</Directory>
Explanation:
AuthType Basic: Specifies basic authentication.
AuthName "Restricted Area": The prompt shown to the user when they are asked to authenticate.
AuthUserFile /path/to/.htpasswd: The path to the .htpasswd file containing encrypted passwords.
Require valid-user: Ensures only users with valid credentials (from the .htpasswd file) can access the directory.
Limiting Access Based on Referrer or User-Agent
You can control access based on the referrer or user-agent, often used to block hotlinking or unauthorized requests.
Scenario: Block hotlinking to images
If you want to prevent other websites from directly linking to your images, you can use the following code.
Example Code:
# Prevent hotlinking
RewriteEngine On
RewriteCond %{HTTP_REFERER} !^http://(www\.)?yourdomain.com/ [NC]
RewriteRule \.(jpg|jpeg|png|gif)$ - [F]
Explanation:
RewriteCond %{HTTP_REFERER} !^http://(www\.)?yourdomain.com/ [NC]: Denies requests that don’t originate from your domain.
RewriteRule \.(jpg|jpeg|png|gif)$ - [F]: Blocks hotlinking of images (jpg, png, etc.) by returning a 403 Forbidden error.
Caching and Compression
You can enable caching and compression using .htaccess to improve the performance of your website.
Scenario: Enable GZIP compression
You can enable GZIP compression for your website, reducing the size of files sent to the browser.
Example Code:
# Enable GZIP compression
<IfModule mod_deflate.c>
    AddOutputFilterByType DEFLATE text/html text/plain text/xml text/css application/javascript application/json
</IfModule>
Explanation:
AddOutputFilterByType DEFLATE: Compresses the specified file types (e.g., HTML, CSS, JavaScript).
Scenario: Enable Browser Caching
You can set caching headers to improve performance for static files.
Example Code:
# Cache static files
<IfModule mod_expires.c>
    ExpiresActive On
    ExpiresByType image/jpeg "access plus 1 year"
    ExpiresByType image/png "access plus 1 year"
    ExpiresByType text/css "access plus 1 month"
    ExpiresByType application/javascript "access plus 1 month"
</IfModule>
Explanation:
ExpiresByType: Specifies the expiration time for various file types (e.g., images, CSS, JS).
URL Rewriting
You can use the mod_rewrite module to rewrite URLs for clean URLs, redirection, or SEO purposes.
Scenario: Redirect an old URL to a new URL
If you have changed the URL structure and want to redirect old URLs to the new ones, you can use the following:
Example Code:
# Redirect old URL to new URL
RewriteEngine On
RewriteRule ^old-page$ /new-page [R=301,L]
Explanation:
RewriteRule ^old-page$ /new-page [R=301,L]: Redirects requests for /old-page to /new-page with a 301 Permanent Redirect.
Enabling Custom Error Pages
You can customize error pages for common HTTP errors, like 404 (Not Found), 500 (Internal Server Error), etc.
Scenario: Custom 404 Page
You can create a custom 404 error page and specify it in the .htaccess file.
Example Code:
# Custom 404 error page
ErrorDocument 404 /error-pages/404.html
Explanation:
ErrorDocument 404 /error-pages/404.html: Redirects the user to the custom 404.html page whenever a page is not found.

Top comments (0)