What is a Device Token in FCM?
Key Points:
What is Token Refresh?
Why is token refresh important?
When is Device Token Used or Called
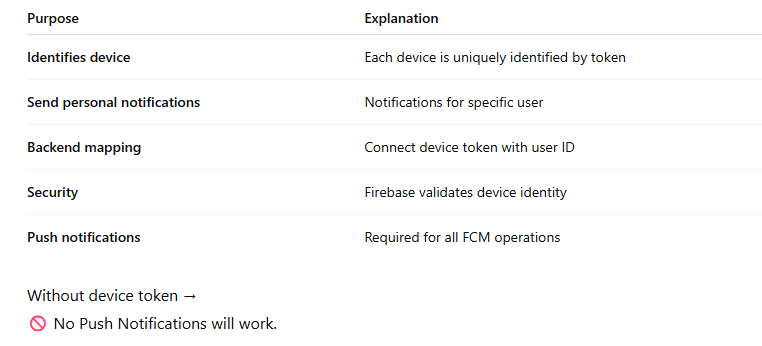
Importance of Device Token
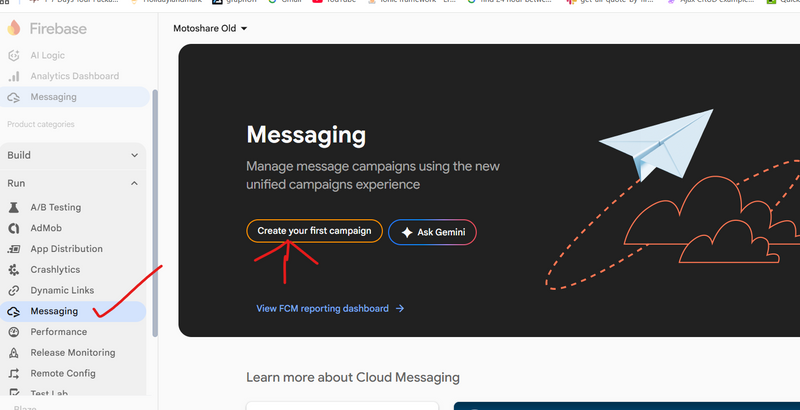
How to send token in firebase
What is a Device Token in FCM?
An FCM Device Token is a unique ID generated by Firebase for every device where your app is installed.
Think of it like:
👉 A mobile number for your app inside Firebase.
Whenever you want to send a push notification to one specific user/device, you use this device token.
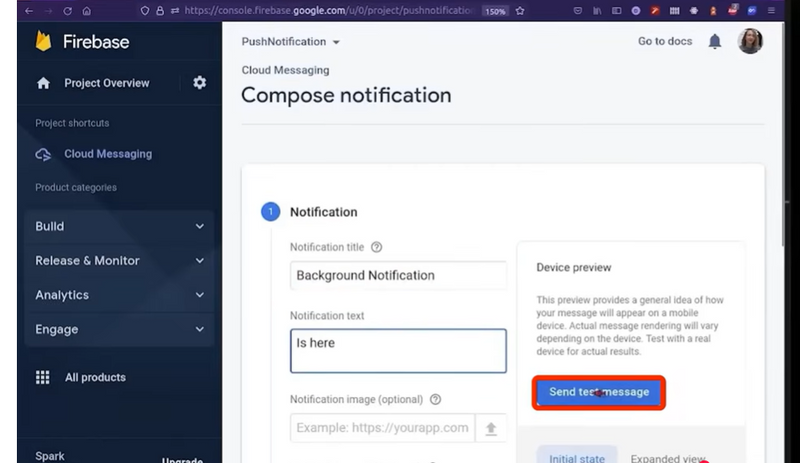
✔ Example:
If you want to send a message to one user only:
Send notification → Firebase → Device Token → User's mobile
🔥
Key Points:
It is unique per device
It may change at any time
You must store it in your backend (database)
Used to target notifications to specific users
What is Token Refresh?
Sometimes Firebase changes the device token due to:
App reinstall
App data cleared
User logs out & re-logins
Firebase security policy changes
System restores
Update to Play Services / iOS APNs
When this happens, Firebase triggers:
FirebaseMessaging.onTokenRefresh
This gives you a new device token.
Why is token refresh important?
Because old token becomes invalid.
If you don’t update the token:
❌ user will not receive notifications
❌ backend will send to old token → fails
❌ targeted notifications will stop working
So you must listen for token refresh and update it on your server.
When is Device Token Used or Called
?
Device token is used in these scenarios:
✔ App startup
You fetch the token when app launches.
✔ After permission is granted
User must allow notifications. Only then token is valid.
✔ On login
You may map the token to user ID.
✔ On every token refresh event
Whenever Firebase updates token, you store new token.
✔ When sending notifications
Your backend uses this token to deliver messages via FCM API.
⭐
Importance of Device Token
Syntax for Device Token & Token Refresh
👉 Request Notification Permission
await _messaging.requestPermission();

👉 Get Device Token
String? token = await _messaging.getToken();

👉 Listen to Token Refresh
_messaging.onTokenRefresh.listen((newToken) {
  print("Token refreshed: $newToken");
});
How to send token in firebase
Step 1 — Initialize Firebase Before App Starts
R:\firebase\firebase\lib\main.dart
Future<void> main() async {
  WidgetsFlutterBinding.ensureInitialized();

  await Firebase.initializeApp();

  runApp(const MyApp());
}
👉 Simple Sentence
This ensures Firebase is ready before your app loads any messaging or notification functions.
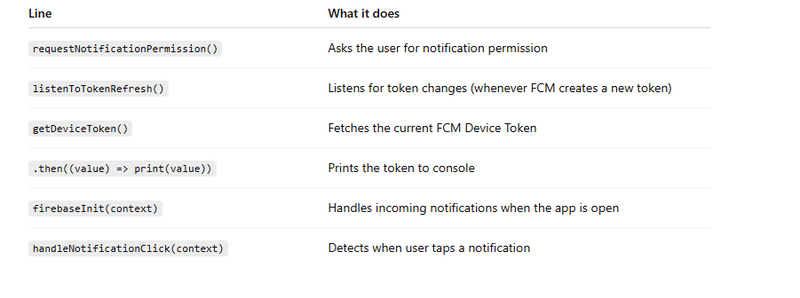
2️⃣ Step 2 — HomeScreen initState(): Request Permission + Fetch Token + Listen to Updates
R:\firebase\firebase\lib\home_screen.dart
@override
void initState() {
  super.initState();

  _notificationServices.requestNotificationPermission();

  _notificationServices.listenToTokenRefresh();

  _notificationServices.getDeviceToken().then((value) {
    print('device token');
    print(value);
  });

  _notificationServices.firebaseInit(context);

  _notificationServices.handleNotificationClick(context);
}
👉 Simple Sentence Explanation
3️⃣ Step 3 — Get Device Token from Firebase
R:\firebase\firebase\lib\notification_services.dart
Future<String?> getDeviceToken() async {
  String? token = await _messaging.getToken();
  print("FCM my Token: $token");
  return token;
}
👉 Simple Sentence
This function asks Firebase for the current device token and prints it.
Why is Device Token needed?
The token is used by your server to send push notifications to this specific device.
4️⃣ Step 4 — Listen for Token Refresh
R:\firebase\firebase\lib\notification_services.dart
void listenToTokenRefresh() {
  _messaging.onTokenRefresh.listen((newToken) {
    print("🔥 FCM Token Refreshed!");
    print("New Token: $newToken");

    // TODO: Save token to backend or database
  });
}
👉 Simple Sentence
This listens for changes and prints the new FCM token whenever Firebase generates a new one.
Why Token Refresh happens?
When the user reinstalls the app
When they clear app data
When Firebase rotates tokens for security
When restoring data to a new device
Why it matters?
Your app must store the new updated token on your server, or notifications will fail.
Function Call (Caller Side – inside initState)
@override
void initState() {
  super.initState();

  // Ask user for notification permission
  _notificationServices.requestNotificationPermission();

  // Listen for auto token refresh
  _notificationServices.listenToTokenRefresh();

  // CALLING getDeviceToken() function
  _notificationServices.getDeviceToken().then((value) {
    print('device token');
    print(value);    // <-- this prints the token returned by the function
  });

  // Foreground notifications
  _notificationServices.firebaseInit(context);

  // Notification click event
  _notificationServices.handleNotificationClick(context);
}

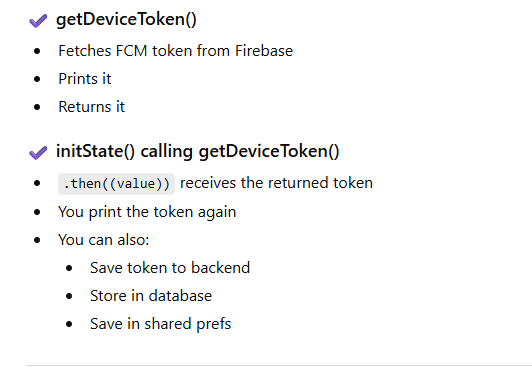
What is happening here?
You call the function _notificationServices.getDeviceToken()
Because it returns a Future, you use .then() to receive the value
Inside .then((value) { ... }), the value = token returned from function
✅ Function Definition (Callee Side)
This is your actual function that fetches and RETURNS the token:
Future<String?> getDeviceToken() async {
  String? token = await _messaging.getToken();
  print("FCM my Token: $token");
  return token;   // <-- returned back to caller (.then())
}
Full Flow Diagram (Simple)
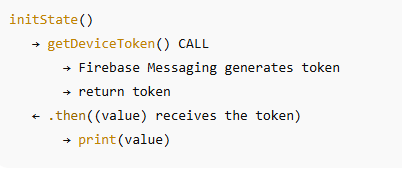
Easy Explanation
Full Working Code (NotificationServices Class)
Below is the complete copy-paste ready code.
import 'dart:io';
import 'package:flutter/material.dart';
import 'package:firebase_messaging/firebase_messaging.dart';
import 'package:app_settings/app_settings.dart';

class NotificationServices {
  final FirebaseMessaging _messaging = FirebaseMessaging.instance;

  /// ----------------------------------------------------
  /// 1. REQUEST NOTIFICATION PERMISSION (Android/iOS)
  /// ----------------------------------------------------
  Future<void> requestNotificationPermission() async {
    NotificationSettings settings = await _messaging.requestPermission(
      alert: true,
      announcement: true,
      badge: true,
      carPlay: false,
      criticalAlert: true,
      provisional: true,
      sound: true,
    );

    if (settings.authorizationStatus == AuthorizationStatus.authorized) {
      print("User granted permission");
    } else if (settings.authorizationStatus == AuthorizationStatus.provisional) {
      print("User granted provisional permission");
    } else {
      print("User denied notification permission");
      AppSettings.openAppSettings();
    }
  }

  /// ----------------------------------------------------
  /// 2. GET THE DEVICE TOKEN
  /// ----------------------------------------------------
  Future<String?> getDeviceToken() async {
    String? token = await _messaging.getToken();
    print("FCM device token: $token");
    return token;
  }

  /// ----------------------------------------------------
  /// 3. LISTEN FOR TOKEN REFRESH
  /// ----------------------------------------------------
  void listenToTokenRefresh() {
    _messaging.onTokenRefresh.listen((newToken) {
      print("🔥 Token refreshed!");
      print("New Token: $newToken");

      // TODO: Send token to backend API
      // updateTokenOnServer(newToken);
    });
  }

  /// OPTIONAL: Handle foreground & background notifications
  void firebaseInit(BuildContext context) {
    FirebaseMessaging.onMessage.listen((message) {
      print("Notification received in foreground");
      print(message.notification?.title);
      print(message.notification?.body);
    });
  }

  /// When user clicks notification and opens app
  void handleNotificationClick(BuildContext context) {
    FirebaseMessaging.onMessageOpenedApp.listen((message) {
      print("User clicked notification");
    });
  }
}
Using NotificationServices in StatefulWidget
Add this inside your Flutter screen:
final NotificationServices _notificationServices = NotificationServices();

@override
void initState() {
  super.initState();

  // 1. Ask for permission
  _notificationServices.requestNotificationPermission();

  // 2. Listen for token refresh
  _notificationServices.listenToTokenRefresh();

  // 3. Print token for testing
  _notificationServices.getDeviceToken().then((value) {
    print("device token:");
    print(value);
  });

  // 4. Initialize listeners
  _notificationServices.firebaseInit(context);
  _notificationServices.handleNotificationClick(context);
}

Top comments (0)