Step 1 :Install xampp
To install xampp on laravel9 lampp version must be greater than or equal to 8.0
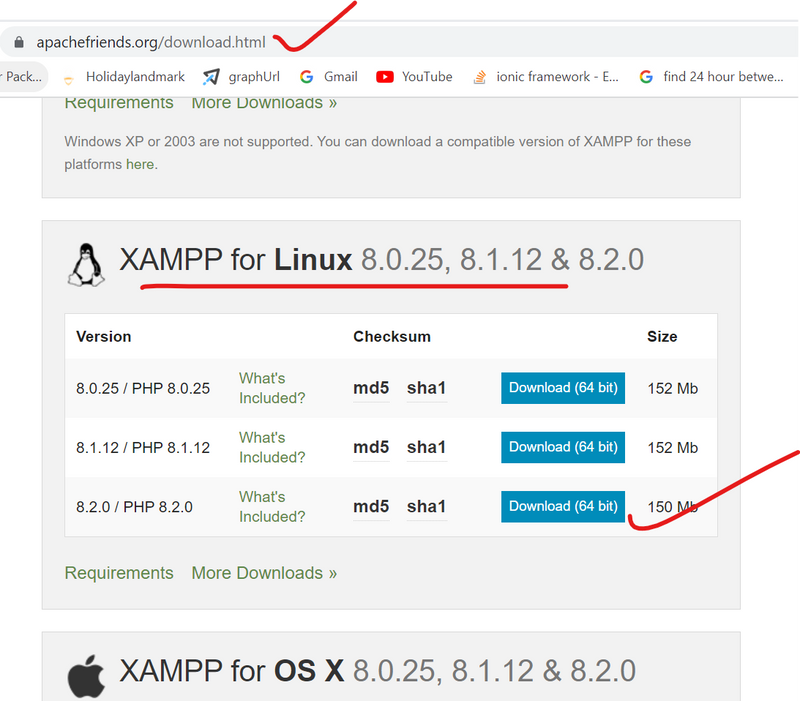
click latest version of xampp for security purpose
Run the below given command:
wget https://sourceforge.net/projects/xampp/files/XAMPP%20Linux/8.2.0/xampp-linux-x64-8.2.0-0-installer.run
Run: sudo -s
Run: chmod 755 xampp-linux-x64-8.2.0-0-installer.run (This will give the executable permission to the installer file that you downloaded in step 2)
Run: sudo ./xampp-linux-x64-8.2.0-0-installer.run
Run/ Start XAMPP server
sudo /opt/lampp/lampp start
Now you can access the server from the browser of any machine if the IP of the Ubuntu machine is static
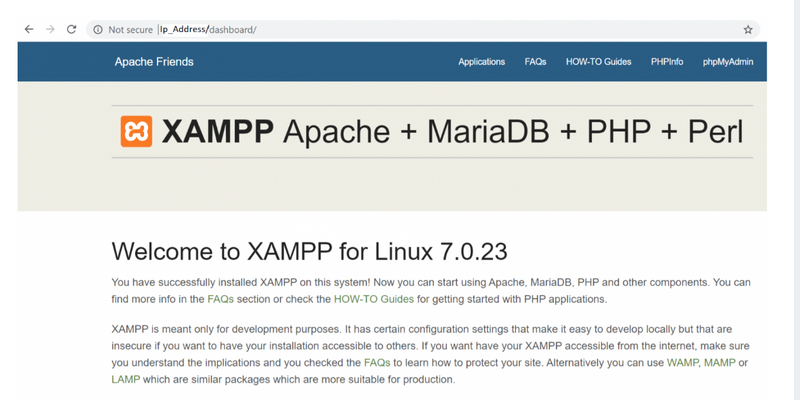
Screen captured while accessing the XAMPP dashboard using it’s IP addess
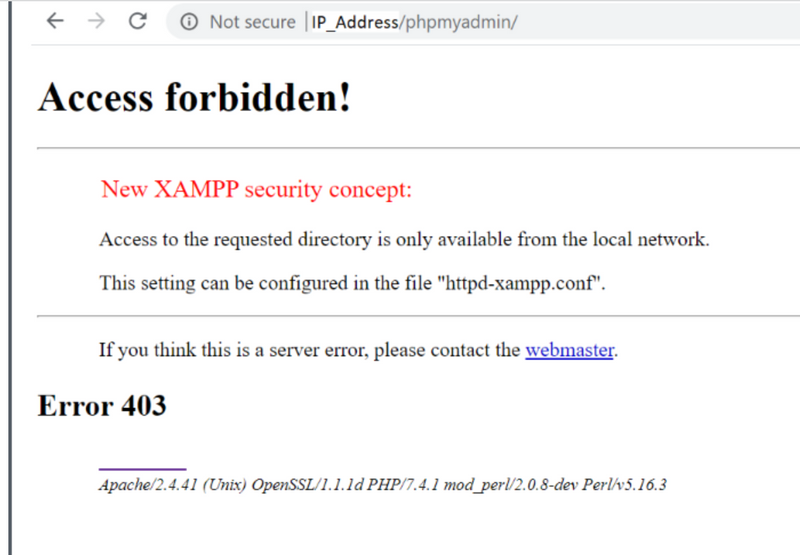
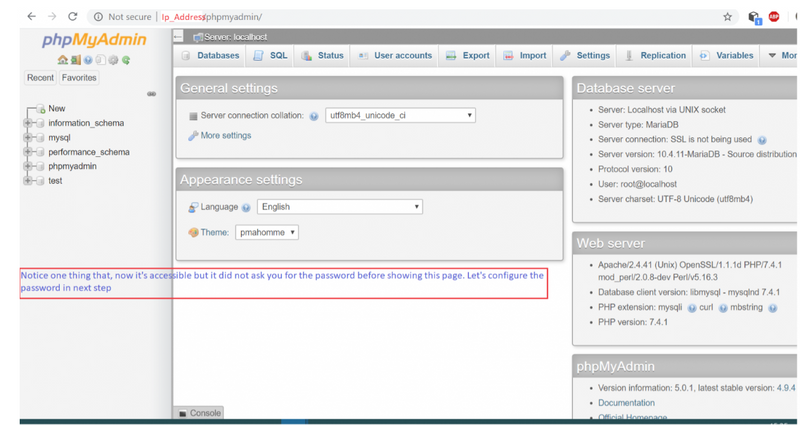
Let’s check the phpmyadmin console:
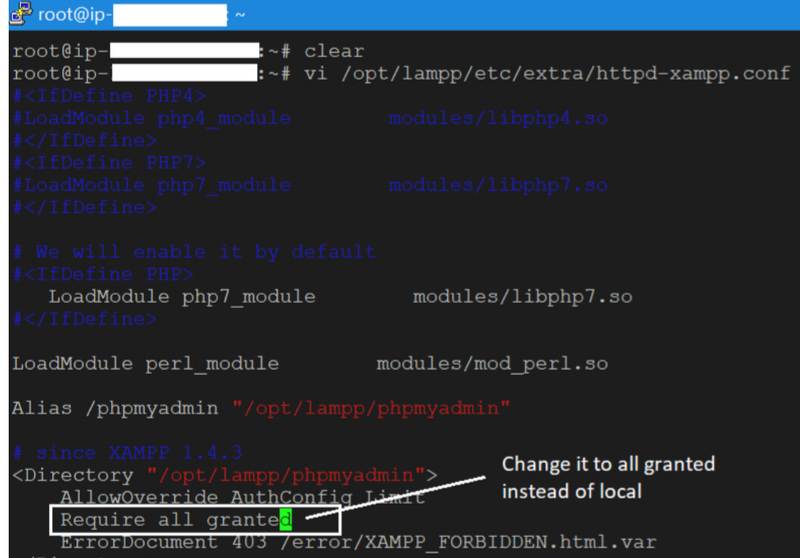
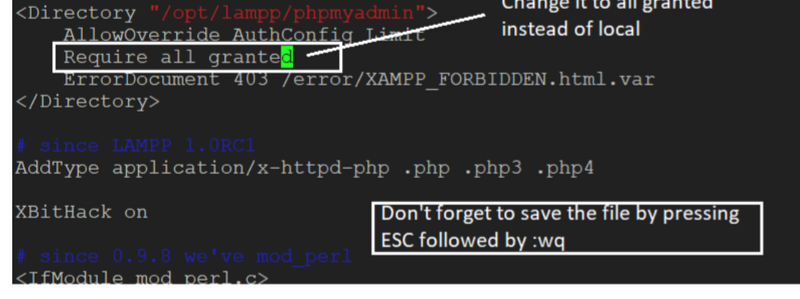
Let’s solve the phpmyadmin access forbidden problem now
Run vi /opt/lampp/etc/extra/httpd-xampp.conf
Restart XAMPP: sudo /opt/lampp/lampp restart
Now reload the phpmyadmin screen in the browser
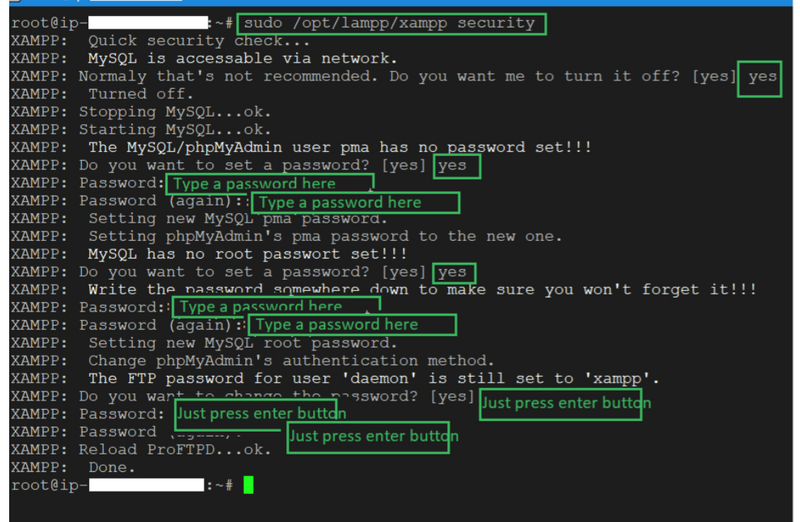
Run: sudo /opt/lampp/xampp security
Restart XAMPP: sudo /opt/lampp/lampp restart
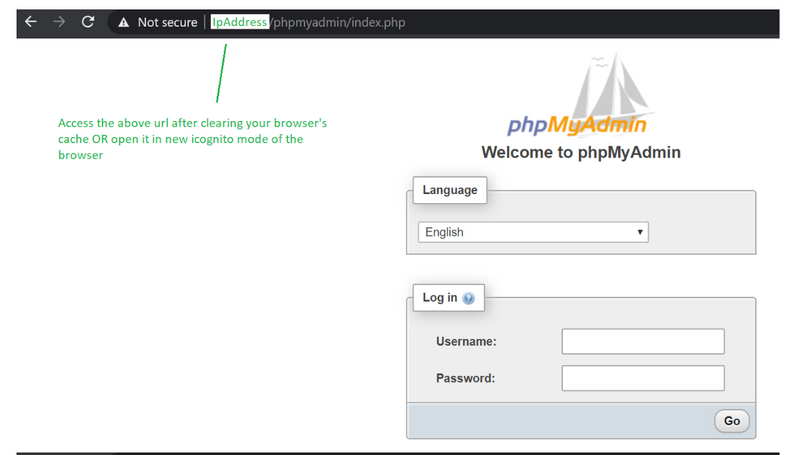
Let’s access phpmyadmin again and see if it is asking for the password:
preparing-steps-for-lamp-installation
how-to-link-php-from-xampp-installation-to-use-php-command-from-user-or-any-other-directory-in-ubuntu-or-linux
nstalling-xampp-7-4-xxx-on-ubuntu
how-to-configure-xampp-and-wordpress-in-linux
video
Step 2 :Set up certificate for ssl
Set SSL cert in httpd-ssl.conf
SSLEngine on
SSLCertificateFile "/opt/lampp/etc/certs/domain.crt"
SSLCertificateKeyFile "/opt/lampp/etc/certs/domain.key"
SSLCACertificateFile "/opt/lampp/etc/certs/mygd_bundle-g2-g1.crt"
Check path
domain.crt is present inside certs folder
/opt/lampp/etc/certs/domain.crt
how-to-get-ssl-certificates-and-enabled-https-for-any-domain-and-websites-in-apache
Step 3 :change php.ini configuration if necessary (optional step)
Step 4 :Set up root pwd for mysql and u can create no of user and pswd
ALTER USER 'root'@'localhost' IDENTIFIED BY '?~,F(?FksJshS6sdf';
===============OR==========
SET PASSWORD FOR 'root'@'localhost' = PASSWORD('Hsgjdk335GSbvd');
Grant Privileges to root **
GRANT ALL PRIVILEGES ON * . * TO 'root'@'localhost';
FLUSH PRIVILEGES;
**create new user and password and PRIVILEGES
create user 'wizbrandos'@'localhost' identified by 'MmD819ECvVDmVu2TR';
GRANT ALL PRIVILEGES ON * . * TO 'wizbrandos'@'localhost';
FLUSH PRIVILEGES;
If u want remove all grant permission to root user
mysql -u root -p
REVOKE ALL PRIVILEGES, GRANT OPTION FROM 'root'@'localhost';
https://www.devopsschool.com/blog/how-to-check-ssh-is-working-with-public-key-private-key/
linuxhow-do-i-set-mysql-environment-variable-in-ubuntu-4n7k
how-to-reset-or-recover-forgotten-mysql-root-password
how-to-modify-user-privileges-in-mysql-databases-cg8
mysqlerror-1046-no-database-selected-how-to-resolve-4o6g
i-am-facing-a-mysql-error-when-i-want-to-login-into-a-database-in-ubuntu-20-04-2-lts
error-phpmyadmin-not-accessible-on-network-using-ip-address-but-localhost-in-ubuntu
how-to-link-mysql-from-xampp-opt-lampp-bin-to-use-mysql-command-from-any-directory-in-ubuntu-or-linux
step5: setup virtual host
<VirtualHost *:80>
        ServerAdmin contact@wizbrand.com
        DocumentRoot "/opt/lampp/htdocs/wz-account-admin-ms/public"
        ServerName wizbrand.com
        RewriteEngine On
        RewriteOptions inherit

       </Directory>
         Alias /site-admin /opt/lampp/htdocs/site-admin/public
     <Directory  "/opt/lampp/htdocs/site-admin/public">
            Options Indexes FollowSymLinks
            AllowOverride All
            Allow from all
            Require all granted
        </Directory>
              Alias /wz-email-access-ms /opt/lampp/htdocs/wz-email-access-ms/public
         <Directory  "/opt/lampp/htdocs/wz-email-access-ms/public">
            Options Indexes FollowSymLinks
            AllowOverride All
            Allow from all
            Require all granted
        </Directory>

        Alias /wz-interval-task-ms /opt/lampp/htdocs/wz-interval-task-ms/public
         <Directory  "/opt/lampp/htdocs/wz-interval-task-ms/public">
            Options Indexes FollowSymLinks
            AllowOverride All
            Allow from all
            Require all granted
        </Directory>

Alias /wz-interval-task-ms /opt/lampp/htdocs/wz-interval-task-ms/public
         <Directory  "/opt/lampp/htdocs/wz-interval-task-ms/public">
            Options Indexes FollowSymLinks
            AllowOverride All
            Allow from all
            Require all granted
        </Directory>

</VirtualHost>
how-to-set-up-apache-virtual-hosts-on-ubuntu
setup-multiple-domain-with-apache2-with-httpd-vhosts-conf-virtualhost-examples
how-to-create-virtual-host-for-laravel-project-on-xampp-in-windows-10
how-to-create-virtual-hosts-on-xamp
how-to-install-configure-apache-httpd-server-in-linux
modules-in-apache-web-server
top-50-apache-httpd-interview-questions-and-answers
Use a non-privileged account to run Apache
Disable the directory browser’s display
Server Version Banner should be removed
step6: setup ssh key and generate public key in id_rsa and paste in git hub for git clone
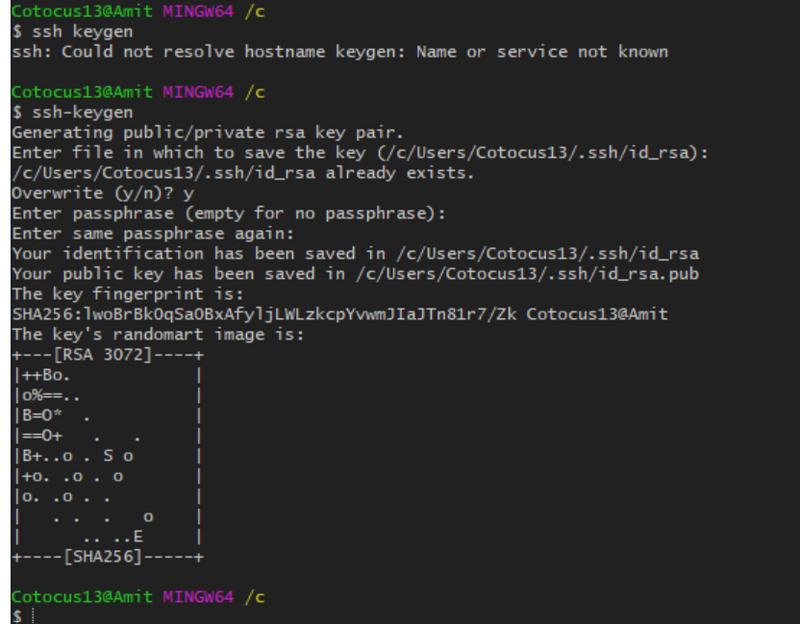
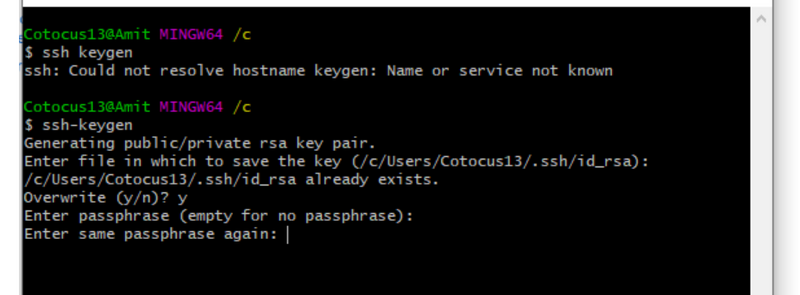
Step 1:- Go to your c: drive and open git bash and run this command
ssh-keygen
Which location you want to save this if ok then click Enter Enter->
Enter -> Now you can see your SSH key is set successfully
run commands
tail ~/.ssh/id_rsa
===========OR===================
/root/.ssh
vi id_rsa.pub
copy and paste
go to github==> setting===>ssh and gpg key
how-to-generate-new-ssh-key-and-and-set-up-in-github-id
how-to-setup-ssh-keys-on-ubuntu-linux
setup-multiple-domain-with-apache2-with-httpd-vhosts-conf-virtualhost-examples
how-to-create-virtual-host-for-laravel-project-on-xampp-in-windows-10
how-to-create-virtual-hosts-on-xamp
how-to-install-configure-apache-httpd-server-in-linux
modules-in-apache-web-server
top-50-apache-httpd-interview-questions-and-answers
Use a non-privileged account to run Apache
Disable the directory browser’s display
Server Version Banner should be removed
step7.follow these blog
how-to-create-project-laravel-9
step8: give permission commands chmod
best-practices-to-secure-your-apache-web-server
Best Practices
xampp-another-web-server-is-already-running
xampp-starting-apache-fail-ubuntu-error
php-artisan-migrate-error-in-ubuntu-sqlstatehy000-2002-connection-refused/
git clone repo ssh
create database
composer update
npm run build
npm install @vitejs/plugin-react
npm install react-places-autocomplete
npm install react-table
npm run build
configure env or rename or copy
export php path in root vi .bashsrc
export PATH=$PATH:/opt/lampp/bin
setup virtual host
cert installed
phpartisan migrate or php artisan migrate:refresh



Top comments (0)