Why use Tensor
Tensorflow basic operation
Creating a Tensor
Tensor Shapes
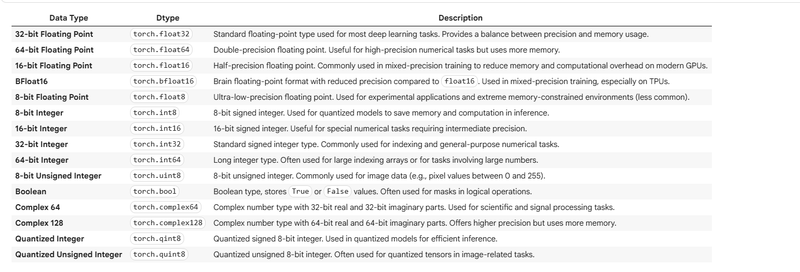
Tensor Data Types
Mathematical operations(Scalar Operations,Element-wise Operations,
Unary Operations on Tensor c,Reduction Operations,Matrix Operations
Comparison Operations,Special Functions)
Tensorflow Pipeline commands
Why use Tensor
In TensorFlow, tensors are the primary data structure, similar in some ways to lists or NumPy arrays but designed specifically for operations in deep learning and optimized for parallel computing, especially on GPUs. Here's a breakdown of how tensors differ from Python lists and NumPy arrays:
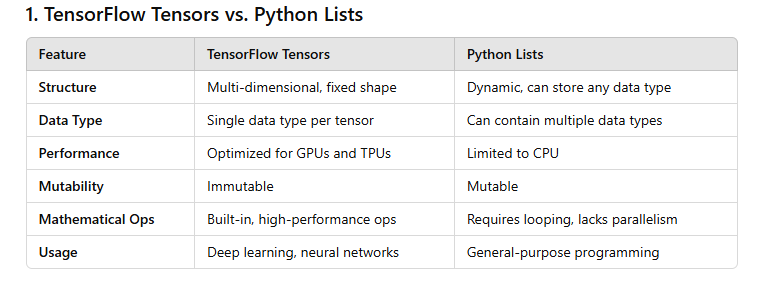
TensorFlow tensors are more rigid but also much faster for computation-heavy tasks, especially in deep learning. Lists, by contrast, are more flexible but slower and don’t support advanced mathematical operations directly
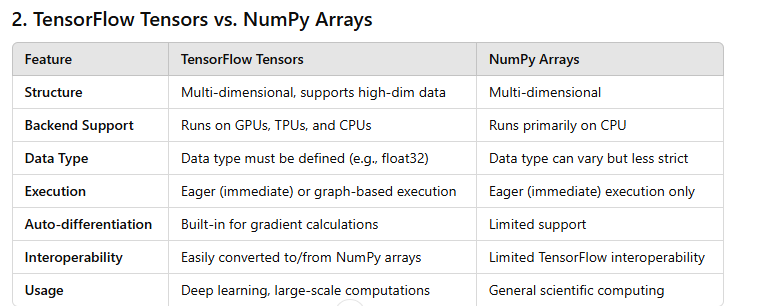
Key Differences Summary
Device Compatibility: Tensors can run on GPUs and TPUs, whereas NumPy is typically limited to the CPU.
Execution Model: Tensors can use "graph execution," optimizing and compiling the operations for performance, while NumPy arrays only support direct, immediate operations.
Automatic Differentiation: TensorFlow tensors support automatic differentiation, crucial for training machine learning models. NumPy arrays don’t inherently support this.
Interoperability: TensorFlow can interconvert with NumPy easily, allowing the use of NumPy arrays in tensor operations when needed.
Tensorflow basic operation
Creating a Tensor
Version and Device Availability
import torch
print(torch.__version__)

if torch.cuda.is_available():
    print("GPU is available!")
    print(f"Using GPU: {torch.cuda.get_device_name(0)}")
else:
    print("GPU not available. Using CPU.")
output
2.5.1+cu121
GPU is available!
Using GPU: Tesla T4
Creating a Tensor
a = torch.empty(2,3)
torch.empty(2,3)
output
tensor([[3.7681e-40, 0.0000e+00, 5.0447e-44],
        [0.0000e+00, 0.0000e+00, 0.0000e+00]])
# check type
type(a)
output
torch.Tensor
Creating an Empty Tensor
Creating a Zero Tensor
torch.zeros(2,3)
Creates a 2×3 tensor filled with zeros.
output
tensor([[0., 0., 0.],
        [0., 0., 0.]])
- Creating a Ones Tensor
torch.ones(2,3)
Creates a 2×3 tensor filled with ones.
output
tensor([[1., 1., 1.],
        [1., 1., 1.]])
- Creating a Random Tensor
torch.rand(2,3)
Creates a 2×3 tensor with random values in [0, 1).
output
tensor([[0.2243, 0.8935, 0.0497],
        [0.1780, 0.3011, 0.1893]])
- Using a Random Seed
torch.manual_seed(100)
torch.rand(2,3)
Sets the seed for reproducibility, giving the same random numbers with repeated calls.
output
tensor([[0.1117, 0.8158, 0.2626],
        [0.4839, 0.6765, 0.7539]])
- Creating a Tensor from Data
torch.tensor([[1,2,3],[4,5,6]])
output
tensor([[1, 2, 3],
        [4, 5, 6]])
a = torch.empty(2,3)
Create a 1D tensor with regularly spaced values in a range using torch.arange.
linspace: Generate a 1D tensor with evenly spaced values between start and end using torch.linspace.
eye: Create an identity matrix (2D tensor with ones on the diagonal) using torch.eye.
full: Initialize a tensor of a given shape with a constant value using torch.full.
# arange
print("using arange ->", torch.arange(0,10,2))

# using linspace
print("using linspace ->", torch.linspace(0,10,10))

# using eye
print("using eye ->", torch.eye(5))

# using full
print("using full ->", torch.full((3, 3), 5))
output
using arange -> tensor([0, 2, 4, 6, 8])
using linspace -> tensor([ 0.0000,  1.1111,  2.2222,  3.3333,  4.4444,  5.5556,  6.6667,  7.7778,
         8.8889, 10.0000])
using eye -> tensor([[1., 0., 0., 0., 0.],
        [0., 1., 0., 0., 0.],
        [0., 0., 1., 0., 0.],
        [0., 0., 0., 1., 0.],
        [0., 0., 0., 0., 1.]])
using full -> tensor([[5, 5, 5],
        [5, 5, 5],
        [5, 5, 5]])
Creates a 2×3 tensor with uninitialized values (whatever is in memory).
Tensor Shapes
x = torch.tensor([[1,2,3],[4,5,6]])
x
tensor([[1, 2, 3],
        [4, 5, 6]])
x.shape
torch.Size([2, 3])
torch.zeros_like(x)
tensor([[0, 0, 0],
        [0, 0, 0]])
torch.ones_like(x)
tensor([[1, 1, 1],
        [1, 1, 1]])
torch.rand_like(x, dtype=torch.float32)
tensor([[0.2243, 0.8935, 0.0497],
        [0.1780, 0.3011, 0.1893]])
Tensor Data Types
Check a tensor’s data type
x.dtype
Returns the data type (dtype) of the tensor x, such as torch.float32 or torch.int64.
output
torch.int64
Create tensor with specified data type
torch.tensor([1.0, 2.0, 3.0], dtype=torch.int32)
output
tensor([1, 2, 3], dtype=torch.int32)
torch.tensor([1,2,3], dtype=torch.float64)
tensor([1., 2., 3.], dtype=torch.float64)
Convert tensor data type using .to()
x.to(torch.float32)
output
tensor([[1., 2., 3.],
        [4., 5., 6.]])
Mathematical operations
Scalar Operations
x = torch.rand(2,2)
print("Original Tensor x:\n", x)

print("x + 2:\n", x + 2)         # Add 2 to each element
print("x - 2:\n", x - 2)         # Subtract 2 from each element
print("x * 3:\n", x * 3)         # Multiply each element by 3
print("x / 3:\n", x / 3)         # Divide each element by 3
print("(x * 100) // 3:\n", (x * 100) // 3)  # Integer division (floor)
print("((x * 100) // 3) % 2:\n", ((x * 100) // 3) % 2)  #
Modulus by 2
print("x squared:\n", x ** 2) # Square each element
Example output:
Original Tensor x:
 tensor([[0.5278, 0.9281],
         [0.0867, 0.6363]])
x + 2:
 tensor([[2.5278, 2.9281],
         [2.0867, 2.6363]])
x - 2:
 tensor([[-1.4722, -1.0719],
         [-1.9133, -1.3637]])
x * 3:
 tensor([[1.5833, 2.7843],
         [0.2601, 1.9090]])
x / 3:
 tensor([[0.1759, 0.3094],
         [0.0289, 0.2121]])
(x * 100) // 3:
 tensor([[17., 30.],
         [ 2., 21.]])
((x * 100) // 3) % 2:
 tensor([[1., 0.],
         [0., 1.]])
x squared:
 tensor([[0.2785, 0.8614],
         [0.0075, 0.4050]])
- Element-wise Operations
a = torch.rand(2,3)
b = torch.rand(2,3)
print("Tensor a:\n", a)
print("Tensor b:\n", b)

print("a + b:\n", a + b)
print("a - b:\n", a - b)
print("a * b:\n", a * b)
print("a / b:\n", a / b)
print("a ** b:\n", a ** b)
print("a % b:\n", a % b)
Example output:
Tensor a:
 tensor([[0.6220, 0.2997, 0.8743],
         [0.3204, 0.8395, 0.1409]])
Tensor b:
 tensor([[0.6265, 0.9995, 0.5222],
         [0.4308, 0.7972, 0.7848]])
a + b:
 tensor([[1.2485, 1.2992, 1.3965],
         [0.7512, 1.6367, 0.9257]])
a - b:
 tensor([[-0.0045, -0.6998, 0.3521],
         [-0.1104, 0.0423, -0.6438]])
a * b:
 tensor([[0.3896, 0.2996, 0.4563],
         [0.1380, 0.6690, 0.1105]])
a / b:
 tensor([[0.9930, 0.2998, 1.6735],
         [0.7433, 1.0529, 0.1795]])
a ** b:
 tensor([[0.6233, 0.2999, 0.7848],
         [0.2455, 0.8722, 0.1408]])
a % b:
 tensor([[0.6220, 0.2997, 0.3521],
         [0.3204, 0.0423, 0.1409]])
Unary Operations on Tensor c
c = torch.tensor([1, -2, 3, -4], dtype=torch.float32)
d = torch.tensor([1.2, -2.7, 3.3, -4.4], dtype=torch.float32)

print("Absolute value:", torch.abs(c))
print("Negation:", torch.neg(c))
print("Round:", torch.round(d))
print("Ceil:", torch.ceil(d))
print("Floor:", torch.floor(d))
print("Clamp to [2, 3]:", torch.clamp(d, min=2, max=3))
Example output:
Absolute value: tensor([1., 2., 3., 4.])
Negation: tensor([-1.,  2., -3.,  4.])
Round: tensor([ 1., -3.,  3., -4.])
Ceil: tensor([ 2., -2.,  4., -4.])
Floor: tensor([ 1., -3.,  3., -5.])
Clamp to [2, 3]: tensor([2., 2., 3., 2.])
Reduction Operations
e = torch.randint(0, 10, (2, 3), dtype=torch.float32)
print("Tensor e:\n", e)

print("Sum of all elements:", torch.sum(e))
print("Sum along columns (dim=0):", torch.sum(e, dim=0))
print("Sum along rows (dim=1):", torch.sum(e, dim=1))

print("Mean of all elements:", torch.mean(e))
print("Mean along columns (dim=0):", torch.mean(e, dim=0))

print("Median of all elements:", torch.median(e))

print("Max value in tensor:", torch.max(e))
print("Min value in tensor:", torch.min(e))

print("Product of all elements:", torch.prod(e))

print("Standard deviation:", torch.std(e))
print("Variance:", torch.var(e))

print("Index of max element:", torch.argmax(e))
print("Index of min element:", torch.argmin(e))
*output *
Tensor e:
 tensor([[3., 6., 1.],
        [8., 2., 7.]])
Sum of all elements: tensor(27.)
Sum along columns (dim=0): tensor([11.,  8.,  8.])
Sum along rows (dim=1): tensor([10., 17.])
Mean of all elements: tensor(4.5000)
Mean along columns (dim=0): tensor([5.5000, 4.0000, 4.0000])
Median of all elements: tensor(4.5000)
Max value in tensor: tensor(8.)
Min value in tensor: tensor(1.)
Product of all elements: tensor(2016.)
Standard deviation: tensor(2.8077)
Variance: tensor(7.8833)
Index of max element: tensor(3)  # Flattened index of value 8.0
Index of min element: tensor(2)  # Flattened index of value 1.0
Matrix Operations
f = torch.randint(size=(2,3), low=0, high=10)
g = torch.randint(size=(3,2), low=0, high=10)

print("Matrix f:\n", f)
print("Matrix g:\n", g)

print("Matrix multiplication f @ g:\n", torch.matmul(f, g))

vector1 = torch.tensor([1, 2])
vector2 = torch.tensor([3, 4])
print("Dot product of vector1 and vector2:", torch.dot(vector1, vector2))

print("Transpose of f:\n", torch.transpose(f, 0, 1))

h = torch.randint(size=(3,3), low=0, high=10, dtype=torch.float32)
print("Matrix h:\n", h)
print("Determinant of h:", torch.det(h))
print("Inverse of h:\n", torch.inverse(h))
Possible output:
Matrix f:
 tensor([[3, 4, 2],
         [1, 9, 5]])
Matrix g:
 tensor([[7, 1],
         [6, 8],
         [4, 2]])
Matrix multiplication f @ g:
 tensor([[49, 38],
         [85, 58]])
Dot product of vector1 and vector2: tensor(11)
Transpose of f:
 tensor([[3, 1],
         [4, 9],
         [2, 5]])
Matrix h:
 tensor([[5.0000, 7.0000, 8.0000],
         [0.0000, 2.0000, 9.0000],
         [4.0000, 6.0000, 3.0000]])
Determinant of h: tensor(-161.0000)
Inverse of h:
 tensor([[ 0.1124, -0.0124,  0.1317],
         [ 0.0913,  0.1565, -0.1807],
         [-0.2453,  0.0870,  0.1155]])
Comparison Operations
i = torch.randint(size=(2,3), low=0, high=10)
j = torch.randint(size=(2,3), low=0, high=10)

print("Tensor i:\n", i)
print("Tensor j:\n", j)

print("i > j:\n", i > j)
print("i < j:\n", i < j)
print("i == j:\n", i == j)
print("i != j:\n", i != j)
print("i >= j:\n", i >= j)
print("i <= j:\n", i <= j)
Possible output (boolean tensors):
Tensor i:
 tensor([[2, 5, 4],
         [3, 1, 6]])
Tensor j:
 tensor([[3, 2, 5],
         [2, 1, 7]])
i > j:
 tensor([[False,  True, False],
         [ True, False, False]])
i < j:
 tensor([[ True, False,  True],
         [False, False,  True]])
i == j:
 tensor([[False, False, False],
         [False,  True, False]])
i != j:
 tensor([[ True,  True,  True],
         [ True, False,  True]])
i >= j:
 tensor([[False,  True, False],
         [ True,  True, False]])
i <= j:
 tensor([[ True, False,  True],
         [False,  True,  True]])
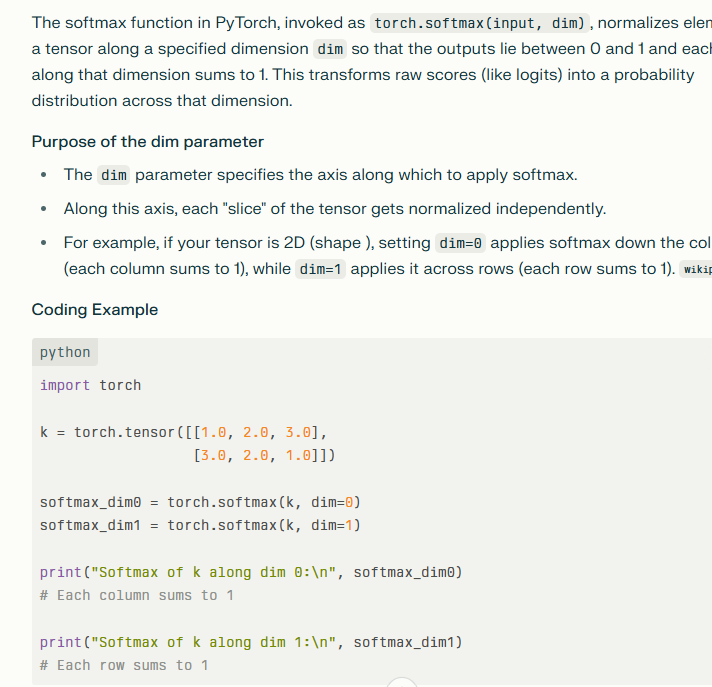
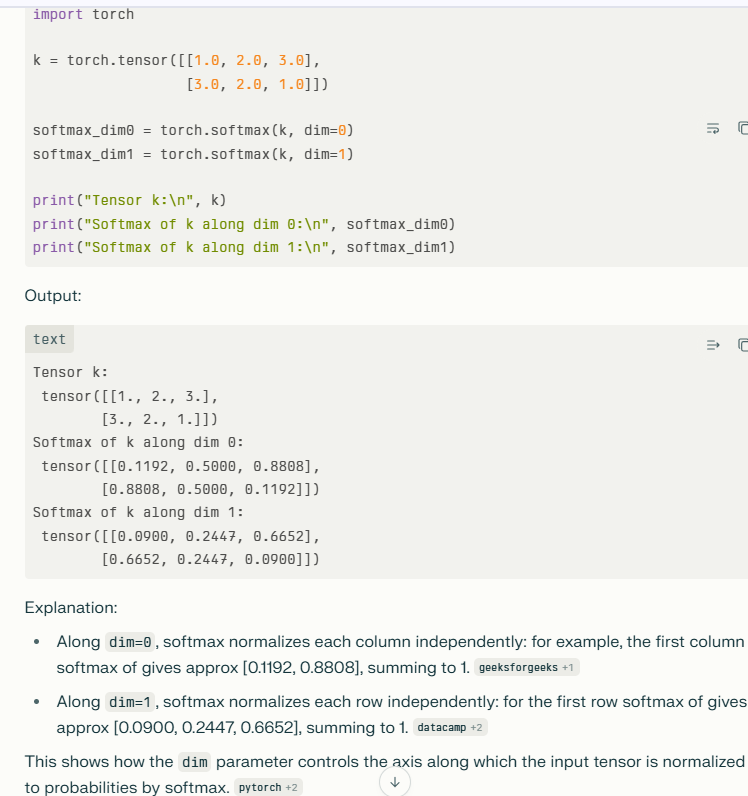
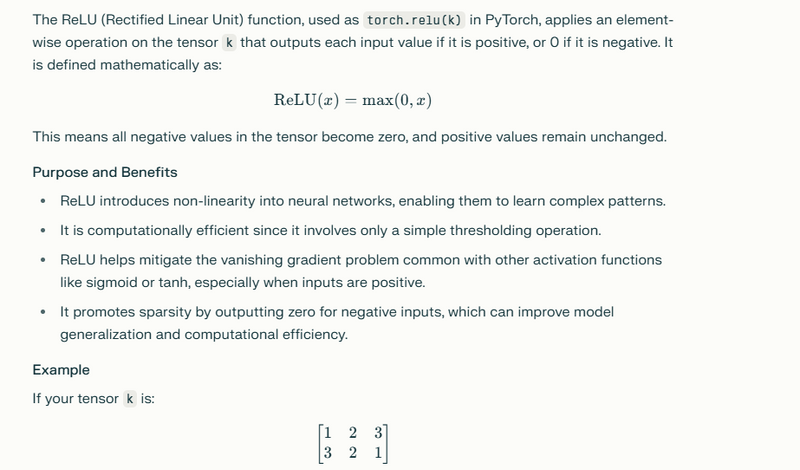
Special Functions
k = torch.randint(size=(2,3), low=1, high=10, dtype=torch.float32)
print("Tensor k:\n", k)

print("Log of k:\n", torch.log(k))
print("Exp of k:\n", torch.exp(k))
print("Sqrt of k:\n", torch.sqrt(k))
print("Sigmoid of k:\n", torch.sigmoid(k))
print("Softmax of k along dim 0:\n", torch.softmax(k, dim=0))
print("ReLU of k:\n", torch.relu(k))
sigmoid
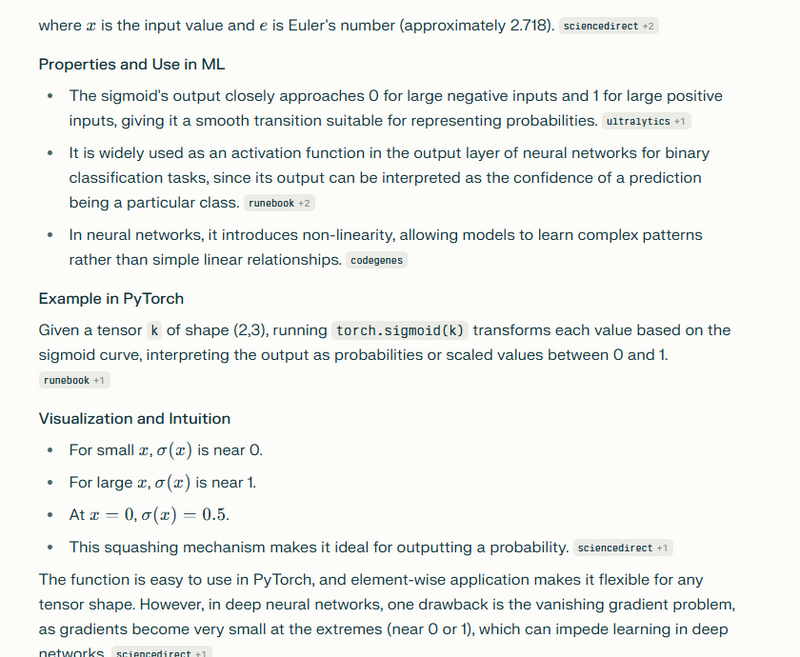
softmax
RELU
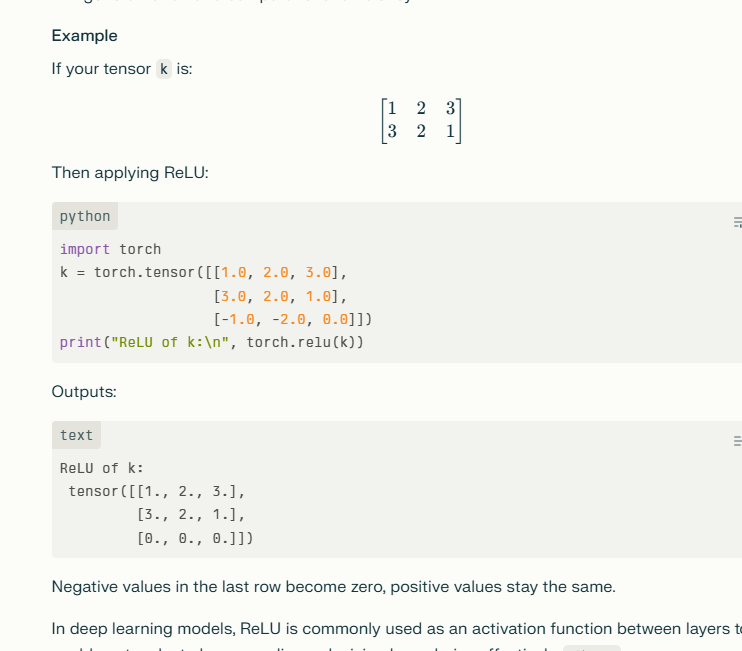
Sample outputs:
Tensor k:
 tensor([[1., 5., 7.],
         [3., 8., 2.]])
Log of k:
 tensor([[0.0000, 1.6094, 1.9459],
         [1.0986, 2.0794, 0.6931]])
Exp of k:
 tensor([[2.7183, 148.4132, 1096.6339],
         [20.0855, 2980.9580,   7.3891]])
Sqrt of k:
 tensor([[1.0000, 2.2361, 2.6458],
         [1.7321, 2.8284, 1.4142]])
Sigmoid of k:
 tensor([[0.7311, 0.9933, 0.9991],
         [0.9526, 0.9997, 0.8808]])
Softmax of k along dim 0:
 tensor([[0.1192, 0.0025, 0.9994],
         [0.8808, 0.9975, 0.0006]])
ReLU of k:
 tensor([[1., 5., 7.],
         [3., 8., 2.]])
Inplace Operations
m = torch.rand(2, 3)
n = torch.rand(2, 3)

print("Tensor m before inplace add:\n", m)
print("Tensor n:\n", n)

m.add_(n)  # Inplace addition: modifies m

print("Tensor m after inplace add:\n", m)
print("Tensor n remains unchanged:\n", n)

print("ReLU on m (non-inplace):\n", torch.relu(m))  # Returns new tensor, m unchanged
m.relu_()  # Inplace ReLU modifies m

print("Tensor m after inplace ReLU:\n", m)
Explanation:
m.add_(n) adds tensor n to m modifying m itself (no new tensor created).
torch.relu(m) returns a new tensor applying ReLU, but m stays same.
m.relu_() applies ReLU inplace changing m directly.
Inplace operations are denoted by trailing underscore _ and save memory but require caution.
Copying a Tensor
a = torch.rand(2,3)
print("Tensor a:\n", a)

b = a  # b and a point to the same tensor
print("Tensor b (just assigned from a):\n", b)

a[0,0] = 100  # modify a
print("Tensor a after modification:\n", a)
print("Tensor b after a is modified (same as a):\n", b)
Explanation:
Assigning b = a does NOT copy but references the same tensor.
Modifying a also changes b.
To create an independent copy, you need b = a.clone().
Possible Output Example
Tensor m before inplace add:
 tensor([[0.2334, 0.5512, 0.1234],
         [0.7654, 0.2123, 0.8765]])
Tensor n:
 tensor([[0.1234, 0.2345, 0.3456],
         [0.4567, 0.5678, 0.6789]])
Tensor m after inplace add:
 tensor([[0.3568, 0.7857, 0.4690],
         [1.2221, 0.7801, 1.5554]])
Tensor n remains unchanged:
 tensor([[0.1234, 0.2345, 0.3456],
         [0.4567, 0.5678, 0.6789]])
ReLU on m (non-inplace):
 tensor([[0.3568, 0.7857, 0.4690],
         [1.2221, 0.7801, 1.5554]])
Tensor m after inplace ReLU:
 tensor([[0.3568, 0.7857, 0.4690],
         [1.2221, 0.7801, 1.5554]])
Tensor a:
 tensor([[0.1234, 0.2345, 0.3456],
         [0.4567, 0.5678, 0.6789]])
Tensor b (just assigned from a):
 tensor([[0.1234, 0.2345, 0.3456],
         [0.4567, 0.5678, 0.6789]])
Tensor a after modification:
 tensor([[100.0000,   0.2345,   0.3456],
         [  0.4567,   0.5678,   0.6789]])
Tensor b after a is modified (same as a):
 tensor([[100.0000,   0.2345,   0.3456],
         [  0.4567,   0.5678,   0.6789]])
- tf.add (Addition) Purpose: Adds two tensors element-wise. Example:
a = tf.constant([1, 2, 3])
b = tf.constant([4, 5, 6])
result = tf.add(a, b)
Output:
[5, 7, 9]
- tf.subtract (Subtraction) Purpose: Subtracts one tensor from another, element-wise. Example:
result = tf.subtract(a, b)
Output:
[-3, -3, -3]
- tf.multiply (Element-wise Multiplication) Purpose: Multiplies two tensors element-wise. Example:
result = tf.multiply(a, b)
Output:
[4, 10, 18]
- tf.divide (Element-wise Division) Purpose: Divides elements of one tensor by another, element-wise. Example:
result = tf.divide(a, b)
Output:
[0.25, 0.4, 0.5]
- tf.reduce_sum (Summation) Purpose: Sums up all elements in a tensor along a specified axis. Example:
result = tf.reduce_sum(a)
Output:
6
- tf.reduce_mean (Mean/Average) Purpose: Computes the mean of elements in a tensor. Example:
result = tf.reduce_mean(a)
Output:
2.0
- tf.reshape (Reshaping) Purpose: Changes the shape of a tensor without changing its data. Example:
tensor = tf.constant([[1, 2], [3, 4]])
result = tf.reshape(tensor, [4])
Output:
[1, 2, 3, 4]
- tf.transpose (Transpose) Purpose: Transposes a tensor, switching its dimensions. Example:
tensor = tf.constant([[1, 2], [3, 4]])
result = tf.transpose(tensor)
Output:
[[1, 3], [2, 4]]
- tf.matmul (Matrix Multiplication) Purpose: Multiplies two matrices. Example:
tensor_a = tf.constant([[1, 2], [3, 4]])
tensor_b = tf.constant([[2, 0], [1, 2]])

result = tf.matmul(tensor_a, tensor_b)
Output:
[[4, 4], [10, 8]]
- tf.argmax (Argmax) Purpose: Finds the index of the maximum value along an axis.
result = tf.argmax(a)
Output:
2
- tf.cast (Type Casting) Purpose: Changes the data type of a tensor.
result = tf.cast(a, tf.float32)
Output:
[1.0, 2.0, 3.0]
- tf.concat (Concatenation) Purpose: Concatenates two or more tensors along a specified axis. Example:
tensor_b = tf.constant([7, 8, 9])
result = tf.concat([a, tensor_b], axis=0)
Output:
[1, 2, 3, 7, 8, 9]
- tf.expand_dims (Add Dimension) Purpose: Adds an extra dimension to a tensor.
result = tf.expand_dims(a, axis=0)
Output:
[[1, 2, 3]]
- tf.squeeze (Remove Dimension) Purpose: Removes dimensions of size 1 from a tensor.
tensor = tf.constant([[[1], [2], [3]]])
result = tf.squeeze(tensor)
Output:
[1, 2, 3]
- tf.one_hot (One-Hot Encoding) Purpose: Creates a one-hot encoded tensor.
indices = [0, 1, 2]
result = tf.one_hot(indices, depth=3)
Output:
[[1., 0., 0.], [0., 1., 0.], [0., 0., 1.]]
Tensorflow Pipeline commands
tf.data.Dataset.from_tensor_slices
Purpose: Converts a tensor or array into a dataset, slicing along the first dimension.
Example:
data = tf.constant([1, 2, 3, 4, 5])
dataset = tf.data.Dataset.from_tensor_slices(data)
Output:
<Dataset element_spec=TensorSpec(shape=(), dtype=tf.int32)>
Creating a Dataset for Features Only
import tensorflow as tf

features = [1, 2, 3, 4, 5]
dataset = tf.data.Dataset.from_tensor_slices(features)

for item in dataset:
    print(item)
Output: Each item in dataset is an integer from the features list:
tf.Tensor(1, shape=(), dtype=int32)
tf.Tensor(2, shape=(), dtype=int32)
Creating a Dataset for Paired Data (Features and Labels)
In supervised learning, from_tensor_slices is often used to create datasets that pair input data (features) with labels.
features = ["TensorFlow", "Keras", "Pandas"]
labels = [1, 0, 1]
dataset = tf.data.Dataset.from_tensor_slices((features, labels))

for feature, label in dataset:
    print(feature.numpy().decode('utf-8'), label.numpy())
Output: Each item is a tuple containing a feature and its label:
TensorFlow 1
Keras 0
Pandas 1
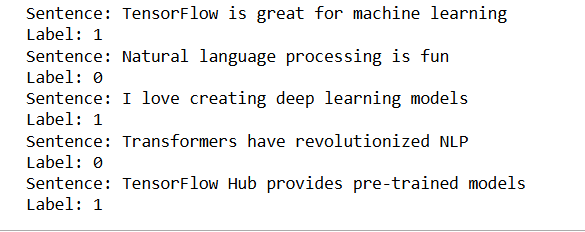
sentences = [
    "TensorFlow is great for machine learning",
    "Natural language processing is fun",
    "I love creating deep learning models",
    "Transformers have revolutionized NLP",
    "TensorFlow Hub provides pre-trained models"
]
labels = [1, 0, 1, 0, 1]  # Example binary labels

# Create a tf.data Dataset from sentences and labels
data = tf.data.Dataset.from_tensor_slices((sentences, labels))
for sentence, label in data:
    print("Sentence:", sentence.numpy().decode('utf-8'))
    print("Label:", label.numpy())
output
Dataset.map
Purpose: Applies a transformation function to each element in the dataset.
Example:
def add_one(x):
    return x + 1
dataset = dataset.map(add_one)
Output:
2, 3, 4, 5, 6
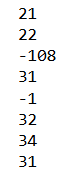
Create tf dataset from a list
import tensorflow as tf
daily_sales_numbers = [21, 22, -108, 31, -1, 32, 34,31]

tf_dataset = tf.data.Dataset.from_tensor_slices(daily_sales_numbers)
tf_dataset
output
<TensorSliceDataset shapes: (), types: tf.int32>
Iterate through tf dataset
for sales in tf_dataset:
    print(sales.numpy())
output
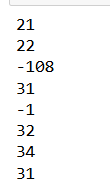
Iterate through elements as numpy elements
for sales in tf_dataset.as_numpy_iterator():
    print(sales)
Iterate through first n elements in tf dataset
for sales in tf_dataset.take(3):
    print(sales.numpy())

Filter sales numbers that are < 0
tf_dataset = tf_dataset.filter(lambda x: x>0)
for sales in tf_dataset.as_numpy_iterator():
    print(sales)
output

Convert sales numbers from USA dollars ($) to Indian Rupees (INR) Assuming 1->72 conversation rate
tf_dataset = tf_dataset.map(lambda x: x*72)
for sales in tf_dataset.as_numpy_iterator():
    print(sales)
Shuffe
tf_dataset = tf_dataset.shuffle(2)
for sales in tf_dataset.as_numpy_iterator():
    print(sales)
Batching
for sales_batch in tf_dataset.batch(2):
    print(sales_batch.numpy())
Perform all of the above operations in one shot
tf_dataset = tf.data.Dataset.from_tensor_slices(daily_sales_numbers)

tf_dataset = tf_dataset.filter(lambda x: x>0).map(lambda y: y*72).shuffle(2).batch(2)
for sales in tf_dataset.as_numpy_iterator():
    print(sales)
Prefetching
dataset = dataset.prefetch(buffer_size=tf.data.AUTOTUNE)
Explanation: Loads the next batch while the current one is processed.
Performance Improvement: Overlaps data loading with training, minimizing waiting time.
The dataset.prefetch(buffer_size=tf.data.AUTOTUNE) operation is used to improve data loading efficiency by preloading (prefetching) data before it is needed during training. This helps to keep the training pipeline fast by overlapping the data preparation and model training steps, so the model can continuously consume data without waiting.
Here’s a full example that includes the use of .prefetch() in a TensorFlow data pipeline:
Example
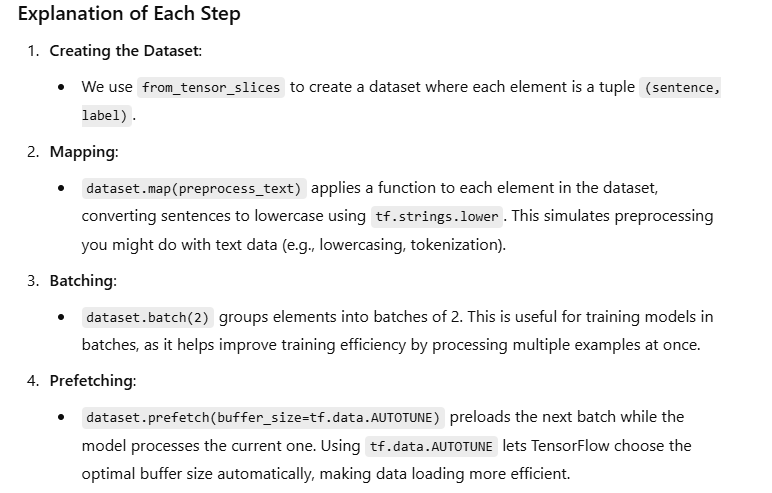
Let's start with a simple dataset of sentences and labels, as before, and add some additional processing steps such as mapping, batching, and prefetching.
import tensorflow as tf

# Example dataset: List of sentences and corresponding labels
sentences = [
    "TensorFlow is great for machine learning",
    "Natural language processing is fun",
    "I love creating deep learning models",
    "Transformers have revolutionized NLP",
    "TensorFlow Hub provides pre-trained models"
]
labels = [1, 0, 1, 0, 1]  # Example binary labels

# Step 1: Create a tf.data.Dataset from sentences and labels
dataset = tf.data.Dataset.from_tensor_slices((sentences, labels))

# Step 2: Define a simple map function to encode sentences as lowercase strings
def preprocess_text(sentence, label):
    sentence = tf.strings.lower(sentence)  # Convert to lowercase
    return sentence, label

# Apply the map function to preprocess each sentence
dataset = dataset.map(preprocess_text)

# Step 3: Batch the dataset
dataset = dataset.batch(2)

# Step 4: Add prefetching to the dataset
dataset = dataset.prefetch(buffer_size=tf.data.AUTOTUNE)

# Iterating through the dataset to see the output
for sentence_batch, label_batch in dataset:
    print("Sentence Batch:", [sentence.numpy().decode('utf-8') for sentence in sentence_batch])
    print("Label Batch:", label_batch.numpy())
    print("---")
Expected Output
Sentence Batch: ['tensorflow is great for machine learning', 'natural language processing is fun']
Label Batch: [1 0]
---
Sentence Batch: ['i love creating deep learning models', 'transformers have revolutionized nlp']
Label Batch: [1 0]
---
Sentence Batch: ['tensorflow hub provides pre-trained models']
Label Batch: [1]
Parallel Mapping
dataset = dataset.map(process_image, num_parallel_calls=tf.data.AUTOTUNE)
Explanation: Applies transformations (e.g., decoding, resizing) in parallel.
Performance Improvement: Speeds up processing by using multiple CPU core
The dataset.map(process_image, num_parallel_calls=tf.data.AUTOTUNE) operation in TensorFlow applies the process_image function to each element in the dataset, with parallelization to improve data processing speed. The num_parallel_calls=tf.data.AUTOTUNE argument lets TensorFlow decide the optimal number of parallel calls to maximize CPU efficiency, enhancing the speed of the data pipeline.
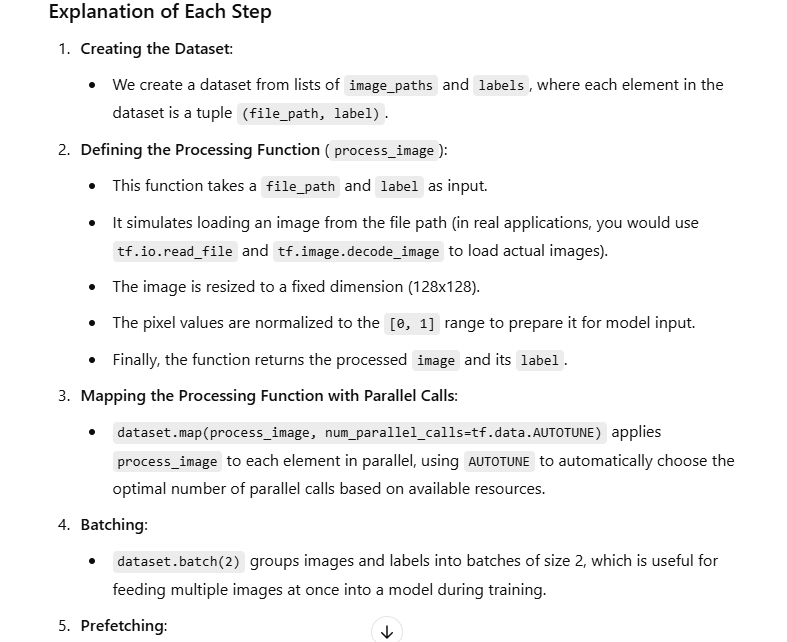
Let’s go through a complete example where we load and preprocess image data. We’ll create a synthetic dataset of image paths and labels, define a preprocessing function (process_image) that resizes and normalizes each image, and then use .map() with num_parallel_calls=tf.data.AUTOTUNE for parallel processing.
import tensorflow as tf

# Simulate a list of image file paths and labels
image_paths = ["image1.jpg", "image2.jpg", "image3.jpg", "image4.jpg"]
labels = [0, 1, 0, 1]  # Example binary labels

# Step 1: Create a tf.data.Dataset from the image paths and labels
dataset = tf.data.Dataset.from_tensor_slices((image_paths, labels))

# Step 2: Define the image processing function
def process_image(file_path, label):
    # Load the image from the file path (simulated here; replace with actual images in practice)
    image = tf.random.uniform(shape=[256, 256, 3], minval=0, maxval=255, dtype=tf.float32)  # Simulating a 256x256 image

    # Resize the image to a fixed size (e.g., 128x128)
    image = tf.image.resize(image, [128, 128])

    # Normalize the image to the range [0, 1]
    image = image / 255.0

    return image, label

# Step 3: Map the process_image function across the dataset with parallel processing
dataset = dataset.map(process_image, num_parallel_calls=tf.data.AUTOTUNE)

# Step 4: Batch the dataset
dataset = dataset.batch(2)

# Step 5: Prefetch for performance
dataset = dataset.prefetch(buffer_size=tf.data.AUTOTUNE)

# Iterate through the dataset and print out the processed images and labels
for image_batch, label_batch in dataset:
    print("Image Batch Shape:", image_batch.shape)
    print("Label Batch:", label_batch.numpy())
    print("---")
Expected Output
Running this code will output the processed and batched data:
Image Batch Shape: (2, 128, 128, 3)
Label Batch: [0 1]
---
Image Batch Shape: (2, 128, 128, 3)
Label Batch: [0 1]
Resizing Images
dataset = dataset.map(lambda x: tf.image.resize(x, [128, 128]))
Explanation: Resizes images to a fixed size.
Performance Improvement: Reduces memory usage and standardizes inputs, which accelerates training.
The line dataset = dataset.map(lambda x: tf.image.resize(x, [128, 128]))
is using map to apply a lambda function to each element in the dataset. This lambda function resizes each image in the dataset to a specified shape—in this case, 128x128 pixels.
Let’s walk through a full example where we create a dataset of images, resize each image to a fixed size using tf.image.resize within map, and then view the output.
Example
Here, we will simulate a dataset of images represented by tensors, apply resizing to each image, and observe the output.
import tensorflow as tf

# Step 1: Simulate a dataset of images (each image has a different random size)
image_tensors = [
    tf.random.uniform(shape=[150, 150, 3], minval=0, maxval=255, dtype=tf.float32),  # 150x150 image
    tf.random.uniform(shape=[200, 200, 3], minval=0, maxval=255, dtype=tf.float32),  # 200x200 image
    tf.random.uniform(shape=[300, 300, 3], minval=0, maxval=255, dtype=tf.float32),  # 300x300 image
]

# Step 2: Create a tf.data.Dataset from the list of image tensors
dataset = tf.data.Dataset.from_tensor_slices(image_tensors)

# Step 3: Apply resizing to each image using a lambda function within map
# Resize all images to 128x128
dataset = dataset.map(lambda x: tf.image.resize(x, [128, 128]))

# Step 4: Batch the dataset (optional, for demonstration)
dataset = dataset.batch(2)

# Step 5: Iterate through the dataset and print out the shape of each resized image batch
for image_batch in dataset:
    print("Image Batch Shape:", image_batch.shape)
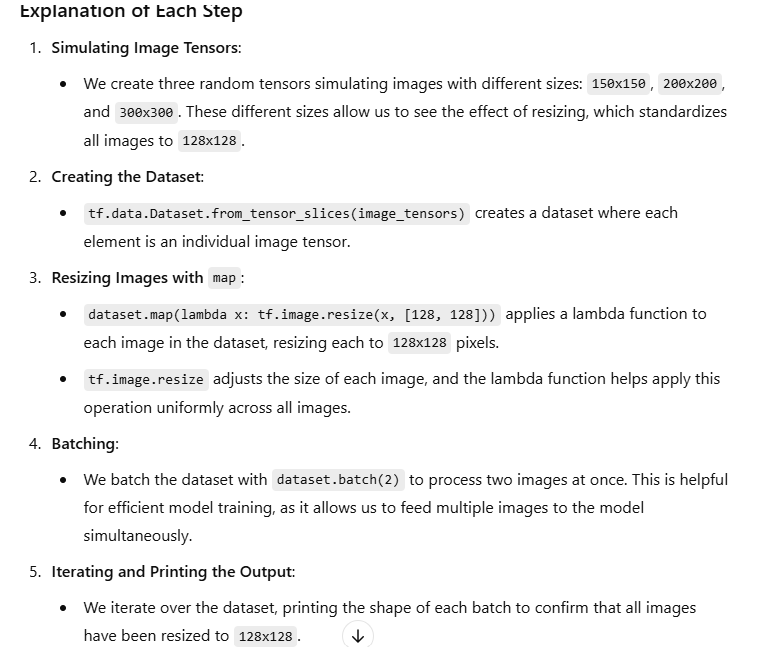
Expected Output
Running this code should output:
Image Batch Shape: (2, 128, 128, 3)
Image Batch Shape: (1, 128, 128, 3)
Normalization
dataset = dataset.map(lambda x, y: (x / 255.0, y))
Explanation: Scales image pixel values to [0, 1].
Performance Improvement: Improves model convergence by keeping inputs within a standard range.
he line dataset = dataset.map(lambda x, y: (x / 255.0, y)) applies a transformation to each element in the dataset using map. Specifically, it normalizes the pixel values of images in the dataset by dividing each pixel by 255.0, converting the pixel values from the range [0, 255] to [0, 1]. This normalization step is often used to make data easier to work with in neural networks, as it reduces the range of input values, which can improve training stability.
Let’s walk through a complete example with images and labels, applying this normalization step and examining the output.
Example
Suppose we have a dataset of synthetic images with pixel values in the range 0, 255, and each image has a corresponding label. We will normalize each image and observe how the data changes.
import tensorflow as tf

# Step 1: Simulate a dataset of images with values in the range [0, 255] and corresponding labels
image_tensors = [
    tf.random.uniform(shape=[64, 64, 3], minval=0, maxval=255, dtype=tf.float32),  # Random 64x64 image
    tf.random.uniform(shape=[64, 64, 3], minval=0, maxval=255, dtype=tf.float32),  # Another random 64x64 image
    tf.random.uniform(shape=[64, 64, 3], minval=0, maxval=255, dtype=tf.float32),  # Another random 64x64 image
]
labels = [0, 1, 0]  # Example binary labels

# Step 2: Create a tf.data.Dataset from the images and labels
dataset = tf.data.Dataset.from_tensor_slices((image_tensors, labels))

# Step 3: Apply normalization to each image using a lambda function within map
dataset = dataset.map(lambda x, y: (x / 255.0, y))  # Normalize each image by dividing by 255.0

# Step 4: Batch the dataset (optional, for demonstration)
dataset = dataset.batch(2)

# Step 5: Iterate through the dataset and print out the first few pixel values of each image batch
for image_batch, label_batch in dataset:
    print("Image Batch (Normalized):", image_batch.numpy()[0, :5, :5, 0])  # Print a small section of the first image's first channel
    print("Label Batch:", label_batch.numpy())
    print("---")
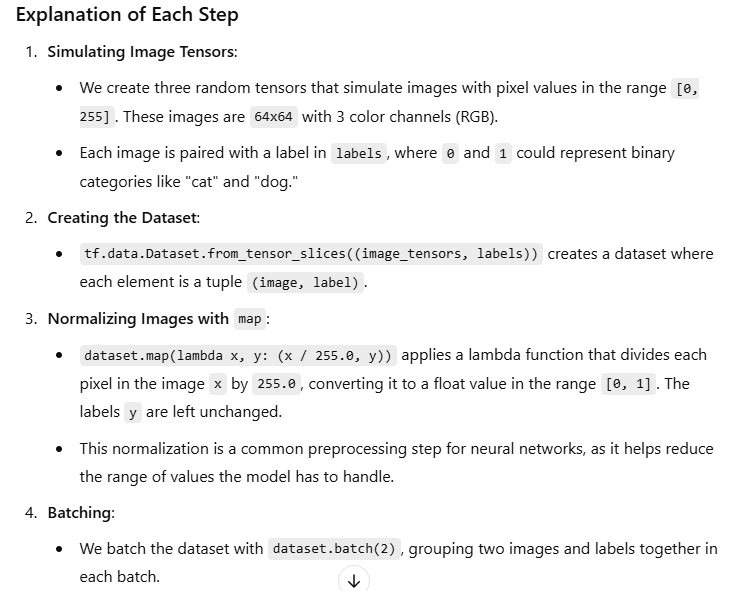
Expected Output
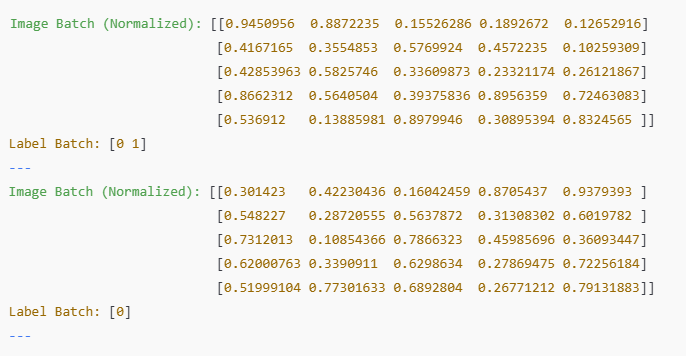
Purpose of Normalization
Normalizing image pixel values to [0, 1] is beneficial for neural networks because it makes training more stable and efficient. Neural networks tend to converge faster and perform better when input data is on a consistent scale, especially within a smaller range like [0, 1]. This step is therefore essential for image preprocessing in deep learning pipelines.
Image Transformation
Explanation of Each Transformation
Random Horizontal Flip (tf.image.random_flip_left_right):
Randomly flips each image horizontally with a 50% chance. This is useful for images where left-right orientation doesn’t matter (e.g., natural scenes).
Rotate 90 Degrees (tf.image.rot90):
Rotates each image by 90 degrees counterclockwise. Rotating an image adds variety and may help the model become invariant to object orientation.
Random Brightness (tf.image.random_brightness):
Adjusts brightness by a random factor in the range -0.2, 0.2. This helps the model learn to handle lighting variations.
Random Contrast (tf.image.random_contrast):
Adjusts contrast by a random factor between 0.5 and 1.5. Adding contrast variation helps the model learn to generalize across different lighting conditions.
Random Saturation (tf.image.random_saturation):
Randomly adjusts saturation within the range [0.6, 1.4], making the colors more or less intense. This prepares the model to handle variations in color richness.
Per-Image Standardization (tf.image.per_image_standardization):
Normalizes each image so that it has a mean of 0 and a standard deviation of 1. This standardization can help with faster model convergence.
Central Crop (tf.image.central_crop):
Crops out the central 80% of the image (based on the 0.8 parameter), which can help the model focus on central objects and ignore background noise.
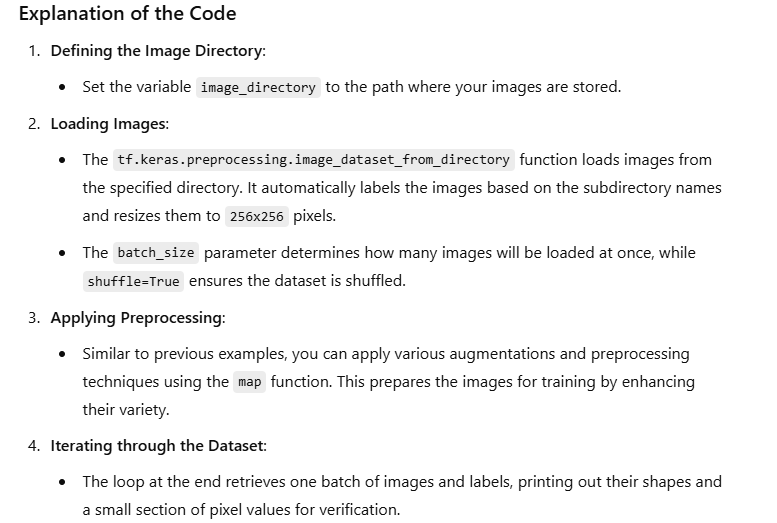
Organize Your Image Folder:
/path/to/images/
  ├── class_1/
  │   ├── img1.jpg
  │   ├── img2.jpg
  │   └── ...
  ├── class_2/
  │   ├── img1.jpg
  │   ├── img2.jpg
  │   └── ...
  └── ...
mport TensorFlow and Other Necessary Libraries:
Import TensorFlow and any other libraries needed for your preprocessing.
Load Images Using image_dataset_from_directory:
Use this function to load images from the specified directory and automatically create labels based on the folder structure.
Apply Preprocessing and Augmentation:
Use the map function to apply various preprocessing steps to the dataset.
Example Code
Here’s a complete example demonstrating these steps:
import tensorflow as tf
import os
# Step 1: Define the path to your image folder
image_directory = '/path/to/images/' # Change this to your folder path
# Step 2: Load images into a TensorFlow dataset
# Using image_dataset_from_directory to load images and create a dataset
dataset = tf.keras.preprocessing.image_dataset_from_directory(
image_directory,
image_size=(256, 256), # Resize all images to 256x256
batch_size=32, # Set the batch size
shuffle=True, # Shuffle the dataset
)
# Step 3: Apply various preprocessing steps
# Apply data augmentation
dataset = dataset.map(lambda x, y: (tf.image.random_flip_left_right(x), y))
dataset = dataset.map(lambda x, y: (tf.image.rot90(x), y))
dataset = dataset.map(lambda x, y: (tf.image.random_brightness(x, 0.2), y))
dataset = dataset.map(lambda x, y: (tf.image.random_contrast(x, 0.5, 1.5), y))
dataset = dataset.map(lambda x, y: (tf.image.random_saturation(x, 0.6, 1.4), y))
dataset = dataset.map(lambda x, y: (tf.image.per_image_standardization(x), y))
dataset = dataset.map(lambda x, y: (tf.image.central_crop(x, 0.8), y))
# Step 4: Iterate through the dataset and display the shapes of the batches
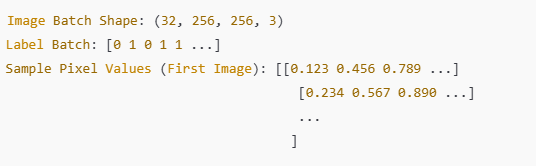
for image_batch, label_batch in dataset.take(1): # Take only one batch for demonstration
print("Image Batch Shape:", image_batch.shape)
print("Label Batch:", label_batch.numpy())
# Optionally, print a small section of pixel values from the first image
print("Sample Pixel Values (First Image):", image_batch[0, :5, :5, 0].numpy()) # Display the fi
Expected Output

Top comments (0)