Install on Linux
Install on window
Traccar Database Migration Tutorial: Export, Import, User Creation & XML Configuration
Using Docker image
How to Track with a Smartphone (IMEI) in Traccar Under SSO
Debugging command:connection refused error
Checks whether the MySQL port is reachable over the network
Checks whether the MySQL port (3306) is reachable from your server
Traccar is a popular open-source GPS tracking platform you can install on your own server for total control, privacy, and integration flexibility. Follow these step-by-step instructions to deploy and use Traccar for vehicle or asset tracking.
Install on Linux
Preparation
Server Requirements:
- Any modern Linux or Windows server (cloud VPS or on-premises)
- Minimum 2GB RAM recommended
- Public/static IP if devices will connect from outside your local network
Choose Database:
Traccar can use its built-in H2 database or an external DB (MySQL, MariaDB, PostgreSQL) for scalability
Installation Steps
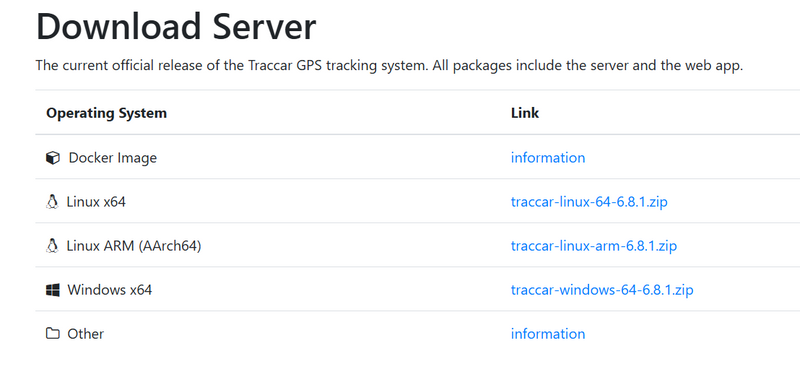
A. Download the Traccar Server Package
traccar
Install Java (Required Dependency)
Traccar requires Java (OpenJDK or Oracle JDK) to run.
sudo apt update
sudo apt install default-jre default-jdk -y # Ubuntu/Debian
Or for CentOS/RHEL:
sudo yum install java-11-openjdk
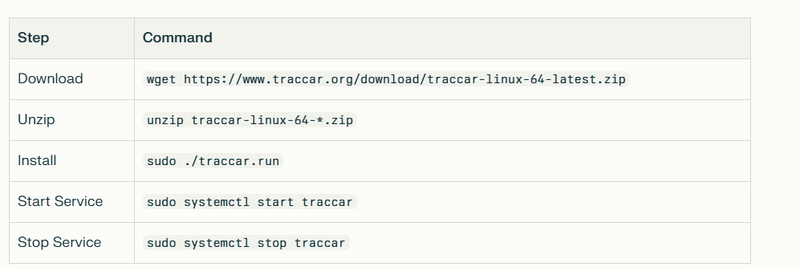
Download the Latest Traccar Package
NOTE: Not download in root directory it would crash got opt directory
cd /opt
Get the installer from the official Traccar Download page or directly with wget (replace VERSION with the latest or desired version):
Note:Must copy link from documentaion not chatgpt
go to from documentaion
right click and copy link address
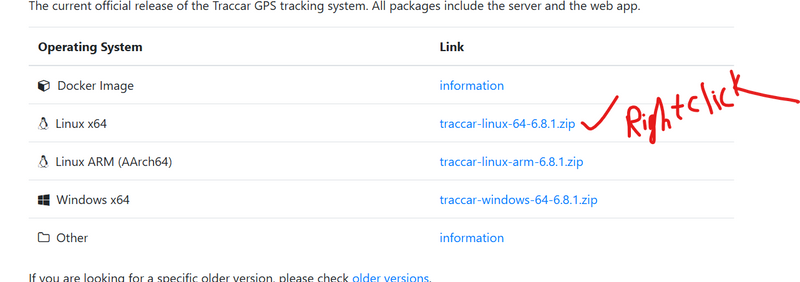
# Example for Traccar 4.14, adjust for latest version:
wget https://github.com/traccar/traccar/releases/download/v6.8.1/traccar-linux-64-6.8.1.zip
Extract the Installer
sudo apt install unzip -y     # If unzip is not already installed
unzip traccar-linux-64-6.8.1.zip
Run the Traccar Installer
Move into the extracted directory if needed, then execute:
sudo ./traccar.run
The installer will copy files to /opt/traccar and set up systemd services.
add this port
Open /opt/lampp/etc/httpd.conf
Listen 8082
Start the Traccar Service
Start and enable Traccar to launch at boot:
sudo systemctl start traccar
sudo systemctl enable traccar
You can check the status with:
sudo systemctl status traccar
====to ckeck wheather stop or not=====
sudo systemctl status traccar
output ==If stopped, the output should show Active: inactive (dead) or Active: failed.
Access the Traccar Web Interface
Open your browser and go to:
http://<your-server-ip>:8082/
View logs:
tail -f /opt/traccar/logs/tracker-server.log
Your Traccar server logs show:
The service starts cleanly:
INFO: Version: 4.14
INFO: Starting server...
INFO: Started ServerConnector@...{HTTP/1.1, (http/1.1)}{0.0.0.0:8082}
INFO: Started Server@...
Most importantly:
INFO: Started ServerConnector@...{0.0.0.0:8082}
This means the server IS listening on port 8082.
But you report you “not running after http://:8082/” (site can’t be reached).
Confirm the Service Is Listening Locally
Try from the Traccar server directory itself
curl <public ipaddress or local ip>:8082/
curl http://localhost:8082/
If you see an HTML login page or similar, Traccar is up and running.
If not, check logs again for subsequent errors.
allow 8082 port
sudo ufw status
If it's active, ensure you see a rule like 8082/tcp ALLOW Anywhere.
To allow:
sudo ufw allow 8082/tcp
sudo ufw reload
note
not run unzip command at root it would crash
sudo mv traccar-linux-64-*.zip /opt/
cd /opt
sudo unzip traccar-linux-64-*.zip
B. Install Traccar
Extracted files include an executable installer:
sudo ./traccar.run
On Windows, run traccar-setup.exe as administrator and follow instructions1.
C. Start the Traccar Service
On Linux:
sudo systemctl start traccar
Open Services panel, find "Traccar" and start the service
Access the Traccar Web Interface
Open a web browser:
For local/server: http://localhost:8082

For external access: http://<your-server-ip>:8082
The first registered user will become admin (set your login credentials)
Add and Register Devices
In the Traccar web UI, go to "Devices", click the "+" button.
Assign:
Name: Friendly name (e.g., "Car 1")
Unique ID: For hardware, this is usually the device's IMEI/serial number (see your tracker label or Traccar logs for "unknown device" connections)3.
Save the device record.
Configure GPS Tracking Devices
Set up your GPS hardware or app to send data to your server’s public IP and the correct port (see Traccar documentation for supported models and protocol/port mapping).
Example tracker configuration:
Server Address: <your-server-ip>
Server Port: (depends on your tracker model; Traccar supports hundreds)
For mobile tracking, use the Traccar Client app (Android/iOS) and enter your server’s URL and the unique ID.
Test Tracking and Integrate with Web
After device(s) report, they appear in the Traccar dashboard in real-time on the map.
Use the admin panel to:
- Monitor live locations
- Analyze history and reports
- Set up notifications and geofencing
Traccar supports direct REST API integration, so your custom web or mobile apps can fetch positions and history programmatically
Install on window
Download and Install Traccar on Windows
A. Download
Go to the Traccar official download page and download the "Windows (64-bit)" ZIP file.
B. Install
Extract the downloaded ZIP (e.g., into C:\Traccar)
Run the Traccar Installer
Double-click traccar-setup.exe in your extracted folder.
If prompted by Windows Security or User Account Control, click "Yes" to allow the installer to run.
Follow the on-screen installation steps: just click "Next" through the standard setup wizard, and wait for the process to finish.
Complete Installation
Once installation is finished, Traccar will be set up as a Windows service
Make Sure Traccar Service Is Running
Open Windows Services (press Win+R, type services.msc, press Enter).
Scroll to find "Traccar" service.
Status must be "Running". If not, right-click and select "Start".
Open the Traccar Web Interface
Go to your browser.
Navigate to http://localhost:8082
If the login page loads, your server is running.
If not, the service isn’t started or there is an install/config error.
From Traccar Logs (When INDOUBT or Unlabeled)
If the device ID/IMEI is missing, hard to read, or you want to be sure:
Step A: Connect the Device to Your Traccar Server
Configure your tracker (using SMS, its phone app, or via USB/software, as per the manual) to:
Send data to your Traccar server's IP address and the specific protocol port Traccar expects for your model (find this port here: Traccar Supported Devices List).
Step B: Power Your Tracker and Let It Transmit
Once the tracker is on and trying to send data, Traccar will receive the packet, even if it doesn't yet know what device it is.
Step C: Check Traccar Server Logs
Open the logs directory in your Traccar program files (on Windows, usually C:\Program Files\Traccar\logs).
Open tracker-server.log in Notepad.
Traccar Database Migration Tutorial: Export, Import, User Creation & XML Configuration
Stop Traccar before migration (important)
If your source is H2 embedded (file DB) or your target is production, stop Traccar to avoid DB lock / inconsistent data. The Debug School article also recommends stopping Traccar for safe transfer.
sudo systemctl stop traccar
(Optional but helpful)
sudo systemctl status traccar
Connect BOTH databases in DBeaver (Source + Target)
Connect Source (Traccar H2 database) in DBeaver
follow this blog to migrate-and-transfer-data-using-dbeaver-dbms
If your Traccar was using H2 (embedded), the DB file path is typically like:
Linux: /opt/traccar/data/database (do not add .mv.db)

Windows: C:/Program Files/Traccar/data/database
This exact guidance is in the Debug School post.
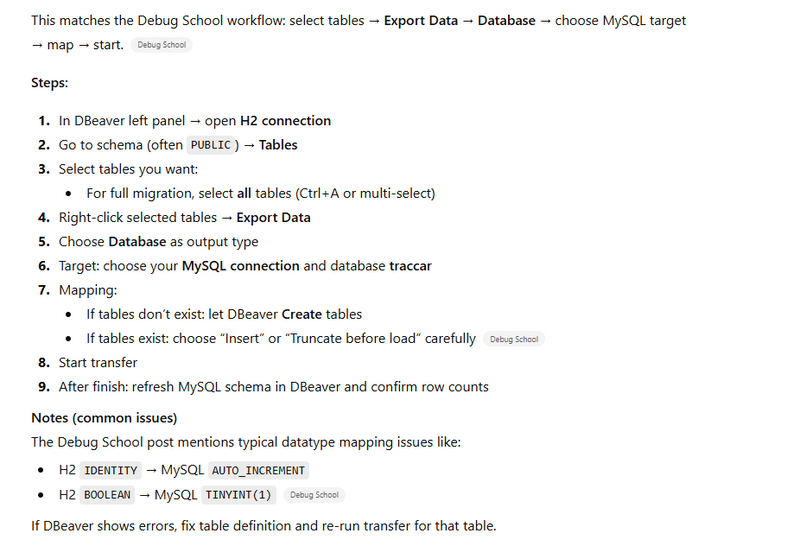
DBeaver steps:
Open DBeaver

Database → New Database Connection

Select H2 (H2 Embedded)

Put DB file path (without .mv.db)

User: sa (often blank password)

Test Connection → Finish
Connect Target (Production MySQL/MariaDB) in DBeaver
DBeaver steps:
Database → New Database Connection

Select MySQL

Host: your server IP / hostname


Port: 3306


Username/password: root or admin credentials

Test Connection → Finish
Note
After this export traccar database and import in production database
Export + Import using DBeaver (Recommended “Database → Database” transfer)
Create empty database + user on Production (run exactly)
inuxaccess-denied-for-user-rootlocalhost-using-password-yes
WHY WE NEED
if we ger error linuxaccess-denied-for-user-rootlocalhost-using-password-yes then create new user and grant permision
Now on production server, run your exact commands to create DB + user + permissions.
sudo mysql
CREATE DATABASE IF NOT EXISTS traccar CHARACTER SET utf8mb4 COLLATE utf8mb4_unicode_ci;

DROP USER IF EXISTS 'traccar'@'localhost';
CREATE USER 'traccar'@'localhost' IDENTIFIED BY 'cotocus@123';

GRANT ALL PRIVILEGES ON traccar.* TO 'traccar'@'localhost';
FLUSH PRIVILEGES;
EXIT;
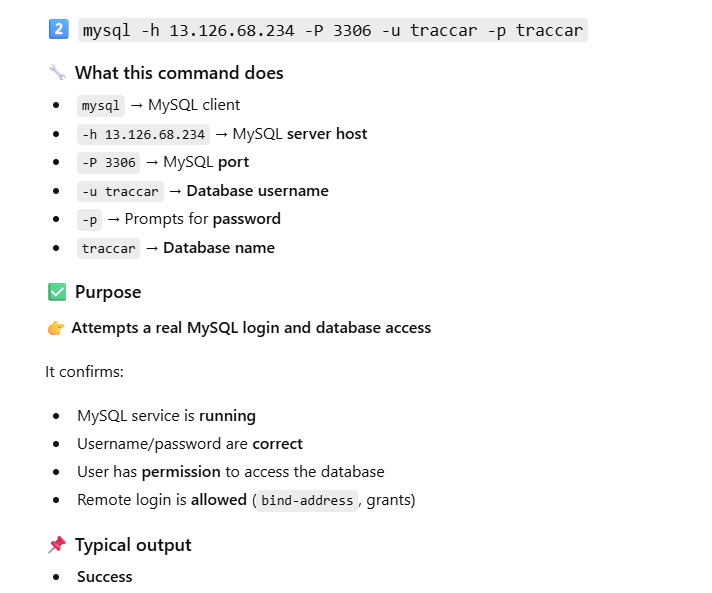
Confirm the new MySQL user login (your exact check)
Run this from production server:
mysql -u traccar -p -h 127.0.0.1 -P 3306 traccar
When asked for password, enter:
cotocus@123
✅ Expected result:
MariaDB [traccar]>
Update traccar.xml (put DB user + password)
Now update Traccar config so it uses MySQL:
File location (common)
/opt/traccar/conf/traccar.xml
Your traccar.xml (with DB user + password)
Keep your DB entries like this (as you wrote):
<?xml version="1.0" encoding="UTF-8"?>
<!DOCTYPE properties SYSTEM 'http://java.sun.com/dtd/properties.dtd'>
<properties>
<!-- Documentation: https://www.traccar.org/configuration-file/ -->
<entry key='database.driver'>com.mysql.cj.jdbc.Driver</entry>
<entry key='database.url'>jdbc:mysql://127.0.0.1:3306/traccar?serverTimezone=UTC&useSSL=false&allowPublicKeyRetrieval=true</entry>
<entry key='database.user'>traccar</entry>
<entry key='database.password'>cotocus@123</entry>
<entry key='openid.clientId'>3</entry>
<entry key='web.url'>https://gps.motoshare.in</entry>
<entry key='openid.force'>true</entry>
<entry key='openid.clientSecret'>fGyEBGcC1g78y79eWqrTEveu0pMC7QHrgZonZqL9</entry>
<entry key='openid.issuerUrl'>https://motoshare.in</entry>
<entry key='openid.authUrl'>https://motoshare.in/oauth/authorize</entry>
<entry key='openid.tokenUrl'>https://motoshare.in/oauth/token</entry>
<entry key='openid.userInfoUrl'>https://motoshare.in/api/user</entry>
<entry key='logger.level'>all</entry>
</properties>
Start Traccar and verify it connects to MySQL
sudo systemctl start traccar
sudo systemctl status traccar
Check logs (very useful if it fails):
sudo journalctl -u traccar -n 200 --no-pager
==============Using Docker image=======================
docker run -it --name mycontainer motoshare bash
output
in dockerimage my path is
COPY motoshare-web /opt/lampp/htdocs
so inside htdocs itself motoshare all folder structure appear

=============ANOTHER EXAMPLE===================
docker run \
--name traccar \
--hostname traccar \
--detach --restart unless-stopped \
--publish 80:8082 \
--publish 5000-5300:5000-5300 \
--publish 5000-5300:5000-5300/udp \
traccar/traccar:latest
note
if http port is for 80 reserved then run below command
docker run \
--name traccar \
--hostname traccar \
--detach --restart unless-stopped \
--publish 8082:8082 \
--publish 5000-5300:5000-5300 \
--publish 5000-5300:5000-5300/udp \
traccar/traccar:latest
docke ps-a
<public ip-address>:8082
13.203.171.107:8082
note never run together two command run container and
wget https://github.com/traccar/traccar/releases/download/v6.8.1/traccar-linux-64-6.8.1.zip
it would crash
note
not run unzip command at root it would crash
sudo mv traccar-linux-64-*.zip /opt/
cd /opt
sudo unzip traccar-linux-64-*.zip
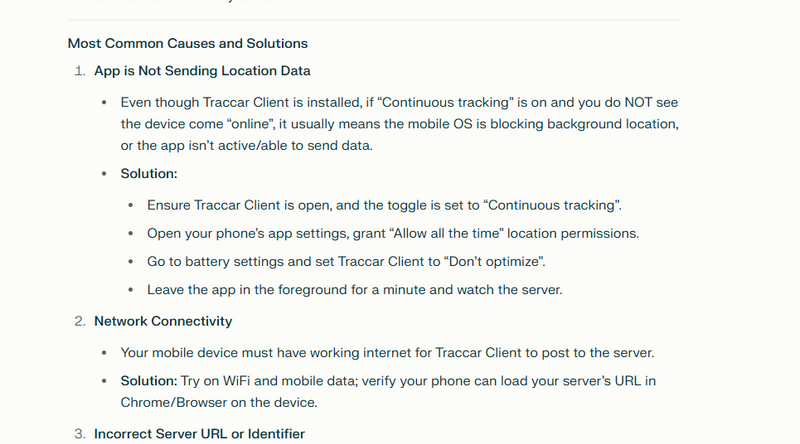
How to Track with a Smartphone (IMEI) in Traccar Under SSO

Configure Traccar to Accept Smartphone Data
Install and Configure the Traccar Client App:

Install the Traccar client app on the smartphone.
In the app, use the IMEI or a unique device value as the identifier.
Set the Traccar Client’s Server URL:
Enter your Traccar server address and protocol port (e.g., http://13.203.171.107:5055) in the app.
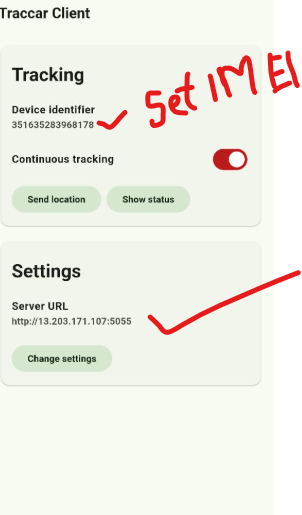
This port is for device data, not for web login.
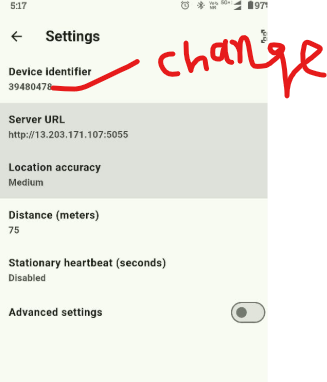
Set the Device Identifier:
Ideally, use the phone’s IMEI (you may need to get it from the phone settings or use a third-party app to read it).
Enter this identifier in the Traccar client under “Device Identifier.”
change by double click
Configure Device in Traccar Admin Panel:
Log in with SSO to the Traccar admin interface.
Add a new device:
Name: Something descriptive (e.g., “John’s smartphone”)
Unique ID: Enter the IMEI or identifier used by the Traccar client.
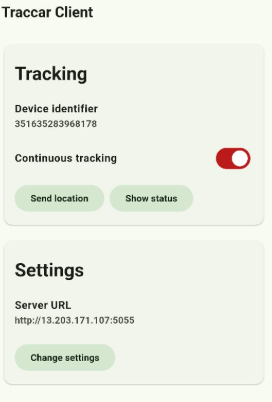
Start Tracking:
Enable service/tracking in the Traccar client app on the phone.
The device should now appear as “Online” in Traccar if all info matches and the server is reachable.
Some Essential Settings
Essential Settings to Review
Device Identifier:
Use the IMEI as the device identifier only if you can retrieve it from your phone. If you cannot get the IMEI (common on newer Android/iOS devices due to privacy restrictions), use another unique string—but make sure to enter the exact same value in your Traccar web dashboard when registering the device.
Server URL:
Confirm this is set to your public Traccar server address with the device port, for example: http://13.203.171.107:5055.
Do not use the web port (8082/8083) here; only use the port for device data (default is 5055).
Location Accuracy:
Set to High or Highest for best results if battery use permits.
Stationary Heartbeat:
Enable if you want periodic updates even when the phone isn’t moving. This helps keep the device online in Traccar and may improve reliability for fleet or asset tracking.
Permissions:
Ensure the Traccar client app has these permissions:
Location permission set to “Always Allow.”
Disabled battery optimization for the app (or add app to battery “whitelist”) to prevent the system from killing background tracking.
Mobile Data/Wi-Fi:
The phone must have a working internet connection at all times for live updating.
Add Device in Traccar Web:
The value in “Device identifier” (IMEI or custom ID) must match the “Unique ID” in your Traccar web interface’s device entry
How to Track with a Smartphone (IMEI) in Traccar Under SSO but my question is in laravel i have vehicle crud i have to locate each vehicle in traccar
To locate each vehicle from your Laravel Vehicle CRUD in Traccar, you need to connect your Laravel application’s vehicle records with smartphone-based tracking devices managed by Traccar. Here’s a clear, step-by-step approach to integrate the two systems—so that each vehicle in Laravel can be accurately located/tracked in Traccar:
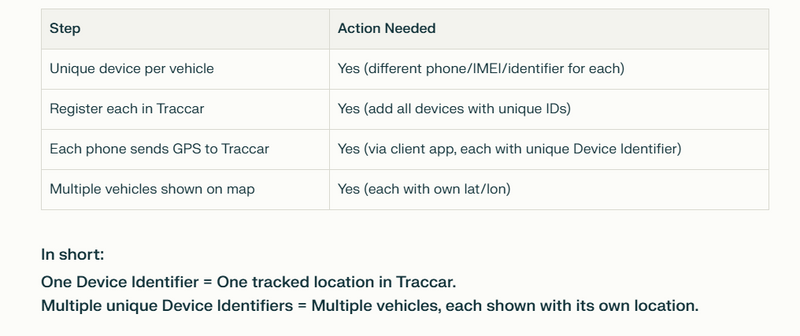
Step-by-Step: Linking Laravel Vehicle Records to Traccar Devices
- Assign a Unique Traccar Device to Each Vehicle For each vehicle in your Laravel CRUD, assign a smartphone with the Traccar Client app installed.
In the Traccar Client app on the phone:
Set the Device Identifier as either the IMEI or a unique string (for example: the vehicle’s registration number or a unique device ID).
Register the same value as the Unique ID for the device in the Traccar web interface.
- Store the Traccar Device Identifier in Laravel Extend your vehicles table (e.g., add a traccar_device_id column).
When a vehicle is assigned a tracking phone, save the Traccar Device Identifier (IMEI or chosen ID) in this column.
Now, each vehicle in your Laravel app is mapped to a unique Traccar device.
- Display Vehicle Location in Laravel Write code in Laravel to pull the live/latest location for each device from Traccar. Two common ways:
REST API Query: Traccar provides a REST API (you may use /api/devices and /api/positions) to fetch devices and their current/last locations.
Match the stored traccar_device_id for each vehicle to the device identifier in Traccar API responses.
Display location data (latitude, longitude, time, etc.) alongside your vehicle info.
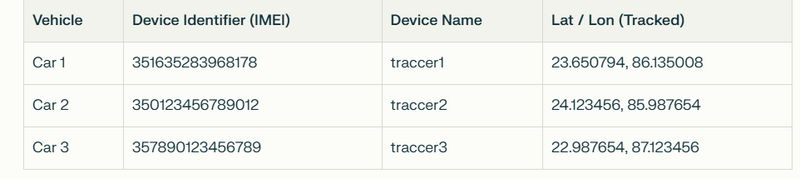
Your approach is correct: if you have a Vehicle CRUD (Create, Read, Update, Delete) form in Laravel for managing vehicles, you can add a read-only "Device Identifier" input field with the value 351635283968178 for each vehicle. This makes sure each vehicle record is explicitly linked to its Traccar device.
Here’s how this setup works and why it’s effective:
Read-only Field:
Setting the device identifier as read-only prevents users from accidentally changing it, keeping the mapping consistent between Laravel and Traccar.
<div class="form-group">
  <label for="device_identifier">Device Identifier</label>
  <input type="text" readonly class="form-control" id="device_identifier" name="device_identifier" value="351635283968178">
</div>
Exact Identifier:
Always use the exact device identifier (IMEI) that the Traccar client uses, so there is no mismatch.
Mapping Vehicle to Device:
When displaying or managing vehicles, you’ll always see—and can use—the device identifier needed to look up that vehicle’s latest location in Traccar.
API/Integration-Friendly:
When you build code in Laravel to call the Traccar API (e.g., to fetch the vehicle’s location), you can reliably use the value from this read-only field.
Debugging command:connection refused error
sudo tail -n 200 /opt/traccar/logs/tracker-server.log
if connection refuse
sudo systemctl status traccar
sudo systemctl restart traccar
also check
sudo /opt/lampp/lampp restart
Checks whether the MySQL port is reachable over the network
nc -vz 13.126.68.234 3306
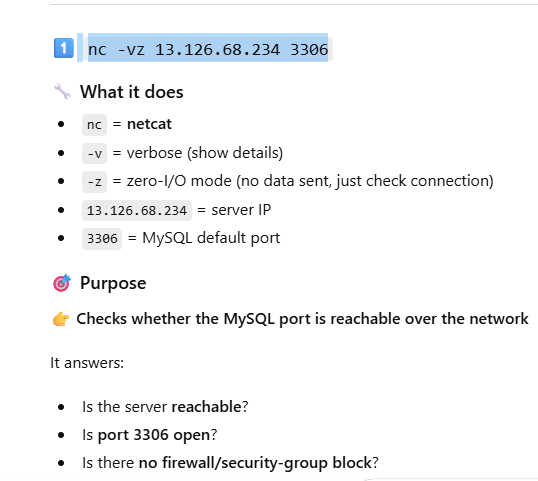
Checks whether the MySQL port (3306) is reachable from your serve
It answers:
Is the server online?

Is port 3306 open?

Is there any firewall / security group / network block?
📌 Typical output
Success
Connection to 13.126.68.234 3306 port [tcp/mysql] succeeded!
Failure
Connection timed out
or
Connection refused
🧠 When to use
Before configuring MySQL in an app (Laravel, Traccar, etc.)
To debug:
Firewall issues
AWS security group rules
VPC / network connectivity problems
2️⃣ mysql -h 13.126.68.234 -P 3306 -u traccar -p traccar

Top comments (0)